Got this in from Sam, which I thought was rather good:
“Thanks to many useful posts on your site I have been encouraged to experiment with many aspects of model railway systems.
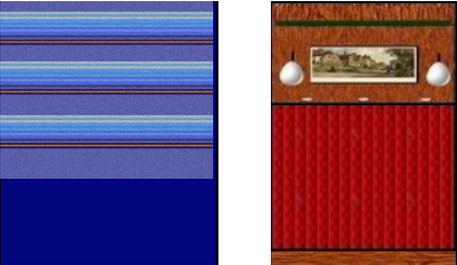
Due to the expense and often the lack of realism with white plastic carriage interiors in Hornby stock I have been experimenting with low cost options. Hope you find it useful.
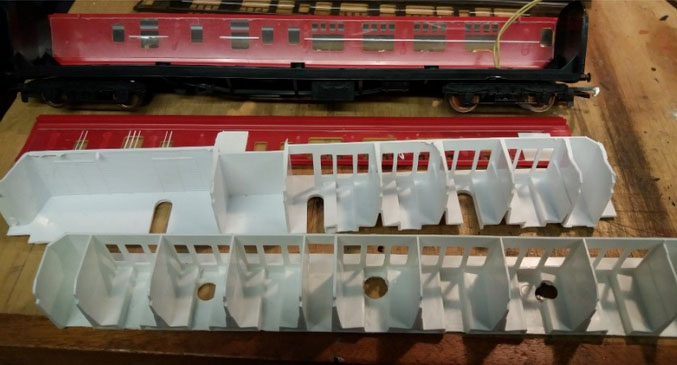
The type of Hornby carriages In my collection have two long screws holding the roof on. Once these are undone the roof can unclipped and the sides fall away. The interior can now be lifted out.
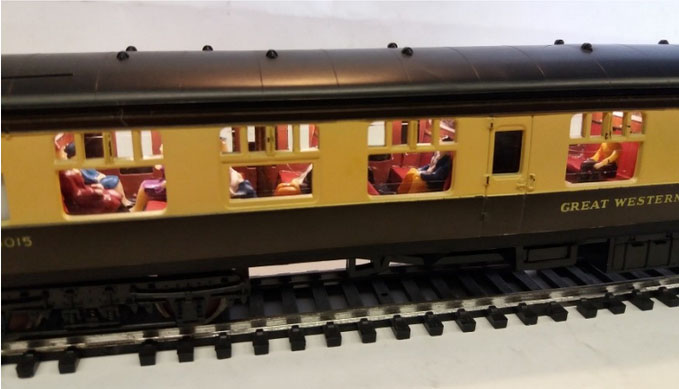
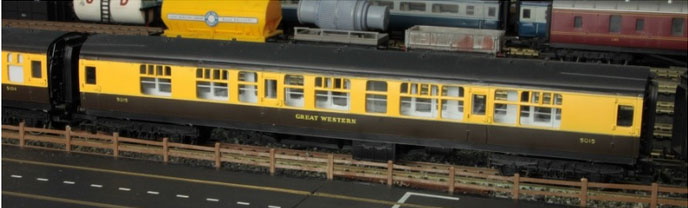
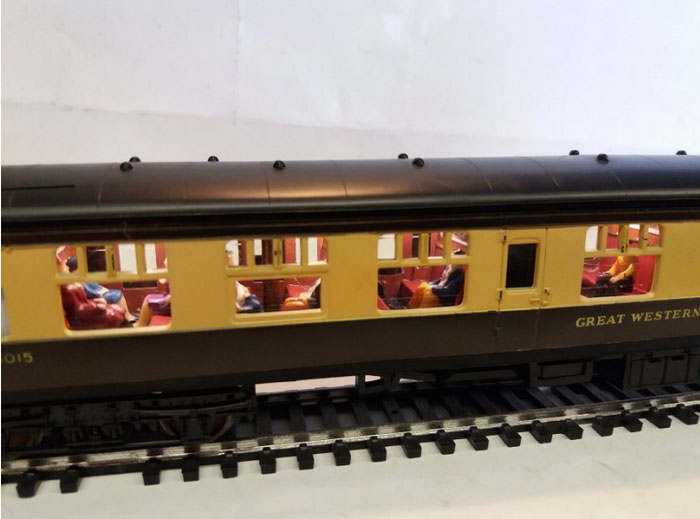
I’m working on several Mk1 coaches with different livery (Great Western, and BR blood and custard)
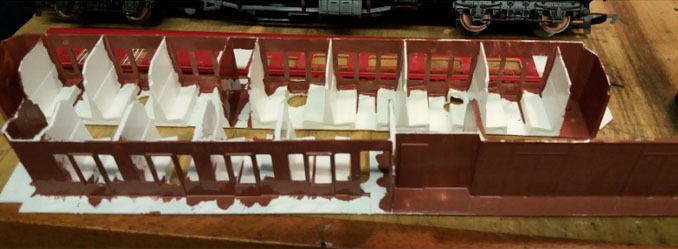
First stage is painting all the ‘wooden’ panelling with brown paint. (I have used wood effect self adhesive stickers in the past but I can hardly notice this and it’s really fiddly to apply, cutting around all the windows!)
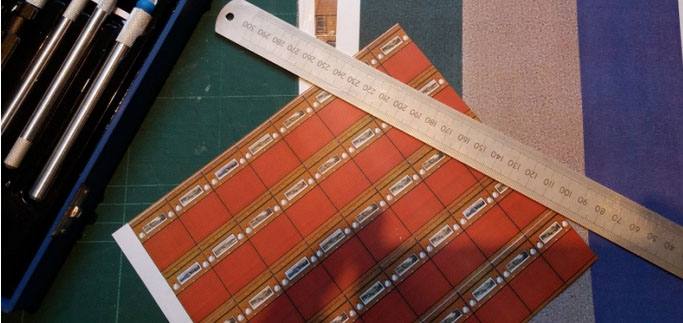
While the paint is drying I printed some self adhesive seating detail. I used online photos as a guide and then just experimented with a paint program – duplicating the seats over and over again to fill a sheet. The flooring was just a green carpet image from the web.

For added realism, and while the carriage was in bits, I removed the wheels and applied a rust effect with a pen that I bought to rust my tracks. Much easier than painting the wheels.
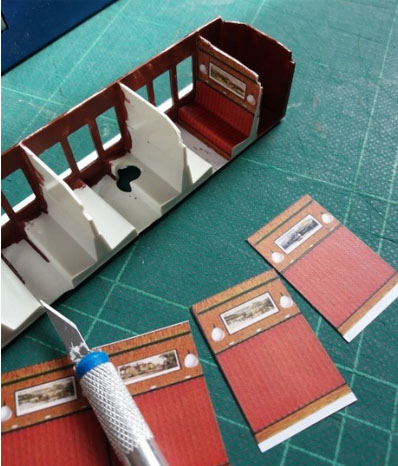
Stickers are now cut to size and carefully applied. I found it better to apply the seats and backs first before the carpets as the carpets cover up and hold the kick plates in place.
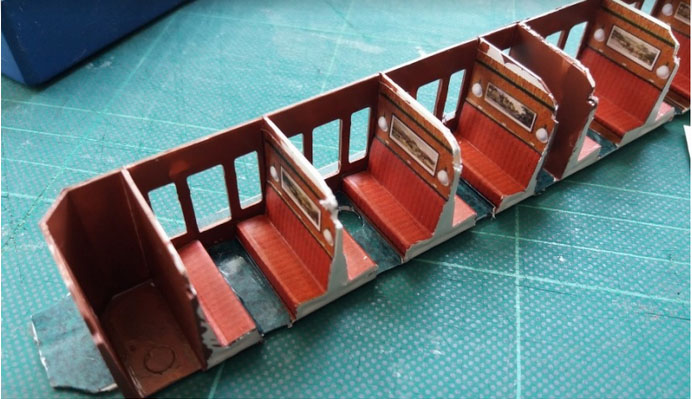
One interior now complete with carpets applied. Make sure you trim any excess off to ensure the sides and roof fit snuggly and cut away the holes for the two brass screws.
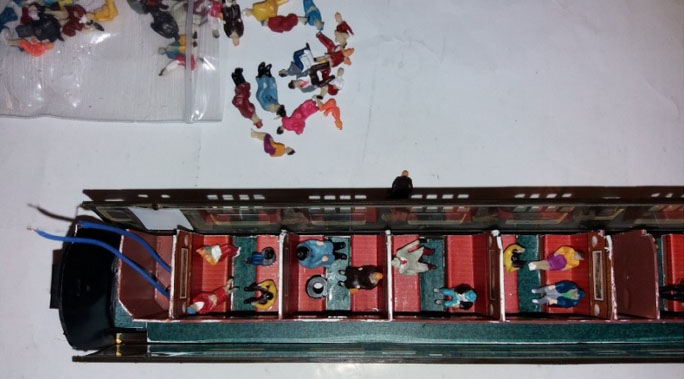
Next are the people. I bought a 100 painted seated people from a well known online auction site quite cheaply. These are glued in position to fill up the carriage. Notice the two wires – I have built my own carriage lighting system that picks up from the rails (instructions to follow!!)
When the glue has dried just carefully reassemble the carriage ensuring the sides and roof clip into place fully. NOTE – I have found that due to the added weight of the people, paint and stickers it’s better taking the weight out. I found that with several coaches (7 on my 125) it’s just too heavy.
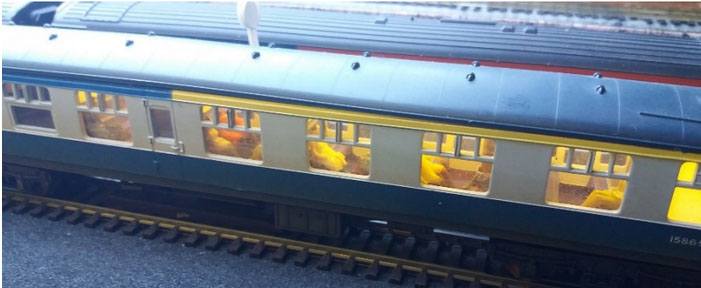
The BR Mk1 coach had a different colour scheme – blue stripy seats and blue floor.
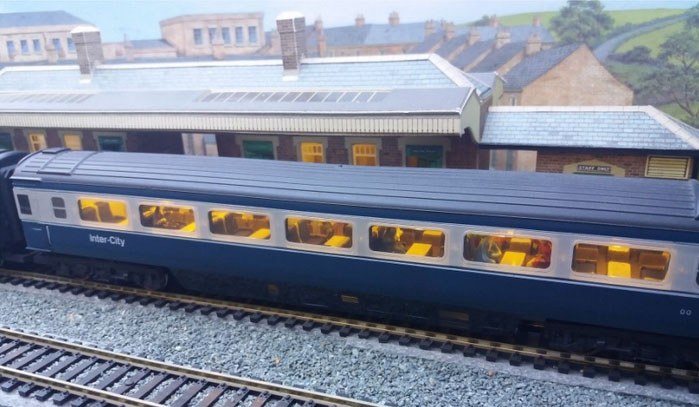
The Mk III coaches seats were just painted blue with a grey painted floor.
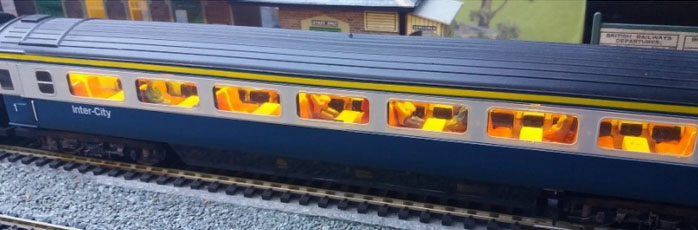
First class had orange painted seats with a brown floor. Fiddly to do but no stickers needed.
If you need the seat detail, it’s here but you’ll need to resize them.
Sam”
A huge thank you to Sam for this wonderful ‘how to’. Hope you like it as much as me.
And don’t forget there are a gazillion more like this in the Beginner’s Guide.
Best
Al
PS Latest ebay cheat sheet is here.


I have 3 Canadian Pacific coaches that lack “humanity”. Your excellent tutorial will be a big help to me. Cheers! NJ Mark
Well a really useful and excellent bit of info ….impressed
Wonderful looking coaches, thanks for the information and how to do. The coaches look very realist.
Nice job. Looks great.
WOW – Great information ! – Thanks for a great job.
Nice job, thanks for posting.
Great article Sam – Cheers
Thank you Mark, you have solved that extra touch, in your sticker that we can print off, with the views of England that made railway carriages so fascinating to a passenger, especially a child, in the 1950’s.
Peter
Impressive, useful detailed information.
Outstanding work, Sam!
Fantastic! Amazing! Wow!
What a fantastic tutorial…
Very clever ideas….
Just outstanding….
Excellent Pictures…
Excellent details…
Excellent text and explanation…
Sam… Thank you very much for your contribution…
Coaching stock is always a challenge because of the windows…
You got it right!
John…
Super job, well done. I have put some people in some of my coaches but found that just a dark rather than light interior with corridor partitions as appropriate is almost as good, the eye is well used to not being able to see much “indoors” through windows, due to light levels and reflections. What does give the game away is being able to see daylight through stuff that would be obscured or solid, the big problem with a lot of older British stock is the gap between coaches and the gangways yawning open, the excellent Bachmann mark ones with the swan-neck type close couplers are well worth having, with the pocket-to-pocket “pipes” couplings.
Such a wonderful idea Sam. So glad that you shared your technique with us. Will certainly give this one a try.
Regards, Tom (USA)
Great ideas for detailing carriage interiors. I also like to add extra detail to older carriages by using a brass coloured paint, such as Humbrol, to the exterior door handles and grab handles and any other detail which may require this addition. This gives the exterior a more realistic finish.
NICE job!!! I save scraps of 1) Wallpaper if the pattern looks right and/or for flooring-also great inside buildings such as restaurants/bars and the like 2) Gift wrap also can come in handy, once again if it’s a pattern you feel would fit your needs And as Al can attest,printed out THIN card stock if there is enough space so nothing gets blocked up or interferes with re-assembly
Superb! That gives me an idea…………….
regards
Dirty Dave
Good job and good ideas….hope you’ll pass along the interior lighting plan soon.
Excellent detailing, very impressed. I just painted the insides of my carriages as I had explored the ideas of printing off upholstery but was finding it too fiddly for my fingers. By choosing the colour of suitable matt paints I found that a much easier option.
That said, i really do applaud you for yours. Well done!!
The carriages interior makes the model come alive, thanks for the info Milt
wow how the finite detail works!!
great job
I have several G scale Coaches that I am going to apply the ‘seat’ stickers to
thanks….!!!!
nice job great how to this certainly helps the carriages look real thanks for sharing.
Truly a great idea ….. and looks good
This really does make a big difference and thanks for letting us in on how you do this .The finished item looks far better than the standard issue …cheers
Great artikel and foto’s.
Regards,
HC Treintje België (Herman).
Opps. . . Did I miss the “how to” concerning the lighting portion?
Sam
Great job
Big AL
Do you realize the immensity of talent you have assembled here. Wow
George from NY
Simply amazing! Thank you!
Very impressive work. I’m looking forward to the lights instructions now!
Great work. Those finishing touches make a big difference.
Fabulous
Very nice job on this project! Did I miss the link explaining how you put the lights in? I’d really like to see that part.
What a great tutorial, thank you. Cars look amazing.
Nice! Thanks!
Well, Sam has solved one of my pet peeves. If the coaches are all empty, how is the railroad showing a profit? The second is, aren’t railroads employing engineers anymore?
My Bachman passenger cars do not some apart at nicely as the Hornby’s above. An effort years ago to accomplish did result is heavy cars, A string of 7 of them made it difficult for the loco to pull them. Before the days of DCC and doubling up loco’s
S Scale ?????
Good “how-to”; I shall use your ideas as soon as I get to the rolling-stock-improvement phase. Very much lookong forward to your way of lighting the coaches. Soren