“Hello again Al…thank you for your comments.
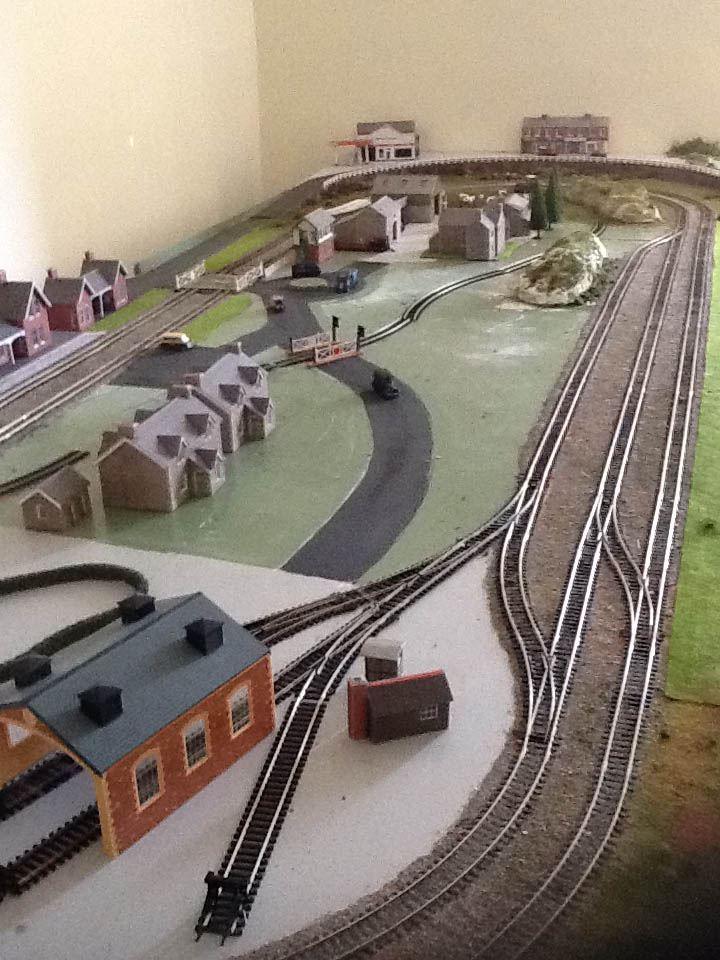
To begin with we built an 8x4ft base, with a circular track but soon realised to do what we had in mind this wasn’t long enough so extended it to 12×4 ft much more satisfactory…
Where to start?… This being our first model train venture plus the two of us in our turned mid 70’s we made a few mistakes but by now feel we are doing reasonably ok.
We found “The Toy Fair”, we picked lots of bits and pieces up very cheap and can’t wait for the next one, also got lots from eBay and Amazon….
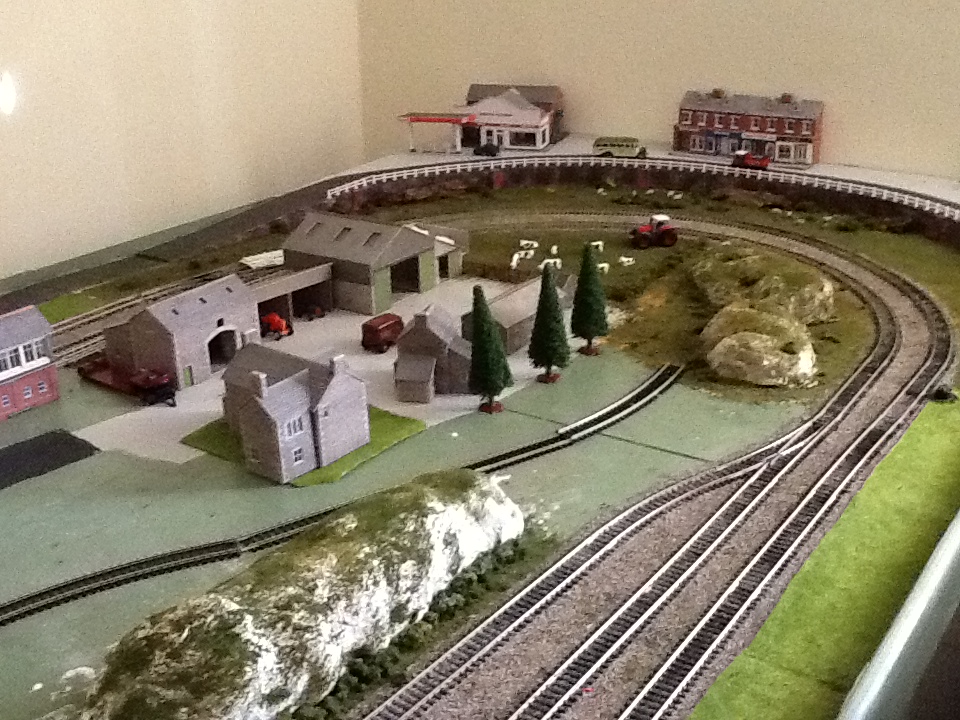
I must say Al though it’s not to everyone’s taste we rather like using plaster cloth, it comes on a roll and goes quite a way plus we are happy with the results….at the moment I am working on a paddock for horses, Ged on the fiddle yard but oh how we are enjoying it.
Many thanks Al to you for your time and all the brilliant enthusiasts who send in their great tips.
Best Wishes
Ged and Eileen”
“Thanks for all the great tips. They have been very helpful as I am building.
This may be a tip of little interest, but it has worked for me.
I used LAN Cat. 5 wire form the 21 blocks and 22 switch controls on the panel…
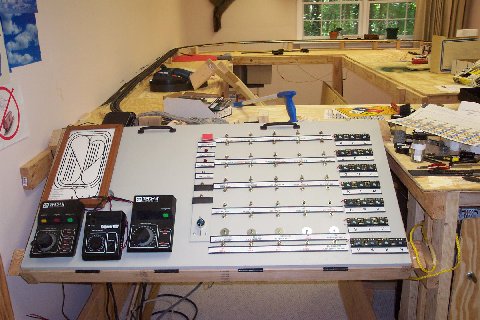
to a set of telco 66M blocks…
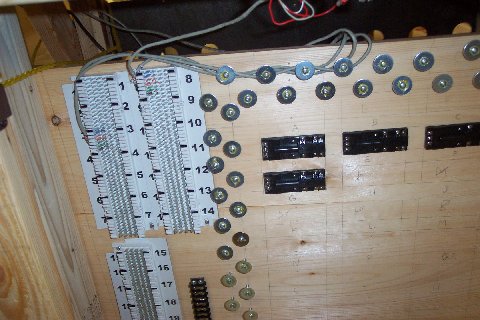
Turns of the 24 gauge LAN cable has a 5 amp rating for DC. No need for soldering or wire stripping. On the track I used Telco butt splicers….
Again no striping or soldering.
Turns out to be economical, about 9¢ a foot for the 8 conductor LAN Cat. 5 and less than 10¢ for the connectors.
Paul”
That’s all for today folks.
Please do keep ’em coming.
And if today is the day you get bored of sitting on the side lines, the Beginner’s Guide is here.
Best
Al
PS Latest ebay cheat sheet is here.


Ged and Eileen you have done well for your first layout , expanded already , bet you expand even more before the Year is out ..??..Dave
Brilliant effort you two, great space as well!
The Metcalfe buildings look very nicely made.
Glad you’re having fun.
All the best.
Thanks for sharing the wiring configuration and blocks. That was actually the most interesting set of pictures for me as I am always second guessing myself on how to set mine up. Very helpful.
Hi and congratulations,
I’d like to learn more about the LAN wire. I don’t quite understand how it works in comparison with ordinary wire. Why does it not need any soldering??
Thank you
Raymond Bove
You have a wonderful layout. You have some good ideas.
Thank you,
Roland – Nashville
So glad to see a woman fully involved in a layout. I’ve done a small one for the grandson and I am starting on a 4×12 HO layout as well. Lots of fun, isn’t it?
Ged and Eileen,
In model railroading …
Part of the fun
your never done
Your first … your mid seventy … your amazing start!
Looking forward to your next update.
Thanks for the information on the wiring system … extremely helpful!
May all that you wish for be the least you receive,
Keep up the great work.
Best regards,
Tom
Ellen & Gad I really like your layout, it’s very detailed and easy to work with, I love it.
I have a question for you are these models make of cardboard paper or other materials, and where do you order them from? I would like to have the whole set and are they HO scale size?
Thank you, and keep up the excellent work
Have a Blessed Day
John Graves
That’s a fantastic first try. Can get some super great idea’s on Al’s site here. Cant wait for more photo’s.
Great looking layout guys keep up the good work
Great start you two, some people think we oldies are a bit daft starting projects like these, but it keeps us active, and our brains exercised. No boredom!
Ive’ just started a small ‘n’ guage layout, the first for 50 years. Great fun isn’t it.
Very nice layout. Next year I am going to make a layout of the Rocky Mount, NC as it looked in the 50’s. I will post pictures as I build it.
Nice layout and wiring! What I am truly amazed about is that your wife I presume is in partnership with you building and having a train layout! Tell me what is your secret with this partnership? I got to find me a wife like that as welk! Does she like going fishing as well? All in jest please!
Nice layout and wiring! What I am truly amazed about is that your wife I presume is in partnership with you building and having a train layout! Tell me what is your secret with this partnership? I got to find me a wife like that as well! Does she like going fishing as well? All in jest please!
Good job,, you solved a dilema I have had, in how to mount scenery against my backdrop, problem solved.
thanks
Al
In response to Raymond’s query, I believe I can explain.
From a modeler’s point of view, Cat 5 or LAN wire is simply a cable of 4 twisted pairs of wire contained in a common layer of insulation. Each of the 8 strands of insulated 24 gauge wire is a different color. Since there is a thin strand of strong fabric included in the cable, it is easy to pull the strand and strip off the outer insulation, leaving you with 4 twisted pairs of wire. These pairs can then be separated for individual 2-wire tasks. How you use these wires is up to you.
Wiring a fiddle yard with 8 strands of wire in a single cable can simplify your wiring task, especially if you need to trouble shoot in the future.
As for not needing to strip wire, the terminal strips pictured appear to be telephone or telecommunications style terminal strips. The wire is pressed between two posts. The posts cut through the insulation to make the electrical connection. Thus, no stripping a this point.
You may find purchasing Cat 5 cable to be a cheaper way to buy wire in bulk. With so many colors, it should make wiring and troubleshooting easier.
Out of curiosity, I looked Home Depot’s site and found Cat 5 wire for sale.
100 feet for $19.38
500 feet for $58.97
1000 feet for $85.00
Remember, 100 feet of Cat 5 wire is 800 feet of single strand wire. That is less than 2 1/2 cents a foot!
This is amazing for your first attempt!!!
I am still thinking about my [future] first one. My question is as follows: why did I not see any re-railers? I know that I am missing something. Is every model railroader so good with track-work that they do not need them? Is every piece of rolling stock so good that it behaves well? Are they all weighted?
Help please.
Thanks,
Joe Chute
Very nice first layout Ged and Eileen. You have all the basics and a good track plan.
I have the feeling this is only the start of something big.
It is a great layout, but can I make a suggestion.
The loco shed is a bit close to the siding beside it. Move the shed back a little bit otherwise you could have a derailment there.
I’m with Ray on the LAN wire suggestion. I am wiring up my layout with lights etc. so would like to know what you are doing with the LAN wires because soldering is a pain. Maybe some close up shots may help explain it better.
@Eileen and Ged:
Really nice work that you both done on your layout. I like your yard and engine house area.
@Paul:
I like your idea of using the telephone hardware for your connections. Does make allot of sense if you have a large layout, but how practical would it be for a 6ft by 3ft, “N” scale layout?
@Raymond Bove:
The wires do not need soldering because they are press fitted into wire points that crimp the wires.securely.
As it was explained to me by a telephone lineman one day. It was a system created so that telephone linemen could make quick, solid connection and would not need to use a gas heated soldering iron or mini-blow torch while in the field doing a service call.
Cat-5 (LAN) type cable is not rated at 5 amps. In fact it carries an average of 30 milliamps for telco and computer use. 24 gauge is much too lite for trains and the current they will require even on short runs. The cable will overheat and could cause a fire.
Unless you combine multiple pairs to increase the gauge of the wire, I would suggest nothing less than 18 gauge or above for track power. You might get away with that wire for throwing switches as the current is momentary only.
How come you don’t DCC it would have been less wiring and you
could have controlled every thing from one or to boxes.
I belive this is realy good for your first layout.Lot better than mine.
Great to see a husband and wife sharing this hobby together, congrats! Cary in KY
the telco punch blocks (as they are called here in the colonies), use a special tool to press the cat wire into a terminal, in a rush you can use a small straight blade screw driver. the terminals have sharp edges along there slot, this slices through the insulation and the terminals embed themselves into the wire, thus making a good electrical contact. In the industry this is called ‘insulation displacement’. There are also butt splices for cat wire where you put two wires into it and squeeze the splice (with pliers) to make contact with both wires.
As another commentor noted, 24awg is not rated for 5A, 22awg is good for 5A but that is for a single wire, the rating derates as you bundle or enclose multiple wires together.
I must say that the wire you are using is much too small for long runs of power to the tracks as pointed out above. Also DCC requires larger gauge wire for power to the tracks. One steps it down to 24 gauge wire to for a short run to the track.
Great looking layout Ged and Eileen. Nice to see a couple effort in model railroading. Cary B
Hi everyone: Just a quick note: Plaster cloth is available from Wal Mart in 5 Pound packages called ” Ridgid Wrap” for a lot less $$$ than hobby stores. You can check it out on eBay
Ray
One of the keys in this layout is about using plaster cloth. He said they were having FUN!! and that is what counts.
An excellent start doing it together. I have been very fortunate in that my wife and I started together 46 years ago when she gave me a loco, five carriages, some track and a controller for our first Christmas together. “Oliver Cromwell” is still running beautifully although has new, much more detailed, valve gear and is digital.
We have done bits and pieces together from time to time over the years with different layouts as and when family commitments and growing children have allowed. For those who saw our layout, that Alistair posted some time ago, the soldiers and military band were all painted by her as were many of the figures on the layout. She also planted many of the trees, etc. Sadly, she is very ill now so the layout is on hold. It’s a wonderful hobby and it’s been great to do it together.
Great job on the layout! I am 68 and have started an HO layout in the shape of a large E with three 4 X 11’ prongs connected by a 5 X 16’ backbone, making a 100’ run for the full loops of the layout. It is NCE digital with 2 Marklin C track main lines and 2 American 2 rail main lines. I am long on size but short on skills and knowledge. I want to wire lighting for buildings and exterior but I haven’t started that since I am not sure best way to do it neatly. I would also like to wire some of the 45 2 rail turnouts and 32 Marklin turnouts but that may never be accomplished. The layout work is in the summer dormant phase since outdoor play in Maine takes priority. Advice on wiring for lighting and how best to automate manual turnouts would be greatly appreciated.
From a retired telephone installer and repairman the connectors are called scotchlocks. Ron from sunny Fla
Eileen anf Ged, What a magnificent start you two have made on your 4 x 12 train layout. I like the track plan (at least as much of it as I could see in the photos.) It’s really nice to see a husband and wife sharing the world’s greatest hobby. I wish my very artistic wife was interested in model railroading too, but at least she’s very tolerant of my hobby.
Ged, your idea of using Cat 5 LAN cable is clever and the telco connection blocks do eliminate a lot of soldering. However, I have to agree with some of the other comments that 5 amps is probably pushing the ampacity of 24 AWG wire. Since your layout is DC and not DCC, you may squeak by with the wiring which is rated 3.5 amps (without insulation) or 2.1 amps (insulated). The difference is because open (uninsulated) wire dissipates heat faster than insulated wire. I wish the LAN cable was appropriate for DCC too as I have a 250 foot box of it in my garage left over from my days wiring a LAN for a friend’s business offices. I think I may be able to use it for LED lighting circuits since LEDs have low power requirements.
i am building a u shaped layout with 3 sheets of 3/4 inch plywood. One side will be 12′ long. opposite side will be 12′ long and the end will be 8′ long. I engines are all dcc except one steam engine. Im 72 and very new at this so I need to go where to go to learn how to do side tracks and switches. i want for now 2 main line with each 12′ side having side tracks and maybe some small incline for turn arounds.
70’s? Who cares about age. You,re doing what you want and obviously enjoying yourselves. I’m 79 and building an outdoor “G” scale in the California, USA, desert. Having fun. I believe that’s what keeps us old timers healthy. Keep up the good work and good health.
I think your imagination drives the love of the hobby. I’m excited to be starting a layout of my own and listening to ideas like yours helps me know I’m doing things right! That “LAN wire thing” is what I’m already doing, you’re right it saves a ton of money. (hahaha). I hope to someday post an update but I think it’s too soon, I enjoy seeing everyone’s posts because it encourages imaginative things like what I’ve seen here. Thanks for sharing!
I wish to make a comment in general and that is “PROCRASTINATION”. Many of us wanabe model railroaders including myself spend too much time procrastinating and planning, including myself instead of just jumping in and building your dream railroad. Especially when you get on in years (I’m 87) and still in the planning stage. I just can’t seem to firm up a layout plan. I realize I just need to get going even if I make mistakes along the way. I finally settled on Marklin HO and have built a layout. I have trains running, but I am still far from making a scenic presentation. At one point, I thought about getting rid of my Marklin and switching to N scale, but realize it is a big step backward. I have a space 11′ x 12′ and thought N scale would give me a good size railroad, but now, I don’t want to go back and start from scratch. I have over $1000 invested in Marklin and although I prefer USA prototypes, I am departing from US trains and going with European prototypes instead. I wish I had started earlier and not have to be in my present situation. I hope others will heed my advice and stick with a plan, whether good or bad and get trains running. Best wishes to all for a very merry Christmas and a happy New Year.
Back to the current layout by Eileen and Ged, I am using the Lan cat 5 cable for all my switch machines and 14 ga wire feeders for track power. So far my trains are running well in a continuous loop for 30+ minutes with no faults. It is taking a train more than a minute to make a complete loop without resetting any turnout directions. One of these days, I will try to post a video. Right now I am making catenary parts from brass wire and code 70 NS rail. I have still to look into DCC and signaling.