As promised, more tips…
“Hi Alastair,
I’ve noticed a lot of train cars, etc. come with a plastic bag of some sort or other. I have been taking emptied plastic bread sacks, turning them inside out to dry them and remove the bread crumbs. After about a week I turn them right side out, punch some holes in them for ventilation and use them to store trains that do not have boxes or packaging. Then they can be wrapped in any medium you wish to use for cushioning and the cars are protected quite well.
I enjoy the emails I receive from you, thanks.
Best regards
Rich”
“I had been making a scale scene kit of a loco inspection pit.
I found a easy way to remove the sleepers of the track.
Leave the 2 end sleepers. & with a soldering iron melt the clips from the sleepers, then cut the web under the track.
Then melt the rest of the sleepers with the iron to soften them, then pull them away.
Note this should be done outside.
Paul”
“Al, I know youre always looking for new ways to make a layout look realistic. I thought i might share something ive done to save some money. Resin or hydrocal retaining walls are expensive, especially if you need 10-15 of them. I found some images on google of several stone wall applications.
I expanded them to the largest size then printed them, then cut them to fit with mortor lines in correct format. Ive enclosed some pics so you can see how real they look. For myself currently im on a fixed income, but I love the railroad.
Thanks.”
Don M from Jonesboro Ga
“Hi Al
Just by accident I Discovered a way to make rock walls from the above material.
I was making the scalescenes kit of the low relief warehouse & when I completed it, I found where I wanted to install was too small for it to fit as I had glued 2 large blocks of polystryrene there.
So anyway I needed to cut those blocks but instead cutting with a knife and making a mess, I thought why not melt off some those blocks & use a soldering iron to cut through them.
So thats want I did with the iron, It did stink & smoke a little & it make a real neat rock face, all I have to do is paint it.
Paul”
“Hmm.
See, now I’m just starting out, and I’m having a ball re-laying out stuff as I experiment. Sometimes it’s tough to do too much in advance, especially when you’re just starting out and can’t decide between a loop and a switching shelf, so I came up with a few tips from my first tentative steps:
1. Get SCARM, and play with it to get a feel for the kinds of track pieces that flow together;
2. Start small, and be prepared to mess around a lot before you know what it is you want from your layout;
3. Never, ever, glue *anything* down unless you’re happy with it;
4. Try to have two layouts – a permanent one, and somewhere to try stuff out, even if that’s just the kitchen floor!
I’m at stage 3 with a switching shelf layout that *will* one day have a loop, because I want the best of both worlds!
Keep on handing out this good info!
Best,
Guy”
“Hot-melt glue guns are miraculous in that you can use them on plastic or metal surfaces (to secure a figure, for example) and if you mess-up or simply want to move it: no problem. The glue releases with a little pressure and you can use your finger nail to peel-off the glue in preparation for gluing again—usually without peeling paint.”
Rick Johnston
Cincinnati, OH
“One of the best ways to show rapidly running water or waterfalls is to take lint (white) from your dryer and gently pull it over your waterfall area. Looks very realistic!
Doug”
As you’ll read, there are some simple tips, and some which are a bit more complicated (have a look at the tips below in the comments too).
But as with all things, it’s just a case of breaking things down, step by step.
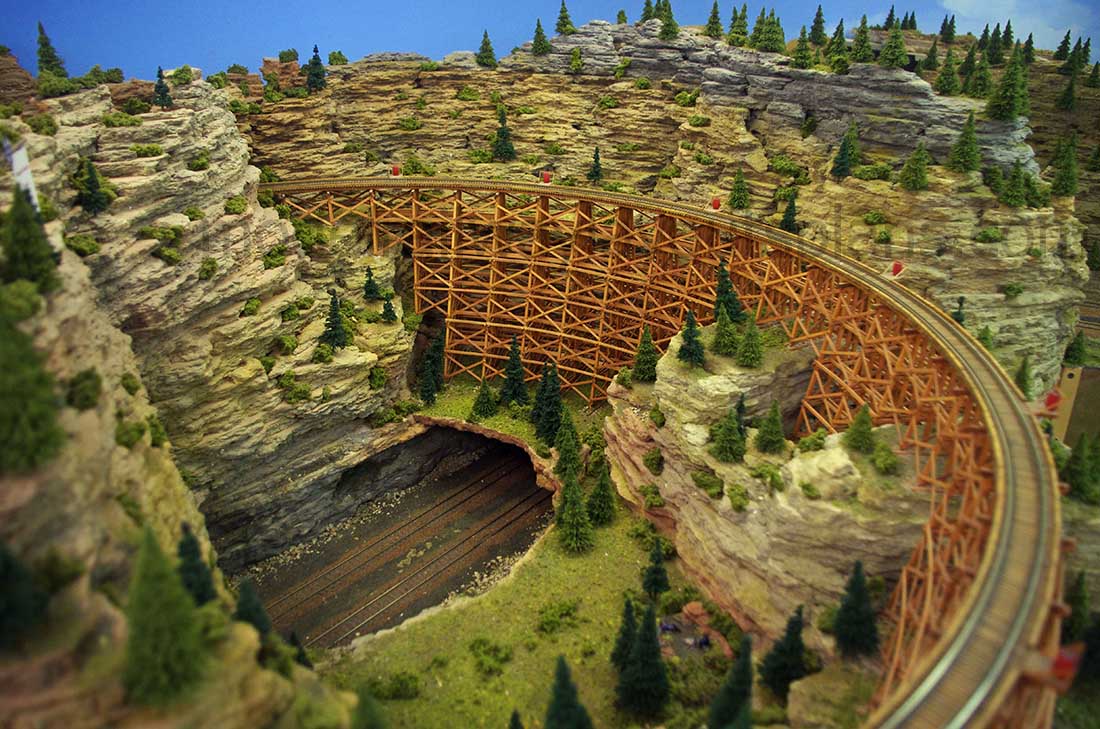
Take a trestle bridge for example – they look complicated.
But look how easy Dan makes them:
That’s all for today folks.
Please do keep ’em coming.
And if today is the day you get started on your layout, the Beginner’s Guide is here.
Best
Al
PS Latest ebay cheat sheet is here.
PPS More HO scale train layouts here if that’s your thing.


Hello Alastair,
I have just started my 4’X8′ layout and I wanted some hills and mountains. Not haveing alot of money to work with, I found a couch and chair someone had set out for the refuse to pick up. I had an idea so I stopped and took the foam cushions.
I have started using them by cutting them with a bread knife. They seem to be working out and don’t look half bad. I do need to go back with a pair of sisssores and shape them a little better. As soon as I get them complete where I feel they look real enough I will take plaster and water it down somewhat and use a paint brush to put the plater mix on. I am also thinking of using food coloring in small amounts of the plaster to color it before I add it.
I am taking pictures as I go along and I can’t wait to post them to your site.
Thanks from Jim S.
Keep’um on the tracks and the problems off your backs.
Thanks ver m uch Al for thetips. Very helpful esp. Doug and Rick. Thanks again Guys.
I am desirous of modleing a prison train and am seeking something to represent a barred window on a passenger car.
Any thoughts?
Jim Lake
For the bars on the windows you could use a single core wire and strip off all the plastic coating. I have done this for my prison on my layout and it works a treat.
Luke
To make landscape like rolling terrain or rocky hillsides, i use aluminum window screen. I cut a piece large enough from the roll and crumple it up. Then I pull it out as much as needed. Then staple it to the framing and smear on plaster. Add paint and trees and the results a great.
I have been using 1″ styrofoam for making the base and hills. To get a very realistic rock surface I have used an x-acto knife and a 1 1/2″ scraper to pry away some of the foam, from th top edge downward. It is looking really good and will be enhancd with the painting.
if you use chuck cloths, that you use for whipeing up.
Make up a slurry of castering plaster in a bucket, dip you chuck in then lay over some Foam, When it sets. You can take away the foam if you wont makes great hill & many other types, and save heaps, instead of bying plaster.
also to make barb windows & also fences use shade cloth, you can also spray it differt colour if you want
When I was a kid my dad used to use mountain paper that you crumbled up the way you wanted, then soaked it in water and it dried the way you wanted it to look. What ever happened to that as I never see it anymore
I read where Kim was building a turbine for $20.00. can you get any info on that. thanks
What is better to use in O-gauge Lionel trains… smoke pellets or smoke fluid??? Comments, information or suggestions anyone?
Ken. When I ran out of the Lionel smoke pills, I used the liquid in my engine, it caused the heating element to burn out. Rats!
i have been looking at all the layouts and suggestions for landscaping. but i notices that most of the trains are HO. Can you please show me o gauge. i mostly collect pre-war lionel.
thanks brian
Jim Lake,
I use a printer to create Venetian Blinds for passenger cars. I print on velum so there is a glow.
You can get clear over head material for your printer so the window will look clear with vertical bars.
Ed
Hello,
I really enjoy reading all the creative ideas on here. I know trees are very expensive, what I have done is get real limbs from trees and they already look like small trees. I put glue on the limbs and then put them in different foliage let them dry and spray hair spray on them to keep the ” leaves” on them. Good luck.
Steve
To use the old greenplastic berry baskets works for bars on windows, fences or intricate patterns for town square gravel motife.
I have had good luck with mixing drywall mud, water and some sand together and painting the mixture over surfaces such as mountains or flat areas. It gives a great look on steep mountain walls. Another benefit is that it fill in any holes or problem areas. Don’t use too much sand as the sand will be loose on top. You can use the ready mix mud that comes in buckets or the powder that comes in bags. It is very cheap either way. You want it mixed like an extremely think paint – enough that it will not easily drip of the paint brush.
I wouldn’t want to go melting some of these plastics with a soldering iron or indeed anything else, some of the fumes could be toxic and it’s likely to really muck up your soldering bits. Can’t beat a good sharp craft knife.
Rod
Rod, as for fumes, Woodland Scenic’s foam gives off non-toxic fumes. I’m also using 2″ insulated foam pieces, and I cut these outside with a wire foam cutter. That is Woodland Scenics too. More expensive than old ice chests and a soldering iron, but sometimes it’s better to get the stuff that is made for the job.
Hi Al,
First of all I love your tips and articles. When ballesting the side of the track pour down the ballest and spread it out roughly with the brush. Then, take the brush handle or totjpick and lay it on one rail. Make sure it is about one inch out from the rail. Simply drag it across the side to spread your ballest nicely and push any exsess to the side. Keep up the great work!
The building plans can the be modified for O scale or O 27
What size ballast should I use for ballast in H O , I have some of the fine however it looks to be to small ?
Also I am having some problems with my turnouts I have peco and some old atlas I am using tortoise motors with the atlas and peco snap motors with the peco also I am using a Lenz DCC system .every ounce in a while when a engine goes over the turnout it will short out or loose power till you move the engine , I have tried
painting the frog area with fingernail polish and it seems to help some, also with the engine stalling do I have to wire power to the two rails that move ,I know there is a way to rewrite the turnouts but I do not want to tear up all the turnouts and rewrite all of them , any ideas thanks
Jim
I would like to know if there is a dictionary for the terms used in model railroading? If so can you publish the site?
Thanks in Advance,
Danielle
Danielle
Google (or whatever) :
‘Railway/road terms’
same for:
‘Model Railway/road terms’
There is also a “Show you how” from Peco
Tony
In Guy’s tip he uses the term “Scarm” , What is this?, Also in Paul Otway’s tip he uses the term “Sleepers”, what are they?
sleepers are what N Thank-youorth Americans call ties. could someone who models n-gauge help me? I am planning a layout on paper for now, and I need to know the length of a pre British rail coach 1. the couch length. 2. length over buffers. 3. the length of at least 2 coaches coupled.
SCARM = Simple Computer Aided Railway Modeller. See website at http://www.scarm.info/index.php. Free tool download and explanitory tutorials on the site. Excellent library of commercially available track products in scales from Z up thru G… Definitely view the tutorials to learn the tool.
You can design in scale…from switching shelfs to a full empire.
I’m in N (1:160) and use Atlas Code 80 — scales perrfectly…but the other scales and vendor’s data is just as good…
I found the easiest way to form mountains ,with poly or foam is to use a hot wire using a small hacksaw, you remove the blade and replace it with 1or2 mm piano wire.Connect it to at least 20 volts dc controlable power and you will have a hot wire to mould what ever you like . Cheers Ray
Hi Al,
I came across your site a few months ago and got hooked. You and the other modellers have been very helpful. I’ve been away from the hobby for about 50 years, you know, making a life, raising a family and everything else that gets in the way. So my boys went into the attic and dragged out my old Lionel’s from the fifties, and you can guess the rest. At least my wife can find me most of the time. Keep up the good work. It’s good to know there’s someplace I can go to for ideas.
Thanks,
Al
I have an N-Gauge 6×4 layour, which I started about 35 years ago.
For 3D scenery – mountains, hills and banks, I used an old surfboard foam blank. This foam is rigid, fine-grained, and you can carve it with a knife, rasp or file, and sand it to get smoother textures if required.It can be glued directly to the baseboard using normal white glue. I got a damaged blank from a surfboard maker for a very small outlay. It was a nice mid-green colour (unusual – normally off-white), which helped with creating grassy hillside meadows. I even managed to sculpt a mountain trackway and fixed the track down with adhesive. Tunnels easily carved out, trees and poles just push in and hold well. Takes paint well, so rock wall effects are easy.
One word of warning – after final shaping, this foam needs to be sealed with paint or white glue wash, as the surface tends to scuff up and produce foam dust if left unsealed.
Hi Al,
I have always been a lightweight freak. At 300 lbs, I am no lightweight tho. But I have made the most amazing mountains out of white Styrofoam insulation. Also, I am a constructor of dioramas, and I build all of my buildings from balsawood and plastic for the windows. I have made multiple dioramas ranging in years from the 1820’s to the 1980’s. People have ahhhhed and wowed them thinking that I purchased the buildings because they look professional. As I have said, I have been making dioramas for 50 years, I think I can say I am a professional, and I’m 67 years young. I’ve constructed 2 HO gauge track lay-outs, one detailing a “Switching yard,” the other a 12’X20′ foot. Modeling is a great hobby, and keeps me busy. Right now I’m working on a 6’X4′ N gauge layout, I just have to think smaller. Thanks for all the building tips, I find them interesting. Oh, using foam rubber is a great medium, it can be soaked in plaster, dried, and sculpted, of course being an artist works greatly. Thank you for all you have provided.
Wanting to do remote control on my HO scale layout. How can this be done.
Jim,
The moving points on your turnouts need to be powered. Using Tortoise switch motors, you are applying constant pressure to the closure rail (moving points), and the closure rail should receive power from the stock (non-moving) rails. If you clean the mating surfaces where the rails meet, then power should pass from the powered non-moving rail to the closure rail.
Another possibility would be trapping ballast or other foreign matter between the closure rail and the stock rail.
If you want to directly power the closure rails, here is one way to wire them without removing the entire turnout. First, make certain the two closure rails are not electrically connected. If they are not connected, then try the following.
1. Take a length of solid core wire, strip about 1/2 inch of insulation from one end.
2. Using a drill which is slightly larger in diameter than the solid wire, drill a hole in the foot of the closure rail near the hinge point, on the side opposite the side where the wheel flange passes. This hole should be midway between 2 ties (sleepers).
3. Using a drill which is a bit larger in diameter than the insulated wire, drill a hole through your train table near where the first hole was made.
4. Form a hook in the end of the wire. Drop the long part of the wire through your table, and insert the hook into the hole in the rail base. Carefully solder the wire in place.
5. Connect the other end of the wire to the bus or feed for the appropriate rail.
6. Repeat this for the other closure rail, connecting it to the opposite bus or feed.
NOTE: This same technique can be used for drop wires from any length of track to the bus below your table. It is quite small and neat, and can be done after your track has been laid and fastened down.
Good luck,
Carl in Kansas
Rock salt coated in black paint makes great coal. I use Apple Barrel jet black matte acrylic paint found at the local Walmart.
Thank you for the great ideas. Keep them coming !
I like my accessories to run automatically. so I use electric eyes. They are not very expensive and can be purchased at any electronics store. They have about a 2 second delay so the train can easily get past a crossing before the gates come up. I also use them to activate the Talking Station and other accessories like the shanty and signal lights.
Thanks to All for the great tips…imagination and creativity have no limits.
I wonder if anyone has experience using double sided tape to hold track in place? Seems like it would be convenient, but not sure.
Have fun!
Dave, from New York
I am interested in starting a HO layout. My question is: Are Hot Wheels and Matchbox vehicles the right size for a HO Scale layout? If not what scale is??
I am getting back into HO Scale trains myself after approximately 40+. I am really excited about this as I have numerous medical issues and have to quit my much more strenuous outdoor type hobbies and certainly can do this indoors. The question about is HO scale and match box vehicles is certainly something I would like to see answered also. The reason my concern is before I order many pieces that are construction related ie; dozers, cranes, etc. (which are pricey) I would like to know. Also, If someone has a connection on track buying in bulk inexpensively and building printouts I very much would look forward to your input. Alastair, I really enjoy this site and can hardly wait between times until the next e-mail comes . Thanks to all for your sharing information. Andy from Houston Area in Texas
Here’s a question. I have a nice size layout on which I run a variety of mostly Athern and Atlas motive power. I even have an Athern Pacific (4-6-2) from the 1960’s that I bought as a kid. Runs great.The layout is wired in traditional block wiring of which I haven’t upgraded to digital due to the cost of converting each loco. The track work is code 100 Atlas Flex with 24 to 30 inch radii curves.
Here’s my dilemma. I recently came across an Athern SD9 I bought 15 years ago but had forgotten about it. I did the final assembly of the wire railings, couplers, etc. When I put it on the layout, it ran beautifully, except for 3 or 4 curved sections of layout (not on turnouts) where the leading 6 wheel truck climbs the outside rail and derails. If I run it backwards, the same truck , now on the back derails. Every other piece of equipment negotiates these same spots without mishap, including the old Pacific, which always had a fussy lead truck. I also have other 3 axel Atherns that don’t have the issue at these locations.
Using a NMRA tool, I checked track gauge, wheel gauge, truck flexibility, etc. I checked for track imperfections in those suspect spots, also.
My conclusion is that there is something about that truck that just is not right. I am considering ordering a new truck assembly from Athern.
Do you concur with my solution?
Hi all,
I am not a modeler, ….. yet.
I enjoy reading all of Al’s emails every morning before work.
I have been helping a friend with his small layout, he wants “rolling hills”. My suggestion is to use aluminum window screen laid on a bed, press potatos of appropriate size into the screen which will leave depressions. Paint the screen and while wet, lay on paper towels or newspaper and paint with a few more coats with a “grit” in the last 2 coats. This will not be structurally sound for larger hills and scales but is light weight for the smaller scales.
Happy railing!
Garry
Do you have Plasticville?
Thanks all for the tips! I am just getting into the hobby and will be using O gauge models. I want to move quickly as I am being pushed along by two very impatient young grandsons, :). Can any of you suggest a source for a good O layout, at least 4×8, that I might simply recreate? I would like it to accommodate at least two trains with some elevation, and/or other interesting elements. A flat oval or figure 8 is just not very appealing or realistic. I am very handy with tools and wiring and can follow instructions and plans. I simply do not want to take the time for self-design or trial and error. That might come in the future. Thanks in advance for suggestions. Rick
Hi Alastair!
Great information, here is something else for you. Using materials you already have at home:
Take a plastic bread bag with color or checkered borders (ex. wonder bread), and cut small triangles in different colors, to use as small flags for car lots and other buildings. I use clear sewing thread and glue the triangles to it and you can make it any size or scale.
The next idea: Get a string of the miniature battery operated (AAA or AA) LED Christmas lights (they come in white, yellow and multi color). These make an excellent light source for tall buildings, telephone poles or outside lighting on buildings that are closer together. They also light pine trees used in Christmas displays. These can be controlled by many train controllers, using the accessory electrical hook up.
Regards – Tim
Very well done – a lot of valuable information
One word of caution, when using a glue gun around your layout! The spider webs from a hot glue gun is like a heavy cable to an N scale Loco! I just spent 2 hours digging “spider webs” wound on the axle and gears of one of my motors. So keep an eye out for “spider web glue” Have a great day and keep the tips coming!!!
I have a large quantity of old cork roadbed that I used about 30 years ago which has dried out. Now that I am retired, I am getting back into the hobby and I want to restore the pliability of the cork. Any suggestions on “how to restore cork?”
Thanks
Hi Sammy,
Soak old cork in water for a few hours or until soft and pliable then dry as much as possible before relaying the cork. It should stick with PVA glue if the 15 minute drying time one is available then that should be used. best wishes with your track, Kevin
I am a new model railroader. Is there any way to disassemble the passenger cars of the Lionel Santa Fe Super Chief so you can put seated figure passengers in the cars?
I worked in film for many years and when Styrofoam needed to be cut and shaped. If you don’t have access to hot wire cutting tool use an electric carving knife. It works very well.
As to Bill U’s question about Matchbox and Hot Wheels scale. I am a Matchbox collector and a modeler. Matchbox and Hot Wheels cars are much too large for HO scale. I believe the Matchbox scale is 1:67 and HO scale is 1:87. My recommendation: get yourself a nice wall cabinet for your Matchbox cars and display them there.
I would like the train layout on the advertisment. the one on the wood table.
No house just track. I have Marklin train. HO
I am considering spine subroadbed. I have read a lot of articles. What do your readers consider best?. I am leaning toward homasote splines. A suggestion was made for lattice clear white pine also masonite. Radius will be as narrow as 18″. I don’t think it is possible to bens white pine to that degree, Anyway, what does your readers think?
In regards to Jim Saccento’s question about 1 truck derailing, check to be sure your truck has full swing. I recall seeing an artical awhile back with same issue and they found truck was binding and not able to make a full swing from side to side, I believe they had to modify the frame slightly to alleviate the binding, which cured the problem. Good luck!
hi al,. I’ve appreciated all of the recent posts on this site, I’ve asked for some tips in building my h o scale layout, I need some info as to what kind. of track design I can use on my 40″x 12 layout, it’s in an l shape,I could use some help on coming up with track design on my small layout,I’ve almost got the first frame built. I haven’t had any ideas yet as to my questions, I’d really like to hear from anyone out there. to date I’ve appreciated all of the ideas and photos that I’ve seen.would love to hear from anyone. thanks from val in Utah !!
Regarding Rick Ahrendt’s answer to Jim Saccento’s problem with truck derailing, Rick’s answer was–as my Brit ancestors would say, “spot on!”
Also, I suggest he check the amount of lateral play in the front and rear axles. As curve radii get smaller the need for lateral play can become considerable. It can be interfered with by flash or miscasts in the axle openings on the inside of the frames, an accumulation of dust, grease and crud, or just that the conical openings aren’t deep enough and need to be slightly deepened with a reamer, which are available commercially from some model railroad equipment suppliers. If the cost of that is worse than the price of a replacement truck, buy the truck and turn the troublesome one into a half a flatcar load for a wreck or hospital train–or even painted up like new and in an open sided crate, a replacement coming in from the factory.
Val:
Is that 40 inches by twelve feet?
I’ll do a quick layout for you and send it through Al. I love playing with AnyRail and I’m retired!
Charlie
Bill
HO scale vehicles are 1:87, matchbox are usually 1:64 or larger
C.H. Specht:
I wanted to get any rail myself but i have Mac computers and any rail doesn’t operate on Mac. If you’re up for a challenge, I would be interested in a layout?