“Hi Al.
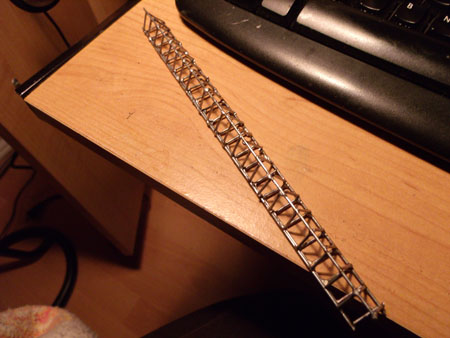
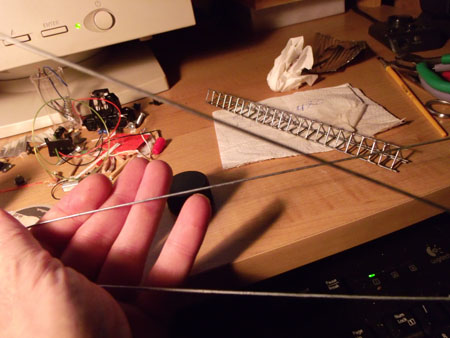
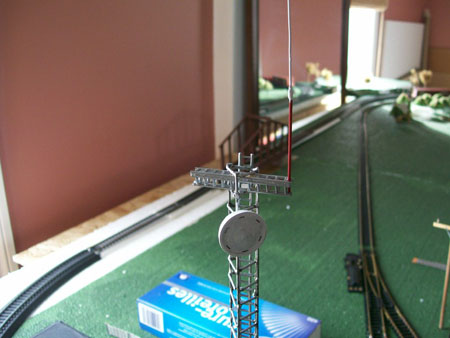
Here is a microwave tower made from small stiff wire.
Need to use flux or paste for solder to stick.
Cut length of wire to what ever size long you want.I took 18 inches.
Make 2 and make sure they are very streight.
lay down on a long piece of wood.
Pin down useing sewing pins with heads.
Space the 2 long wires 1/2 inch apart.
Make sure they dont move.
Now cut smaller pieces to fit between but make sure you dont force them in or the tower will have bulges.
Now flux or paste and solder small pieces.
Go all the way up.
Half way you should be feeling a pain in your back hunched over.
Once you get the lenght you wanted, looks like a huge long metal ladder.
Now make another one.
ooch my back lol.
Once done stand lenght wise like a upside down V.Pin to hold still.
Now solder in only a few places along.
Once stiff, turn over to a V shape and start soldering more little ones.
When you solder close to another peg it may come loose so be quiek.
Now you have your tower.
Go wash it off with dish soap water carefully.
Dry with blow dryer or it will rust.
You dont want to introduce paste or flux to your engines paint job or any paint.
You see in mine i used ho plastic ladder’s done the same way as tower.
Addes a antenna and a water saver screen for taps make of plastic for the microwave antenna.
I will add more after and stuff. As well as a 2mm flashing red warning light on top.And a steady red half way down the tower.
Oh the long antenna is made from the tower metal and a thinner piece soldered and painted.
Kim”
“Alastair,
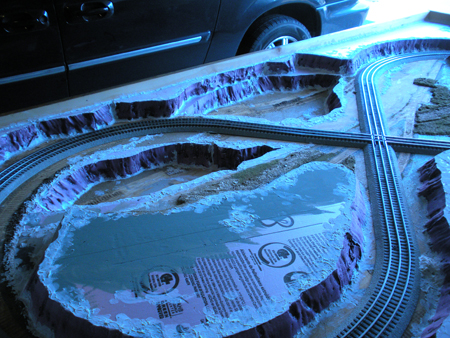
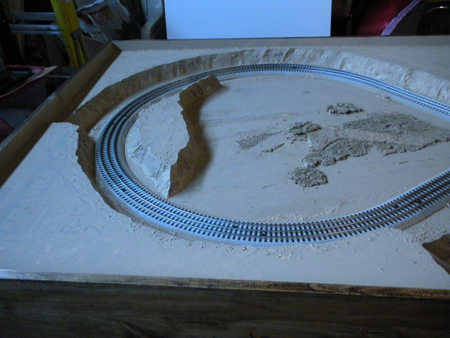
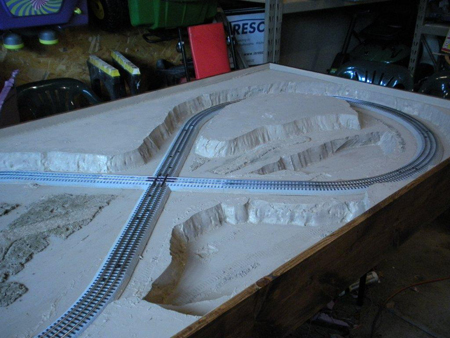
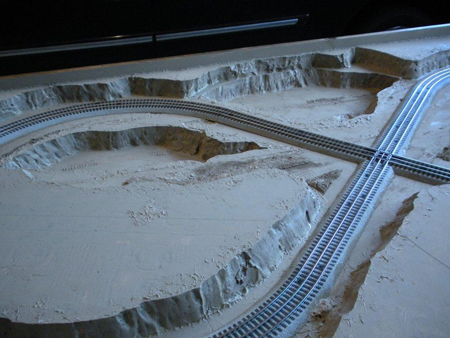
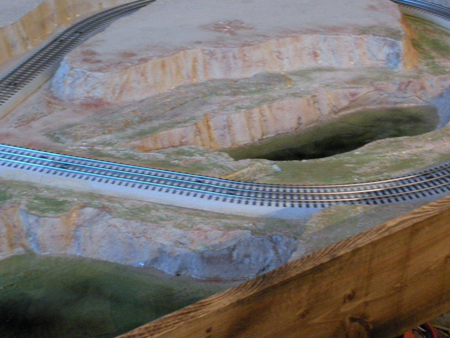
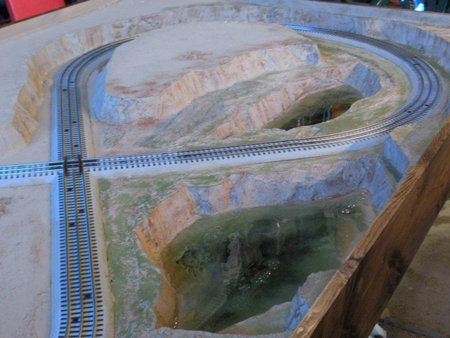
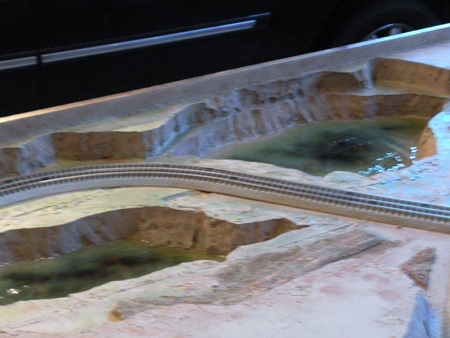
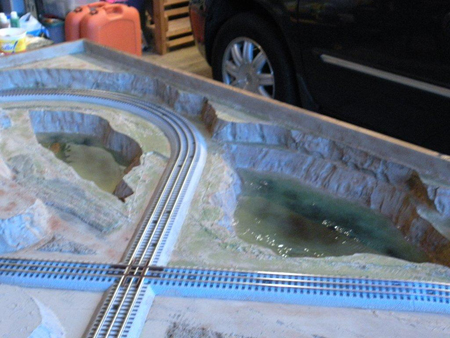
This is a Lionel “O” scale layout that I started a couple of days ago that I’m building to hopefully sell on Ebay.
It’s a simple figure “8” with no sidings.
I’m doing the landscaping with 2″ pink high density foam house insulation.
There will be no buildings but (2) lakes and I will add schrubs and grass. I’m trying to keep it very low profile for easy protective storage. I put fold away metal legs on it for easy set-up.
I’ll be done in a few days and I will send you final pics of it then.
Regards,
Barry”
Can’t wait to see the final pics Barry! Al.
So looking forward to seeing Barry’s finished model layout.
Now on to something completely different. I was in two minds whether to post this or not.
But then I thought of the countless times I’ve watched it – and thought it may go down well with you all.
Hope so.
But if not, please do let me know so I the right sort of stuff to post…
That’s all for today folks.
Please do keep ’em coming so I can keep posting.
And if today is the day you stop dreaming and start doing, the Beginner’s Guide is here.
Best
Al
PS Latest ebay cheat sheet is here.
PPS More HO scale train layouts here if that’s your thing.




Kim, that’s a lot of soldering, but a very good model. Well done!
Nice Job !
If you take any small solid strand of wire & place one end in a drill chuck,
hold the other end with plires & run drill slow , the wire will get a little
smaller & very straight. Also the wire will get stronger.
Thanks for including me on your “E” list. Very much enjoy all the suggestions & tips & videos. Thanks again,
Andy
Dover Delaware, U.S.A.
looks good , well done
Thanks for the idea. I have a radio station and the tower will be perfect.
The pain in the neck: back microwave tower is Amazing!
I would sware the tower looks exactly like the one Rohn makes. Great work!
Thanx for sharing, Kim: Al
Tom N
Keep on training
Very good idea. Looks like even I can make it . Keep up egos work.
Wow! Beautiful work Kim! And thanks for the great laugh too!
great how to kim brilliant.
Very good , nice bit of nimble work gone in to that
Thanks for this Kim. I will try it as I want to make some jib sections for a crane and this looks ideal ! Would also be useful for making supports and gantrys as well as bridge sections. I would then make up a wee jig on a woden plank to get them all the same. Good instructions – mind that back! D/
Looks good
Wow! You’ve got more patience than me Kim. But it really looks great. I am not that good a solderer, and would have the last rung melting off while soldering the next one!
This just shows how a little thought goes a long way. Thans.
A master piece!
Very nice. But what size is the wire???
Ken G thanks. But you wouldnt beleive that it didnt take me all that long with it.Cut all your pieces first.follow my direction’s and you will be done pretty fast.I also did a load stress test on that tower.To see how much weight it could hold.I have an idea.Im makeing a few more and build my own metal realistic crane.useing old mini rc servo i can lift a locomotive and move it around and drop it back down again.So i know it will hold alot of weight.After i done soldering.I took a tiny round file and cleaned off any extra solder.then i washed it to clean contaminates off so i dont transfer to my layout.
Andy Lampmann one of them be perfect Andy for your radio station.I forgot to mention.If you take ya first 2 lenght’s pass fine piece of sand paper along them to take off the finish and will make for super easy soldering.follow my directions and you will have a very strieght tower.
Tom it was so easy to make.Seem’s like alot of soldering and is.But when done ya going to be really happy with it.You just cant buy metal tower’s for Ho that i can find.Unless ya want to buy really cheap fragile plastic stuff.And it will be very small.follow my directions and you will love it.Im useing that tower to build my own working crane.
Holly cow what size of wire hmmmmm never put any thought into the size.Okay i checked it out.It seems to be the same size of stiff wire as the wires ya find in phone wires.You know what this wire is.When you do metal fences and you have to wire it in places about the same wire.I tryed to use a drill and make them smaller.But found the wire so stiff it wont twist right and breaks.Tom Oliver yes you can.Im a terrible solderer.but learned a trick so even mine looks good.Oh about the back.hahahaha im good.and off doing more tower sections lol.Ya you can make ya own gantries not plastic stuff way better.If anyone has any idea’s they like to see or have.Let me know and i will see if i can make it.Just give me idea’s and you may profit from it.So shoot me idea’s everyone on what ya like to see and maybe i can.I just cant build a layout with just plastic store bought stuff just dont look real and has some plastic shine to it.So the more idea’s i get from everyone.the more everyone will injoy.so ask its free .wait till ya see my next idea hahaha
Oh i bought a new panoramic camera and will be doing backgrounds.I did a test from my bedroom window up 2 stories of my valley and came out really good.Im going to be doing background’s soon as well.I will send in a test picture let me know what ya think if Al posts it.its only a sample.and would people be interested in them.I should be able to do unlimited view with this camera meaning 360 with no joints.
Thankyou all for the compliment’s on my build’s incourages me in building better and better thanks everyone including Al for posting it all.
Duncan lol tell me about it.Im not young anymore.Try and bend over and touch ya toe’s next morning sheesh Ya a plank of wood be perfect.I used pin’s with heads on it so i could move them easly and reposition them as i went.When you snip the tiny pieces watch it doesnt fling in your eye.I recomment to use a rag or something on your leg to deflect the pin.Warning as i removed my pant’s to go to bed i found a heck of a bunch of bloody pin hole’s in my leg from then sticking in sheesh not only the back and kneck but the leg to.Oh fun hasnt stopped, also had a bunch pin holes in a few finger’s awww the joy of building this tower came with self mutalation and a bit of anticeptic.Oh and when ya go to solder, file the pin slightly to make flat.as you go you will find that each pin will be alittle large to fit file it down.I used a small pair of needlenose pliers to hold the pin as you solder.Goe’s faster.So fine sand the wire.pin down on plank tight.i left just under 1/2 inch space between each rung or pin.oh and another trick.When ya go to solder the pin since you are useing a pair of needle nose pliers heat up pin first a dab of solder on end and solder into place.use paste of flux if needed,push it flat on board so it doesnt look off.Dont worry about extra solder.when done find a small round i guess chainsaw sharpining file.I have bought a pack of 5 diffrent sizes for $4.99 those files are so worht the money to spend on.Please love to see any tower someone has made.send it in to Al.PS Duncan ya gave me a few more idea’s thanks.
Soldering tips:
Soldering is a learned skill. If you are using a soldering iron, let the tip get hot before touching it to metal. You want to use enough heat to quickly heat the joint, solder quickly, and remove the heat before it can travel to the old joint. Too little heat and it will unsolder the previous joint because the heat will travel along the wire before the new joint can melt the solder. Too much heat and the heat will travel too fast to the previous joint. If you are having trouble, try using a heat sink such as one of those big spring type paper clips. Put it between the new joint and the old joint. It should conduct heat away from the wire and into the heat sink.
Oops – I made a small error in my Soldering Tips. It should say “If you are using a soldering gun…” Also, if you are using a soldering iron, select one with the most suitable heat range.
Practice a joint or two or more until you feel comfortable with your soldering technique.
For the tower cross pieces, try making some kind of jig so you can cut lots of those little pieces all the same length.
Thank’s Ken.Bet you could do just as well.It’s just take’s a bit.I save do the first ladder,take a break and finish.It took me about 2 full hour’s to do it.another 30 minutes to cleanup solder and wash and blow dry it.so it dont rust.From the time i wrote the last comment,Ive started two more metal wire project’s.Gandtrys with led light’s and something else.
Very good bit of scratch building. Well done.
Hi Alan.thanks.is easy and im sure you can build one as well.Im starting on a gantry with lights.yep back saying not again.I just got my pack of 3mm red flashing led’s.5 in a pack for 0.99 cents free shipping on ebay,will install one at the top of tower.and a steady led half way down..i’m only going to run 1 tiny black wire to the led’s,and use the tower metal as the ground and ground the tower and negative’s on the led’s.may paint the wire aluminum color so to hide it.okay back to the pain in the back.thanks all for the comments
The soldering iron i use is a black and decker 2 temp switch on it.Works fantastic for this tower job.or led’s or lights.
Awesome!
EXCELLANT! Just won’t work in my turn of the century model. Beautiful job.
Excellent tip. Awhile back Al sent a tip on making a playground out of paper clips, seems like put that tip with this one and the possibilities are endless. Love these tips keep them coming.
An excellent portrayal from the modern age. Strong work.
good looking tower.
Excelent piece of scratch building, really looks the part but alas the same comment as Dennis, too modern. How about a pidgeon loft, they carried messages.
Lovely work Kim. Please keep the tips coming in as thay are a big help to us all.
Al can you ask if any one who may have tips to send them in. Thay are so important to your members.
Many thanks.
this is a great creation. very realistic. Non-creative mind need to know again how you made cross bars.
Would make a great encapsulated railroad track for elevated railways twenty feet off the ground.
Great idea. I am just about to start a layout (N gage) and this is a great project; I will get to it someday.
Some Suggestions:
You did not mention what the material is. I would go with brass as it solders at a lower temperature. It is available (across the pond) at most hobby shops and I assume there too.
Use 1/16th inch rosin core electronics solder. It is much easier to control so that you don’t wind up with a big gob. It will cut down on the fluxing and is soluble in alcohol. Then wash with soap and water, prime and paint.
Barry
I’ve saved up most of your tip letters for reference.. I’m building a 10 ft by 4 ft lay out which has been my dream since 1970.. It’s in N scale, in the steam era (1945) as I remember it growing up as a small boy..
Keep the rails clear..
Angelo
Beautiful work Kim. I do suggest investing in a pair of safety classes for use when cutting small pieces of wire or even rail. Yes, they should also be used when using a motor tool like a Dremel.
Safety is something we too often take for granted…
Sincerely,
John Reynolds
For soldering safety, (when possible) I use a motorized paint-exhaust booth with a 4-inch diameter plastic exhaust pipe to move fumes away from my work area. Works great, and I don’t have to hold my breath when close to the work at hand.
Is it normal to feel a pain in your back from just thinking about it??? It looks great Kim.
Kim great modeling. Now please repeat the same process for Z Scale, as I need one atop my Akinbak mountain LOL.
When soldering the wires, to prevent the heat from going back and de-soldering the previous joint, use a pair of clamping pliers between the new joint and the old joint. The pliers will absorb a lot of the heat and prevent de-soldering the previous joint. I use a pair of medical hemostats. For smaller wire, like a LED lead, I use an alligator clip between the led and the lead I am soldering. Prevents ruining the led with too much heat.
SUPER JOB…..looks like the real thing!!!!!
Hi Kim. Thanks so much for sharing your antenna with us. I’m Scott and I’ve worked in the television/broadcasting/ industry for many years. Always loved trains and layouts. My first, as a kid, I built “train city1.” In my teens, you guessed it, then “train city 2.” I know, not so creative in the names, funny to grow up to be a writer. I always knew I wanted to work in TV so my layouts always had at least one TV station. Your tower is fantastic!!! You have inspired me to learn soldering and from your example I plan to will build a tower like you have. Even though it looks like a great deal of work, if I were you, and you had the time (and the aspirin for back — ouch 🙂 ) I’d consider selling them on eBay and make yourself some money. I’m sure others would be interested too. Really quick, you probably already know this, and I’m not sure the level of “realism/acuracy” you’re going for on your layout…. Like I said, I’ve been in TV forever. If you planning to paint the tower, the FCC has specific rules about paint colors and the distance the reds nd whites should be distanced from each other. A simple search will give you that info if your interested. Also, if you super crazy about certain things being just “right,” know that the FCC does not require certain red flashing lights atop towers less than 1000 feet off ground level. Example, a station where I worked had to put up their new HD tower. It was planned for 1000 feet. They redid the engineering to see what signal pattern they’d get if the tower was 999 feet. No noticible change so they ended up with a 998 foot tower, eliminating the cost of the bulbs, replacements, and expensive specialists to change the bulbs when burnt out. Anyway, you’re is just perfect. Now get busy on the transmitter shack 🙂 There’s always one right next to the “stick” as we call the tower. Think of a say 12×12 garden shed like size. Always on a concrete slab and I’ve only ever seen them made of brick, block, or stone. The buildings are small and are connected with a trunk of (normally black/grey) cables in protective sleeves.Thanks again. I think I’ll learn how to solder now. Amazing. Down will my old Lionel tower !
Yes you truly must have the patience of a saint. Off topic a bit, how do you get the red marker light to flash and how many volts do you use blah, blah, blah?
Someone help me please I am having electrical issues with these small bulbs.
Thanks in advance.
Rick.
Kim, I am interested in the LED signals you made. I have made them, but need the proper way toconnect to track. I want themto change each time you move in forward and then reverse. My layout is DCC.
You kind reply will be greatly appreciated.
Tom, Dallas, Ga. USA
Great work but beyond my skills. It looks really realistic Kim. Hope you show us your layout soon. Cheers Rossco, Adelaide South Australia
Have not tried it,but was thinking about using rails from unused(bad) track.Stripping the ties off you have either straight material,or depending what you are trying to make EVENLY curved pieces from old curve sections.Suppose I need to get off me backside and see what I can make with them.Steel track sections are already “weathered” steel because…well they are already steel HAHA.Let me know if anyone else gives this a try and what they came up with.Happy railroading
OH followup.My idea works with ANY scale,since your old track is already in scale.have at it and let me know any results
What a wonderful tower. Don’t know which time period you layout is but the last few towers that were erected in Omaha NE don’t have red winking lights but flashing strobe lights and are they bright. You might want to try for bright flashing LEDs. Just a thought. Saved your post for my Garden setup.
Hi everyone: Searched E-Bay for HO ladder material. Found Central Valley Steps and Ladder plastic material for $6.00 plus shipping. Take three pieces of long ladder material and glue them into a triangle and you have a nice tower for use as needed cut to scale length. .Put four pieces together and you have a nice looking steel bridge support. A lot less soldering
Ray, USA
Your work is amazing. Looking forward to your next post
Al, you asked for input on posting off-topic items.
Buddy, please, by all means … if/when you come across anything that captures your fancy because of its uniqueness or mystiqueness (is that even a word!), share it with your sizeable circle of friends. It doesn’t always have to involve trains. Besides, it’s your site … you go son!
Barry, great way to get a lot of landscape “relief” and still keep the layout flat and portable. The way you cut the banks down along the tracks gives a very realistic effect, the way tracks were actually cut down through hills to keep grades level. Your lakes are beautiful, also. You could really do something realistic in N scale this size. Let us know how it sells! Good luck with your enterprise.
Hello, your layout looks fantastic! I like the way you designed for easy storage, because I don’t have a lot of space. Thanks for the tip on the table.
Andy in Florida says;
Really neat video, what was the purpose of this exercise? Does anybody know the answer? How will he get out if he unloads the hopper? More odd videos anytime!