How to make inclines – it’s something we all wonder about at some point.
“Hi Al.
Just wanted to inspire others on how I made my inclines for my layout on a 6’x4’ board. Might be nothing new but here goes.
First I made a hot wire cutter out of scrap wood, nichrome wire and a 4.5 Volt rechargeable battery pack. I used this to cut the incline to the gradient I wanted.
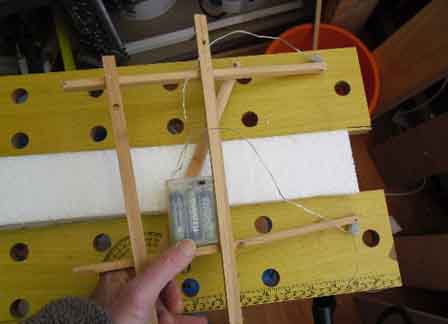
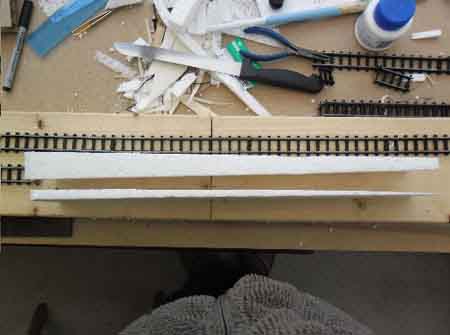
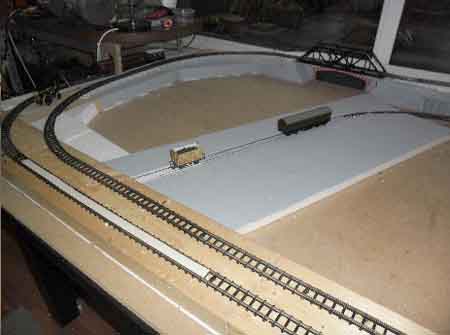
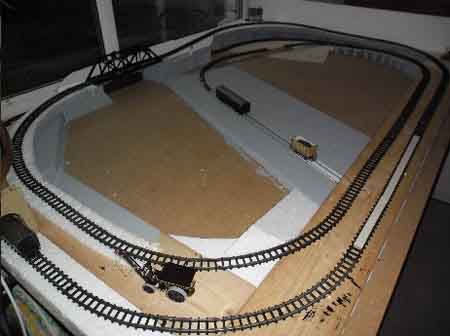
The result of the cut inclines.
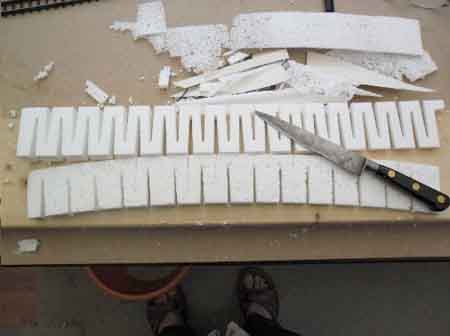
For the next step I used a woodlands scenic incline to act as the template for cutting the slots in my inclines. I use a sharp fillet knife as I’ve found it very good for cutting and shaping polystyrene. Note that wide slots only have to be cut on the inside of the radius. A simple cut is required on the outer radius
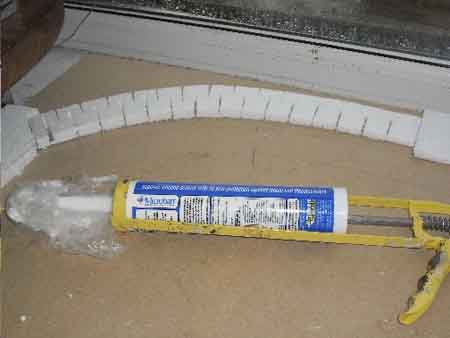
Finally I use silicone sealant to fix the incline in shape on the mdf board.
I used this process to create my layout on a 6’x4’ mdf board. The layout is basically a figure of 8 with the cross over placed to the rear. The two loops run side by side at the front at a height of 2”. The inclines to the crossover have a 1” rise and a 2” drop giving a 3” clearance with a rise gradient of 1:40. This doubles the length of track on a single controller and enables me to run two locos at a safe distance between them.
This is how to make inclines! I hope it helps with your layout.
My theme is steam on a 1930’s inland water way with barge dock and town. The photos show the finished base before the scenery covers it up.
Hope you like it.
Chris”

Thanks to Chris – a nice ‘how to’.
And when it comes to inclines, you’ll probably find Lawrence’s post very helpful too.
Bob’s incline post is also helpful when it comes working out what percentage of slope you can use.
That’s all for today folks.
Please do keep ’em coming.
And if you’re tired of everyone else having all the fun, the Beginner’s Guide is here.
Best
Al
PS Latest ebay cheat sheet is here.


Chris
Excellent stuff, thank you! Many of us will find that useful; I’m just starting to build inclines on my layout and your guidance is a great help.
Regards
Ian
Exmouth
its a good way to save a bit of money Chris , those inclines are a bit expensive , nice job
Thanks for reminding me that light-weight material can be used for inclines. I will use this idea to build the steep hill of my in-process San Francisco Street diorama on which I will be running my nearly completed Occre Cable car kit.
Hi Chris,
Great tips, great help. I will us this info for the inclines I am getting ready to add on my railroad.
Please send some pictures as progress continues.
Thanks …
Best regards,
now we wanna see the ‘finished’ product
Hi everyone.They sell locomotive sort of tyres or bands that help with traction.Dont have to put them on all the wheels .
Great idea, Chris
looks good.
nice tip i was thinking of putting an incline on my layout. keep the the progress coming.
Thanks Chris,
I enjoyed your how to build inclines as it made the process seem so much easier than I’ve been use to, as I’ve been using strips of cardbord and fibre resin. But I’m definately going too try your way, so thanks.
WHEN YOU GET IT FINISH PLEASE HAVE3 MORE PICTURES OF THE FINISHED LAYOUT.
nice job
Very helpful; this def going in my how to do folder
LOTS OF NICE INFO HERE THANKS FOR SHARING
Chris I like the idea and will try it
Thank
Nicely done! And that’s a real beaut of a filet knife too 🙂
Traction tyres can only be fitted on loco wheels that have the groove cut into the running surface of the wheel. If you try to put them on wheels with no groove, since the wheels taper slightly to the outside, the tyres will just work their way off and wrap themselves round the bearings or motion.
Personally, I think you’re better off without traction tyres, as they stop the wheels they’re fitted to from picking up power from the track. If your loco won’t pull the whole train up your hill, do what the real railroads do, either:-
use a bigger loco;
add a helper/banker engine to shove it up the grade; OR
split the train, leave half in a siding at the top, then go back down for the rest!
Much more fun and completely prototypical.
Rod
Woodland scenic foam inclines can often be found second hand and unused on eBay. Don’t buy their pins though, dress makers shops sell 2″ T pins which are exactly the same for half the price. PVA glue will stick the foam, never mind expensive glues and sealants. In the UK, the works sell big bottles of PVA for £3ukp.
I’d like instructions for making the jig that Chris used to set the incline angle, along with more detailed info on making the hot wire cutter.
I’m just getting ready to start my first layout and have been debating foam vs cookie cutter style.
can any one help me have two different brand of loco with two different types of couplers on them can you change these to one type so I can make all my trains and rail cars fit each other
I had been buying Styrofoam at the hobby shops. Very expensive. $5.00 for
a 3′ x 1′ x 1/2 inch. Went to Home depot and bought a 4′ x 8′ x 1/2″ Foam Insulation board for $7 and change. It has reflective tape on one side & clear plastic on the other. Leave it on until you’ve finished your Cuts. They will be cleaner. Then strip off the plastic & tape. it’s very easy. Save some money.
Thanks Chris
simple effective
Hello I’m making a layout at the minute I’m using wet floral blocks for the incline but I’m wondering how to pin the track down as this is to soft and keeps pulling the pins out
Did Chris ever provide more detailed instructions on how he made the jig for creating his own inclines? I understand how the cutter was made (awesome idea), but how is the guide for the inclines made? Thanks, and sorry if it was posted already and I just have not seen it.
Very informative. I have a related question re the 3% inclines I’m planning for an HO layout. Clearly this can’t be at the joint between tracks: I think it should be in the middle of a flexi-rail. But what’s the inimum (vertical) radius I should use for the transition from level to inclined sections? I.s. how much can I bend flexi-track in the vertical plane?
Building the jig:
First of all, the incline appears to be made from the white bubble type foam. I used the blue extruded stuff – it is more durable. As for the jig, it appears to be two long boards. Each board needs to be as long as the section of foam he is using. The foam is held so the cutter wire is flush with the foam at one end of the jig. The foam at the other end is the same height plus the degree of incline needed. To calculate incline, it is one inch of incline per 100 inches of length for each percent of incline. For example, a 2% incline would be 0 inches at one end, and 2 inches at 100 inches away. (That would also be 1 inch rise at 50 inches of run.)
As for the vertical radius at the start or end of an incline, do not worry about it. Just be sure the transition does not start where sections of rail join. The inherent rigidity of flex-track will allow a sufficiently smooth transition. I have one abrupt change to a 3% incline right at the junction of a turnout and even my 2-10-0 steamer does fine.
Keep on training,
Carl in Kansas
I have found that making the incline on a curve, simply make the slits on the outside of the incline. The slits should go most of the way across the foam. The foam will flex nicely, and there are only half as many slits to make.
Keep on training,
Carl in Kansas
Inclines – I just had another thought on transitioning to steep inclines. For a 3% incline, start with a foot of 1 1/2% incline, then go to the 3% incline.
Carl in Kansas
Would it not be better to make ‘v’ cuts on inside of curve and not have open slots on outside?
Further thought – Easy on straight rise – cover incline with 3 mm board (and felt if you like) to hold pins/nails AND smooth transition from flat to incline for track! For curve you may need to cut curved segments of 3 mm before attaching,
Thanks Chris, on the inchline. I seen this the first time you posted the info. Thanks again because I am making your inchline this time. HO is looking good also, thanks for sharing.
Thanks, SDG
On foam surface, smear a streak of Liquid Nails Foam for Projects calk down first. then your sub roadbed…a foam style can be used. Push your pins thru your track and down thru the smear streak which will hold the pins very firmly. also allows for easy removal of track if required. Go on Youtube and search for marklin of sweden for making a wire foam cutter. Note – a 2% incline is recommended which is 1 inch of rise every 50 inches of run. Make an incline by setting a laser level at this angle and stand your pieces of foam supports along this line. Cut to fit. Set your foam base on top of these supports. Allow for the thicknes of the foam base. Apply foam tack smear, subroadbed, and pin track thru all of it. 1 inch pins recinnebded with small heads on them to grab and pull out as required. Paint pin heads to match members..
a little light on details how you made your foam cutter. diagrams? pics of both sides? couple detail pics? shouldn’t have to tell people this stuff.
It’s a pity you don’t have a donate button! I’d without a doubt donate to this fantastic blog!
I guess for now i’ll settle for bookmarking and adding your RSS feed to my Google account.
I look forward to new updates and will share this blog with my Facebook
group. Talk soon!
Hi.
I want to tell you that I’m visiting this site foor some time and you post very good content.
I shared your last post on twitter and got
a lot oof positive feedbacks.
Hope you put new content soon.
Very useful tip. I had looked at those inclines from Woodland. I saved a ton of styrofoam from my move and the packing material of some of those bookcases I purchased. NOw I have a better way of using them
Just a general comment when working with smaller layouts when you need to give the illusion of larger ones. Put larger buildings in the foreground and smaller ones in the background, thereby “forcing” the perspective. It’s easy to do by simply printing out your buildings at a smaller percentage as you go further into the scene. Yes, the buildings won’t be “correct” relative to the train going by, but, most people won’t notice that, keying mostly on similar buildings being smaller. “Forced perspective” was used to make Snow White’s castle appear larger than it is in Disneyland, Disneyworld, etc.
great how to inclines need to right and cheap. thanks for sharing.
How do i make a small two circle helx and what’s the hiegh in inghs. ahd do you make a boxes tablewith out a top ?
Nice job Chris, I wish this post was here 2 months ago! Would have saved a bit of coin . I would love to see progress shots! Thanks.
Bill
Thanks for the pictures. I am interested to learn more about the hot wire cutter. It appears simple to make. Can you show it in use?
Great site. Every time I come and look there is something new to learn. This post on making inclines from styrofoam was excellent, educational. .
@Raymond Halling,
If you can hang in there a couple weeks, I am currently building two helixes for my new N scale layout using a different construction method. I’m planning on writing it up once the first one is done. Once you understand that a helix is just a long incline curled up into a stack of loops,you will be able to any and all needed calculations (not really that difficult, uses old style high school algebra and geometry) to design a helix that fits any need. If even that is too complex I’ll provide the basic steps to follow in using a calculator to do the hard work. You will just need to know a few measurements pertaining to your particular layout.
great article on inclines!
very nice. informative.