The comments on Barry’s model train rocks (Barry’s rock formations) came in thick and fast – so I asked Barry if he’d be kind enough to share with us how he does them:
“Al,
I’ve been trying to get this tutorial done so I can send it to you to hopefully explain how I do my rock formations that apparently look quite real.
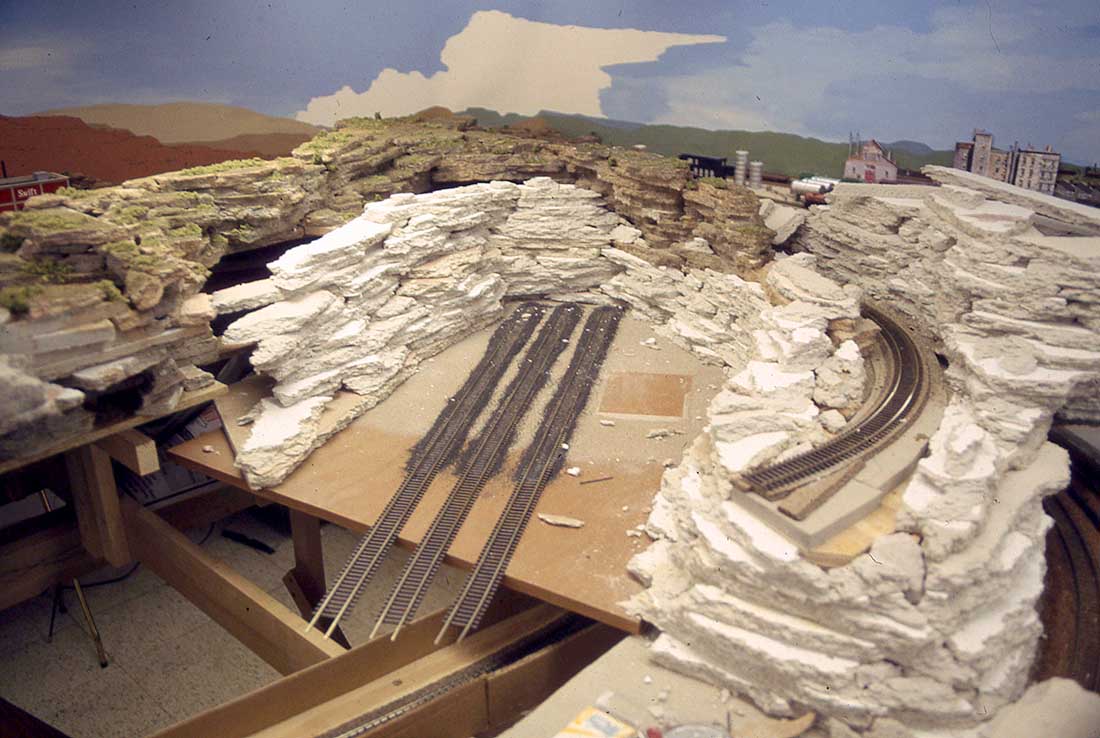
1) Build the supporting structure that will eventually be covered.

2) Stuff with crumpled up newspaper to achieve the formation desired.

3) Cover with plastercloth or plaster soaked cheese cloth.

4) As the they are drying use your fingers to shape the effect desired.
5) Create rocks from rubber plaster molds and apply suitable castings to the face of the plaster formation with a hot melt glue gun and then fill in around it with plaster-of-paris.

6) Then paint with acrylic latex paints from a crafts store. I prefer the lighter colors to make the layout look brighter. I use a tan for the entire base coat, then a burnt umber for the highlights with an occasional darker brown for a deep crevice or crack. It takes some practice but it’s not difficult to get a good realistic result.

7) I sprinkle my various colors of grass(comes in plastic containers from the hobby store).

8) Finally glue clump foliage on for shrubs, drill appropriate holes for telephone poles and trees you can see the final results.

(Press play on the last one to see the video).
Regards,
Barry”
A big thanks to Barry for sharing his model train rocks!
It reminds me of Dan’s post, which you is also really good when it comes to making rocks, cliffs and roads:
And for some more gems, just read the comments below!
That’s all for this time folks.
Please do keep ’em coming.
Don’t forget there’s more tips and ‘how-to’ stuff here.
Best
Al
PS If HO scale is your thing, there are lots of HO scale train layouts here.


Hello,
How do you make water scenes?
Well shown Barry, god job done
Very well done, thanks
Excellent, realistic and most important everything around the layout so neat and tidy. I’m impressed with the rocks, but I was wondering If Barry could let us know how he achieved such straight and tidy lines down the centre of his roads. Keep up the good work.
Hello from down under in NZ,
process very simple and very effective thanks well done appreciate tips
Great job on all your scenery! Does the train on your “Upper Track” have the ability to come down to the lower and vice versa? I may have missed that in your previous photos.
Thanks
Hi From South Africa
Great track design, to keep those wandering little fingers off the scenery I also like the modern fresh colors. Well done
Thanks to both you Al and Barry.
This is by far, a very impressive layout. I enjoy each time you display this work and explain how it was created. I hope that you continue to promote all aspects of the layout. It is a terrific learning experience!
What a nice job. The layout looks great.
Always like to read the tips and save them in a file for future reference.
John R USA
This arrived just in time.I was planing to start making my rock’s etc,tomorrow thanks alot Barry
Mike.
I’m 81 years old and been out of modeling for too many years. Decided to get back into it and build a small platform (no space basement). Love your hints, shortcuts and artistic results. Well done.
Really realistic,the subtle colouring of those rocks really looks good,thank you for preparing this on our behalf.
Barry.
Thanks for sharing your techniques. Looks excellent.
well done,a very good looking layout.
Really effective, I better go and get started or nothing will happen. Only dust grows wild on a model layout.
Cheers
Ralph
Al.
The How Too tips for building rock formations and boulders are fantastic and are great for those who are talented enough to accomplish a realistic look. However, I have found that the easiest way to make rocks and boulders that look as real as real can be, is to have someone else make them. You see I have a partner who helps me with the construction of my layout. He has been creating things like trees, rocks and dirt for years and is very good at it. His name is GOD. I simply take a walk in the country and pick up whatever He has made for me. The peaceful walk in the country also affords me the opportunity to talk with Him at which time He gives me fantastic ideas for OUR layout. He sometimes has already built a prototype which He displays before me. For those of us that are not as talented as others I suggest, get help. I prefer to go with the pro.
With Him, “We” can accomplish much, without Him, “I” can do nothing.
Happy Railroading and God Bless,
Richard, USA
Great ideas for rock formations. I would also like to know your method for building good looking roads. I am thinking of using peel& stick floor tiles (grey) & appyling tape or painting lines.
A-OK AND IM 70 AND BEN OUT OF LAYOUT FOR 30+YEARS BUT HAVE A LOT OF CAR AROUND 75+ AND LOC 25-30 AND NOW RETIRED SO I`M THANKING ABOUT BUILDING A LAYOUT AND THE HENTS ARE GREAT AND WITH GOD AND YOUR HELP IT WILL BE GOOD TO GET BACK IN IT . THANKS VERY MUCH.- PHIL
It sounds very simple, but when I start to do it, it suddenly becomes a complex project. Keep up the good work. With the cost of materials now a days, any “home-made” ideas is a great help, so keep them coming!
I have another question from Alabama, in the good ol’ USA! What scale, and how wide and long is the layout? Thanks!
I love the way your landscape turned out. I am going a totally different way, I am using foam from sofa cushions. I sat the foam on my 4’X8′ layout and then I cut it with a bread knife to shape it somewhat. Next I am going to take plaster that is watered down a little and apply it with a paint brush. I am taking pictures as I am going along and if there is an interest in them I will post them. If it turns out ofcource. lol. No, I will post them no matter what, if we can’t own up to our mistakes, we have no need in even trying. lol
Well, keep on trackin. Jim S.
Cracking layout
really great workmanship
Remember, there are several geological types of rock and they are typical to various regions just as are commercial activities. What I mean by this is that in the iron mining areas of upper Michigan, you find solid ignias rock. This stuff is well recreated with crumpled newspaper However, were a model railroad to be set in coal country or if the mainline transverses some parts of Wisconsin where the rock structure is sedimentary, I would recommend using tree bark. If you look at chunks of it from the edge of each piece, it is constructed in layers and it makes a good replication of sedimentary rock. Even the color is right. The problem is to assemble large sections in a way that hides the glue. It can become a little bulky but it isn’t very heavy.
I agree with Richard Maxwell! I try to use what I can find outside that God has provided, such as twigs for fallen timber or logs and small stones for boulders, etc…. I even use twigs for my tree trunks, no painting requied 🙂
what a splended lay-out
Looks great Barry,
Thanks
1 question though,
How do you clear a derailment inside your tunnels ?
We fill in such a lot of space with foam, scrunched up newspaper, polystyrene tiles etc., but that’s useful space! Cut a hand access hole in the profile board, do your scenery as a thinner skin over a framework of card strips, for instance, and you have a handy little hidey-hole within for all the stuff that comes with a model railway – track cleaning rubbers, spare couplings, coffee cup etc. When I was finishing the scenics on mine, I was really stuck for anywhere to put down the tools and materials where I wouldn’t tread on them or knock them over.
Rod
Hi from Australia. Great work on all the tips, obvious to see they are all considered and given in the spirit of friendship. My tips to recreate different types of rock
* limestone outcrops can be recreated with bits of pumice I find on the beach near home, make for fantastic caves and convuluted landscapes my son had great delight in making figurine ‘cave rescue teams’ for
* sedimentary rocks like sandstone can be mimicked with thicker tree barks laid side on with subtle painting to highlight the strata
* igneous rocks like granites and basalt can be found in little bags in hardware stores for using as mulch around pot plants. Also, for a smoother looking finish granite then the laminate bench top sample cards at the hardware store look great, or even the off cuts from our recent Laminex bench top in our kitchen renovation. Similarly, I use paint sample chips to make walls of small buildings, advertising signs etc
* natural cork looks great in sheets, but hard to get and can be pricey (especially this end of the world!). Old wine bottle corks torn apart make great looking loose rocks/scree
* the best was a lava flow my son made by putting some powdered pigment in some silastic gap filler and simply extruding it with a caulking gun (he is 8!). Not sure how many HO layouts really need a lava flow, but between that and his cave rescue guys we have a layout bordering on a natural disaster zone!
Thanks Barry. I’ve been struggling over how to create a cliff beside my harbour feature as opposed to just putting in a slope with grass. I’ll use your suggestions.
Thanks again
Syd
Too much hassle, although they look good. I use real rock. Also, for my track ballast I took a piece of shale and smashed it up into tiny pieces with a hammer. Go all natural!
This is a beautiful layout. Would love to see the plan if you might share it with me. Thank you very much.
A special thank you for sharing your techniques. You are getting excellent results. I live on the Canadian Shield where the rocks are nearly 4 billion years old so I enjoy using real ones on my layout and impressing the kids with their age. They also enjoy collecting rocks to use on the layout, I hope it’s educational as well as fun.
I want to put in a hidden tunnel in a new layout which is hard to do with real rocks so I will be using your technique for this. Thanks again.
like your layouts iam in process of making one,but space is small….
Very nice! I plan to use some of your tips on my layout. I like natural but right now there is about 30 inches of snow pack in my region of Maine. Thank you for sharing and that you Al for posting.
I would like to build an above the windows and door around the room O gauge layout. If anyone would have photos or suggestions I would greatly appreciate it. The reason for the layout is because the room is small. Much Thanks.
Excellent info.
Nicely done.
Thank you for sharing, Barry. It’s a beautiful layout.
Thank you Barry!!!
My wife had orthotic inserts done some years back. They wrapped her feet in plaster cloth. There was always extra pieces left over.
The assistant started saving them for me. I ended up with a plstic shopping bag full.
I made tunnels with them in nscale by laying the over a caulk tube that goes in the gun. Once it harded, TUNNEL!
Great stuff to work with. Light weight and strong.
Great looking job. Thanks for sharing.
Very nice layout and scenery. I am trying to plan a wide but not too deep layout and would be interested in seeing the track plan for this layout.
Thanks, Matt
I’m new to RxR. Looks super thanks.
Hello Barry,
Your effort is ashtonishing and demonstrates the magic of visualisation and far sight. It’s an excellent piece of work which will certainly encourage the BIGINNERS. I am one of them. No work is impossible, once you are committed to it. Love you,
Till then,
GOPAL DAGA / CALCUTTA, INDIA
Hello Barry. Great job You made it sound easy. Looks GREAT ,TOO
Thanks, BILL
Nice looking layout!
Can’t wait to get going on my On30 Modules.
Nice layout you did a very nice job.
This is nice
Really great love your ideas thanks so much
regards
jp from arkansas
It’s so impressive to witness Barry’s talent displayed in easy steps for all model railroading hobbyist to follow. A big thanks to you for sharing your creative art.
great how to. your layout looks really good. nice to see trains running. thanks for sharing.
Love the long run,just what i want to do in my man cave /tv room.Wife wants me out of 2 part living room,lol ,only problem is ( re-situate/ locate my two golf bags full of clubs 50” TV , computer,printer ,Key board ,2 guitars 10 folding metal chairs,Recliner and corner book shelf / photo albums. HELP!
Thank you for taking the time to make a great video and sharing it with us. The crumpled newspaper before and after plaster and paint is a great motivator for those of us having trouble moving on to the next step. I would also like to see your track plan to get ideas about elevations and turn radius.
Barry nice work on the layout, keep it up. I’m 63 and for the past year I’ve been working on my layout and became pretty good with rocks and walls. Wiring is where I need to improve!
Wow, Barry That Lay Out is Impressive. How Did You Come up With Your Lay Out And How Long Did it Take For You Build.
Amazing. After church I’m headed to the Amaco to gas up and get a Grape ne-hi belly washer. I am truly inspired by your work and look forward to one day posting.
Lots of helpful ideas. Great layout. Would like to see more and a track plan
Barry……what a terrific layout you built utilizing the space that you had. Great rocks, great scenery and great tips. Very impressed.
Wow! Looks awesome. At 71 years of age, I have decided to get into the hobby. I appreciate learning from some talented people.