If you’ve ever wondered how to weather your model trains, Eric has sent in this fabulous ‘how to’.
Some of you may remember the wonderful pictures Eric sent in some time ago of his ‘weathered’ trains.
Hope you like it as much as I did.
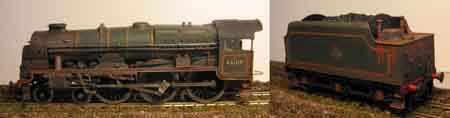
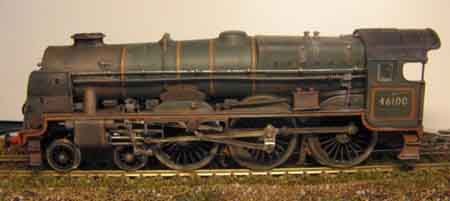
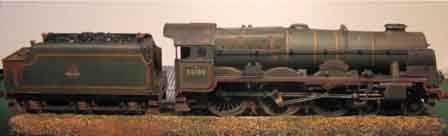
“For this third instalment in my series about weathering, I’ll explain how I weathered my « Royal Scot » , composed of my 2-3-0 green BR steam engine « Royal Scot » (Airfix) and two ex-LMS coaches from Märklin (taken from a « Hogwarts Express » train set, best known as the « Harry Potter Train »).
For those who does not know about the story, the “Harry Potter” train is in fact a well-known train that rides for tourists and train fans: the “Jacobite”, riding the Scottish rails between Fort William and Mallaigh on the line from Glasgow to the Isle of Skye, and where you’ll find the famous (or now infamous) Glenn Finann Viaduct (the curved concrete viaduct seen in the Harry Potter movies).
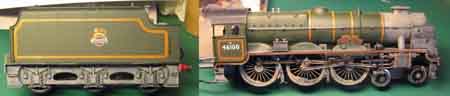
You’ll see here below the Airfix locomotive and the two Märklin coaches (OO Scale).

I wanted to depict a train riding in the late 60’s, at the end of the steam era in the Scottish Highlands, on a train from London to Skye on the old LMS lines…
The first step was to disassemble the body of the Tender from its chassis and, then, cut the wires connecting the engine to the motor in the tender (I’ll later install a small connector and a DCC decoder).
Once the engine and the tender separated, I start by brushing a coat of « Dirt » paint (8 parts of “Black Glaze” for one of “Smoke”, three of “Dark Flesh”, one of “Glossy Black” and five of “foundation White).
This mix is drybrushed on the chassis, wheels, and even on the front of the locomotive’s body (the part in black) and the steam deflectors (the Elephant Ears, as we call them) without forgetting the cab’s roof.
Then I prepare a mix of « Dark Green » with a bit of my « Dirt » mix to lighten and tone it down before brushing a wash of this mix on the green parts of the locomotive and tender bodies.
The first layer wiped dry with a sponge, the next ones brushed dry with a Filbert brush, as a “Glacis” in artistic painting.
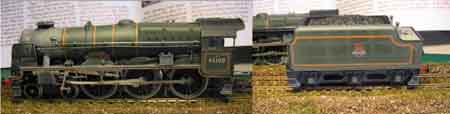
After this, I prepare my « Grime » mix (one part of « Smoke » for three of « Black Glaze ») that I brush as a « Glacis » lightly diluted on all the areas first weathered with the « Dirt » mix.
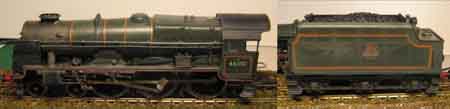
Then I prepare my own « Rust » mix, composed of three parts of « Cavalry Brown » for one of « Burnt Umber » or of « Chocolate Brown ».
I then drybrush this mix on the locomotive’s and tender’s bodies, and also on the tender’s chassis.
As you can see, the trick with how to weather model trains is lots of dry brush work.
The Locomotive’s chassis also receive a drybrush of “Rust”, but not as heavy as on the other parts, and I mostly concentrate on the front buffers, the footsteps and some other parts of the chassis.
I then prepare some « fresh Rust » (one part of « Smoke » for three of « Cavalry Brown ») and highlight some of my previous rust application spots and also apply some « rust leaks » on the tender where water spills from the tank when loading or near some steam valves.
The leaks are applied with a round brush and for this diluted at a ratio of one part of paint for two parts of water.
I prepare next a mix of one part of « Black Glaze » for one part of « Foundation White ».
I brush it very lightly with a small round brush near the water tank and the valves to represent lime streaks where there are some water or steam leaks.
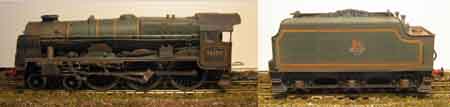
The last step is to apply a « control coat » of « Grimmy Black ».
I prepare a wash of “Black Glaze” diluted at a ratio of one part of “Black Glaze” for three of water, and brush a liberal coat of it on the entirety of the engine and the tender, being thorough especially on the wheels and the driving rods.
The last steps of the « detailing » would be first a drybrush of light grey (mix of « Black Glaze » and « Foundation White ») to highlight the details on the inside of the cab, then a brush of « Glossy Black » on the tender’s coal load to make it look more realistic, and finally applying some of this « Glossy Black » on the handrails and tubes on the engine’s body and also on the buffers (greasiest parts).
The last thing to do then will be to reconnect the locomotive to its tender and put it on the tracks to admire the final result.
Just amazing. A big thank you to Eric for sharing how to weather model trains. He’s also done a ‘how to’ on the carriages and the people, which I shall mail next time.
Comments still coming in thick and fast on the ‘ebay cheat sheet‘. They are all appreciated. Thank you.
Best
Al


Very realistic looking wear and tear. I have a few locos that will benefit from that treatment but I will need to go on pilgrimage to a mountain hideaway and meditate for a week before I can get myself to do that to my lovely new shiny motive power.
Cheers
Ralph
Very impressive results – and photography. Weathered loco power and rolling stock always looks best. I will give this a try for my trains and my vehicles. Thanks. D/
Very impressive results – and photography. Weathered loco power and rolling stock always looks best. I will give this a try for my trains and my vehicles. Thanks. D/
nice job you have done there
Very nice work. I wish the pictures were bigger, though.
So beautiful and so different from our Canadian steam. I’ve always admired the U.K. steam engines. Thanks
lovely photos
great work, steps are great, a hard working train look, will be a while before i can do that to a train,but its in the folder for later on.
Very informative. Will be useful when I get around to this myself. Thanks
Looks very realistic.
very nice job love it jeff.
Great Job plus thanks for supplying the Tip Sheet on how you pulled this amazing look off, as it makes the whole thing more acheivable so again thanks from all who will use your method in the future.
I DONT KNOW IF I WOULD LIKE OLD LOOKING STUFF.
Thanks a lot for all your comments. As you seem to like it, I’ll send other “Tutorials” to Al so that he can post them here.
Thanks again,
Eric.
really good finish
Eric you’ve done a wonderful job on that “loco” ( Chuckled because over here it’s a 4-6-0 )
Very nice, really, you should show a step by step video of this awesome technique…… Thanks
What brand of paint r u using? Btw very nice job.
In Canada and the states most boxcars are covered in graffiti. Has anyone attempted to do this to their boxcars?
great weathering how to thanks again would like to no if ther is any feedback onryans graffiti/tags detailing as i stay near a line that has hoppers being hauled to and fro tags somtimes cover 5/10 waggons some artistic some vandalism hope somone else picks up on this and can give ryan in canada and me in scotland some artistic tips in hope tony
Never noticed how the crest was off-centre on Scot tenders before. Nice weathering job,
Re the comment about grafitti, it’s practically everywhere now, Holland, France, Italy, even Switzerland. I do notice quite a bit in Italy is in English, I don’t think we have lots of English taggers holidaying there, I think it’s just that something often sounds a bit more ‘clever’ if written in ‘foreign’.
Again, this is the help that people like me can only wonder at. Great job!
I was also taken by the casual way the author mentioned taking the tender off, fixing a coupling and fitting a decoder.
WOW! I would like to hear more about that. All the websites I have seen seem to assume that we ( the reader) has some knowledge of what is being described. I certainly do not. I have an Airfix Praire from some years ago and would love to fit a decoder but dare not even start to think about it as I have no real idea about the process. Can anyone help? I am looking for a course to go on but some help beforehand would be appreciated.
What is drybrushing? How do you do it? I’ve read it mentioned in several articles, but all I know of painting is to stick a dry brush in some wet paint, then apply the paint to a surface.
Thanks,
Keith
What a terrific effect Eric. Thanks for the tutorial on how to achieve such a great result. Will give it a go, weathering certainly adds realism to a layout. Found the abandoned trains interesting, thanks Al.
David
Great stuff, thanks
Enjoyed Eric’s locomotive weathering tutorial. Are the materials used, special weathering paints/powders or a selection of normal modelling paints if the latter what brand?
Terrific work. Looks wonderful, but could not the process itself be simplified? What bit(s) do you add a plate between loco cab floor and tender floor that allows loco to corner? And the side openings; something to ward off the drafts?
As for early UK loco numbering, I think 4-6-0 rather that 2-3-0 was adopted the world over quite quickly. But complications with complex, articulated compound locos arose. I expect lots of keen readers will respond with details which we can look forward to studying although a quick glance at Google shows it has masses of stuff on the subject.
At least with Covid, our hobby allows us to putter indoors. Good health in 2022 and cheers to all, Mike.