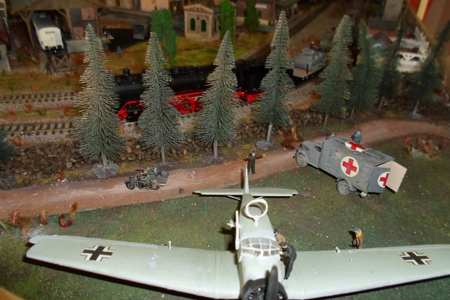
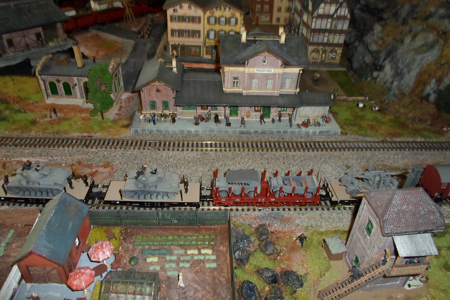
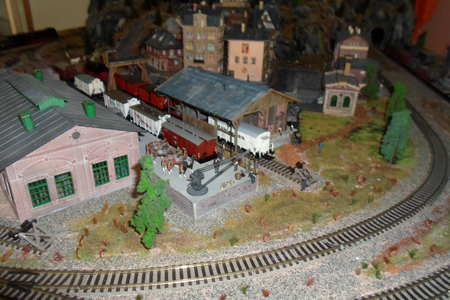
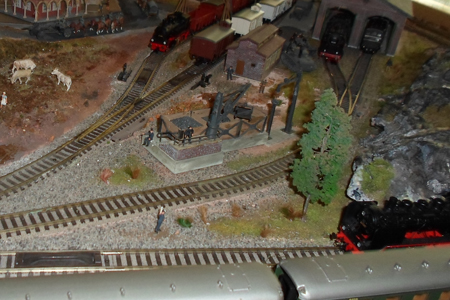
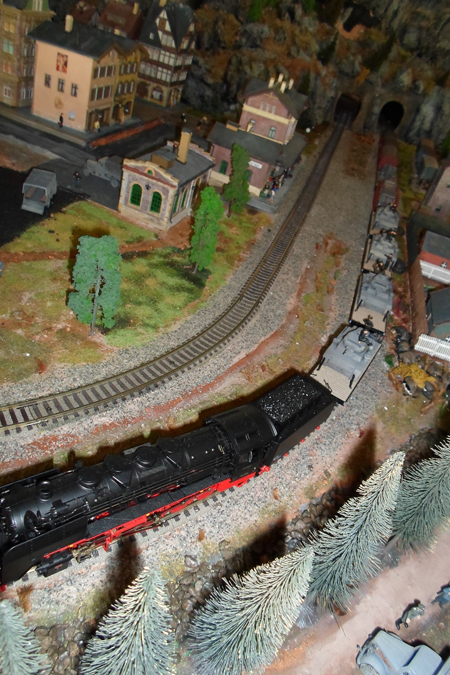
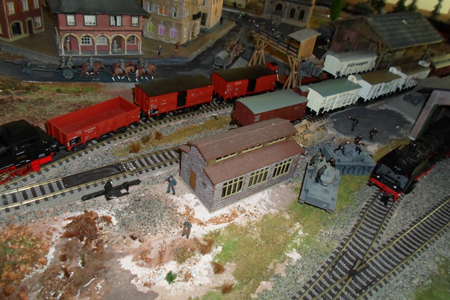
Paul’s been in touch with his Military model train layout:
“Hi Al
Following on from an earlier lay out on your email, attached is another attempt at incorporating a military element.
The lay out represents the period around 1939-41 in Germany and combines military with civilian operations.
The town Fraustadt (in the then West Posen Province) exists but my layout is entirely fictitious.
The tanks are mark IIIs of First Panzer Division. It is still very much a work in progress.
regards
Paul”

I have no idea why I like the military model train layouts so much – but I do!
Next is a ‘how-to’ sent in from Toni. There were lots of comments on Arnie’s layout, in particular the fire scene. Here’s what Toni sent.
“For the people who inquired about the burning building. You can create a similar building using a multi-floor building. Materials needed: one multi-floor hotel or office building model and about three or more electronic candles.
step 1) Assemble building and paint per instructions except for the floor(s) the you want engulfed in fire, and the floors above that if you plan on a huge fire.
Step 2) After the painted building is dry, add dark soot colored weathering material to the top of the windows, on the floor that is to be burning, with upward strokes using a wide brush.
Step 3) Paint the inside of the building, on the floor that is burning, a medium shade of grey. This will help to darken the room’s interior. You do not want it to be black. The grey helps to reflect the flicker of the electronic candles.
Step 4) If possible take the electronic candle circuits out of their casings.
Step 5) Disconnect the LEDs from their flickering circuit boards. Remember to mark which leads went to what pads on the boards. Attach long wires to the LED’s leads and connect the other wire ends back to the circuit boards. Remember the LED’s polarity.
Step 6) If the candles have On-Off switches, disconnect them and solder longer wires to the circuit boards and the wire’s other end to a switch that you perfer to use and connect that switch to your control panel or an unseen location on the building model. If you are using more than one candle, be sure to wire the them in parallel to the one power switch.
Step 7) Now secure the candle’s LED to the inside of the room that is to be burning. If using more than one candle per room, do not group them together. Secure the LEDs in different places in the room. You want it to look as if there are multiple flame locations in the room.
Step 7) Figure where your fire fighting models are to be and color the areas under and around the models to look wet. Remember that street asphalt and sidewalks will be a few shades darker when wet.
Step 8) Locate your fire equipment models for action.
Step 9) Step back and admire your work and bask in the ahhs and wows from your family and friends.
Side note:
I am retiring an old microwave and hand blender from kitchen use. The microwave will now be used for drying scenic material and the hand blender will be used for pulverizing the dried scenic material for spreading on my layout.
Toni”
A big thanks to Toni and Paul.
That’s all for today folks.
Please do keep ’em coming.
And don’t forget the Beginner’s Guide, if today is the day you start your railroad adventure.
Best
Al
PS Latest ebay cheat sheet is here.


Very nice indeed.
hi i am thinking of doing a winter scene for my oo gauge railway is it possible to use snow spray and cover with pva glue to protect it? if you have a better or easier idea that would be great thanks gordon ps i am in the uk
“Nazis! I hate Nazis!!” ………Indiana Jones ;o) Kidding aside, it’s a really cool layout. Well done!
Hey Toni, Thanks for a really great idea. Was wondering how to get that
little extra flicker and your, how to, hit it perectly. Thanks
And, Thanks to Al for this great site.
I have used the spray snow flock and when I needed to remove it .. well lets just say I wish I never used it. Woodland scenic has a far better product for that now days.
Following from Jeff it just needs a few Mosquitoes and Typhoons flying overhead : )
And nice ;layout by the way
Just another idea for a painting tool. I recently parted out a microwave oven that had ‘expired’ and kept the motor which turns the interior glass plate, and the plastic ‘spider’ with the wheels upon which the plate rides. I made a box using 1/2″ plywood, 11 1/2″ square which rests on sides that are 2 1/2″ wide x 11 1/2″ long. All ends are mitered for appearance. Drill a hole in the exact center of the square piece, in my case 5/8 ” diameter. Mount the motor on the underside of the piece with 1/2″ sheet metal screws with two small washers to prevent the screw tips from penetrating the top. I then gave the whole thing four coats of aerosol laquer spray to keep the wood clean, and also provide a smooth, hard surface for the ‘spider’ wheels to roll. The addition of a long shanked SPST toggle switch and a short power cord, a re-purposed six foot extension cord, and you have a turntable for painting that turns at approximately 6 RPM and stops dead when the switch is turned off.
Need the add that ‘Big Bertha’ to a flat car for your fine layout!
VERY VERY NICE
I like it, What about a railway set in Germany in 1945, The russians coming from the East & the British and the Yanks coming from the West.
In between the Germans forces retreating.?
Hi , what scale are the tanks? I made some white metal Challengers in N gge but they are very heavy , I suppose like the real thing, and I can only pull 4 at a time. Also can we see a close up of your tank transporter wagons? are they low loaders?
Good to see so much variety & innovation. I have seen a few pre-D Day models, but never one from the Axis side. Danke !, D/
Hi Duncan. The panzers are HO from Roco so are quite light. The aircraft area are all 1:72 so there is a mixing of scale – the 1:72 scale area is separated from the rest and is at the front. Will send through a photo of the panzer transporter- all Roco with different serials. I guess they are low loaders.
PLEASE SIR CAN I HAVE SOME MORE ”PICS” I just am gaga for military railroad scenes – not too many out there – Would love to know where and if there are more pics of this stunning layout to be seen ?
Loved the great article on the fire scene – definitely will be using that in some of my builds – was trying to figure out how to simulate burning in a Bunker – Now have the answer – This can also relfect gunfire flashes – very nice
All your articles of of great interest – Keep up the good work – I know it is loads of Hard work and love’s Labor but always remember there are thousands of us out there that truly appreciate this.
Thank you Al, for printing my “Tips” and “How to articles.”
For Gordon Scott,
I do believe that a better choice would be to use a thin layer of white plaster and a layer of diluted white glue sprayed on the plaster.
Having to remove the spray-on snow can be a gooey mess. while removing the plaster is easier by chipping at it and vacuuming the plaster up, or you can just leave it and paint over it with other seasonal colors and replant foliage.
Nice job Paul of providing so much content into a small layout. The military theme seems to have always held some favor among model railroad modelers.
Oh, and I want to give a big thanks to Toni for providing readers with a step-by-step on how to model a burning building of the type that was recently shown by Al of my N scale SV&GS Railway.
Very nice place you have, the open timber buildings are quite nice! I’m doing a N scale 1935-1945 American Army Post/Fort layout. I served seven years, 1970-1977 in the Army.
What’s Taking place i am new to this, I stumbled upon this I have found It positively helpful and it has helped me out loads. I’m hoping to contribute & aid other users like its aided me. Great job.
HI Toni, any chance you could include some photos of the LED candel conversion please
Mark
nice military layout , for those who are modeling N-scale like me I used micro machine military magnifiers for my military train , they the perfect size for n-scale , I have flat bed cars w/ tanks trucks and jeeps and painted my flat bed cars camoflosh colors, and painted ( 2 ) engines to match , and bought some US Army box cars & a caboose
A nice throwback to the WW2 days very outstanding
Nice job . Just remember All the german people were not Nazi’s. There were millions of German people were hurt by the entire WW 2. . Germans survived as they have done for hundreds of years. Germany was like the Phoenix and arose from the ashes . She is one of our good friends today .The war was h*** for all sides .Its good to see this model and perhaps some one will think more of the history behind it and what it all meant . Perhaps a small cemetery with the flags of the UK, Germany and America could be placed some where so those departed souls resting can watch the passing trains .
very imaginative, and creative it just needs more led lighting,
I’m also very interested in building a military model layout (HO) only mine will be a period of the American Civil War (1861-1865). Personally, I do not understand the popular fascination with the Nazi military.
Lou
Very unusual setting – really enjoyed the photos, would like to see a video of your layout.
Snow scene.
Use white sand (silica) sold at some hardware stores in 50 lbs. bags,
If you want to keep the sand from bleeding into surrounding scene, you’ll want to use white latex paint mixed with warm water. A glob of white paint and 16 oz. of warm water mixed with a paint brush. Painted water (white) is ready for the white sand to be poured into the painted water. Keep pouring the sand into the paint/water mix until all the liquid has saturated the sand.
Dump the painted sand onto a sheet of aluminum foil to let dry. You can chop the damp sand with a ruler size piece of wood every day or so until the sand if dry. Then shift it through an old window screen. Place the painted sand into a one gallon size kitchen bag and leave the top open so any of the sand that remains damp may dry.
I am just transitioning from collector to operator. I am working on a small layout 5X8, not much room in the house for anything bigger. I have been collecting Marklin HO for years and I have quite a collection of European, mostly DB German RR and cars, but Marklin did and still are producing USA Engines and rail cars. Since It’s what you want it to be in your own RR world I am going to run USA and European Engines and cars at the same time. Why not, it’s my world right. In any event it’s all good, Love model railroading any way I can I can get it. I like Marklin for the Quality and many years ago I was introduced to the company by Robert Monaghan, Bob;s Big Boy’s toys in Philadelphia,PA. I became pretty good friends with Bob, who has since passed and hence my love of his favorite brand, Marklin. Looks like some Marklin stuff in the military layout depicted in this email. I only model USA buildings etc. on my layout itself though.
If you look on Ebay there ARE 1/87th scale war planes.Not many,but I have seen Messers which would be closer to your scale if you choose to check those out.I have seen a few others,some are in klit form,others are pre-built but with a little effort can be painted anyway you see fit
That’s quite an amazing layout you have there. I have enjoyed seeing the photos of your layout. I like the tanks and the medical transport. I saw that you had horses up on the platform next to several of the railroad cars I hadn’t thought about putting them that close to the train but very realistic. Thank you for sharing
Hello Al. Thank you for all the info you have put up and to all the readers that send it to you.
Yes I would like to know if Paul would send or post the info on the wagons he used for the german tanks. I too have a military theme in my lay out. It is just a stage area so far, with a train of both with 2 artillery guns and troop wagons so far.
Keep up the good work and happy training to you all. Danny WA
Hello Al:
What a fantastic layout!
I have recently watch Nazi Mega structures on Netflix and learned of how important the rails were in WW2.
The Germans were producing 300 plus new steam engines per month.
2 of the rail coaches of Hitlers train still servive today.
Also many abandoned rail structures still exist as reminders of this moment in history.
Hitler’s Rischbond. The 2/10/0’s they were making 300 per month.
Biggest operation in Germany. They changed the gage in Russia, from 5’ to 4’ 6”.
9300 miles to supply the invasion.
I do reply to some but I don’t know where it goes not on the list above for some reason. great photos and how tos thanks for sharing.
I’m not alone.
Years ago had problem deciding how to create large areas of board space on a tiny budget. Already had a mountain, pasture land and lake. All rather boring.
Then it hit me. Air force base !!! Hangers (one style repeated four times) a tower, flashing beacon light and HO scale airplanes from an old military war board game. Over time the air base grew to include a commercial airport. Naturally everything required rail traffic. Freight to Air Base and commuter train to commercial airport.
What started as temporary filler on board was integrated into my railroad community.
Joe in Nashville
Running HO Varney and Trix engines and rolling stock
Love the military layout, Paul! And Toni, what a great set of tips for burning building. Have to incorporate that in a diorama some day.
@Gordon Scott – unfortunately that method of snow will not work – it will be neither convincing nor permanent. There are commercial products available to model ice – Woodland Scenics modeling paste and ice crystals are possibly the most reasonably priced. However if you really want to be original, try using scalptamold /good paper mache and then just use bleached titanium white paint – with a bit of practice you might get some great results. If your need is temporary, then baking soda can be of great help – but don’t think of it as long term because it will turn yellow over time.
Cheers!
Kaustav
great idea for a layout
I had a very similar layout. Unfortunately I had to remove it for family space reasons. I have several prints and books left over about German rail stuff. If you are interested please contact me. Very nice layout!!
Bob
Al; Thank you so very much for all your e-mails. Next month I will be 76 years young. Working on my first HO layout. Themed Old West, Gold mine town.
A couple of weeks ago you sent an e-mail out with a Mountain & 2 mine shafts on the sides. If you can, If you can remember where you got it from Would you PLEASE send it to me??? I thought I printed it out but can’t find it.
I have been in lockdown for 11 months now. Only going out to replace food as needed. PLEASE help me with this matter as fast as you can.
Thank you. Stay Well & Be Safe.
Gary in Las Vegas,NV
Military Theme – I too am starting my 3rd road with the WWII theme (the Over There RR Line) – the pictured layout is great – good tips – my problem right now is finding the Ferdinand Foch’s Railway Car and although they say they are 1:87 scale tanks the sizes for the same tanks very – any suggestions
The military L\o – a good segue into the following article. Roaders are always looking for something to make their L/o interesting. How about a water trough (British terminology), or track pan – sometimes called track tanks – (American terminology?
Taking Water On The Fly
Steam locomotives had a great thrust for water. In the early days of the railroading when schedules were more casual and division points were smaller, frequent stops for water posed no great problem. But when speed became paramount and runs became longer, frequent stops for water became problematic, especially when intense competition existed between two railroads. The solution was to devise a method for moving trains to take water at speed.
In 1860 the London & North Western Railway developed the first water trough (British terminology), or track pan – sometimes called track tanks – (American terminology), a device to enable a steam locomotive to replenish its water supply while in motion. It was a long trough filled with water, lying between the rails. When a steam locomotive passed over the trough, a water scoop was lowered, and the speed of forward motion forced water into the scoop, up the scoop pipe and into the tanks, cistern, or locomotive tender.
The first US railroad to embrace that technology was the New York Central (NYC) at Montrose, NY in 1870. The Pennsylvania Railroad (PRR) followed in 1872. The track pans were about a quarter of a mile long and 6 or 7 inches deep, from which water was taken at a speed of about 35 to 45 M.P.H. To prevent the water from freezing in the winter steam was piped in at 40- or 50-foot Intervals. The reason for their development and use was the saving of time as described by the PRR in 1875:
“Heretofore, much time has been lost by frequent stoppage necessary to fill the water tank; and, in consequence, express trains had to acquire an extremely high rate of speed between stations to make up for the logs. As now arranged, but two stoppages are necessary between Philadelphia and Pittsburgh, at Harrisburg, after a run of after a run of 105 miles and Altoona after a run of 132 miles leaving a run of 117 miles to Pittsburgh. Through passenger trains are made up of weight suited to the capacity of the locomotive with nearly constant speed enroute.”
By 1919 PRR installed track pans on following divisions: New York, Trenton, Philadelphia, Middle, Maryland, Pittsburgh and Atlantic but oddly, not system-wide. Despite the stated benefits, most US railroads did not follow the NYC or PRR examples and only the New Haven (briefly) and the B&O-Reading-New Jersey Central “Royal Blue Line” were so equipped. NYC, the prime competitor of the PRR, utilized tracks more consistently and intelligently covering the mainline between Harmon, NY. and Chicago. The “Royal Blue Line” trains competed with the PRR between Washington and New York and accordingly the fastest service was required. The Milwaukee Road had one short-lived experiment with track tanks but elected not to embrace the concept.
It took skill for the locomotive fireman to “take water on the fly”. The fireman would watch for a disk and a marker light and that was the signal to lower the scoop. In the early days, the scoop itself was activated by a gear and chain. Later, air was used to power the scoop. At the end of the track tank another disk and marker light were installed as well as an inclined plane to make certain the scoop would raise by the end of the tank. A safety lock on the tender prevented the scoop from dropping and getting caught on crossing planks or cattle guards.
Expense and the need to cost justify track pans was the drawback that prevented wide spread applications. In addition to the pans other requirements included: traditional standpipes (for freight trains that did not scoop water), Belgian block beneath the roadbed for drainage (as opposed to traditional ballast), one or two water towers were needed to ensure an adequate reservoir of water and those were in turn refilled by tapping a nearby stream. A stationery boiler and pumphouse were also required to maintain water pressure and to prevent the pipes from freezing in winter. Finally, an operator was needed 24/7 at each installation. In addition to maintaining the boiler pressure and the pump, the operator also was required to remove debris from the track pan to prevent such material from being scooped up into the tender cistern where it could eventually clog the water line between the locomotive and tender.
The Cyclopedia of Civil Engineering, published in 1917, states that “track pans must be constructed on tangent, level track” but the PRR designed several on curves with super elevation. Of those, the curved track pan at Radnor, PA was most frequently photographed. Track pans were comparatively expensive to build and operate compared to simple water towers and standpipes. A World War I estimate was $10,000 to to construct those facilities and annual operating expenses of $1,500 to $2,000, excluding salaries.
NYC is credited with scooping water at the highest speeds, in the range of 45 to 50 MPH due to advanced piping-pressure release drains that were on each side of the large. PT tender designs of the 1940s that also featured a larger coal compartment (since water could be scooped as needed).
Dieselization spelled the end of the track pans. B&O-Reading-New Jersey Central were the first to deactivate those facilities in 1953 and the NYC followed in 1955. PRR deactivated their last installation by 1957 thus closing a unique part of the age of steam. Seldom modeled (at least in appearance if not functionally), track pans offer challenge and could elevate the accuracy of modeling a prototype operation in either the steam era or transition era of 1945-1955. FAW, MBK, Inc.
thank you for the site , ran across it ,what can you say GREAT like to see some G scale , O scale , aside from that keep it up and going , very informative living in louisiana where outdoors is a way of life , I run G , indoors O
Paul. Great idea thanks for submitting.
The plane does however look way over scale. Are the railway rolling stock of German origin ?. Obviously the locos are but are the other items.
nice work
It’s a really great idea – if I had a constructive criticism it would be that everything looks too clean. More weathering would sell the idea of wartime operations more effectively.