“Alastair,
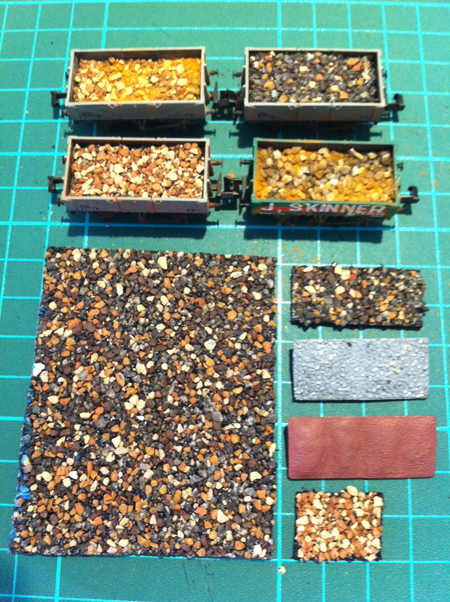
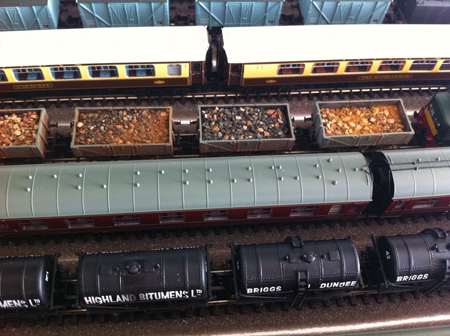
We recently had some bitumen roof sheet samples in our office which I have used as wagon loads in N gauge.
With some judicious use of weathering powders, these are very realistic with the added bonus of extra weight, much the same as Dapol incorporate into their closed wagons.
In the image you will see a couple of PECO wagon loads which look pretty flat in comparison.
The stones on the roof sheets vary but are approx. 2mm average. Could also be used on other scales.
Very easy to cut from the underside and it really needs only one roof tile or shingle to prepare many wagon loads !
I’ll send a couple more images in separate email.
Just thought I would share with you, as I have enjoyed and appreciated your emails on many subjects over the past few weeks.
Regards
John”
Thanks John, a great tip.
Now here’s a frustrating one. Remember Barry’s excellent basement railroad layout?
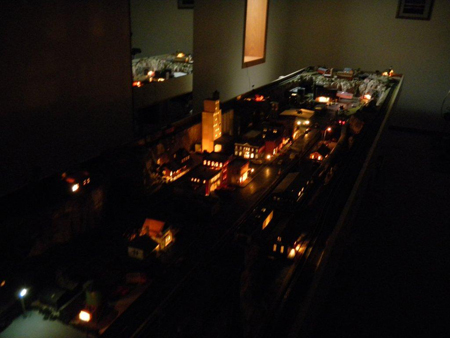
Well, he’s added lights to the lay out – trouble is, taking pics of them in the dark is quite difficult.
Anyhow, here’s one that came out okay.
That’s all for today folks.
Let me know your thoughts and commments below – I do enjoy reading them.
Please do keep ’em coming.
And if you want to start your model train layout, the Beginner’s Guide is here.
Best
Al
PS Latest ebay cheat sheet is here.


Good one John , a usefull tip that, and well done Barry , brings the buildings to life
Just a tip for Barry taking photos at night of his basement track layout with lights. If you have a desk light or stand lamp, turn it on behind the camera and try and bounce the light off the ceiling. This will give you enough light for the scenery and you will still see the lights.
Remember the light must be behind the camera.
Andrew
Perth
Western Australia
John,
The wagon loads look very realistic,thanks for the tip.
Can you show a schematic as to how you hooked up the lights . I always seem to have too many wires etc. You have been very helpful
Nice tip! Looks like a good addition for my N scale Colorado railroad project, but where is it available?
I love the idea to use roofing for wagon loads. In the States these are available as samples at our home centers. The samples are about 2X3 inches. The varities are endless
very clever…hide the weight, too.
Very clever wagon loads!! I’m going to try that!
great tips
The lighting effect looks great Barry. What is the best way to wire all the lights up in each building and connect them to the power source? Also what have you used for the power in the way of voltage total amps etc and how have you provided this from a power source? I have tried this but need more info as I am no electrician and hardly know a volt from an amp!!
Gavin, Scotland.
Gavin, there are many ways to connect the wires of the lighting for the buildings and street lights. Generally I come off the accessory terminals of the transformer to a switch to control the lighting circuit. Then I use smaller terminal blocks (varying from 3 to 6 sets of contact screws) and run jumpers from one to the next with 18 ga solid core wire. Then I use 24 ga stranded speaker wire to connect the various lights to the terminal block buss. The wire on the lights is very small stranded wire so they twist together easily and I tape. I don’t solder my connections as lights do burn out and then they are easily replaced. I use black 15 lb roof felt (tar paper) cut to a size that fits corner to corner of the building with a slit cut half way through to allow them to be fit together forming a 3 dimensional “X”. This allows you to segment the light in the building and not allow you to see all the way through the building. It looks more realistic. This is an old tip that I learned years ago. I hope this helps you.
Barry
great tip learning so much from these emails.
Just purchased three O scale trains with fast track. All are straight and curved. Going to purchased a few switch tracks.
Appreciate some creative ideas for track layouts. Trains on 4×6
platform. Thanks.
That’s a fabulous tip for wagon loads with such a variety of colour and grading and an easy way to make them up.
Thanks for that one John, and regards,Merv’
For lighting I used 3mm 12 VDC LEDs and use a regulated 12VDC power transformer. Remember LEDs don’t care for 15 to 19 VAC for your train power supply. Remember that an LED is a diode and it takes voltage in one direction and they will last a long time.
Great tip. I love that one and will do it myself.
Love the tips, Now to get started on my layout.
these are realy good ideas
keep up the good e-mails Al
Hi Ai, Love all the tips and movies you pass on. I have a question.
Could anybody tell me how to calculate the weight ratio to the weight of the wagon. By adding some weight to the wagons I hope that they don’t derail so easy.
Cheers Werner
I haven’t started building my layout yet, no less bought or made buildings but, LED’s and I are old buddies. Be cautious!
Some LED’s can be run straight off of either a DC supply or with AC, but some will burn out instantly if directly connected. You have to put in a current limiting resistor.
It’s easy. E = IR, Ohms Law. E is the voltage of the power source and I is the current (flow of electrons). A good number for I is 20 milliamps (.020 amps) or less.
Also, use a resistor (the R above) that is at least 1/4 watt and don’t use one resistor for a bunch of LED’s. If one fails, the current burden falls on the other LED’s and the whole thing cascades and burns out.
A safe bet for 12 volts is 1,000 ohms, pennies here in the US. If the LED is too bright, just keep making the resistor value higher until the light is at a level that you want.
LED’s don’t care about AC polarity, with DC and since as it was mentioned above a diode, it won’t illuminate if connected backwards, but it won’t be harmed either. Just reverse the leads.
Source of supply here in the US is Radio Shack or any surplus electronics store. I am not familiar with consumer electronics distribution in other parts of the world.
Hope this helps.
Another Barry
Hi john,
Great work of imagination to create wagon loads at no extra cost. If you look around, we have many stuff, which can’t be utilised otherwise but make great value addition to the layouts. Otherwise one keeps on spending on same at hobby stores. Great help. All the best.
GOPAL DAGA, INDIA.
Lighting Tips : I recently bought solar-powered Christmas-lights ‘on clearance SDale’ for £3., for strings of 50. Each bulb is 5mm L7 but an advantage is, they run on a solar charger which has a resevoir of one AA battery. The output is quite low, but in scale, not overly bright ‘searchlights’ – example, I’ve clustered one set, bound together as a bedside reading light. They’ll lend themselves to be converted and adapted for lay-out lights – street-lights – building gentle illumination. These sets ‘come-on automatically’ in the dark so, I turn the panel face-down if I want them lit.
Just an example of parallel purchasing, with the modellers brain making the decisions, rather than ‘She’.
SALE – not S D ale – PROOF READ ME { U2 }
I LIKE THAT THANKS
John,
If you can put your camera into manual mode, shoot with the most wide open apeture (Smaller the number the better i.e. 2.8 as opposed to 16 or 22)
Also set the shutter speed slow like 1/4 or 1/2 second.
Set your ISO as high as the camera will allow (800, 1000).
Now these settings will push your camera to its limit and you will need to use a tripod or brace the camera on a steady surface.
You may notice “Noise” in your photo but I think you will get very much improved results that you are showing us here.
Love your tips. Keep me in the loop.
Gday all, I’m a newbie and have 2 dumb questions, i have a bunch of lights with resistors, where to i hook em up, red or black wire? (I can build a 5.8 litre engine in my bedroom but electrics stuff me lol) and the next question I’m looking for artificial looking grass that looks like tufts, not lawn like, my layout is something totally different, it’s a yank nuclear base at the moment of missile launch, set in a mountain range 🙂 i wanted something totally out there. Regards bill
A1 tips I luv all your tips jimmy edinburgh
Thanks For All The Gems!! Started My Latest N Scale Project, After 40 Years Of Lionel & Ho. Love The Possibilities!!
I have used plain ol’ sawdust as loads. Just put some in a small box or spay can lid and spay it with black, brown or any shade of grey. It looks great and does not add much weight if you are putting together a long train, that sometimes workd better.
Hi Al
Great tips in this issue on carloads and lights. Very helpful. The guy that is looking for grass, use a piece of material that has the furry look, cut out the amount you need, cut the grass to the lengths that you want and then tease the grass with a comb to make it stand up and spray it with your wife’s hair spray and then when that dries, you can spray it whatever color you want. Makes instant grass patches for yards, ditch grass, mountains , etc. Cost here in the states about 7.00 per yard at the local fabric store.
Larry
Fantastic tips as usual. Like others I would like a more detailed example of LED wiring before I try the lighting. A wireing diagram would help, and some online advice says the use of resistors is required and others say they are not- confusing!
Your ideal of using the Asphalt roof tile for Wagon Loads was GREAT! Your thinking is really out side of the Box. The next advantage it helped me with was it added some weight to the Wagons.
Thanks for the Great Info.
Bill you can make tuffs of grass from old tooth brush bristles or any small stiff brush that has bunched bristles. Tim
An old diorama trick for grass tufts is I woven hemp rope. Trim to size and glue down. Color to suit.
…..great idea on the wagon loads….the shingle material should add a little weight to the cars for better handling…..standard black or gray residential roofing shingles can be used for coal and ballast loads….again, great idea and thanks for sharin’ with your train Buds !…..
John
very cleaver !
Barry
I had lights on the last layout I finished many moons ago and I never found a way to get good pictures of it in the dark I had to wait for an thunder storm to darken the day but not totally dark and for what ever reason it would let the back ground
and the lights show up clearly .
george
Great tip about the roofing samples – must see if I can find them here in the UK.
Shots of lit up layout look great too.
i live my wish i had done it through your site. thanks. matt
I have a programmed PIC micro processer and have it’s output on a random timer with about 10 seconds timeout. So I can have 4 building with there lights turning on and off randomly every ten seconds. The PIC also provides a limited current that’s safe for LEDS.
Thanks to “Another Barry” for the clear, simple LED information. He both reminds us how to make the calculations for our selves and gives us a rule of thumb that will work in many cases. Can’t be more helpful than that on a topic that is often presented in a confusing manner.
With regard to the roofing material for hopper loads, I found it advantageous on my N scale set, to use the business end of a polyfoam cutter to somewhat soften the asphalt side of the load and bend it up a bit to give it the ‘loaded from above’ look.
For 0 gauge to make rough concrete, roofs or car loads I have used cat litter. start with spray adhesive on thin card board, add the cat litter and spray with clear rattle can paint.
LEDs have a very limited voltage range to operate properly. 1.5V-2.5V DC is normal range. Electronic stores sell 5VDC regulators which can be hooked up to 12 VDC and by wiring two or three LEDs in series per circuit will prevent over voltage. Since LEDs draw so little current, many circuits can be run in parallel
providing each has at least two bulbs in series. Remember LEDs are a diode and current will only flow in one direction. A good way to test for polarity without over voltage is to use a 1.5V flashlight battery.
great tips and night photo thanks for sharing.
Great tip. I have been using roofing tiles for road bed and walkways never thought about car loads. Thanks for thinking out of the box.
I use a 5v regulated plug-in supply for LEDs. For full brightness, 20ma is the standard current drawn, no matter the colour. However, you must be mindful of the voltage at which the different colour ranges reach the 20ma limit. To go above that current threshhold means greatly shortened life. For a 5v supply, for example, you should generally employ a 150-ohm resistor in series with each red, orange or amber LED lamp. Use a 100-ohm resistor in series with each white, blue or green LED lamp. If you, say, desire half the brightness of any given lamp, simply double the value of the lamp’s resistor. To determine the polarity of an LED, you can use a couple of methods, both of them just by looking at it. First, if it’s a new item, the longer lead will be the positive, the shorter negative. The other visual indicator is if you look at it from the side, the narrow blade inside the bulb will be positive and the wider one negative. As well, I have for years used 1/8 watt resistors without issue, because a single LED bulb running at maximum brightness will dissipate 0.1 watts.
something new. i saved a quart jar of my wood shavings after
doing a lot of drilling. then used easter egg dye to color
the shavings. works for tuff grass as well as mountain rock, when glued in places. another thing, i used pillow stuffing
and made clouds, then hung them from the ceiling with fishing
line above my layout. gives a nice slight movement.
georgia,usa
Wow! what a mix of topics and questions in one post!
Bill, if you can wire an engine you certainly can wire a layout. Since we are working with low voltage supplies that are usually fused or breaker protected the chances of burning down the layout is slim to none, so stop being intimidated. We always use a reducing transformer as a supply source (often referred to as a wall wart). They can either supply AC or DC current check the markings for votage, amperage, and if DC or AC. You will have to read the specs on the devices you want to power as to which it prefers. AC power can be converted to DC power with a simple electronic device called a rectifier, but for LED lighting since they prefer DC, keep it simple and use a DC power supply for your lighting circuit. I suggest using a separate source and circuit, not track power. Most of us hoarder/scrounge types have amassed a collection of wall warts left from various electronic devices, or you can pick them up at swap meets, second hand shops, or even buy them new on Ebay or Amazon. I’d look for one that is rated in the 5-12V range and 1-3A depending on if you are going to supply a few or a lot of lights. Remember if you run out of capacity on one, just plug in another transformer and start a new circuit off that. An LED as mentioned is polarity dependent, but if you hook it up backwards, no harm, it simply won’t light. Reverse the leads and it should work. Others have already talked about that LEDs are current sensitive (not voltage like an old fashioned light bulb) so almost always requires a resistor in series with one of the leads between the power source and the LED.
So much for LEDs, you also asked about grass tufts and/or a wild field appearance. There are a number of online companies that sell inexpensive premade grass tufts that come on a sheet in different colors and lengths that are quite realistic in appearance both for model train scenery or for wargame terrain (wargamers us a lot of the same scenery products, methods, painting and weathering techniques we do, so check them out). Google artificial model grass tufts. or check on ebay, Amazon, Woodland Scenics, Noch, and other scenic materials suppliers. Or if you need a lot of them, you might invest in or build a static grass applicator tool and make your own. Plenty of how to videos on Youtube. P.S. you can also easily make tumbleweeds.
The easiest way to test LED’s is to use a 2032 battery. The battery provides about 1.3 volts which will light most LED’s. Just put one lead on the positive and the other on the negative terminal. If it does not light, just reverse the leads. As mentioned before, use a series resistor with each LED or assume that each LED drops approximately 1.3 volts across the terminals. A group three or four LED wired in series, can be powered by a 5 volt power supply. The current drain will be approximately 0.20 Amperes. You can power quite a few groups off of an USB phone charger.
Love the bitumen roof sheet idea. One sheet would go a long way on HO scale as well. The night picture looks like what you would see at night on an overnight flight — neato!
Thanks Everybody on your lighting idea’s haven’t started my set up yet working on it
Hey Barry, like you I have lights on every structure on my layout so taking nighttime photos is very appealing. One of the things I did was hang a strip of multi colored LED’s up on the ceiling above my layout. They are controlled by a small hand held remote “clicker”. I usually set the color to a medium blue to cast a hue similar to what a full moon would cast. This really adds to the realism of the layout and makes nighttime photography easier. If you’re using an SLR camera, then another comment in this thread gave some great advice on where to set your ISO & shutter speed settings. Coupled with full moon LED lights you’ll be taking awesome night shots!
looks really good under the lights, the different colored stone for the coal cars is a nice touch too. very well done.