Got this in from Tony. I think it has all the makings of a great train layout!
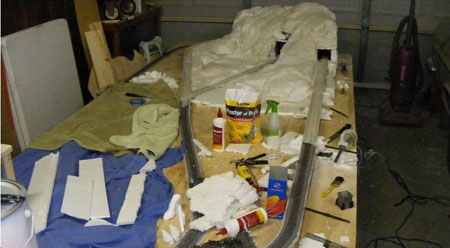
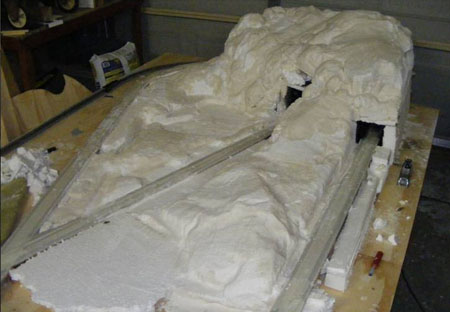
Hello Alastair, find pics for a 4M x 2M HO layout in figure 8. Still under construction but base board, track risers and track laid and ballast.
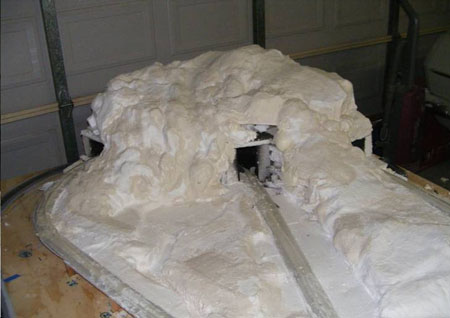
The tunnels and mountains are constructed from broken styrene boxes, expanding foam and plaster cloth.
I am in North Queensland Australia so this layout will be a rainforest and bush layout. Have left the “mess” in the pics to show some of the materials.
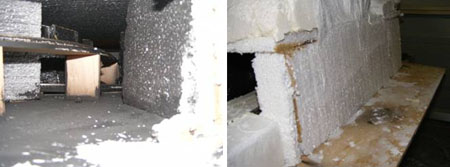
To make tunnels/mountain, I first made a box section with openings for the tunnels and spray painted inside with flat black waterbase acrylic.
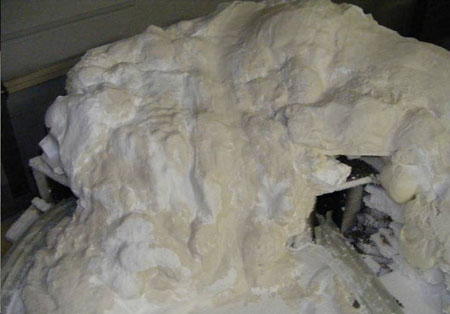
As can be seen there is a roof for the mountain to go on top. The mountain is constructed by breaking up styrene boxes (got these from the fuit and vegtable section of a large supermarket as ithey are what the transport cold produce are are usually trash) and randomly placing them on the tunnel roof.
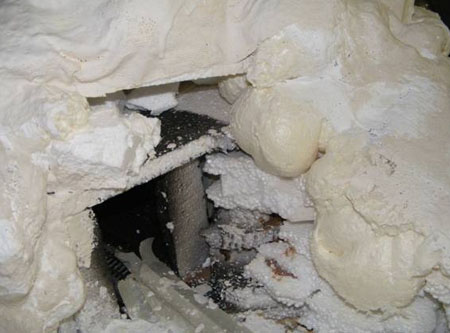
I then fill in everything with triple expanding foam (in an aersol, $14 from a large hardware store chain). Took 3 cans. This all tapers down onto the base board. I break the styrene by hand as this gives a more random pattern to the edges . Also by using the broken styrene boxes and no expanding foam I can create a cave in the layout as seen above the tunnel opening. You can also see the expanding foam and broken styrene in the same pic.
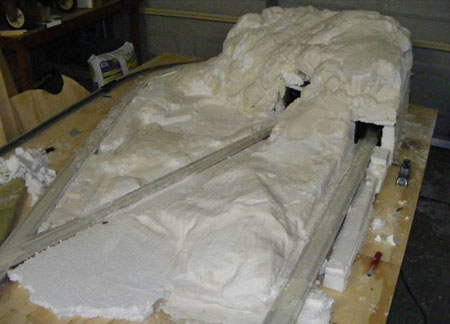
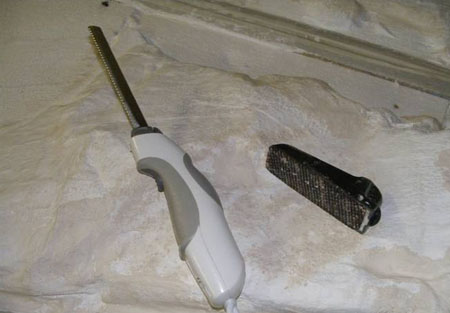
Once the expanding foam has cured (24hrs) I then “carve it” using an electric carving knife ($10 Ebay) and a “surform”
I just chop and hack any old way to obtain random shapes and because I do this I don’t become set in a pattern.
With the surform I can create the mountain and river waterfall. Once shaped I then covered it in plaster cloth. I did not use wadded newspaper as a fellow modeller had an insect problem from the newspaper.
After the plaster cloth hardens (24hrs) I then mix up a soup mixture of plaster and dab this on to reinforce the hardshell.
Cant really see it in the photos but at the bottom of the waterfall is a pond with river coming of this. Next step will be a mixture of grey acrylic primer mixed with water and plaster to prime the scene.
Regards,
Tony”
An excellent ‘how to’, Tony, thank you very much.
That’s all for today folks.
Please do keep ’em coming.
And if today is the day you decide to join in the fun, the Beginner’s Guide is here.
Best
Al
PS Latest ebay cheat sheet is here.
PPS More HO scale train layouts here if that’s your thing.


Well done Tony , messy job doing that , I Know ..mess everywhere when I have done !!!
three exits/entrances to the same tunnel, very unique ; )
Cool Tony!
Have been trying to use burlap I got from a farm store, whole lot cheaper than from a cloth store, and popsicle sticks. The sticks are for the frame and the burlap to cover everything with.
Want to try and do something that looks like one of our mountains here in North Carolina, USA.
As usual, very instructive and full of inspiration. This has to be the best `club` on the planet !
HI , Can’t wait to see the end result but have you left a way to retrieve any derailed trains in the tunnel. Good work . Keith
I agree with len thank you
Great ideas – so thanks for that! Good question from Keith re: recovery access in tunnels. Removable sections along layout edges are relatively easy but in the middle – a bit more tricky. Also – word of caution when using electric carving knives! Don’t try to cut too much at once. I bought a brand new knife then tried going through a sizable chunk of foam, stalled it and burned it out! My bride was none to happy about that. Onward and upward lads.
Another intuitive mountain lesson. Hadn’t thought much about ‘expanding foam’ previously – But, now I’m ready to start my mountains. “Thanks’ from Ontario.
Very well done Tony, should look great, I am in south east Queensland I am doing mine on a farm scene, with a few mountains, may be we could Email each other on our progress
Plaster Paris is an organic form and will draw bugs and provide food for mice. Hydrocal is the preferred medium due to its chemical make up. You can cut plaster 80% hydor 20% plaster if preferred.
Have you tried ceiling tile rock for entrances and inside enter and exit? I have a demonstration on foam tunnels. This allows you to LIFT the entire mountain off of the layout to retrieve derails. Cutting a hole in the rear of the plaster and hanging a curtain will keep the light out while allowing retrieval.
Houses sprayed with stucco use “chicken wire” to hold it. It can be found as scrap at construction sites, and can be formed in any shape, like a mountain. There is a different type, that is expanded metal mesh, used for stucco on overhanging structure. It is usually black. It can’t be formed as easily, but it can be useful. When I was a sheetrock hanger, we also would use a piece of this expanded metal, folded over, like the Surform. It makes a good scraper for styrofoam, and if you pick it up at a construction site, it is free.
Have anyone ever tried tin-foil and plaster of paris for rock faces???? It will compliment the mountain at the cut-ins.
I used greatstuff foam and news paper for filler and it turned out pretty good and I also used foam board to make the tunel and used balsa wood for the tunel porthole.
I live in Australia too , love to see the completed project.
Love your creativity, a little messy, but the results are well worth the effort!!! Great Job!!
keep the pictures showing progress coming
DIRK: Is your demonstration on foam tunnels in the form of a video? If so, how can I access it? I live in the U.S., so if your demo is in person, I guess I won’t have the luxury of viewing it! Thanks, Marion in Mississippi
nice job and hints.
Hello,
it a great idea. It gives every one who are such enthusiasts, a lever to build their lay outs. I will try and adopt the idea. Thanks!
GOPAL Daga, Calcutta, India
Thanks for all the greet tips
to the question of using crumpled tinfoil for rock bases/faces…..it can look great – but hydrocal didn’t want to stick to it…..possibly with a coat of primer first then coating………….otherwise – just on the foil it’s to easy to chip pieces off when trying to color…
this looks very cool I have been trying to get mountains on my layout but just have’nt been able to get it yet. I have it all in my head but just can’t get it down on my lay out.I even went with wades of paper and topped it off with plaster cloth but it looks like A big wade of paper.
I make my mountains out of wadded up newspaper. I gives me the same texture that you are getting, with no mess. I us the expanding foam too, but on the inside of the “mountain” to give it strength. Once that stuff hardens, it will hold up anything you want to put on the “mountain” and then some! I did do a tunnel with expanding foam once, but found out (of course) that the foam expands both up and down into the tunnel; had to dig for hours to get clearance for the cars to pass through it. My table has to be removable to the garage, and the newspaper adds almost no weight at all. Light weight framing, foam table, newspaper mountains, black foam ballasted track and N scale. My portable 36″ x 80″ board weighs less than my briefcase!
wow right on Tony…..nice job
everybody has a different way of building and yours seems to work good..
I like using paper over a frame with hydrocal myself
along with the ‘rubber molded rockface’ and real stones from outside…
keep em runnin fellas
A very careful and meaningful use of styrofoam and arosol expanding foam to make mountain. This tip of yours is of great help for the Moddlers !
pl keep it up.
GOPAL
Expanded foam. Ingenious. I never thought of that ( I’m rather thick ) Will experiment with that medium when I return home to Wales in the new year. Thank you very, very much.
Trevor Ball
To make mountains we use an underlayment of foam core board. Over that we tear up sponge rubber foam and glue it to the foamcore face . The torn up sponge foam makes a good rock face. To that we paint on several layers of tile grout. Then just color that with any kind of paint to your whim
Looking good. Let us see when it is done.
Great mountain Tony .
You need to show us your track support system if you have some pics of it ?
I await your follow on as you go !
George
Nice Tony, Please send Al updates as layout progresses.
Cary B
Hi Tony
Thank you for the tips on the mountian construction.
You all train lovers have a great New Year.
Howie Va. USA
Super! You can’t make an omelette without cracking a few eggs!
Have never trusted myself to form rock faces so I created them by smoothing layers of 5 cm (2″) thick building insulation. It’s easily shaped using files, knives, etc. I am lucky enough to have an artist friend who painted these smooth surfaces. The result is so realistic that you cannot tell that the rock faces aren’t ‘real’ in photos and even for many people, in real life.
Chris M.
Ⅿarvelous, what a weƄsite it is! This web site gives helpful
faсts to us, keep it up.
Wow what a great little site this is for us modelers. On tunnels under mountains I install a thin wood “portal” over the tracks to prevent materials from falling on them and it remains permanent so dust keeps out. Of course it must be accessible so do not build tunnel walls,just some wood posts to hold the lid in place then mountain over to your hearts content!….
On3 Bob…..
For hills and mountains I like wading up news paper and making a basic form and cover with plaster cloth strips.To me the contours look better than styrofoam and once dry the paper can be removed and there is some time to make some changes while the cloth is drying…only thing is it is much more heavier than plain styrofoam
a
Tony: Your mountain is really coming out nicely. Paper hand towels in rolls or out of dispensers found in public restrooms can be dipped in a sloppy solution of Hyrocal and crumpled into all kind of nice rock and smooth surfaces. A lot cheaper than plaster cloth bought from retailers. I built a three-foot high four-foot wide mountain for a train club I belonged to with just heavy cardboard understructure cut to shapes with cardboard stringers and paper towels as mentioned.
Keep up the good work. Would love to see the finished product.
Looks Great Tony
Now this is why I admire my fellow model railroaders, Tony, because they have super swell ideas and are willing to share them.
I have used packing foam from injection molding with an electric knife makes quick mountains that hold plaster and paint well. The injection moldings are from shipping boxes for large appliance boxes free from the appliance store dumpster.
They remind me of the “Mountains in Minutes” foam from the 1970’s.
what a great tunnel mountain. a very good how to. thanks for sharing.
I’ve used the same technique to start my N Scale RR In fact Tony our mountains look similar. The only difference is my center tunnel is off set more to the left. The track for this tunnel was made for either a mine or passing under the double track that runs left to right at a higher elevation. I started here with the intent of making it corner section. Temporarily my railroad is named the NNR for “No Name Railroad. Building in modules it will begin with running Southern Pacific equipment from the 40’’s thru the early 60’s. Good luck with yours.
Great work. The tips on how to make the tunnel/mountain and terrain is very help full. Please show the completed project when finished.
Looking really good,Tony. I’m wanting to know where I can get the Hunt Magnetic coupling from?
I am new to the post.
Manny NH, USA
After reading some of the suggestions above about making mountains . I thought about how I did my mountain many years ago. It was made of corrugated cardboard cut to the shape of the mountain, then cover it with old window screen then cover that with joint compound that you buy at a big box lumber yard. It is very easy to do and durable. My mountain is 40 years old and has been moved 4 different times, and looks the same as the day I made it, no damage or cracks.I would post pictures but I don’t know how.
great job I model n scale
Looking great, one thing i did for my mountain was use foam to desired height and added premium wood nuggets all over it at random and used a little pop to smooth the edges from wood to foam and sculpt with a mini hand saw sand paper and hot wire than added paint and omg it turned out great. Please keep us up to snuff and thanks from Wisconsin
I have a can of fome setting on my layout for over a month so I couldtry it. Now I know what it will do. Thanks, I will start using it as soon as I get my arm out of the cast
Very nice.
Can’t wait to see it done.
i would like to know what kind of light wood jerret grisham used to able move his set up ??
Thank you for thr info very informative. Quick note they make a non expamding foam for doors and windows just make sure it says non expanding on the can.
time consuming mess but worth it.
Much work, experimentation and patience into this. Believe the mountain should be more overpowering. Huge with it “appearing”as having limitless height and width. A reason to actually warrant tunnels with a scene. This is commonplace and I always think of the Mountain placed over the tracks not the tunnels as being bored through an impenetrable obstacle. Same difference as with backdrop scenery, things just unending. My opinion only perhaps…
Regarding, Rich
Awesome mountain build Tony, you just gave me a wonderful idea because I have a lot of packing foam and some expanding foam on hand along with corrugated cardboard to make my mountain scenery with, thank you for the wonderful advise.