Here’s more from Cameron.
If you missed the first installment, it’s here.
“Tunnels and retaining can be pretty expensive at a hobby shop. On a tight layout you can also end up needing allot of retaining. I for one got a pretty rude shock when I saw the price for my layout. I did some hunting around and found this great solution using silicone bathroom sealant and car body filler to make your own moulds.
Step 1 – Make Something to Cast
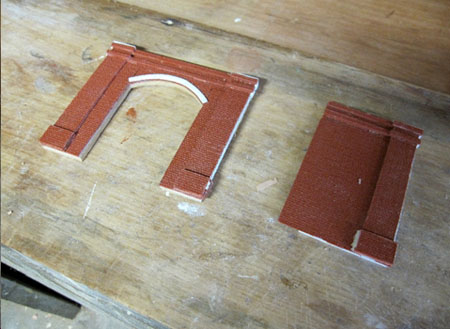
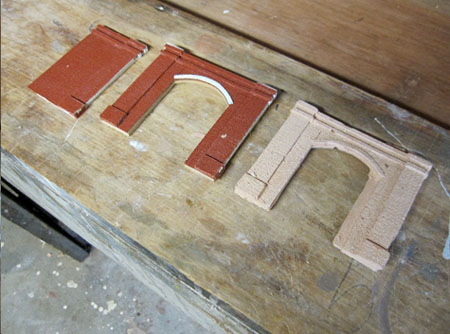
I guess I could of purchased a cheap tunnel for the mould but instead decided to make my own using some plastic brick sheets I bought off Ebay. I made a tunnel and section of retaining that would fit together. On the back I put some thick cardboard to build up the thickness of the original. A mould about 5mm thick seamed about right to me.
Step 2 – Make the Mould
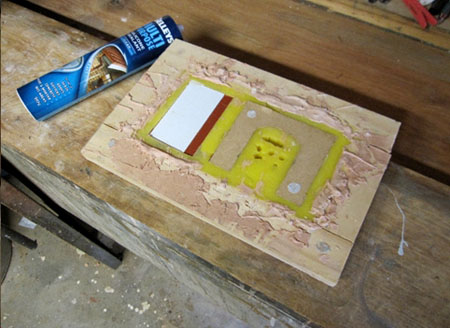
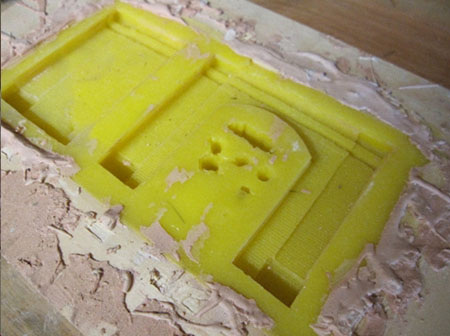
Firstly make a small box from timber off cuts that is big enough to take your originals and deep enough to have a good layer of silicone under them. Then comes the best bit. Instead of buying an expensive silicone moulding kit I used some regular bathroom silicone sealant from the hardware (not the odorless one). Mix one ounce of regular bathroom sealant with 5 drops of glycerine and a drop of acrylic paint in a small cup. Pour the mixture into the box and press in the originals. The acrylic paint helps the silicone to set properly and the glycerin helps the castings release from the mould. I left the lot for 48 hours. Before I took the originals out.
Step 3 – Cast Away
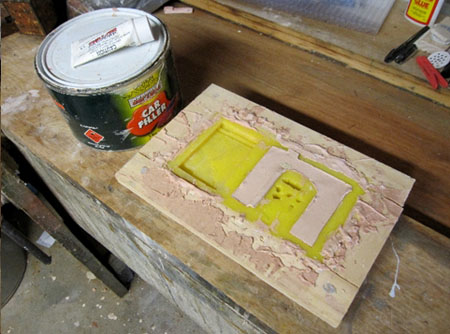
You can cast either plaster of epoxy in the mould. I used some cheap car filler from the auto repair shop. Following the directions mix the car bog and the catalyst in a tub then pour it into the mould. The epoxy sets quite quickly so you can run off a mould every 30 minutes. If the castings start to stick in the mould wipe them with a thin layer of soapy water before you pour in the epoxy.
Laying some track in the next episode.
Cheers
Cameron”
And now let’s fast forward to the next installment…
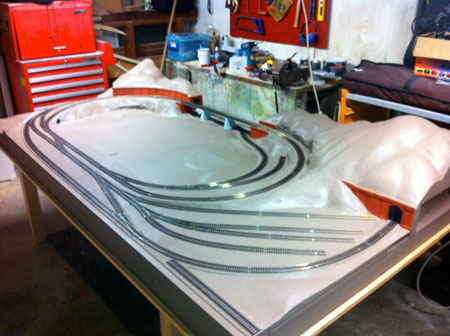
“Laying the track would have to be one of the most rewarding stages of building a layout. With all the centre lines marked out it is a simple task. Just work your way around from one end to the other. My track is Peco code 100 and the points are a combination of Streamline and curved Setrack points.
Before fixing any track I drilled holes in the middle of the track at every point slide to accommodate point motors in the future. The point motor manufacturers have guides for how big the hole should be and exactly where it goes. I wasn’t sure if I was going to use point motors but I figured this would be a lot easier now than retrospectively. It was just one little extra task but, as it worked out, well worth it.
To fix the track I used the larger track pins which I found to be a lot easier to work with and easy to pull out for adjustments. Map pins are handy for holding down curves before putting in the track pins. I first tacked down the track with the minimum number of track pins. I didn’t push them all the way in to make it easier to remove them if I needed to adjust. Before running the trains I cleaned the track and train wheels thoroughly with mentholated spirits.
I then ran the largest loco I had along with the longest rolling stock over the whole track multiple times in forward and reverse. There were lots of little adjustments to make along the way.
When I was happy with the running I pinned down a bit more track and repeated the process until the whole lot was fastened into place. I had a few weeks of running every train and every bit of rolling stock before I finally had the nerve to push down all the pins flush. It was great to finally see trains going round the layout.
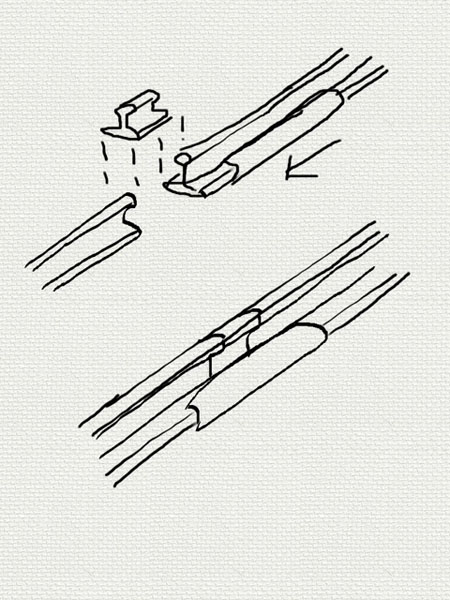
One unfortunate outcome of the whole process was a small gap in the track where a curve met a point. This caused frequent derailments. I did however find a great fix which I have drawn a crude drawing if bellow. I slid the rail in question along until the gap was in a straight section of the layout. Then I cut a very short piece of track that was the same size as the gap and slid it into the fishplate. It was pretty fiddly but easier than ripping up a whole length of track. It worked so well I have a hard time finding it now.
Next installment will be ballast.
Cheers
Cameron”
And now, breaking off at a tangent, I got this question in from Rev. Ron:
“Hi, Al ….. Enjoy your site and the layouts and info sent to you. I wonder if any can advise me re how to get constant brightness of lights in passenger cars, cabooses, and locos. I use conventional method right now (varying voltage via track). I have only one loco equipped for digital (MTH).There are 3 other engines that are not so equipped. So, lights vary in brightness according to speed. What is the best way to change all this? Do I have to put decoders in locos and get a DCS system? Someone mentioned voltage regulators instead. Is this possible? As you can tell, I’m a bit technically challenged. I got back into the hobby at the age of 70 (almost 76 now).
Keep up your good work.
Awaiting a reply.
Rev. Ron”
And that’s your lot this time folks.
Don’t forget to let me know what you think by posting below – and have a look see at the latest ‘ebay cheat sheet‘ before you buy anything!
Best
Al



You can achieve constant brightness for lighting for your carriages, cabeese and so on by using a coin-cell battery (CR2032 or similar) – the 3 volts will drive LEDs happily, in parallel, and the battery holders are cheap. To switch them of, either put a small switch in circuit or simply pull out the battery, which should last months. Of course, with DCC and a rectifier/resistor combination you can get the same constant voltage from the track, if you can rig workable pickups.
Express Models produce lighting kits with “light store” which use high-value capacitors to maintain constant brightness levels, even keeping the lights on for a couple of minutes after the train has stopped.
The only snag is that if you reverse the train during those couple of minutes, both sets of headlights are illuminated!
An alternative to the light store kit is to have some rechargable batteries, charged from the track supply to power the lights.
Reply to Rev. Ron’s question about constant lighting. All of the prior suggestions are workable. But here’s another: First I will assume that you already have lighting in your rolling stock and all electrical pickups are sound but you are not happy with the varying brightness by voltage level changes. If so what you can do is place a resistor in series with the bulbs (or LEDs) along the positive side. You will have to search out what capacity resistor you will need for the lighting source. You want bulbs (but ideally LEDs) that will respond to full illumination at low voltage (say ~5 volts) as this is all you will probably need to get locos to be rolling slowly. But once this is done, the lights will come on and remain bright from that voltage point on. And the resistor will keep the voltage constant at the low limits of the bulbs (or LEDs) so they don’t burn out. However, while illumination level is now constant, this does not guarantee against flickering that can be caused by breaks in current due to track irregularities, dirty track or wheels, etc.
Dear Cameron / Alastair — and for that matter the other modelers who share their stories on this site ….
Cameron — great article
What I would like to ask everyone who shares their stories here — could you please be a bit more specific on the items you mention that you use????
Ok — auto body filler is auto body filler but say be more specific with the type of bathroom sealant you were using. There are many types available and you could shorten the learning curve for all of us here. Mentholated spirits to clean the wheels and track — which product do you use …?? People can then research it in terms of where they can buy it and / or a viable substitute if the brand you use is not necessarily sold in their area somewhere.
I have said this also about scratch building articles in such Mags as Model Railroader — provide a very close or exact listing of required scratch building materials with every article to assist those who want to follow the lead of the respective author and duplicate their work …!!!
Nice work Cameron. While I have some recorded photo data on the construction of my layout, I am sorry I didn’t keep a detailed photo record of the process. What you are doing is extremely valuable to modelers, especially those looking to get started in building a model railroad. Excellent! Keep up the good work!
Very, very nice layout thread indeed! I love the tunnel portals and the overall prospect that this layout presents – in terms of running as well as operations. Would love to see the finished product!:) what about a couple of videos of trains running?:)
You can use an tolephone charge (for the car).Put your light whit the led and conect your line in the 12 V in.carfully whit the connection is doesn”t work in reverse but its ok
Good luck !
I will try this moulding method of Camerons. I had some success with wax for small moulded parts and plasticine ( kids modelling clay) for simple structures like walls etc. using plaster of paris or wall filler to make the part.I made the low profile dump trucks for my N gge mine in a briefcase model this way.
I also cast plaster -of -paris blocks in tubs etc , carve them to the desired shape and then use liquid latex to make a mould for more complex structures etc. Paint the latex on in coats, reinforce certain areas which might stretch with a cloth bandage and make a simple support for the mould to stop it stretching/distorting when the plaster is poured in. I find Al’s printed sheets and card idea easiest for buildings and you can add your own bits and pieces to suit or change each remake slightly.
A comment regarding Cameron’s use of largest loco and rolling stock on the layout before final anchoring of his track. I agree that this should be done. Not only on the main-line track but also on branch-line tracks as well. The process would help to insure that branch-line rolling stock will have a less likely chance of derailment.
I figured that I would be using shorter cars on my branch-line. But after reading Cameron’s article, it makes sense to use large locos and stock on the branch-line as well, before securing the tracks permanently. If the branch-lines can handle the big stuff without derailments, then the branch-line should not have problems with the shorter rolling stock.
And I also agree with what Kaustav suggested about videos. In fact a video of the finished layout in operation would be an excellent idea.
looking good so far.
Pastor Ron Try keeping your electric contacts clean
WHAT IS THE SIZE OF THAT LAYOUT. SMALL ENOUGH FOR A SMALL ROOM.
great layout am enjoying seeing the step by step progression please keep the steps coming
It is great to see somebody document the building of a layout, I for one get to a fairly advanced stage before realising that I should have taken more photos.
Cheers
Ralph
Dear All,
Apologies for this late reply to Johns question regarding the type silicone sealant. The sealant I used to make the mould was Selleys Multi Purpose Silicone Sealant. This may not be available in all countries. Clear silicone bathroom sealant comes in two basic forms, odorless and regular. You can tell the regular sealant because it has has a very sharp smell, like vinegar. The regular sealant is the one you want as the odorless one will not work for moulds. Hope this helps
Cheers
Cameron