” Al,
For scenery, I use Plaster Of Paris and water based paint, available at any art shop or hardware.
If combining two or more colours, mix small amounts of each until colour is good, keeping notes on quantities.
Make it a little darker than required. Take a small amount of Paris and start adding water to about the consistancy of milk.
Again, take notes on quantities.
Add the colour slowly so that the mix is darker than required, to the consistancy of toothpaste.
You can always add more black etc to darken it. Apply the mix to a test strip and practice makes perfect.
Don’t mix too much at any one time, the Paris will lighten the colour and the paint will stiffen the mixture, causing it to dry more quickly than normal. It can also be painted over when dry.
Steve”
“Hi Al,
Here are 3 photos for you.
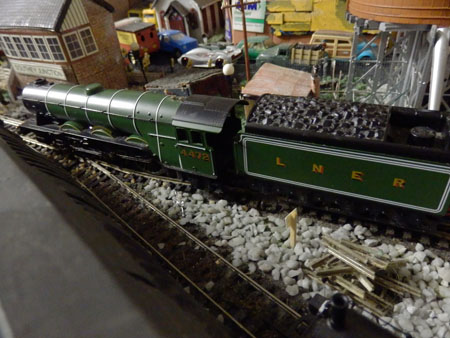
1 Flying Scotsman at my mpd.
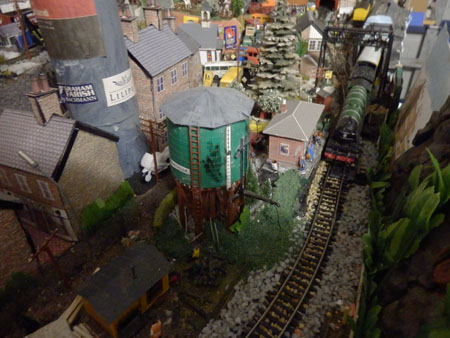
2 Atlas water tower with weeds growing around it.
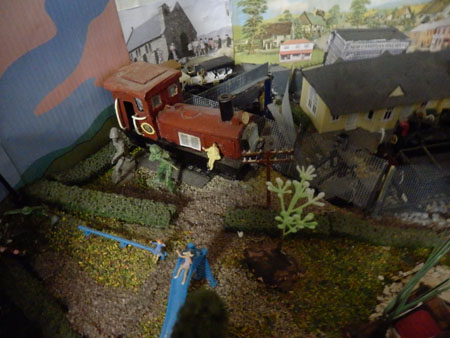
3 TR 67 on display at my model Park.
Tr 67 was built by Hudswell Clarke for the New Zealand Public works Department. later taken in to NZR stock.
Written off 1960.
Paul Otway”
“Alistair – making waves.
Dennis wrote:
“The only problem is that the liquid last for some time and it takes time to gather enough to make some more.”
That’s why we have relatives, and neighbors.
Another alternative (for loners like myself), is to buy as many as needed, and transfer contents into larger containers… like 2 litre soda, or orange juice bottles or gallon milk jugs. No need to wait till it’s used up…
Here is another tip for making “waves” at the seashore…
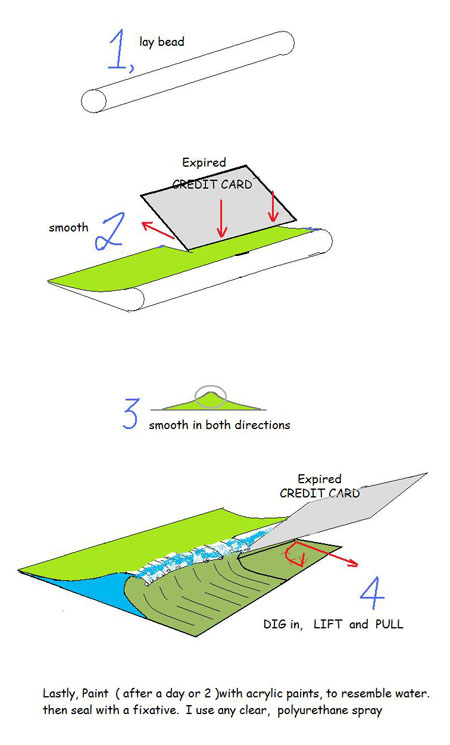
Clear silicone sealer. Comes in a caulking gun style tube.
Lay down a heavy bead, then with the edge of an old/expired credit card, start to press it into the surface going away from the direction of wave travel. This smoothes the “back” of the wave.
Do the same to the front of the wave. When that is done for the entire length of the wave.
Start at the base of the front of the wave Dig the card in, and pull it up and in the direction of wave, let cure, then paint.
Here’s a diagram…
And here’s the latest from the talented Dave:
“The Tornado from Bachmann Al , i am well impressed with the markings , but not the bet of runners
Regards
Dave”
That’s all for today folks.
Please do keep ’em coming.
And don’t forget the Beginner’s Guide, if today is the day you start your railroad adventure.
Best
Al
PS Latest ebay cheat sheet is here.


Like the method of making waves, and the note about expired credit card
Brilliant waves, just what I need for my layout with seashore and ships, Thanx a mil.
Good tips. Though both on the water as well as plastering …
As usual, I am very impressed with Dave’s setup! If it is as big as it appears in the video, I can’t help but wonder how he gets back to the corners and along the sides to correct mishaps? The wave instruction will be very help full for me in the future. I am always amazed at the technique’s the fellows pass along. Very helpful as well as ingenious.
Thanks Al for publishing my photos. I hope everyone enjoyed them.
I HAVE GOTTEN POOR RUNNERS BEFOR TO AND REALLY HAVE TO WORK ON THEM.
Excellent ideas! I hope I can remember some of the wonderful ideas posted on this site when the time comes to use them. Thanks to everyone for sharing.
A hint for Sheila, and others. Stuff you think you may have use for, but may not remember, print it (use both sides and do it one page at a time to save paper, and it reads more like a book), punch it with a 3 hole punch, put each page in a document protecter, then install them in a 3 ring binder. Label it so you can find it as a reference, and to add more pages. I find this to be most helpful.
All the tips and pics. that have been sent have been of a huge inspiration. I can’t wait to get started myself. Keep sending the emails through. Congratulations to eveyone. Well Done!
The diagram showing how waves are created didn’t come out. Could you please send it again?
Wow good work.I love the mind’s of modeler’s.They come out with the most interesting build’s.Man those are beautiful engines.I love the UK engine’s.We dont have such in canada.We use big bruiser’s to haul.These unit’s are they 12 volt.Or DCC or DC love more info on these units.thanks
Hey Ken,
I remember when my father and I was putting together my train set when I was a kid. We had a problem similar to yours. What we found that if there was any unevenness then the engine would derail. Also if the track connection was uneven this also caused derailment. This can be fixed: 1). by switching out sections of track, or 2). by filing with very fine jeweler’s file the joint connection.
Hope this is helpful… Stephen
I really enjoy reading your tips , they are great . Can u please email me some track plans for a 4×8 ho layout that has a reverse loop with over and under trestles , possibly that I can fit in a roundhouse turntableif possible
Dave, another great look at your layout. But dave you need to tone down your narration, your enthusiasm takes away from the video HAHAHA
Dennis Love the concept of using clear silicone adhesive for making waves. I love scratch build anything and had put the question of wave building out to the forum , thanks for the reply. I am very familiar with the adhesive but never thought of using it in that manner before
Love Dave’s videography, a/b rolls etc. Always fun to see his “little” layout. My wife and I, living in Minnesota do love the British mysteries, currently going thru Midsomer Murders, and there was a scene where a train came thru an active crossing. I don’t think I had seen that before, and was surprised by how fast the gate, which was really a fence came down and then went up. In the states we generally have a long bar with lots of bells and whistles before the train comes, but does not seem to drop as quickly as the British version.
Thanks again, Dave.
I have a n-scale Pensy passenger set that i would be willing to trade for a British pass. set. complete with an “A-B-A” set of engines.
Thanks for the hints, pictures, and info. I love my model trains but am getting to old to play with them, but I still love to dream and you are helping me do just that.