Mark’s been in touch with a very useful tip on how to build model train scenery.
“Hi Al.
Here is my ‘Tip for the Day’. Trying to complete a lot of scenery on your layout all at once can become very tedious and sometimes frustrating.
I’ve found that taking a small area, planning it out and then completing it before moving on to the next project is more rewarding.
This method allows you to try different techniques using various materials. If you complete a scene, and are not truly happy with it, you haven’t wasted a lot time and material.
You can continue to ‘tweak’ it until you are completely satisfied and then move on to the next project.
Every time I complete a project, I like to add a small “signature” of some sort – much like putting a cherry on top of the ice cream!
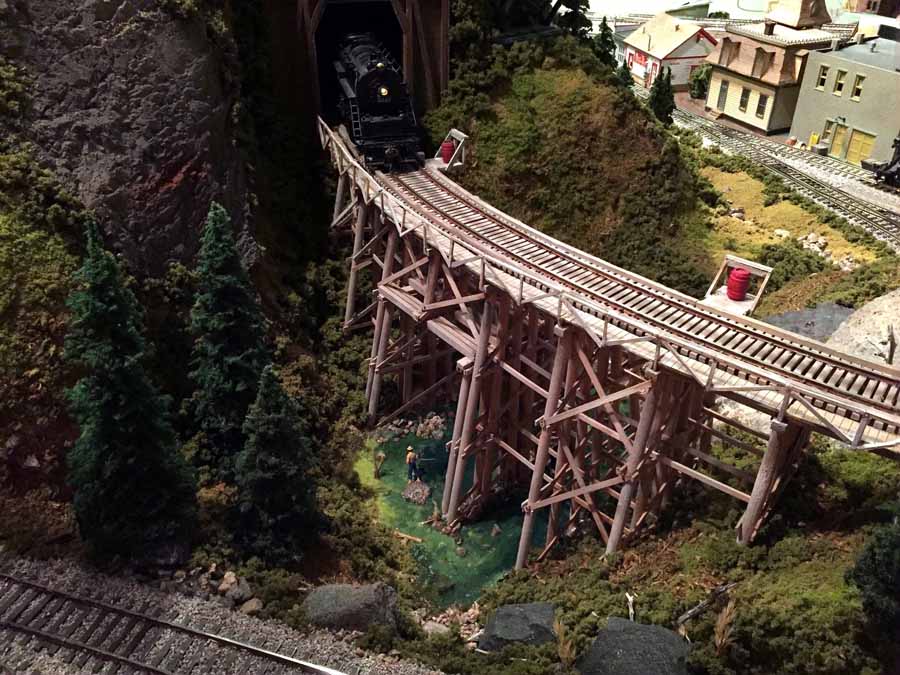
Sometimes it’s just a small sign that I remember from my younger days, or naming something after a friend or, in this case, I placed “myself” in the scene enjoying two of my favorite things – railroads and fishing!
Anyway, whatever you do on your layout should be fun and bring you great satisfaction at completion.
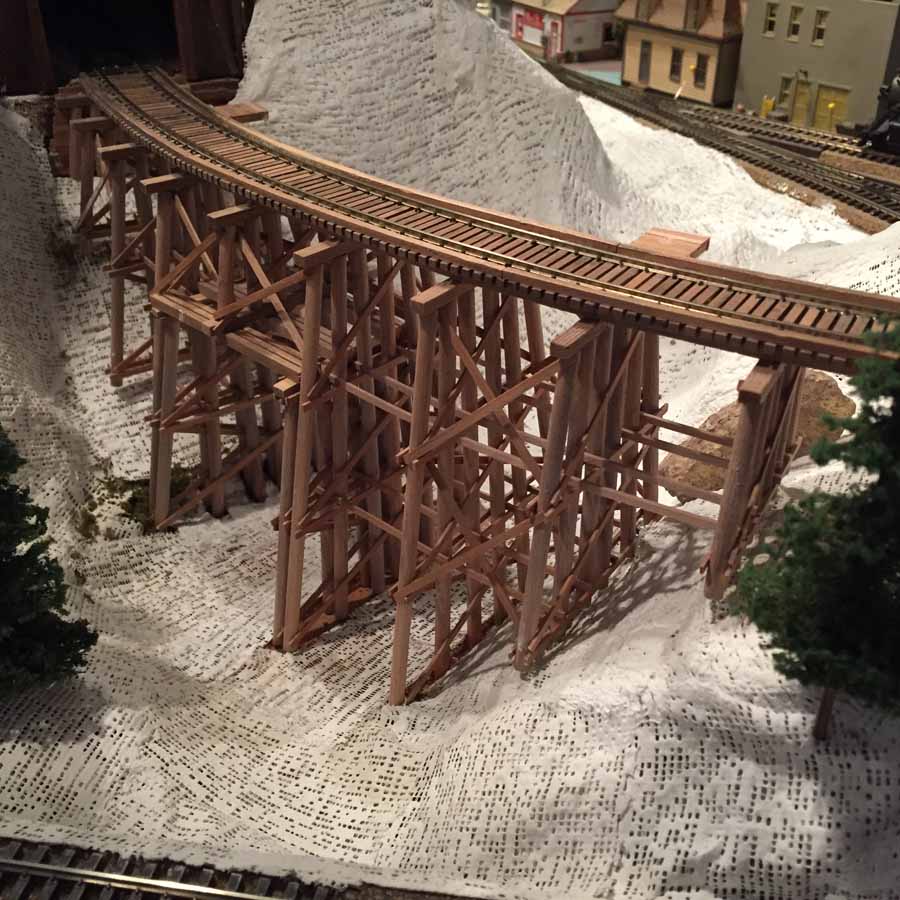
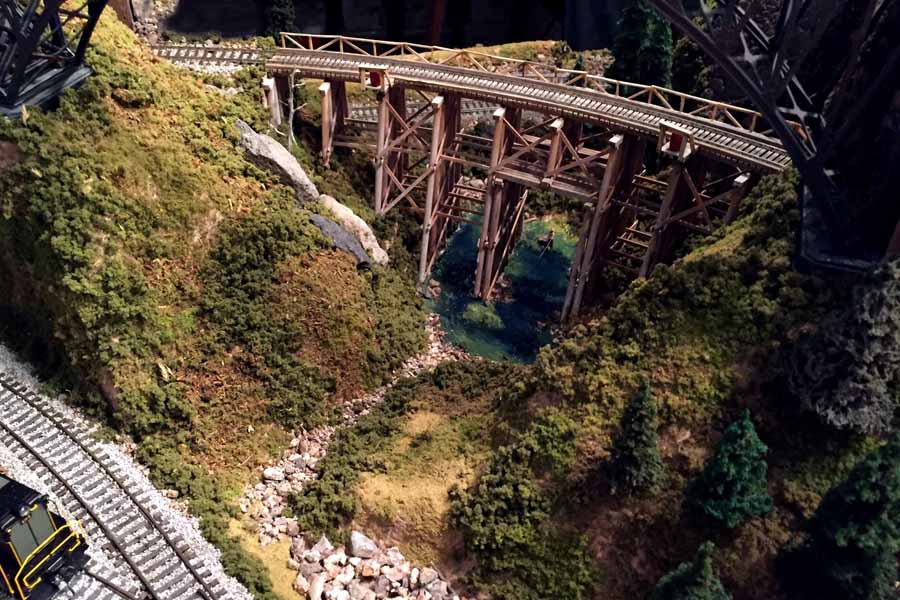
Attached is a ‘before’ picture and two photos of the completed scene along with a short video.
Keep your rails shiny!
Mark”
Next, on to John:
“Hi Al,
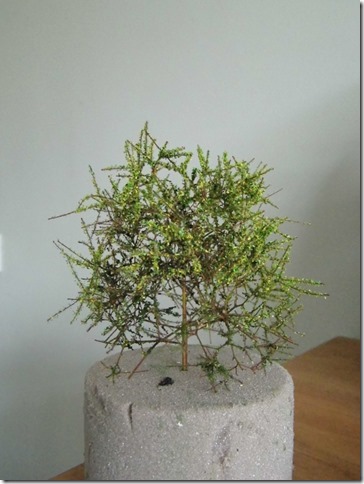
I had been using Sea Foam to make trees for my layout and have been very pleased with the results, but have been looking for a cheaper option.
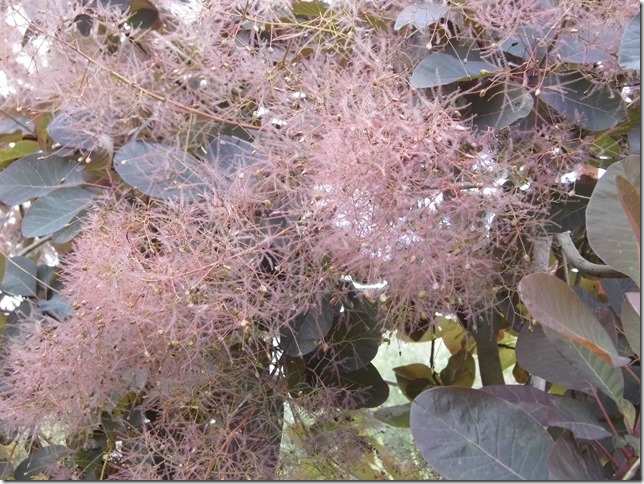
Yesterday whilst sitting in my garden I noticed our Smoke Bush ( Cotinus Coggyria) had what looks like a viable alternative.
The ‘flowers’ have some tiny seeds which need to be snipped off, but my first attempt, using hairspray and scatter, shows promise.
Maybe needs a trim, some more scatter and placed in a group.
Obviously I don’t know yet if they’ll stand the test of time, but at the moment they seem pretty robust.
Best regards
John”
Wise words from Mark – A big thanks to him for sharing his ‘how to build model train scenery’ tip.
It’s a tip that is echoed by others in the Beginners Guide too.
There are also more scenery tips here too:
That’s all this time folks.
Please do keep ’em coming.
Best
Al

great tip Mark my two favourite past times as well
Love the trestle bridge Mark …well done .. ..Dave
Never been fishing, but I gather it has some advantages – like making your leisure time seem to last three times as long!
I’ve just spent some time trying to sort out a set of points that seemed to be derailing the train that normally uses it. The train worked fine round the rest of the layout so I assumed it had to be the points, right? Wrong. It turned out, when I realised it was always the front end of one particular coach that initiated the derailment, that it was a vehicle problem – I think what was happening was the sprung swan-neck of the close-coupling was catching on a slight blemish on the vee plate in the mounting. Gave the vee a gentle scrape with a craft knife, problem seems to be fixed, fingers crossed. What I want to know is, why do these things always rear their heads when you’ve got someone round to play with the trains?
Rod
Thank you for sending such an interesting and informative ‘before and after’ set of photos. Plus the video – really nice work. Excuse my ignorance (living in England) but what are the barrels on the bridge for? Do they still have wooden bridges or is this set some time in the past? Whatever: great stuff!
I have an box elder in front of my house. It put out several suckers which I removed . After they dried I saw a source for some really realistic logs, they even have bark. They range in diameter from about 9 scale inches, up about two feet. And about 174 scale feet long.
Lots of new and some old,stuff. I like your houses but would like to see some inexpensive industrial tanks andplants. Loading docks etc. Otherwise great stuff!
Thanks Marc, this is indeed a very appropriate advice…. that sometimes I forget, and then I have to go through disapointment.
Very well done. Thierry
Great trestle bridge! I agree that it is best to have fun building your layout, and to create scenery that is personally meaningful.
Jerry
I really like your layout, especially that the town is at the level of the bottom of the ravine. I never heard a diesel sound like that. The question about the rain barrels is that they were supposed to be there in case there was a fire on the bridge. In Canada, where I live these wooden bridges were filled in with rocks and soil by Chinese labourers who worked for little and lived in tents along the railroad. They used wooden carts to pull the fill out onto the bridge and then dumped it. Eventually you would see the railroad as if it had been built on a berm, all hand made. For more information on this story study the Canadian Pacific railroad on the west coast. More interesting railroad building techniques were encountered going over the top of the Great Lakes as piles had to be driven deep into the ground.
Hi, your right-on-the-Mark (pun intended) with your scenicking tip.
I too learned the hard way over the years that it’s always better to be in control over a project’s progress rather than let it run ahead of you and lead to frustrating results. Pacing yourself with reasonably sized scenic work areas of about 12-18″ is the way to go! Then continuing along reproducing what works rather than repeating errors over large areas has always worked for me.
By the way, I love the Badwater Trestle scene and the video with that 1st generation diesel (VO-1000?). Nice work! Thanks for sharing it with us. – Arnie
There it is again: frustration at trying to get your entire layout done at one time. Good advice Mark, do a little at a time. However, we all hate to see a little area looking great but it is surrounded by bare plywood and Styrofoam. Try this approach. Paint all that plywood and Styrofoam with dirt colored brown paint, or grass green, or a mixture of both. In a very short time you have a semi-finished layout. Not good enough? How about using some of Al’s paper buildings? Use them as temporary space fillers. Move them around and test your ideas for finished projects. Now concentrate on smaller areas one at a time.
Your trestles are super great! Where I grew up, back in the Maine woods, we had quite a few trestles and as a kid they always amazed me (they still do), albeit I have not tried building any – as yet. I might try one, now that you have given us such great pictures. Thank you, Bob
Great job on the trestle and scenery increments Mark.
The red barrels on the trestle are water for fighting fires. If a spark from the locomotive or a car with a hotbox (over heated axel journal box) started a fire the conductor could stop the train. Then the crew would use the water to put out spot fires so that the whole trestle would not burn down. A Maintenance of Way crew would then be dispatched to inspect and repair any damage. Very nice details on the trestle and the whole scene. Tim
water barrels on wooden and some steel bridges are use as fire control. hot ashes dropped on ties can cause them to catch fire. Steam engines were the worst . diesels today eliminate that problem but we still have vandals that have set some wooden structures on fire . they burned a wooden trestle or bridge on the Cumbres and Toltec Scenic RR in N M a year or so ago. and several old stations that were no longer in use have been set on fire . Like the consist on the G N . the boom car used as the work caboose is an other thing I had not seen . I some times add a flat car in front of the boom car as there are some places I have to switch and run it boom forwards .
thank you for your post. I enjoyed the video. Gave me new ideas to liven up my layout.
great looking trestle bridge, reminds me of the ones in wild west movies.
Paul from down under
A bad day of fishing is better than a good day at work! Great post!
Very nice scene, and a valuable tip. Thanks.
love the bridge cant imagine the time spent on it love the video with the train.
Here is an interesting, true story about one wood trestle. This railroad had orders that when a hot box is noticed, the engineer is required to stop the train and not move it until the situation was rectified and deemed suitable to move. Well, the conductor reported a hot box while on a wood trestle. As required, the engineer stopped the train immediately. The hotbox was hot enough to start the nearest tie to catch fire. All personnel abandoned the train – nobody got injured. However, the entire trestle burned to the ground, dropping the entire train into the ravine.
Had the rules allowed the engineer to use his common sense, he could have removed the train from the trestle, and saved the train. By continuing off the trestle as soon as the chance for fire was recognized, he could have even saved the trestle. Had there been water in the water barrels (assuming there were water barrels), they could have cooled the hotbox and structure. But – rules must be obeyed.
Keep on Training,
Carl in Kansas
By the way, the technique of building a trestle and then filling in with earth to make a tall embankment (mentioned in another comment) can be seen west of Omaha, Nebraska, USA on the Union Pacific Railroad line.
Beautifully detailed scene, loved the video.
Thanks for reminding us to concentrate on one project at at time. Cary B
It should be fun, and it is! Gave up the portended game of golf simply because the sport of kings causes more heart attacks than Heinz has pickles. Don’t need a 19th hole to create majesty in miniature. A passion for perfection is smiled upon, and encouraged to the limit of the modeler.
The scene today is majesty in miniature. Amazing how modeler’s from all over the world can compliment, enjoy, learn from, and come a bit closer to approve this awesome effort. Odd how people who may never may meet, except for a moment on Alistair’s wonderful platform, can come together in complete peace. This man from England has given us a gift 🎁 beyond value. Bless you all YOUR LIVES MATTER!
Mark….. you are so right…….I think a while ago you gave this same tip in one of your blogs to Al. I have been working on completing the second section of my Sunnyside Yard layout which is the Commissary Yard. There is a lot of activity that takes place at the Sunnyside Yards in Queens, New York, preparing the passenger trains for their trips south and west along the Northeast corridor. I have been working a long time on this section, working on individual scenes and I took your tip from a while ago to work on one scene at a time and not try to complete everything at one time; especially with scenery. Thanks for the tip and thanks to Al for posting. I hope soon I will be able to send Al pictures of the scenes that I have built on my layout when I am almost done with the Commissary yard. One thing about scenery…….you are never really done……always tweaking and adding and changing.
Wonderful jon Mark – that trestle bridge is amazing. Well done.
Sound advice on the landscaping – model railroading is no longer a pocket money hobby, not even at our age – I’m in my sixties!!!!!
All the best.
Brian, Wokingham, UK
Hey Mark, great work! The track on the bridge appears to be hand-laid … what about the rest of your layout? I’m contemplating hand laid turnouts and track when I start my new N scale pike, and would benefit from hearing from others who have gone this route.
Re: Fred S’s comment, I grew up in NW Omaha (Benson area). The fill is called the Dodge Street Cutoff. It shortened and straightened the main line between Union Station and Elkhorn, Ne. and is several miles long. The old mainline became the South Omaha Branch.
Great advice Mark! I get too caught up in designing track plans and laying track to stop and scenic just one area so I can see if it will ever look right. Some of the most fun I had building scenery was with a Woodland Scenics practice kit that built a 12 x 18 inch module and scenicked it. I use it to take photos of model RR equipment for product reviews or sales on eBay. It looks a lot better than a plain piece of track with o scenery. I really enjoyed your brief video.
Pretty Kool.!!!! Keep up the good work.
Great tip and great video (with the train running at a realistic speed!). Thanks Mark!
Great Tip, and the layout pictures were great to
Yep, patience indeed a virtue in this hobby.
very nice trellises.ive always likes sets with these on them.
Mark, couldn’t agree more with you on doing small scenic areas at a time. Every layout that I have built, I adopt the same method. As you said, you always improve as you carry on and fix mistakes as you continue.
Rod Mac – I had a similar problem with a point (switch) where the train would run over it in one direction perfectly but in the opposite direction it would derail (the locomotive that is). It turned out that a guard rail was the culprit as I tested a different locomotive and it also derailed at the same section. Solved the problem by running a file over the offending guard rail. Problem solved.