More model train stuff…

A real mixed bag for you today.

Ever since I published some train pictures a long while ago, I’ve lost count of the times the below three have been mailed in.

So I thought I’d publish them and get them out of the way!

Beautiful aren’t they?


Next stop is one of my recent posts. It relates to this one here.

A fireless engine was new to me – but thankfully I got some mails on it:

“The fireless steam engines, often laughingly called teapots or tea kettles, were used in many places where an open flame in a traditional firebox would be dangerous. An example that immediately comes to mind is that Eastman Kodak had several at their chemical plant in Rochester NY. Porter built many of them.

Ed”

“We have one of these “fireless cookers” at Steamtown, not running of course. They were most common at one time at industrial sites. PP&LElectric Co. had one. On a similar vein, I know of two area examples of old steam locomotives being attached to industries to supply their steam during emergencies and during plant boiler replacement projects. The Lackawanna and the Reading are two that I know did that. It was a small source of revenue from old engines that were not very road worthy in the late days of steam.

Thought the “troops” might be interested. Thanks for including me on your mailing list. Some really neat stuff out there and I enjoy it immensely.

Sincerely,

Don”

“Alastair –
If you haven’t heard already, that 0-4-0 loco is referred to in the States as a ‘Fireless Cooker’… they were used in alot of factories that dealt with flamable/explosive material… amunition plants (primarily).

Dave”

“These engines were usually employed in areas such as munitions and chemical plants where an open fire could prove dangerous. Also, there were engines which ran on compressed air – same principle.

cheers

Bob”


And now on to another friend in need, as so many of helped out Wayne last time:

“Hi Alastair thanks for all the great info you send out to all of us. I for one really appreciate all the ideas. I am an ex pat living in the US. I belong to a local HO Modular club but at home model N scale.

I get back to the UK every few years but not often enough.

The reason for my message today is to ask for advice or information. My 91 year old dad and 88 year old mum are still alive and well living in Southern CA. For a hobby they enjoy making scale model buildings. The scale changes and actually they are pretty good at it. They built a replica of the church they were married in Killamarsh Derbyshire and Conisbrough Castle near Doncaster where my dad lived and in who’s ruins he played as a child. They were both employees of British Rail before and after WWII and my dad served in the RAF during that war.

What they would like to do is build a model of an olde British pub with a thatched roof. In talking to him this weekend he said he wasn’t sure about making the thatch and also getting ideas for a pub design. He has emailed pubs in the UK and asked for photos of pubs to get ideas. So far he has not got a whole lot of response.

What I am looking for is links to instructions etc for making thatch for modeling and any pictures of old pubs etc. I thought as a modeler in the UK you might be able to help.

Thanks again for all you do…..

John Dye

Yuma, AZ USA”

Any ideas? Please do post a comment below.


“Hi Al,

Thanks for the emails. They are great and very informative.

I have attached a photo of my first attempt at a layout. Let me know what you think!

Regards,

Graham Alexander.”


Hope you’ve enjoyed reading this installment as much as I have writing it.

Love all your comments (especially about theebay cheat sheet‘). Please keep ’em coming.

And if you want to get started, the Beginner’s Guide is here.

Best

Al

PS The ‘broken down old shak’ in the print out scenery was really popular, so my boy has done another:
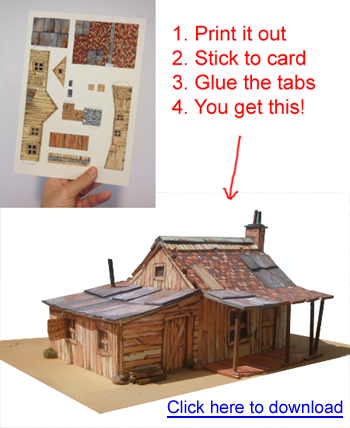


Roger’s climbing plants for your railroad

“Hello Al

This occurred to me while I was re-building a badly made-up OO gauge house kit. I love poorly constructed and broken plastic building kits. They’re a bargain on eBay because no one wants them and you can get them for a song. Once you’ve taken them apart and re-assembled them, you’re left with lots of imperfections which are a challenge and fun to disguise. This is one way to do it – requires little or no skill – is very quick – and foolproof because even slip-ups look good. You can cover up glue marks, missing chunks of plastic, dodgy windows, broken guttering – all manner of mess. And it costs nothing.

The photos can’t show the results properly because they’re two dimensional. In reality the plant is proud of the wall, falls way from it in places and has texture – really appears to be growing on it. The pictures make it look ‘painted on’ but should give an impression. Here’s the process: –

(1) – Cut a short length of thread, dip it in the dark brown paint and lay it on the wall from the bottom upwards – vertically – the root branch. If it splatters a little – great – exactly what ivy appears to do. The paint itself glues the thread to the wall. Cut more lengths of thread, dip them and lay them from the main stem outwards – up and over the roof if you like – across windows – the more haphazard the better. Gently dab them down if you wish.

– Make a little paper applicator for the sawdust.

(2) – Once dry, drop blobs of glue on and around the branches, allowing plenty of brown stalk to show through. Use a matchstick to apply the glue. You’ll notice that the glue reacts with paint to give a ‘crazing’ effect and whitens – fantastic – exactly what dead ivy stalks look like.

– QUICKLY – using a the paper applicator – drop patches of sawdust into the glue – gently pat it in if you wish – leave it to dry. Just like kiddies’ glittering! You can re-apply if you want to build up the plant.

(3) – Dab blobs of green paint on and around MOST of the sawdusted areas – not all of them or you spoil the effect.

(4) – Trim off any unpainted thread ends – or dab a little green paint on them. Looks good if they stick up or fall away from the wall.

Bazinga! Tis done!

Of course you can use the same technique with tiny dabs of colour to create wisteria, climbing roses – all sorts of things. And ivy grows absolutely everywhere so it can brighten up the dullest goods yard.

Best wishes to all.

Roger.”


A big thank you to Roger. Don’t forget to leave a comment below!

And to all those still sitting on the side lines, or those just looking for inspiration, this will sort you out.

Best

Al


Steam engine with no fire!

Okay, so perhaps this is a bit off the beaten track of model railroads – but I found it interesting and thought you may too.


“Al,

Here are some pictures of a steam engine which has no firebox.

It was parked at the power plant of NCR (National Cash Register) here in Dayton.

A pressure hose was attached from the factory’s steam line to the loco. Steam was pushed into the thermos flask (the main part of the loco), and used to move it around the yard switching 2 or 3 small rolling stock cars.

–Ben”


And now dear readers, some help is needed.

Wayne has got in touch. And I thought I’d ask the collective – that’s you – on his behalf. Please post comment below!

“I read your material everyday. I print it out and have put it in a binder. If you can get some feed back on what I should do? I thought I had it figured out.

I am a novice and just getting into model railroading. Sometimes you get things that your mind cannot comprehend. A friend’s husband passed and he had HO trains and layout with accessories, some installed and others not?.

I picked it up this AM and now I have a 4 track layout on a 4×4 HO Scale board with trap door in the middle. All four tracks are separate buy can switch cars from one to the other.

There are five engines and several cars…. Bachmann and Atlas material. Enough track to build another rail system on a separate board.

There is railroad crossing with lights and signs, end of 3 track switch with lights, etc.

I have the ability to build the hills and buildings as I do scroll saw stuff. Work a lot with plastic.

Attached is a picture of the stuff I have.

1. Do I start all over and build new?
2. Do I work with what I have>
3. Or do I get creative and build around what I have?
4. Should I just start with one engine, cars and work my way up?

Wayne”


So can you help Wayne out? What would you suggest? I’m asking because I know we’ve all been there!

Oh – and don’t forget the new ebay cheat sheet”

Keep ’em coming.

Best

Al

PS Beginner’s Guide is here.