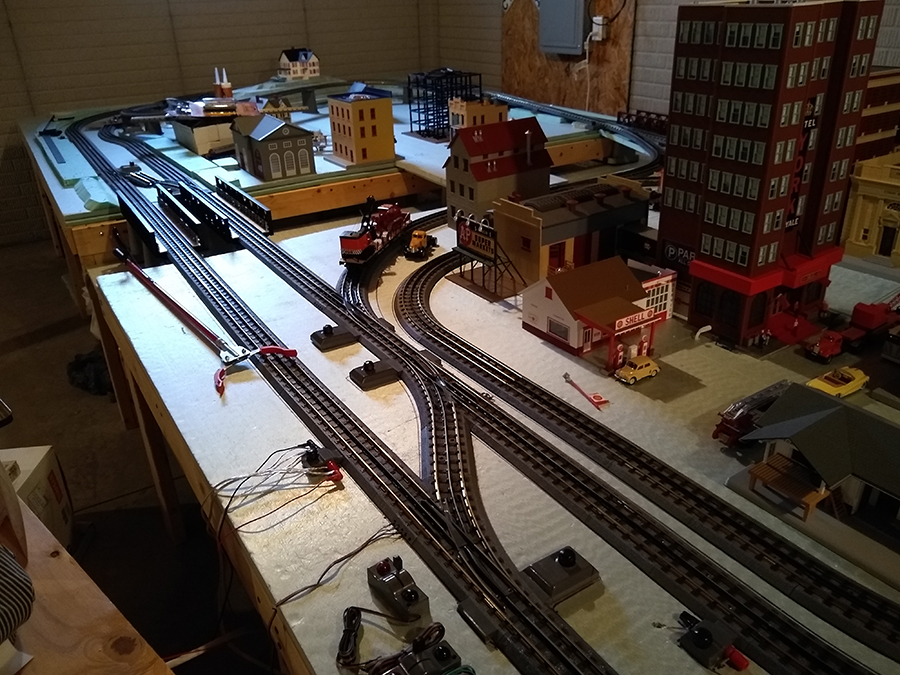
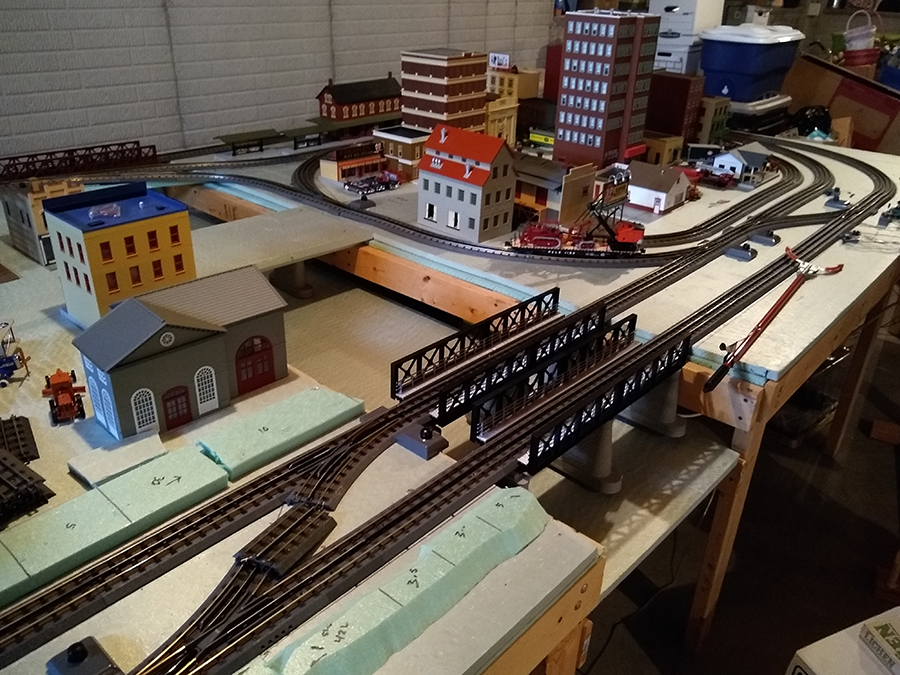
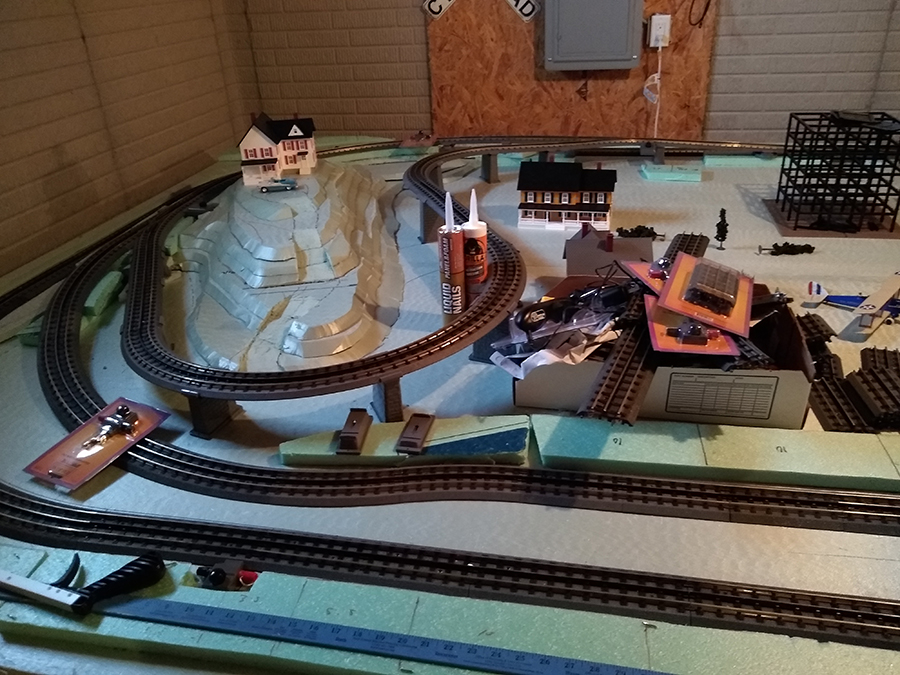
Jeff’s been in touch with his small O scale layout:
“Hi Al,
I have been receiving your emails for several years and have enjoyed them greatly. They have encouraged me in model railroading. I am from Ohio and a novice to this hobby.
I’m sending you some pictures of an attempt I am making at a small O scale layout.
As you can tell I am running a loop within a loop. I have connected them with entrance and exits turnouts. I know I’m supposed to use insulated track sections. But I don’t know exactly how to place those sections or configure the wires underneath.
When my locomotive exits the inner loop to the outer loop or vice versa, it shorts on the insulated track sections. I would be grateful for any advice on this.
Thank you so much for your encouragement in this hobby.
I have included a couple of pictures so that you can see what I mean.
Have a blessed day.
Jeff”
Next, Hall of Fame member, Rob, has been back in touch.
And it’s wonderful to see what he’s been up to (his last post is here if you want to get up to speed.)
“Hi Al,
My Farland layout has seen a few changes which I thought some of your readers might be interested in.
I decided I wanted to build a flats kit by Kingsway Models for the layout. I do not have any urban structures on the layout and I thought it might be fun. But where to put it?
The only place that made sense to me was at a road intersection where there was a patch of level ground but then a fairly steep drop off. How could I possibly get the building to sit plumb?
I thought and thought and finally came up with the idea you see.
I cut out scale beams and columns form some scrap pine, then glued the columns to the beams and with superglue attached the columns to the beams. Knowing there would interference to the beams on the side with the hill, I estimated the lengths that would fit and left those parts out.
I then glued the beams with the columns to the underside of the building (it has a flat bottom). If a column hit an area that caused trouble I just broke it off easily since superglue is so brittle.
Since the building was going to overhang the road by a little bit and I didn’t want it to interfere with my Faller Road, I inset the column on the corner and hollowed out the lower section so it looks like it is buried into the hillside.
Since the train table is level it sits on the columns which sit on it and the building is plumb. Problem solved. It was a head-scratcher though.
Here is the before pictures where it is propped up on the box:
Below is the video after it is finished.
Rob”
Latest ebay cheat sheet is here.
A huge thanks to Rob. I do love his Farland Howe layout. There’s always something to learn with his vids too. Can’t wait for the next update.
And who can help Jeff? Please do leave a comment below if you can.
That’s all for today folks.
Please do keep ’em coming.
And if today is the day you get started on your layout, the Beginner’s Guide is here.
Best
Al
PS Latest ebay cheat sheet is here.


Rob,
How are the DHL truck and bus guided down the streets on you layout? I don’t recall ever seeing anything like them on any other layout video.?they are really neat. Kudos on your building addition.
how dothe DHZZL truck and bus work on your layout?
Great start, Jeff. It is always great to see the efforts of another “o-scaler” (“high
railer” “three-railer” or whatever they call us).
shlack
Hi Jeff, nice layout. I see your running a 3 rail system which appears to contain a reversing loop. As such there should be no problem with connections as the centre rail is always the same polarity and likewise for the outer rails.
If your using DCC then all the sections can be connected together.
With DC you’ll need to isolate the loops if you want to run more than 1 engine on the layout. Just put your isolating connectors between the points where the loops are joined. No need to worry about switches between the loops though as there is no need to reverse polarity and the engine will run happily from one loop to the next.
Have fun,
Luen
If the loco shorts only when running across from one loop to the other, and runs OK on either loop individually, I wonder if you have mixed up the live and return wires to one loop? The loco wouldn’t care whether the third rail is live and the track is return, or vice versa, but would short out right away if it comes to a place where the feeds are the other way round.
Rod
If the loco runs OK on either loop in isolation, and only shorts when going over the crossovers from one loop to the other, it suggests the positive and negative feeds may be the opposite way round on one track?
Rod
Rob
Terrific work. Not easy being a master builder.
George from NY
Hi Bobb Farland Howe is no doubt one of the nicest layouts we see posted. Although the new building has been well built and you have gone to a load of trouble to overcome the location of the building, I do have to say that I don’t think it adds anything to the layout. I would go as far to say that it distracts from the layout. Even though it is in scale it look completely oversize. Do you plan to expand the whole are of the layout to incorporate more tall buildings. This may help improve the siting o the building.
Colin Edinburgh.
Rob And Dangerous Dave Are the most entertaining layouts .I could watch all day.
Carry on fellas. And Commercial free too!
I am excite see at last the Faller system incorporated in a layout. I hope we can have more of this as the German instruction leaves a lot to be desired.
As you know Al I am a novice and still in the planning stages. I have accumulated enough rails buildings am rolling stock, now moving on to bench work.
I am planning a two level layout and only have room for a reverse loop lto run from the lower to the upper. I am having a hard time figuring out how to make it work??????
Track plan to follow.
Wow! You are all so amazing. Thank you for posting!
Wow Rob, cool layout . It would be nice to see your layout from different positions at a distances where we could see the whole layout. Keep up the fantastic work.
Great layout rob I love the passenger trains
Jeff, MTH Real Tracks has a brass strip at the end of the roadbed. This brass strip carries power, you need to cover this strip with plastic electric tape. I think this will stop your short.
Marty, go to Rob’s YouTube channel, Farland and subscribe to his videos. There are lots of them showing the layout from many angles and through many changes. You can be entertained for hours!
It took me a second or two, to remember who was speaking I was expecting low relief buildings,ya know, flats, then it clicked, apartments . My yank is showing.
Nice job to Rob and Jeff.
Mn Dan
Hi Jeff,
In addition to making sure that your feeds for the outer rails of your loops and the outer rails of the inner loops match polarity, you will need to place an insulated pin in the center rail of your tracks. This insulated pin(s) should be placed between the center rail of the outer loop and the center rail of the inner loop at the intersection of the two switches. That occurs between the curved sections of the switches. Judging by the photos, your layout ids going to be fantastic. Thanks for posting.
–Tom
Rob, That was your best video to date. Could you please explain the mechanics of the DHL truck and bus. Thanks.