“Hi Al,
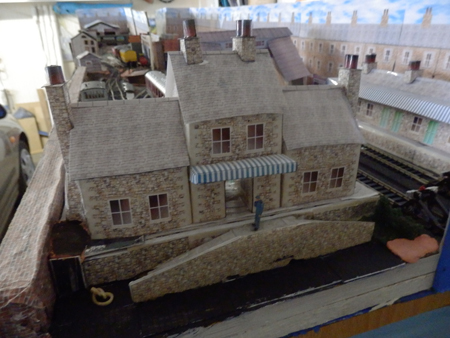
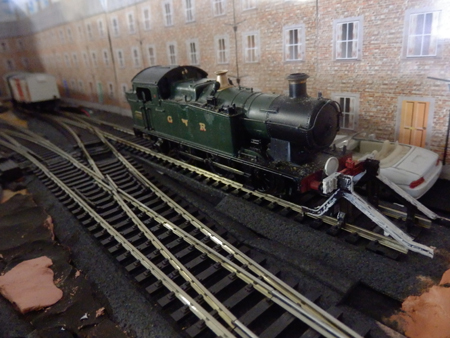
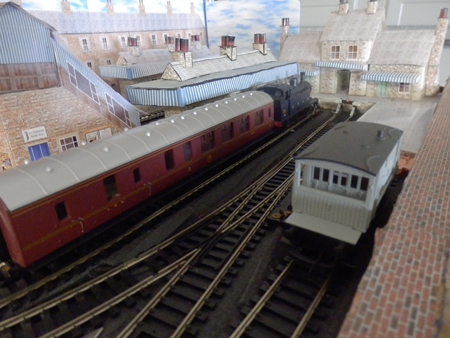
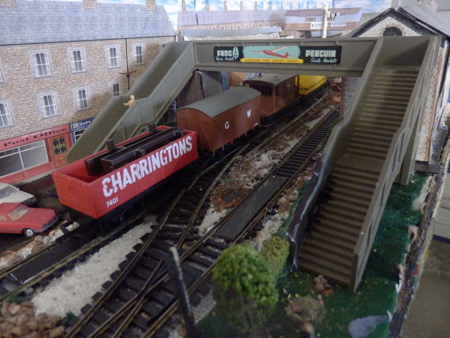
Here are some photos of My new layout, built on top of the old one.
I even got a name for it ,MIDLAND GREAT CENTRAL JOINT RAILWAY.
The line is jointly operated by the Great Central and the LMS.
The line used to go further than Sherwood but in its freelance history closed the rest of the line..
The Station in the photos is called Sherwood Central. The photos show the trains I am using and the goods yard area.
One of my locos is the Bachmann/ Rail exclusive limited edition model of Class 57 57604 Pendennis Castle, she is the green diesel at Platform one with her lights on.
Other locos are 0-6-2 56 class 6606 and class 104 0-4-0 tank.
The line is still being built but I done the scenery first.
Paul”
“Ever wondered how to make an Ariel or lightening conductor for free especially for those card buildings? Simple really.
just take a piece of the waste plastic rod from any model kit or you can buy the thin plastic rod (polystyrene rod works best).use a heat source and hold 1 ONE end of the rod and twirl. slowly around to heat around 25mm 1 inch from the other end till it starts to bend under its own weight then gently and slowly pull the ends apart until you have the length you require.
If you need a really thin piece just pull a little quicker – a longer one just keep pulling the ends stay soft longer than the middle so if you are careful you get a real long Ariel – lightening conductor or a number of them happy modeling
John”
“Hey Al,
Here’s a tip for making screen for HO windows and doors.
Take a pair of your wife’s old panty hose, ask first. Cut them into 4, 6, or what ever size squares are easiest for you to work with. Take a piece of old ceiling tile, and cover it with wax paper. Stretch the hose out until it looks like scale screen, and thumb tack it down over the wax paper to hold it in position. I use India ink and alcohol to stain the hose black, but any stain will work so long as it does not dissolve the hose. India ink and alcohol doesn’t. Let the India ink and alcohol dry, then coat the screen with diluted white glue or matt medium. Let dry, remove from wax paper and cut your screens to size. This method looks very much like real screen when mounted on a scratch built window or door.
Ray”
And seeing as Rob’s video explaining his layout went down so well, here’s another one:
Thanks to everyone – please do keep ’em coming.
Apologies to anyone who has sent in a mail and I’ve not got back to them. I do my best but I get too many to manage…
That’s all for today folks. Please do keep ’em coming.
And if you want to take that first step, the Beginner’s Guide is here.
Best
Al
PS Latest ebay cheat sheet is here.

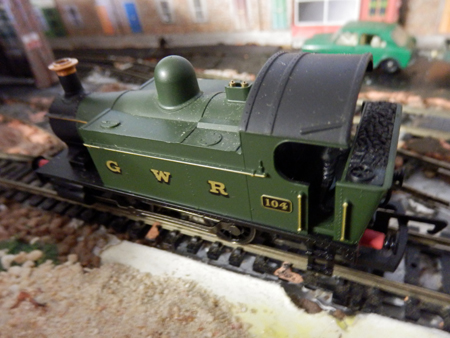
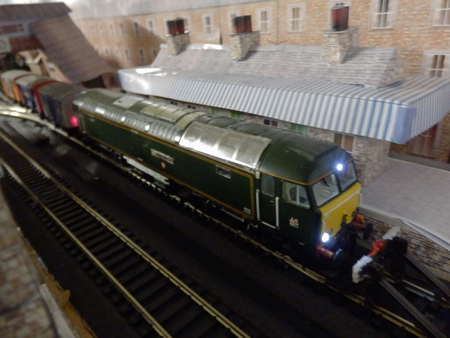

lloks very good Paul , and Rob i have answered your on Youtube nice job
Looks very good hope to see more
An idea for Rob who is working on the Farland Howe layout. You might consider leaving the access doors off the two sides of your mountain. It would allow visitors to your layout a glimpse of what a train looks like while it is going thru a tunnel. You could string a series of white LEDs and power them at a low voltage so that they would glow just bright enough to illuminate the train as it goes thru the tunnel.
very well done,i have learned a lot from this. not so afraid to tackle my own now…
Great layout Very talented and patioent….
Question, I enjoy seeing all these layouts,as they help me to improve mine, however I am an O gauger, Are there any o gauger layouts out there.. I see very few.
Good layout Paul enjoyed it.
Thanks everyone for your kind comments.
Very soon you will photos of a cardboard signal box that has been fitted with inside lighting. So watch this space, same time same channel.
I also intend to conceal the fiddle yard, it has 2 tracks leading into it.
one line will be disguised as an industrial siding.
I wlll also put a tunnel over both tracks.
VERY SLICK LOOKING LAYOUT.
Can’t wait to see the scenery on the mountain. Looks great.
Excellent work sir! Especially you on top at the end of the vid waving “Bon Voyage!”
Would you mind sending us you knowledge on scenery design as well???
Hey Al– “CRUD” is crud and thats what we like it to be called when we dont want it where it gets to be!!!! LOL!!!
AH CRUD!
Wow, thanks for all the great comments. I have a new video camera on order that I hope will help the quality of my video. I have almost finished with scenery on the mountain now, but perhaps I should leave a bit and video finishing it. I am not any kind of expert on scenery. I am a beginner, but would be happy to demonstrate what I have been doing right or wrong.
Watch for more from Farland Howe on You Tube!
Paul, the mountain looks great! It would have been nice to see the plaster cloth going on, but seeing how to build the frame solves a problem for me.
Keep up the good work.
Nice picture of 57604. I see that Loco in 12in to the foot scale at my depot in West London when it pulls the Night Riviera Sleeper set to and from Cornwall. Looks much longer in model form.
I am just about to get started back into model RRing and love the pictures and the videos; they have given me a wealth of ideas however I am having trouble guessing the gage or the scale.
It would be extremely useful for all of us newbies (or at least this one) if the contributors could state the gage or scale.
Thanks
Great buildings. They look so realistic. Mountain looks good but I would have used heavy cardboard of extruded foam board to lighten the weight and expense of the wood.
Best regards
Terry- Miami
Very nicely done looking forward to seeing the finished product , wait we are never finished so let me say when you have the ground cover and some trees on it . Keep up the good work and have fun while doing it that’s what this hobby is about.
How much room is required to run O gauge when O-72 is involved. Please respond with as much info as possible and I am an O gauge – 3 rail modeler myself and would like to see more in this scale as well. Everyone and everything shown helps and they are great, but I would love to see the O scale as well… Thanks
I have been receiving lots of good information from Alister Lee and all of you that contribute to these sites. I have just got the students of my Design & Technology class to make a board layout of cedar marine plywood which hopefully at Christmas time I will be able to send you some photos and a video 2200mm x 1500mm.. I too have had trouble with curve points and have found that the new wheels on new wagons are finer and I have purchased a lot of new wheels too fix this problem. I like the door idea in Farland Howe’s video. Thank you all for great tips..
Brilliant guys!!!! Thanks for sharing…..Great progress Rob and well done!!!
John E. UK
Nice Great Western R.Y. layout . That Rivera sleeper was that a through sleeper ?
Do they have any “OO”, SCALE H-O , in the U.S.A . The Brighton Belle the all ELECTRIC ALL PULLMAN M,U. train of the Southern Railway available . This was a 10 car train .
I do not know if this is possible, however it would be nice to click on the posted pictures of the layout and be able to enlarge them for better details.
Hi Paul, Great to see others working in G scale, love the buildings. Just wondering if you have room to expand? Very cool, thanks for sharing. Cary in Kentucky
I love it but too many tunnels?
Great video. I am several months behind you on my layout. We moved from a house to a condo. Fortunately my basement layout was modular and I saved most of it, though it is in a different configuration in the new place I am very interested in how you made the gully and bridge just ahead of the tunnel..
Thanks for sharing, great thoughts and ideas
Ray,
Packing gaps with toilet paper and dilutted white glue / water, works very well
Very nice layout keep up the great work.
Alastair, why would steam era engineers & firemen not demand enclosed locomotive cabs as found on (modern) diesel engines?
Every steam model, cab-forward notwithstanding, boasts an open-air AND no railing to prevent fatal falls. Am I missing something or were railroadmen just lucky to have a job therefore did not complain.
I’ve learned that the caboose, as a travelling crew house, didn’t exist until the late 1800s and was deliberately denied to train crews [who were forced to fend for themselves in all kinds of weather and at all speeds] by the railroad barons.
mike
great pictures of the layout. nice how to on the mountain thanks for sharing.
Rob. Sometimes we just get in too big a hurry. I have a 20′ x 16′ H.O. pike, and a nice “little” 5′ tunnel without access. Only one derailment was enough to remind me to have access built. I have another tunnel under a mountain and am planning access doors. Anyone wanting to see the train in the tunnels only need to ask. I’ll open the doors for them. Or maybe plexiglass doors will do. Love the use of plaster screen. And my pike has a number of Al’s printable offerings. I’m getting good with them in N scale now. Nice video.
Inexpensive 1/4″ paper faced foamcore board from the craft shop or school supply section of a big box store makes easy to shape mountain forming ribs. Glue in place with white glue or low temp hot glue gun temporarily secured with T pins. Add horizontal braces to strengthen, make tunnel roof, or road base. Cover with a grid of cheap tan masking tape (does not need to cover completely just enough to support next layer of plaster cloth cut into 12″ squares, or (cheap alternative) paper towels dipped into plaster mix or wallpaper paste. Build up a couple layers thick , smooth or adjust shape by adding paper towel bit mixed with paste to form pulp. Don’t build too thick, >1/4″, all at once or may take a long time to dry. If in a hurry use light weight spackling powder as binding instead of wallpaper paste as it sets by chemical reaction, not by evaporation.
love it