“Al
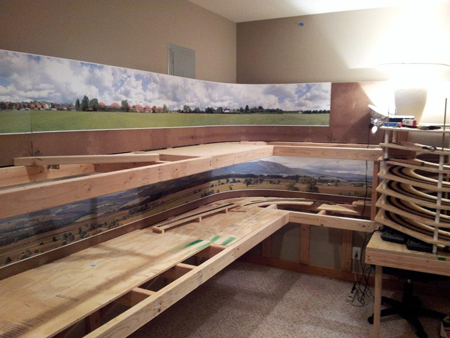
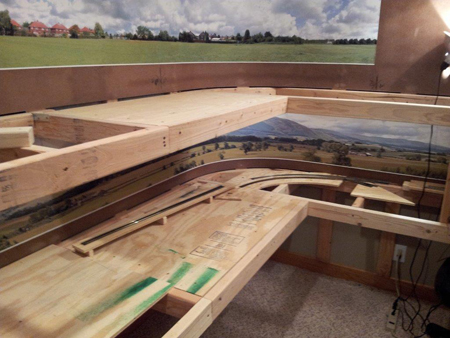
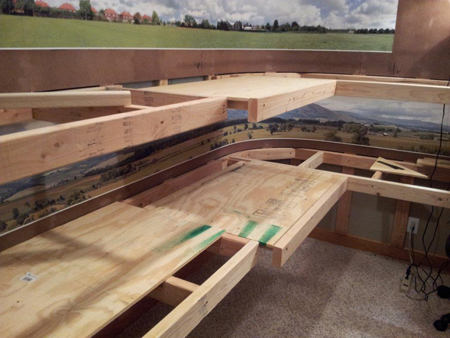
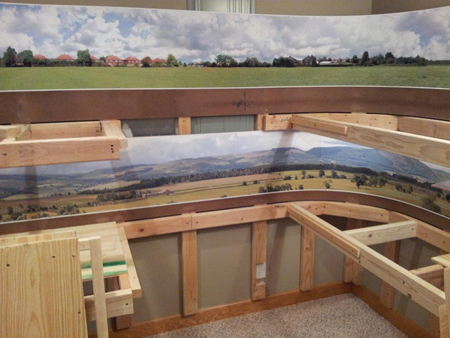
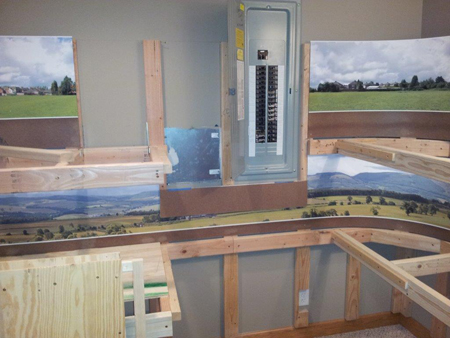
I finished the structure for the removable sections of the upper and lower decks per fire codes to be able to access the breaker panel.
The sections will normally be removed and set in place only to run the train.
The track will be at the elevation as shown by the temporary bridge that will be attached to the removable section and come out with those sections.
I decided to take over more of the room so my layout will get much larger than originally planned. This should answer the concerns that the one gentleman had about the electrical panel.
I’m going to start the lower deck track layout and the actual bridge over the removable sections tomorrow.
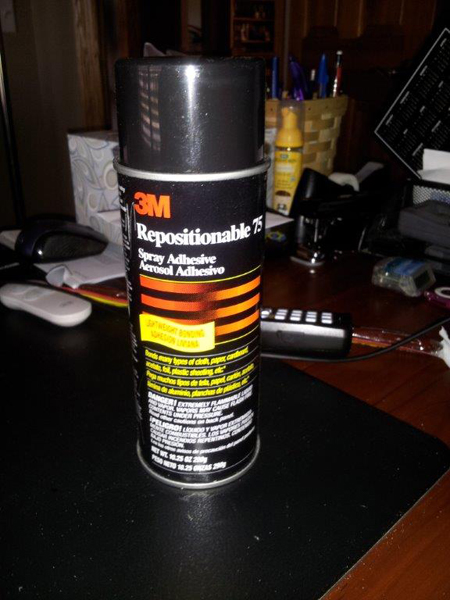
This is the spray adhesive I used to attach the murals to the masonite hardboard.
It’s called repositionable because you can reposition the murals as many times as necessary to get the joints lined up correctly.
I applied the adhesive to the masonite.
The murals I purchased.
The upper deck mural is quite obviously taken in the UK but it was the only one that had 4 consecutive images available and my upper mural needed to be 40 ft long.
Regards,
Barry”
A big thanks to Barry. Can’t wait to see his progress!
That’s all for today folks.
Please do keep ’em coming.
And if that train itch is driving you mad, scratch it with the Beginner’s Guide.
Best
Al
PS Latest ebay cheat sheet is here.


Nice job you have done there Barry with the joinery work, and that spray is a great tip
Never mind the excellent layout and clever helix design, I’m just gobsmacked by the carpentry of the base boards! Are you a cabinet maker of a shop fitter?
Disguise the UK backdrop with some vegetationor low profile buildings. Half of one of Al’s cheat sheets would do the trick. I look forward to seeing this development please keep us posted, D/
It is obvious a great deal of planning went into your table layout and design. Great work. I will look forward to subsequent updates.
Looks Great,Can,t wait to see the finished article.
nice woodworking…I like the viewing levels that you’ve chosen; good tip on the 3M product…thanks for that one. UK is a beautiful country; I like the backdrop scenes…
It must be nice to have all that room for a layout like yours. A lot of work I’m sure.
Barry, Barry, how does your garden grow … with backdrops, helix, woodworking, and the tracks all in a row. Awesome! Cannot wait for the next edition.
Thanks Al,
regards,
Tom
How did you do you back drops
Oh well like they say “the well made plans of Mice & Men” when it seems whenever it looks like everything is finally coming together and the layout looks really good a light bulb/wife pops the bubble an reality raises it’s head. Of course the Circuit Breaker Box will have to be made to have access to it. Bummer!
Changing the subject, the helix looks great can’t wait to see a video of one of your trains using it. Keep up the good work.
Great lay out. Lots of room can’t wait to see finished lay out.
GROOVY LOOKING LAYOUT.
just amaising i have seen kitchens that dont meet your standard of woodworking keep it up you have a big bench mark for the rest of the layout. hope the pressure doesnt get to you,keep the updates coming.
Wow…. Just Wow!
I await more updates….
Great looking layout, looking foreward to the end product
I Really Like The Two Levels Concept It Gives Me Ideas Of How I Can Condense An Area Of my Photo Studio Into A Full Time Layout. I Have To Be Careful To Not Invade The Area That I Need To Photograph Customers. This Could Be The Answer!
Nice helix. I am planning to have a helix to climb between levels
I have 20 inches to climb. How many levels do I need to stay about 2 percent grade.
In answer to the helix planning question. 20 inches to climb at 2 percent grade.
Firstly, 2 per cent is 2 in 100. So for every 2 inches climbed the track needs to run 100 inches. ~To climb 20 inches requires 1000 inches of run.
The question then becomes how tight you want the radius to be in the helix. let’s say we run a 4 foot circle (24 inch radius) then using 2 PI r as the circumference gives approximately 150 inches per circle. 1000/150 = 6.66666…. or in round terms. 7 turns of the helix to climb 20 inches at 2 per cent gradient.
Now for the reality check. 20 inches divided by 7 gives just short of 3 inches per turn of the helix which IS enough to get your trains under. So the plan should work.
Great job Barry! I do some wood working myself I really appreciate excellence you are very good at what you do. As everyone else says I wish I had the space to attempt something like this. Thank you for sharing with all of us your great work. I model N gage and hope to share some pic`s one day. As for the gentleman who worked out the math on the roundabout I wish he would give his name he`s really got it down, I may need to ask for his expertiese one day. Thank you all for your help. FROM THE DESERT RAT PHX AZ.
Layout looks great. I was wondering if the upper section will be called heaven and the lower one hell?
I was also the desert rat in phx, but now I`m in Payson AZ so i`m now the Rim Country rat a tat. I model a large N scale and med HO. Soon to be another HO small shelf type. Love the hobby Tom in AZ
Good pictures. I really didn’t see the helix. Do you have any plans that can be forward? What gauge track is your set up?
This is my first time to respond. I love seeing reading what other people have accomplished.
Impressive.. Just what I want 80 feet long..
Barry,
Brilliant bench-work and the helix and scenic backboard are fantastic. I am building an OO GWR layout, but wish to put a two-tier N gauge shelve layout with helix above it identicle to yours.
How did you get the support at the front-end as there are no apparent visible supports at the front of the baseboards or bench-work to hold it up? I would really appreciate some advice or plans. I can’t wait to see how you progress with your layout. Many thanks for the inspiration.
Best wishes
Jim
Would like to know what supports top level saw yours and am planning to do similar really like the layout. Mike Storey
I wish I had that much room to run a railroad. Great looking good luck hope to see when its all finished.
why the upper level ? Not a fan of helix’s . You don’t see Helix’s in real life.
On the other hand you do great carpentry work.As you can see I don’t hold back.I call it as I see It. The upper Landscape and lower landscape are clashing..I do hope you’re modeling in HO scale that would be a plus.
P.S. Why did you even put the breaker box in play,hence why 2 levels.Making removable panels will show and might take away from what you want to accomplish. Negativity promotes improvement.
I’m with Duncan. That carpentry is so awesome it would be a shame to clutter it up with choo-choos and fake grass.
Also, that helix is so solidly built it could support real choo-choos.
I believe it may be a building code violation to build or store anything in front of an electrical panel. Not safe for maintenance work.
Beautiful bench word. Could you please post some pictures or explain how you support the top level. Are you using metal L Brackets? How far do the selves come out ? ( I would like mine to be 24″ from the wall studs)
Thank you
David Miller
Great looking mural. I have the same need…about 35′ of mural for my backdrop. Grest work. Will love to see the finished product.
I wish I had known about that re-positionable spray adhesive when I put up my 30’ x 3’ background recently! By the way, backdropwarehouse.com has continuous scenes from all different areas of the USA in all scales. Expensive but really nice. They even customize for you. I had them reduce the landscape to under 1/3 so the hills would be in the distance and give me more sky for that Kansas “feel” .
The leading email to this post touts the helix, which I was excited to see, except that it is only in the edge of one picture with less than 1/3 of it showing.
That was not to pan the post, because there was a lot to see, and some very impressive cabinetry. The mural is also very nice. I’m looking forward to seeing the progress as you keep working on your train layout.
sweet
Forget the naysayers who offer “the negative comments.“ just remember that Leonardo da Vinci had critics too.
Your cabinetry work is outstanding; something that I envy.
Would love to see more of your work, specifically the helix.
So when time permits. could you post some pics of. the helix please?