“Hi Al,
I just started working on a significant expansion of my layout.
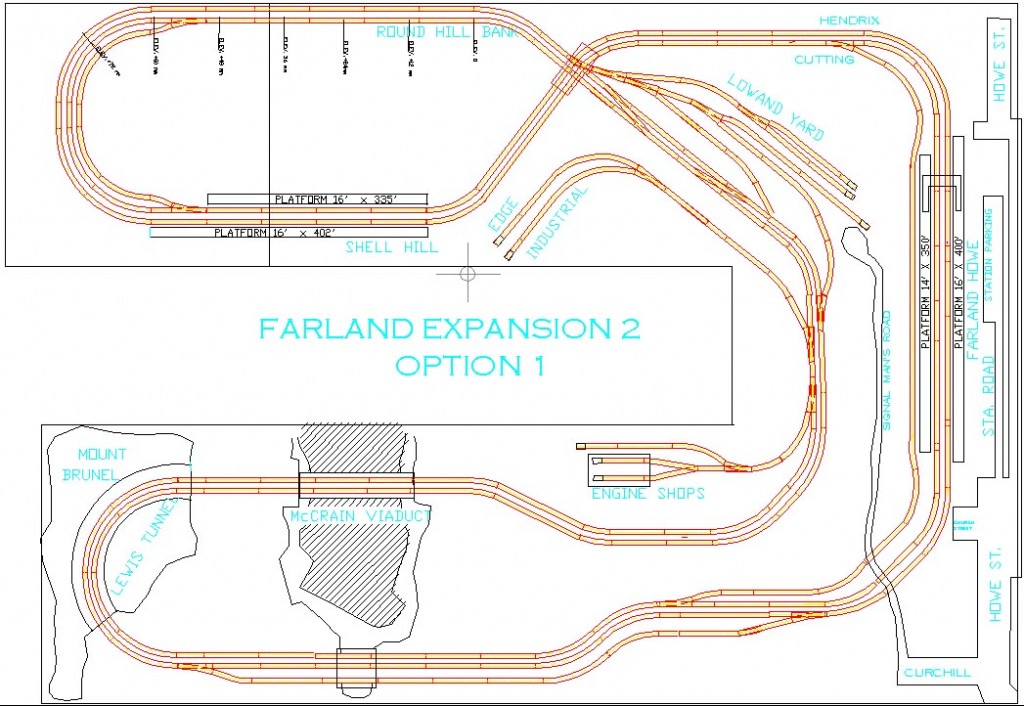
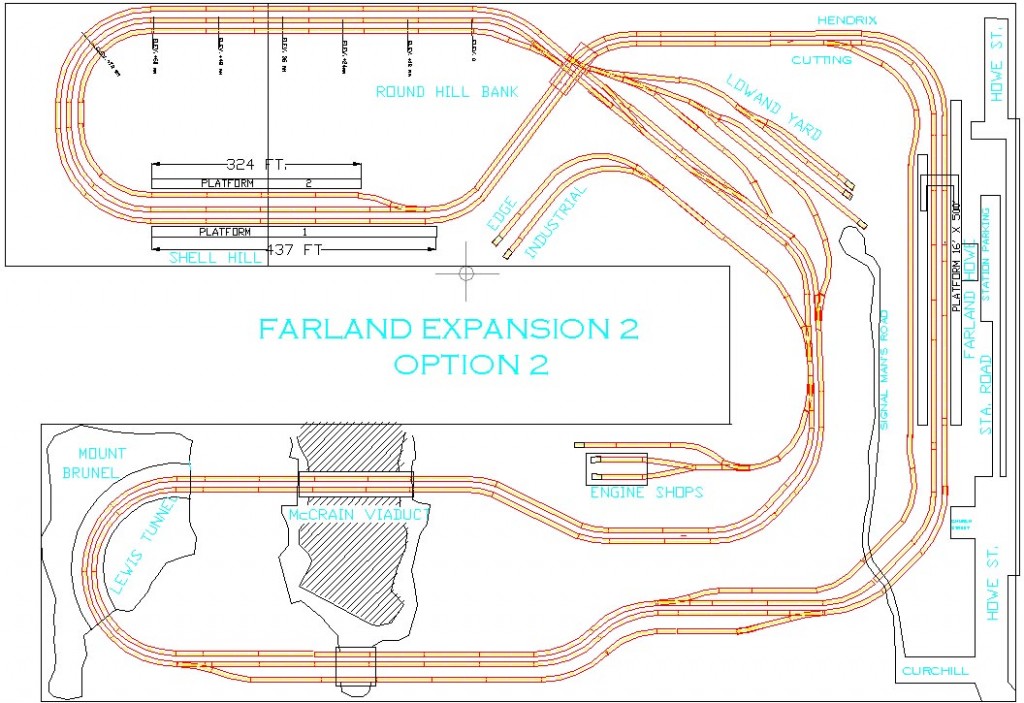
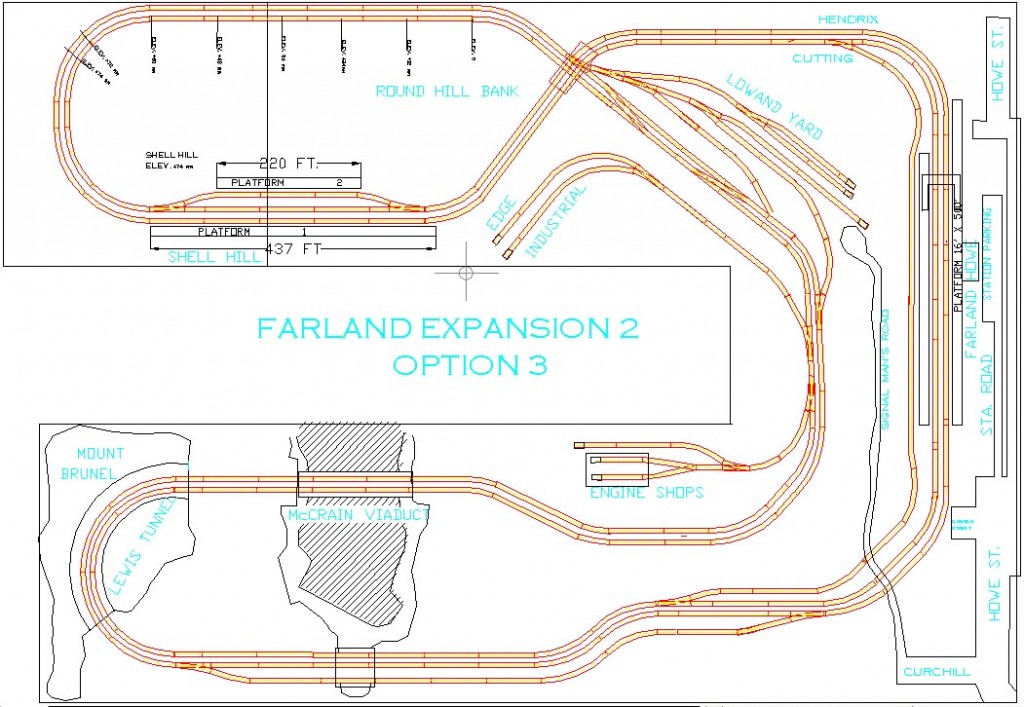
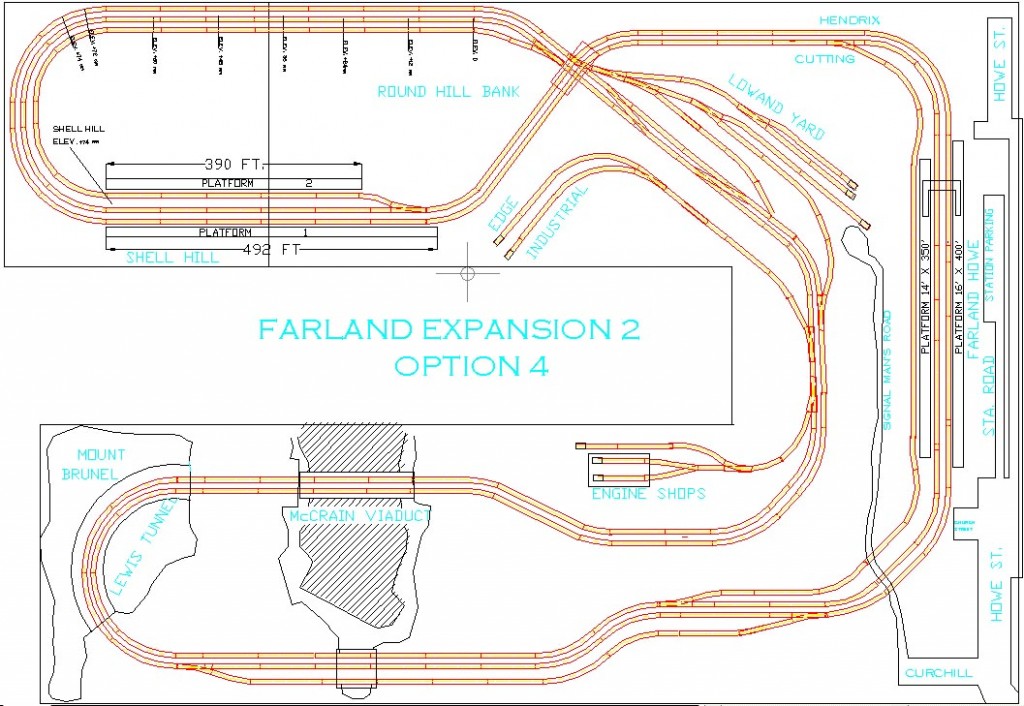
I hope to solve several issues. One is reliability where a declining track meets a curve and then a point, the next is reducing the severity of an inclining track that goes around a curve and immediately starts up an incline and the third is having another siding or bypass to store longer trains when I am not running them.
It may help other people that are planning layouts or are considering changes to existing ones.
I really enjoy seeing what all the other modelers are up to and getting the tips and suggestions for better modeling. Keep up the good work.
All the best
Rob”
Option 1
Option 2
Option 3
Option 4
Big thanks to Rob for sending this one in. Enjoyed it.
That’s all for today folks.
Please do keep ’em coming.
And if you want to make that start – just like Rob and everybody else did – the Beginner’s Guide is here.
Best
Al
PS Latest ebay cheat sheet is here.


An interesting layout that offers considerable flexibility in operation. You don’t say the overall size of the board and presume it is HO.
Hope all goes well
Brian.
Rob,
I would add option 5.
Put a turn out in the straight part of the left inside curve.
Put the other one the right of Shell Hill past the first curve before you go onto the bridge.
Like that you have 2 level turn outs, no long third track going up the slope and your platform at Shell Hill can be 292 ft at each side.
Just my 2 cents.
Cheers,
Jan
Why not put the passing loop on the outside track. So that the central track becomes the parking siding. Hope this makes sense without a drawing. Advantage is all the points and passing loop will be on the upper level,but will you will need 2 curved points.
Someone contemplating such a layout probably knows all I know and then some.
One thing is to make sure that points are not installed in the transition areas(where the climb starts) and “super-elevate” the track where the start of a climb is also on the start of a curve by about 1mm. This tends to throw the leading wheels into the curve and reduces the drag on the outside flanges making the start of the climb a bit easier.
That said, I have simply used shorter trains or more powerful locos (just like the real ones do). My ruling grade is 1 in 30 and the ruling radius is 450mm, this is about as tight as you can go with six wheel locos and then some of them hate it. My big union pacific sits on display until I can negotiate a larger space with the household manager.
Greetings… Nice looking layouts, but, I immediately noticed turnouts following a curve…This creates an “S” which are notrious for derailment of cars. You need to rethink those section, or you might have run issues.. (Bottom section, all 4 renditions)
Other than that they look very nice..
Cheers, Gernot
I like the look of the layout. I am trying to find a layout to build. Is the layout HO? What radius curves do you use? What is the overall dimensions of the layout?
Thanks.
Rob,
I have just started in the model train and track only 15 months ago. That layout looks awsome, the largest I have seen. Would like to try and duplicate it. My layout space is only 10 feet by 10 feet. Would like to know where I could get the plan from if there is one. If you can help let me know. Thanks.
Hi there, I would love to know how you reproduced your designs for your layout expansion? I am in the early planning/design stage for a layout and cannot find a good designing program!
Any help please?
Thanks
Jase
Why not move your point further towards the bridge after the curve and on the straight track. That way you could also extend your station to the right to accommodate your train, or go further yet and add a second bridge and put the point after the bridge on the straight section……just a thought 🙂
The overall layout size is 20 feet x 15 feet. It is 00 Scale and the track is the same as HO. The radii are either 438, 505 or 572 mm.
What you could do with an incline is have banker loco stationed at the foot of the incline, this may only work with DCC.
I think Rick has hit the nail on the head. On Plan 4, extend the track toward the bridge, or add a second bridge. Gernot is also right – avoid those “S” curves. Avoid derail potential, and it also makes for a more graceful looking layout. I also like the idea of using the center track as the storage track.
A second bridge using a different design would add variety and also an interesting contrast.
Whatever you do, good luck, and have fun.
What are the overall dement-ions and what scale are you working with i.e 1/4″ or ? I like the design and look forward to your next video
i am not much of a designer,in option 4 can you move the point at shell hill first straight after the curve.the layout it self looks great. hope to see more of the results after you have designed option 5. good luck is time on your side.
I have no further opinions to give … I just hope everything works out okay for you. Certainly looks great! Keep us posted
regards,
THOSE ARE SOME NEET LOOKING OPTIONS.
hi what size is your layout
regards
i also think yhat it does look good and is it digital
I do like Option 4 without a doubt. Very nice layout and going to be a super nice looking layout when finished. Loosing some water, but that is okay to have more track down in a larger area. I love more track. I am currently out of the train layout business for at least a year since I am in the military and posted away from home. Going home for Christmas, no doubt I will be running my trains. I love running HO Scale and I can assume that yours is N Scale by the looks of the beginning of the video. Happy railroading.
One comment I’d like to make and some contributors may think it worth following up: Recently I installed the (free) SCARM design software, and after getting to grips with it I found the following:
It places curves so you can’t make them too tight and automatically joins sections of set track or flex track. Components from many manufacturers in all scales are available to click.
It gives you all the elevations and tries to help you stick to whatever maximum incline you want.
It shows your layout in 3D so you can run through it on screen and get a basic idea of how it will look and run. Tunnels and bridges are done automatically with a click. And more. Love it. Now to get a bigger house…
I am just your friendly transgender model railroad builder(TMRB). I am wanting to find the app you used to make the plans. I tried Xtrackcad and I want to compare it to yours. Thanks. Emily Shelton.
I endorse the comments about avoiding S curves wherever possible. Where you do have to have one, the real railway would impose a permanent speed restriction through it – a sharp reverse curve might be 15mph.
Secondly, don’t worry too much if your train is longer than your station – on the Severn Valley Railway most of our trains are longer than several of the stations, we typically run 6/7/8 coach sets and some intermediate stops only hold about four, we just have the booking clerk and TTIs ensure that passengers know they have to be in the right part of the train for where they wish to get off.
Rod
Thanks for the demonstration.
Steve
I understand all the converstion , but….. thanks run those trains ,