John’s been in touch with a very clever Model train IR detector:
“Hi Al,
Your website and the products you offer are great for any level of model railroading, and recently I saw a few folks missives on signals, so I thought I’d send you my updated cheap train detection article.
I’ve been trying to get some way to detect trains as they pass, and drop signals to red when they go by.
There are some good detectors out there, but I wanted to see what I could figure out on my own. I’ve been fooling around with the little sensors used in manufacturing mostly made to send a signal for something, like a light being on, or to turn on lights when dark, or objects passing by on an assembly line.
How about people sensors? Both types had some utility, well the turn on the lights did just that, but not when I wanted to run trains.
The people sensors… well OK… sensed people, not HO trains, and when I adjusted the sensitivity they detected everything but trains.
Back to research, and success!
I found little IR detectors on eBay for $2.00 each. A lot less than that from China (just ordered 20 more for a total of $10.33!) but it takes a few months mail, and customs, and red tape to get here from there.
They are called Arduino PIC AVR IR Infrared Obstacle Avoidance Sensor Module Object Detector, and eBay has a ton of vendors selling them.
Size is about 16 mm by 50mm with a plug attached. They run on 3.3 to 5 volts DC, and will detect anything directly in front of the sensor diodes.
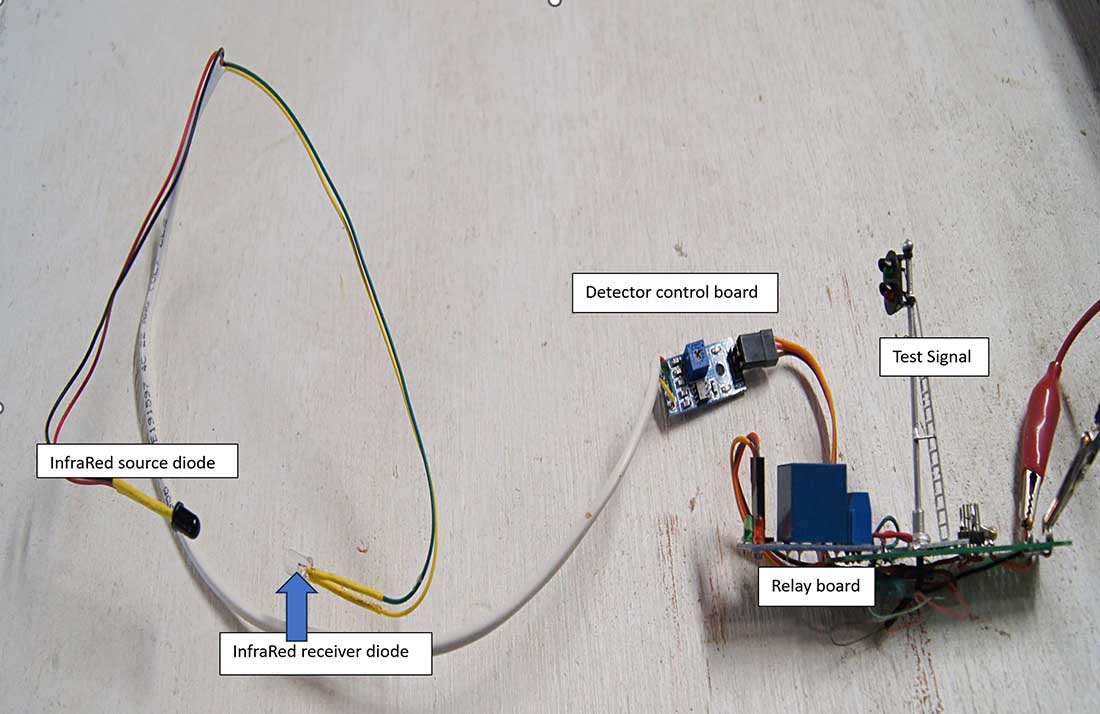
They work by sending an InfraRed beam out of the dark diode which is supposed to bounce off the detected item back to the detector Diode, which changes state when InfraRed comes in the front of it.
Out of the package, they will detect from as little as 8 mm and, with playing with the on the board potentiometer, out to about 40 mm.
They react fast, and in a few tests actually picked up the space between the passing HO cars. Not good. So I decided I would modify the detector, but quickly determined that connecting everything with jumpers and alligator clips was tedious and confusing.
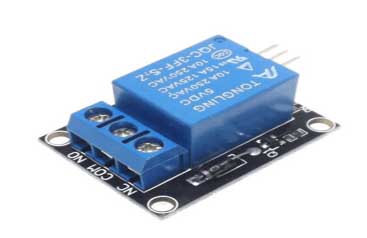
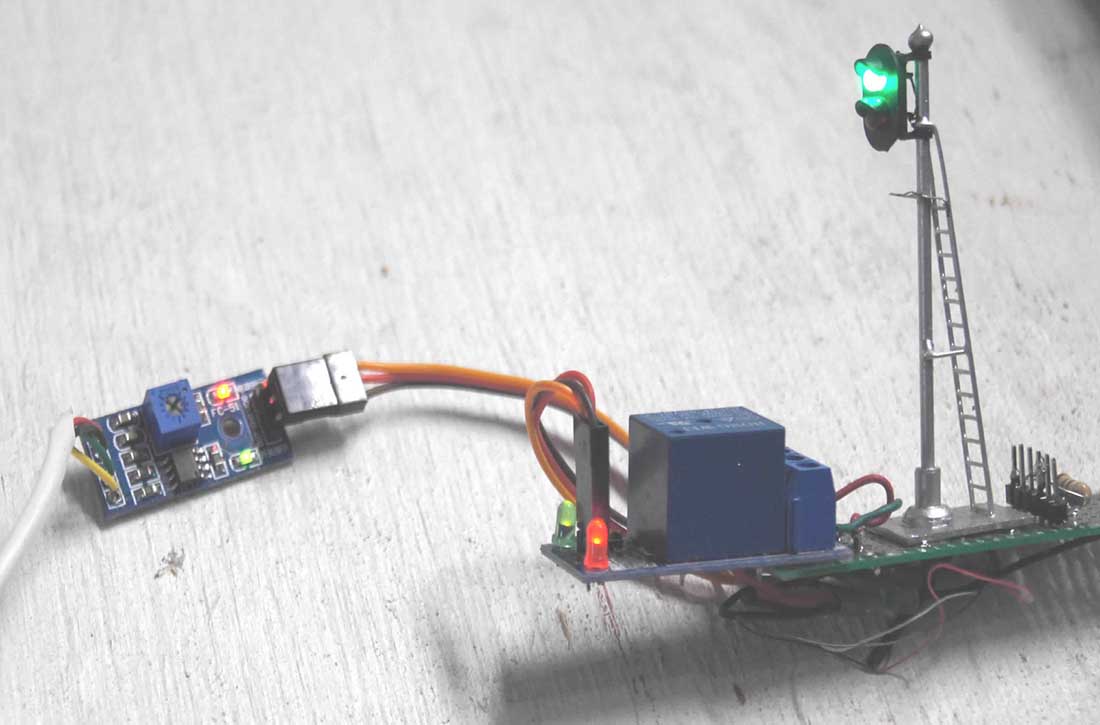
So I made a little test board. It has a place to connect my power supply, a common cathode, type “D” 2 color signal, and a relay to get the trigger from the detector and change the signal. I use a relay, also from eBay, 1 Channel Relay Module 5V Optocoupler LED for Arduino Pic ARM AVR (also on eBay) note that it has the same plug as the detectors.
These are single pole – double throw relay that work with the same voltage as the little detectors. By having several in tandem I can control all sorts of stuff, like killing track power if a switch is set in the wrong direction (called trailing a turnout, by the way) and a train is approaching the error set switch.
Obviously I can turn on road crossing signals, and by leap-frogging the relays, can have a real signal system – where operators go on green only.
As I got into the detectors, I realized that not only the range was a problem, but putting them in some kind of structure so they could “see” a train going by would also be difficult.
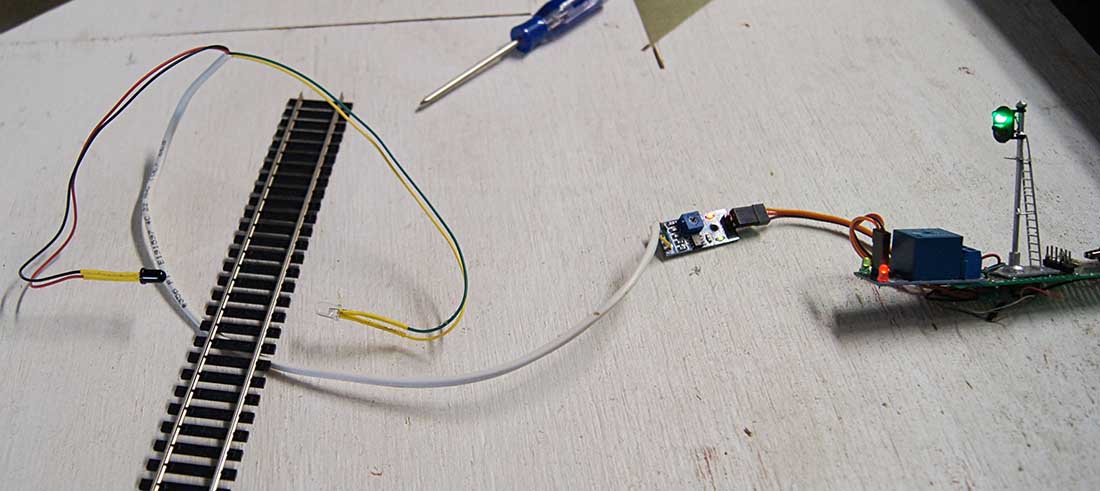
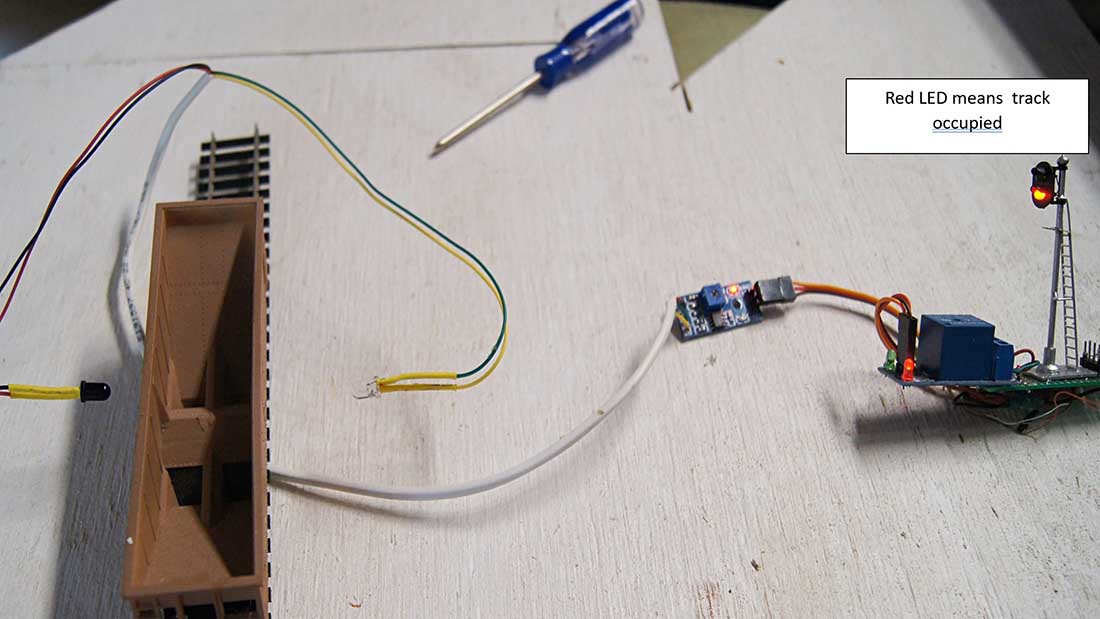
As we see in the pictures, the wires and little IR and Detector diodes are really small, and can easily be hidden in a trackside trash-can and maybe a tree stump on the other side of the tracks.
Since I’m planning on having a dozen or so of these detector/relay/signal sets, I also bought some 3 conductor Arduino plugs/connector sets that plug into the board and relay.
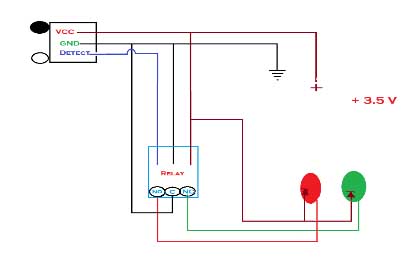
The circuit design is:
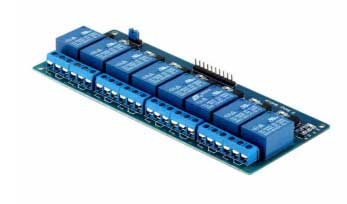
I found that the relay below is just what I needed to make a tester, but decided for the layout I’d get a bunch on one board, they come up to 16 relays on a board but I ordered a few with 8 relays.
1 Channel Relay Module 5V Optocoupler LED for Arduino Pic ARM AVR:
8 Channel Relay Module 5V Optocoupler LED for Arduino PiC ARM AVR
I wondered if I could remove the IR LED and Detector LED, and if they needed to have a specific wire lead length.
I decided to try to un-solder the IR-LED and Detector LED and extend them on longer wires, this allows for them to be hidden in most anything on the railroad, like in cars waiting at a grade
crossing, or in a little signal box next to a switch.
Some care needs to be taken as the little IR Led and Detector are unsoldered, wires extended, and shrink tubing applied.
Be careful not the lose the polarity. I added about a foot of wire, and 6” to each LED, like below.
Since they face each other now, their mode switched and they send a detect signal until the space between them is blocked, out of the box and mounted side-by-side, they look for reflected IR so they are normally not detecting.
So, how to detect the trains without blinking as the detector “sees” the spaces between the cars?
Decided to shoot the beam on an angle like below:
My signals, most from China, are LED common cathode, so the schematic shown above is how to wire them with that configuration.
If common anode, reverse the + common to the relay and connect the negative to the LED’s.
What I found is that when the IR and Detector are facing each other, the range is really increased. I easily detected a card blocking the beam from more than 6”.
When my test railcar even gets close, the detector hits it and the detector will report “track occupied” to the relay, which turns the signal red.
I’m planning on also having a parallel LED on my control board to also see where my trains are, and what tracks are occupied.
Humm, maybe a detector to see when someone opens my beer fridge would be an ancillary use?
Take care,
John From Baltimore”
A huge big thanks to John for sharing his Model train IR detector.
Here’s his last post if you want to get up to speed with his layout: Model railroad quarry.
That’s all for today folks.
Please do keep ’em coming.
And if today is the day you get started on your layout, the Beginner’s Guide is here.
Best
Al
PS More HO scale train layouts here if that’s your thing.
Need buildings for your layout? Have a look at the Silly Discount bundle.


Very interesting article, well done John.
i’m sure that i missed at one point but Alastair, all of us 100% appreciate the posts that you make showing the clever and creative ways that the model train builders contribute to your posts. i’m speaking for myself and i would assume just about all your contributors s big round of appreciation for you doing this. If we were together, you’d get a standing O. Thank you. it makes me feel great to see this. when i invite a neighbor dad and his kids in to run the trolley, they love it plus they get a conductor’s hat and a wooden train whistle to annoy their parents at home. You make us all proud. !!!!!!!
Nice work on circuits, very experienced and see has done such things prior. And yes, the 4 conductor old telephone cable ing is perfect for such projects.
I couldn’t ever believe how easily 120VAC could develop and transmit on telephone transmission lines. Twisted pairs helped but always that surprise connection. Especially the old analog alarm systems.
Rich, Regards
John has submitted one of the most clearly written, well structured and comprehensive electronic project tutorials that I have ever seen on this forum.
Easy to follow, with lucid descriptions and excellent supporting pics and graphics.
Superior submission all around … great job.
Like the others who have commented before me, what a well written article! This is what I’ve been looking for. Thanks for the detailed explanations and explaining your testing methodology.
This is a great project for the tinkerer. I guess model railroaders are tinkerers at heart anyway. or at least many are. It is a well written description and instructional piece that should help some folks take a swing at the issue of model train detection. When you get into 3 and 4 aspect signals it would get a little more complicated I expect. Great article, Rob McCrain
John
Cant thank you enough for your well written, brilliant IR treatise. This is great stuff. I never bought anything from Azatrax because they have had the HO NJ cross signal out of stock for 4 years and while I am in S scale now I’ll be damned if I buy their S scale stuff. If you do the math your way would save about $60 a signal anyway.,
Big Al
Denny’s got it right. Your blog and the super contributors have been a tremendous source of inspiration, information, and tips & tricks. Your sharing and hard work cant be appreciated enough!! Much thanks.
I wish I had the electronic experience that a lot of guys have who create circuits by “putzing” around. I would love to have a system that controls a crossing gate when trains approach (with DCC), and warns of approaching trains that a turnout hasn’t been thrown. But John’s description (and seemingly many others) is way over my head. I can wire tracks, turnouts, building lights and street lights all day long. I can make ponds seem lifelike, or craft masterpiece mountains out of foam and make dirt road look lifelike enough to make you sneeze! But when it comes to the electronic aspect of this hobby, I’m afraid I’m left in the dark. Great post to share for future reference.
Hi Al and John:
Thank you for your very well written IR Article complete with drawings and the Photos of how you wired your signal system. Question, do you need that self contained Arduino Computer module to run your system? Or is your system a “stand alone” type? How much control wire length can you install between the IR unit and the control relay module board by your signal stand? Or do you have to have the main board with the signal up close to the senors? It would make an excellent Block Control unit for Tunnels and Bridges…. Especially a long hidden tunnel, if the train derails, the detection unit would not change the signal indication of a train being stuck in a tunnel.
Also wondering if you thought of a way of using a relay to open and close a warehouse door or Coaling Station Coal Shoot to dispense coal to a hopper car or to unload one? Also Great Photos of your Layout as well…
Mike in N.H., U.S.A.
John, you gave me some great ideas. A big THANK YOU!
Nice if you have a degree in Electrical Engineering. There must be others out there to whom this description might as well have been written in Sanskrit.
Michael G – An Arduino controller is only needed when operating a motor, any on or off Arduino chip like the ones in this article can be run with with a simple 5V DC source. I always test with 3.5V and if everything works, I don’t need to add a resistor to light LED’s. Since the signal from the detector board to the relay and signal is a data Hi or Low the length of the wires can be as long as you need them to be.
Thanks for the kind words.
John
Now this is a huge gold nugget of information, well written, and done with inexpensive items. A lot of effort went into providing this article. I bet there will be many modelers that will gain much from this one. Tons of kudos John.
Dick Chapple Sr Hardin Mt USA
Very well written. I’ve saved it for future reference.
This is PERFECT! I think I can modify it to fit my needs: I have a lot of 22,45,60 degree crossovers on my layout and I need to make sure that the tracks to them are dead until a train crosses a sensor and activates them. Nothing worse than a sideswiped train! LOL
Great Article, but would you give us the part number or the number given by the company for the items you got. You are right about the number of IR detectors listed. But it would be nice to have the number you ordered. Plus there are two items, how about the number of each so I can find the same ones you are using.
John,
Great bit of information and very useful description and photos /diagrams. I am going to save this for future reference when I am at the point on my layout to install track detectors and crossing gates and signals.
You should find out where you can submit this article and photos / diagrams to the Model Railroad Magazine. So, that others that don’t know about Al’s website can also enjoy and use your useful information. Thanks,
Roy B. in Utah, USA (home of the 2002 Winter Olympics)
Donald R –
10Pc IR Infrared Obstacle Avoidance Sensor Module for Arduino Smart Car Robot US about $13 for 10
5V Channel Relay Board Module Optocoupler LED for Arduino PiC ARM AVR
About $1.05 each
use this description on ebay
John
Your solution to the problem of detecting the spaced between cars is so simple, and fool proof. I’m embarrased that it wasn’t obvious to me when I ran into the spacing thing. I like your use of the 16 relay board, and standardizing the connectors. I’d rather have a wiring harness and the connectors make that a possibility. I am not so good any more at laying under the layout with my arms working above me.
John……great article and how to on the relays……. I am saving your article for future use.
Check out Temu.com search for Arduino. Lots of stuff that could be applied to our trains, and all dirt cheap. I’ve ordered from Temu, so far all has been great.
I’m with a few of the others who responded saying that this is total Greek to me. I had hoped for something simple, sort of a “plug and play,” I guess. This certainly isn’t it. But that’s on me and my lack of knowledge about anything he talks about here,
What a well written and informative article!
I have been looking for a simple & inexpensive way of detecting trains in my fiddle yard for some time, now I think you given me the answer.
A big thank you from me.
interesting ideas. well done.
Great article John and very good pictures to follow, some day when I get my railroad up and running I’ll consider trying this set up, although I may have to do a little research first.
Hey John! Thank you for writing this up so clearly! I have thought about tinkering with Arduino relays and such but lacked the time to research the “How To” (and most of what I did find was confusing). So, Great work!
Jerry
Great work. Going on my projects list. And I thought I came up with a great idea. I wanted to change all my switch controllers to toggle switches and also include green (straight) and red (curved) led lights to determine the direction on a control panel. Your idea blew my idea away. Now if I can figure out how to power two track lines separated by a 072 switch using different power. My thought is being able to run trains on two tracks or one train running on both tracks. All thoughts are welcomed.
Can this be modified to operate an on/off relay to control a 12 volt motor? A three volt circuit to operate an independent 12 volt circuit?
I used magnetic reed switches. After over 40 years of service they still work.
I use IR detection with the IR mounted under the track pointed upwards. My problem is the detector won’t pick up the signal from dark objects ( the bottom of locos and cars). Adding a reflective surface like white paint or aluminum foil works.
Any other solutions for this?
Not sure where the author is located but my orders from China take 2 to 3 week here in California.
I’m with Ken Holbrook, that went whooshy, whooshy, straight over my head!
yup- did the same thing using the same detectors- I found out that in bright light, you can trigger the detector device, had to add a shield over/around the two units.
then I found out that they made a ir sensor, that is, both devices on the board are red colored instead of one red and one white, which doesn’t seem to suffer the same problem as the origional one does.
I used a latching relay, but now, I am going with the Ardunio, a bit of a learning curve, but there are many things you can do like building in a time delay, activation a sound card (another neat low cost Chinese device) etc.
Have fun, it’s another aspect of the hobby that will take some time to master, but it is well worth it.