Mike’s been in touch with a tip on model train block detectors:
“Hi Al,
Been reading your blog for nearly a year now & found some great tips. I particularly like “Dangerous” Dave – his layout is superb.
I was watching his post of a few days ago when he was on about the 12 outlet connector blocks, something I hadn’t thought about.
Only problem from my point of view is that I will need quite a lot for my layout & it would get very expensive. So I thought I’d make my own.
Apart from the obvious cost advantage – I bought a 10 pack of 12 block strips for £3.50 – you can also make them whatever size you want.
So if you only want 8 connections at a certain point, you’re not wasting 4. Or if you need 15, simple, just join an extra 3 on the end.
Here is one I made for 8 connections for a series of lights. I used 9 blocks but you could you use 8 if you want to be frugal & use the fist connector for feed & output if your wires are thin enough.
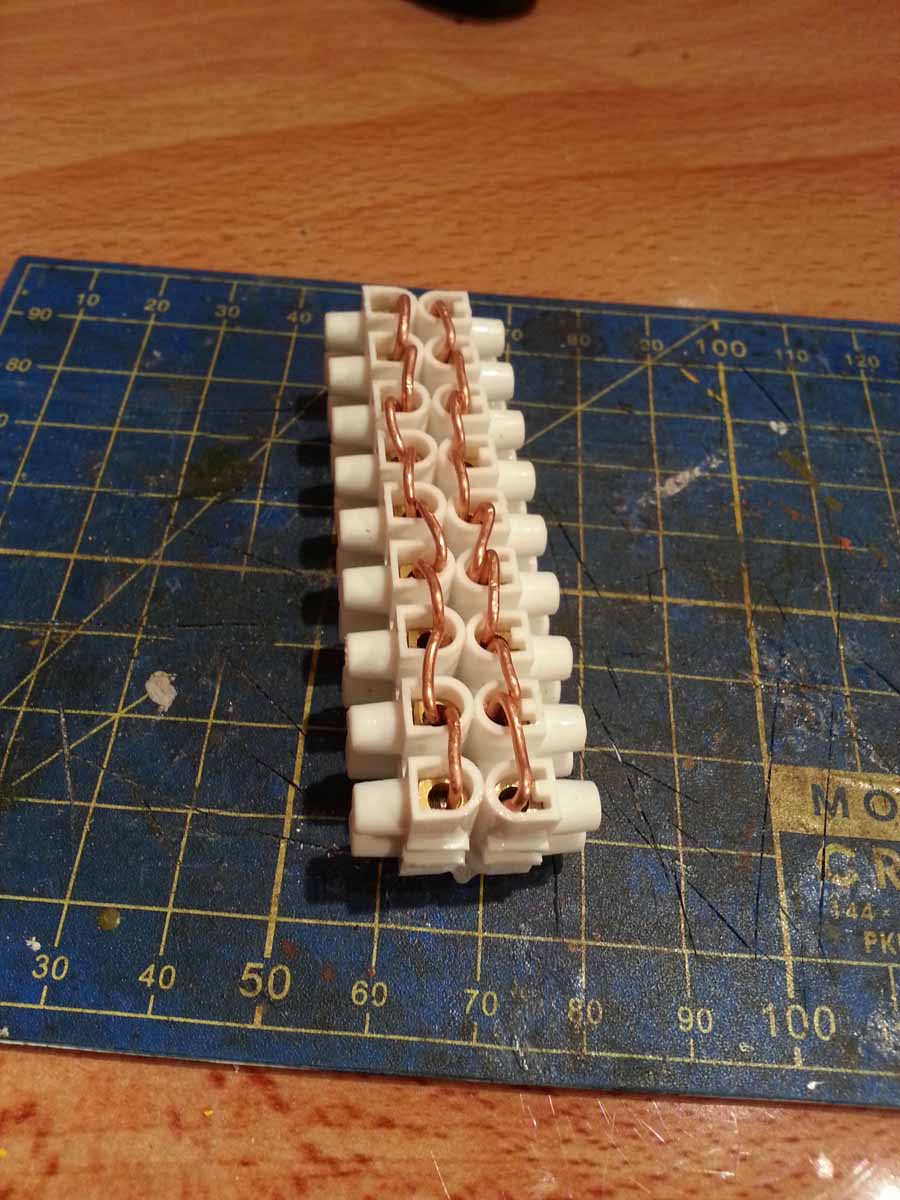
I started by taking some wire (I used the core from some 13 amp power cable but any wire would be suitable) & bent it to shape to fit into the connector blocks – pic 1. (Don’t fix the first until you have bent the second so that you have a pattern to work to.)
Insert in one side of the block & tighten screws – pic 2.
Do same to second block.& then stick back to back, superglue works well – pic 3.
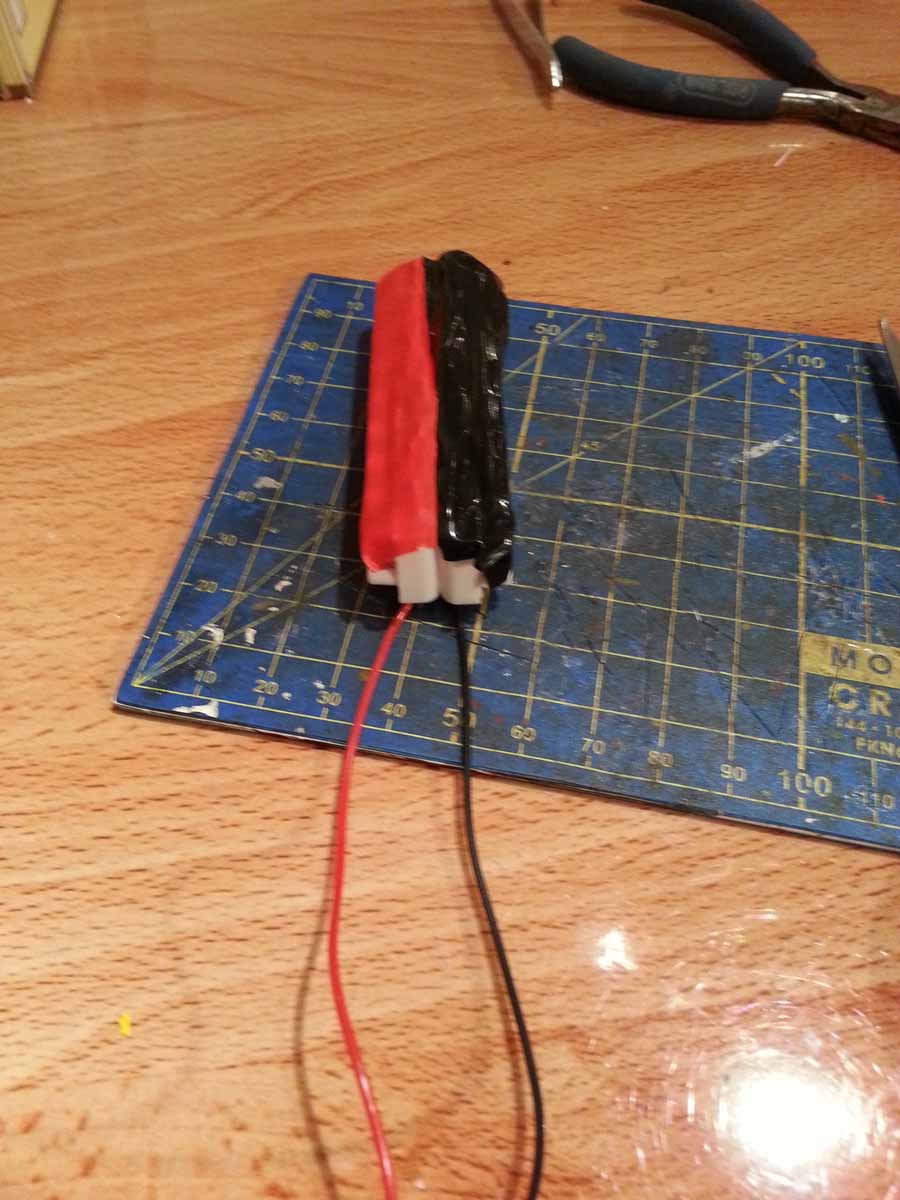
All that remains then is to put some coloured insulating tape over the wire to easily identify positive & negative & insert your feed wires – pic 4. Turning the block over, you now have your parallel lines of connecters for your outputs..
I hope you like this tip & consider it worthy to pass on.
Thanks
Mike”
Model train block detectors:
A big thanks to Mike for sharing his model train block detectors tip. It’s great when one tip leads to another.
If you missed Dangerous Dave’s last post, it’s here.
Looking back over the year, it’s amazing what subjects have been covered, and what remarkable tips have come in. Thanks to everyone who has taken the time and trouble to contribute.
That’s all for today folks.
Please do keep ’em coming.
And if today is the day you get started on your layout, the Beginner’s Guide is here.
Best
Al
PS Latest ebay cheat sheet is here.
PPS More HO scale train layouts here if that’s your thing.


Great tip. Thanks
Great idea Thanks
That is a great idea. Will definitely copy. Thanks Mike.
PS Glad to see a modelling board as dirty as mine!
Making your own is the best way, not that hard and that way you can customize your wiring .i.e. when street lights come on so do the interior lights in your houses and businesses or have them separated so a switch will have control over individual sections. Timers are nice so the house lights and business lights will go on and off at predetermined times. A little more complicated but you can easily do an electric diagram to keep track of them.
Why oh why mess about with wires everywhere and block connectors? Available for as little as £3.50 from exhibitions are the BUS tape copper strip. Self adhesive to run around under your base board to just drop wires from LED’s & lighting items I solder straight onto the strip. Much neater job instead of all those wires everywhere. Simple!
Copper solder able buss tape
Self adhesive back, under layout
connecting lighting, track etc.
30 metres length
Bargain cost only £3.50
Great idea Mike – thank you so much
Glyn
How do I add a picture? I try copy & paste but it does not work!
great idea and so handy . a good wiring job takes time but I can see where making several of these at one time will save a lot later and the job will be easier to complete . any problems later will be easy to track down . Thanks for the photos and the tip.
We call it a “bus” in the states and the connecting wire is called a “jumper”.
They are still available at active Radio Shacks at a nominal cost.
I use them to save wire for any length of five feet or more. Gives better control and identifies in case of a malfunction. I use 300 volts of AC power which can be directed to track, accessories, etc. The wire MUST be labeled, in any case.
You all have a very Marry Christmas!
what do any of you think about box-type connecters? I personally like them, no glue or curled wires. but you folk are showing one me a different style that never I saw before. they don’t look like something that’ll work for me. i’m 69yo and have epilepsy, I MUST start bldg. my 6th layout. it’ll be a lot smaller than the others, not much space in my trailer. thanks much for feed-back. terry
like the post on making YOUR OWN TERMINAL STRIPS, but don’t know where to buy the basics here in CANADA. would like to know. thanks. dave.
It is simpler to find an old electric panel and use the solid bus ground bar. Whereas most voltage is around 12-18 volts it doesn’t present a shock hazard. (300 volts?)
Box type connectors are the crimp on style which do work if used properly. They are not good for mixing wires sizes/gauges, must be crimped with the proper tool at the proper pressure and can’t be undone when tracing a wiring issue. Crimp too lightly and not enough contact is made, crimp too much and you can cut the host wire.
interesting and informative tip
thanks
keep em runnin fellas
stjohn in long beach calif
Here is another suggestion/tip for scratch builders, “Popsicle sticks”.
A lot can be done with the common and humble “Popsicle stick”, or as some craft stores call them “Craft Sticks”. Depending on scale, by cutting off the rounded ends they could be used as wood planks for buildings or lumber for construction sites. Gluing several together and rounding the side edges, they can be tinted and used as timbers tor trestle bridges or as logs for use on flat-bed cars. If trimmed to size, they could be tinted as replacement ties for large gaps under tracks or as track filler for railroad crossings, train stations and yards.
So, there you have my two-cents worth of a suggestion. Enjoy and have fun.
Toni
That terminal strip shown is called a European barrier strip and is available here is the US at radio shack as I just got 2 this past saturday. By alternating red and black wires you can have one strip for everything. Good Luck.
Use staples to join the connector blocks. See your local printer to get a length of them. I use 15mm.
Hi Mike,
I’ve been using those terminal system for about 10 years or more, i always thought everybody made bus connection like that…I have batches of,mostly
four at time sited inline with the track for point work. signaling and buildings
But its nice to now there someone out there is telling every one that that’s a
very good and cheap way of making a bus system.
Merry xmas every one and especially to you Al
Iddy
hi al i have used the choc bloc with link wires for years now i would like to say a big thank you and merry christmas to you and all contributers to your site.i may not read straight away but have saved all posts since we met warts n all have decided to go dcc so layout will be ripped up and redone
thanks al
tony
hello,i have been receiving email from you a long time and I do like it alot,so as long as you send them I will brouse through them,thank you
Good suggestion to use terminal blocks this way. These plastic strips are popular in Europe, but not much in the USA. I did find some on Ebay and Home Depot, sometimes called “Quick Connect Terminal Block.” Please keep in mind that most of HO trains and smaller, and specifically LED lights take very little power. Try to use small gauge flexible wire if you can for easy installation. Any wire rated for 1 to 3 Amps will do.
Great idea. Would be good to paint red and black as tape may become unstuck over time. Cheers Chris from Australia
Have done more or less the same, but not quite as tidy. Works well.
Great tip Mike! They also make red and black liquid electrical tape that you could just paint onto the bare wires and wouldn’t come off like tape could.
So neat and kool.
Al thanks again for what you do. RE: connector blocks….In the USA we have a
company by the name of Allen-Bradley. They were building those blocks since
the 1990’s. and like the man said, ” If you have to ask how much it is, you
cannot afford it” which is more practical than eliteist . Or as Walt Disiney’s
brother said ” Walt, You plan, I will get the money ” I could go on but you get
the drift. Thanks for listening to an old man’s loudmouth…RJL
ill try this when i set mine up again. thanks.