“Thank you for the constant info and images – all very inspiring.
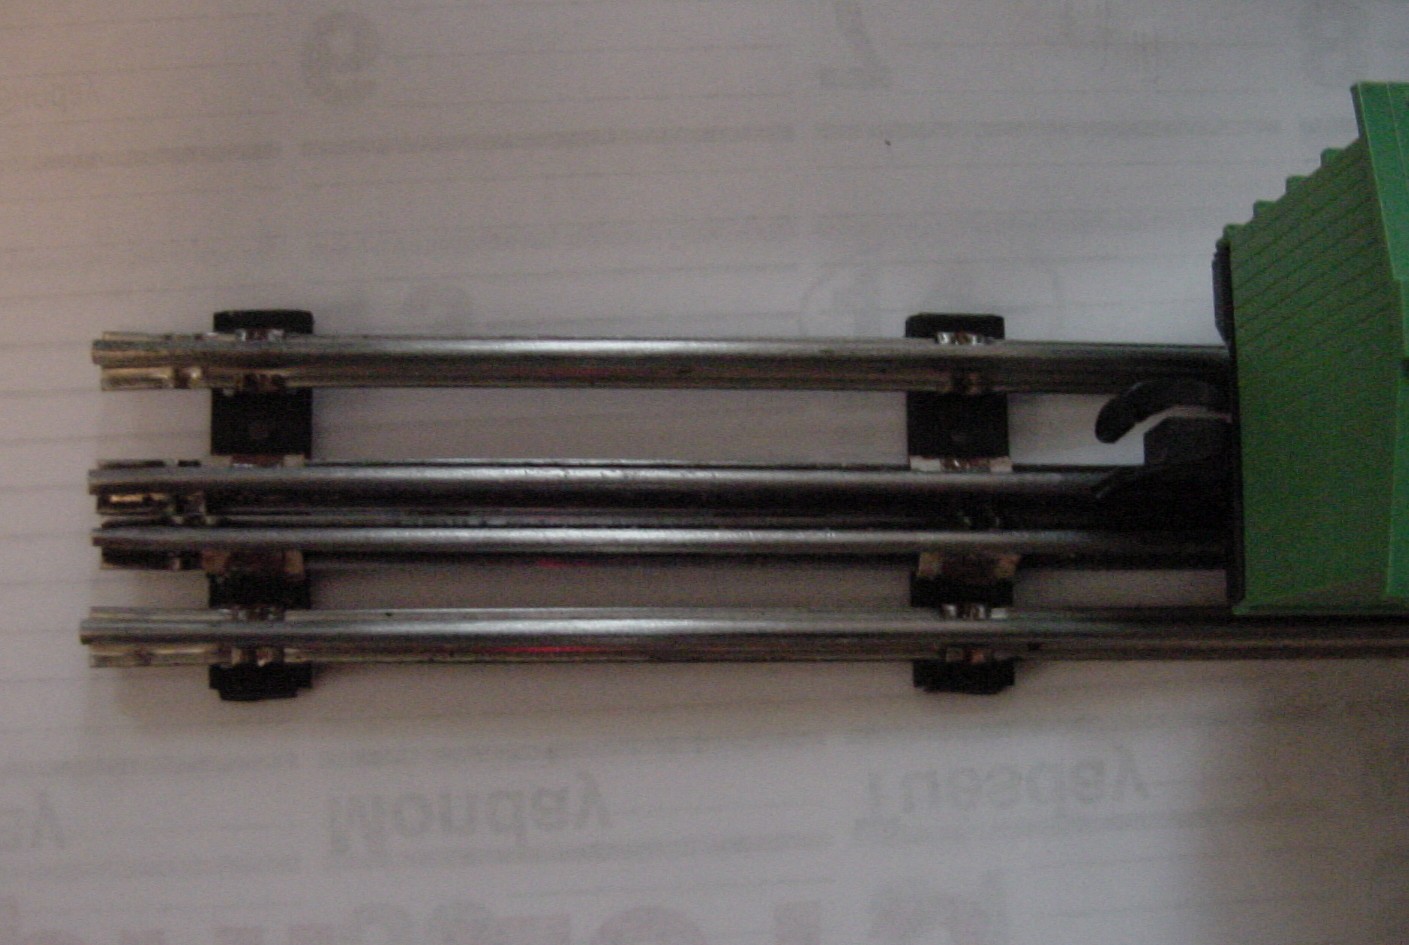
Here’s an easy upgrade I have done on a lima 9400 – Add additional wheel pickups
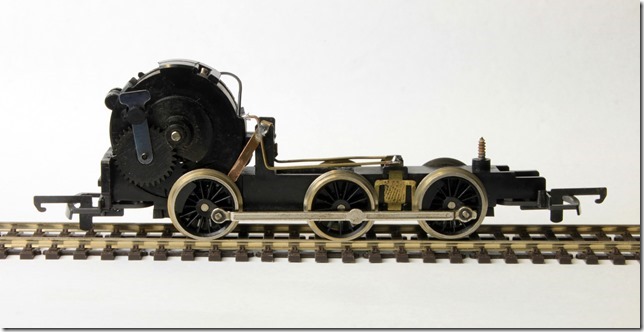
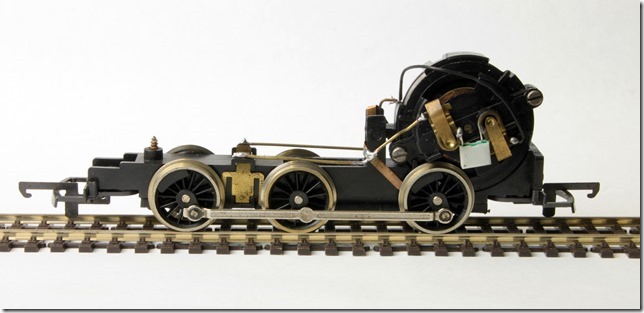
The problem with these is the rail pickup is only on the front two wheels hence stalling on points and crossovers.
By unsoldering the wires from the pickups to the motor and replacing them with thin solid brass rod, additional thin flexible copper or brass strips can be soldered to pickup on the rear wheels.
A huge improvement is seen. You can also paint the visible part of the pickups black to blend in.
Sam”
“Al,
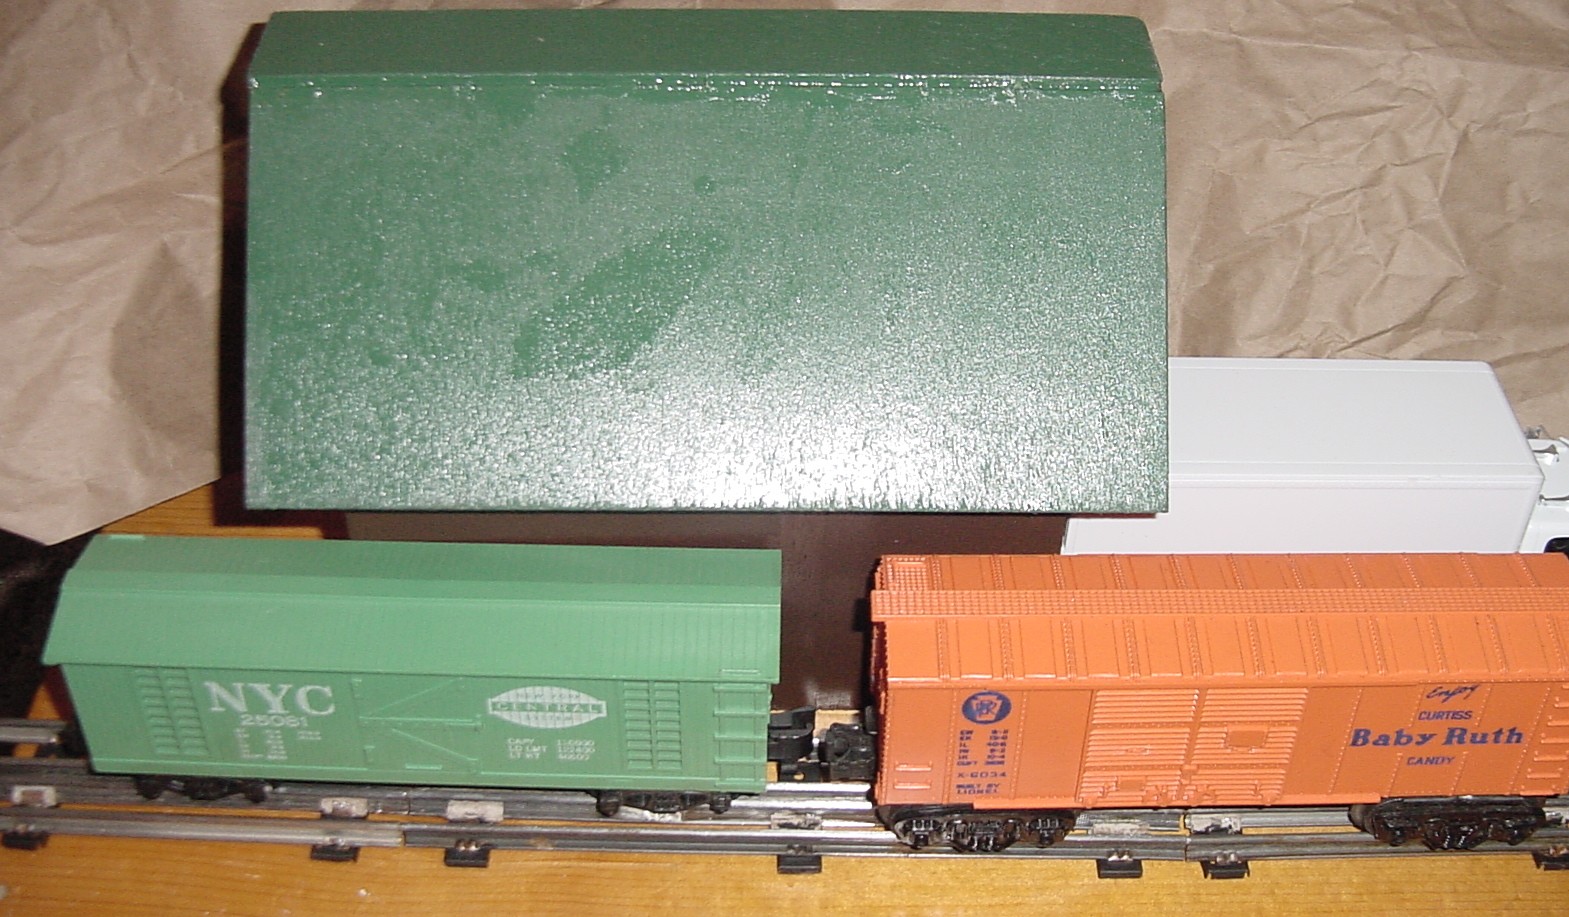
I know most of the folks on this chat group are HO people. I like O and especially S gauge.
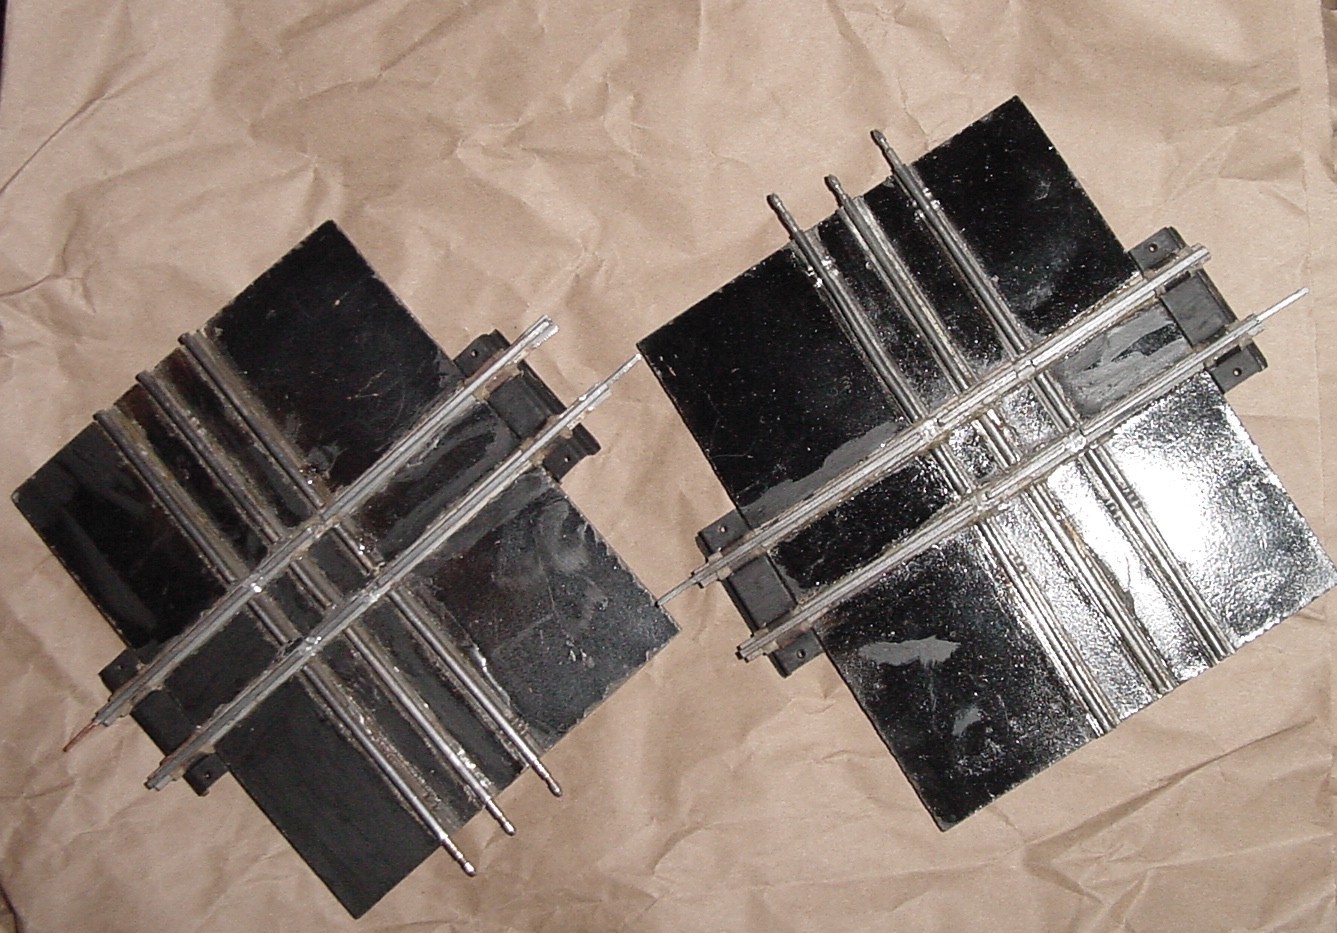
My question is, how do you build an S and O gauge layout with limited space. Answer is to use the same track.
I built an “OS” gauge track and can run both S and O gauge on the same track with the same transformer.
It allows me to park cars for simulated loading and unloading next to buildings and .hoppers with out the space between tracks.
Also built my own cross overs and dedicated Ys I can use an S engine to pull O cars and visa versa with a modified adapter. Laugh but I enjoy running both gauges on the same track.
Joseph”
“Is there anyone out there who knows the trick/tip how to glue those ultra-microscopic plastic people, that are supposedly in HO scale (via Woodland Scenics) that will make them stay permanently on a foam sheet (or any flat surface)?
The feet on the people are so small, I have no idea how to keep them standing up (such as construction workers on a street or train station people waiting on the platform.)
How Woodland (and other companies) can call these HO scale (clearly marked on the package and bought from E-bay or Amazon) is beyond me.
WK”
I do love the way you folk come up with these ideas and solutions – please do keep ’em coming!
That’s all this time peeps.
And if today is the day you start laying track again, the Beginner’s Guide is here.
Best
Al
PS Latest ebay cheat sheet is here.


A little dab of rubber cement on the feet will help these little people to stand and also they are easy to remove and place somewhere else
I am an n scaler and to mount the tiny n scale people I first super glue them to a small piece of clear plastic. Most will stand up by themselves on the plastic. When dry, I mount them on my layout with white glue. I use white glue on the layout in case I want to move them. They pop right off. There is also a product that remains tacky so you can move them around in the future, but I find good old Elmers works just fine. I do have to use tweezers. Fingers don’t work well with scale people.
Try dental adhesive.
WK
I glue the feet of the people to a small square piece of clear plastic. I get the clear plastic from the container lids that my wife buys lettuce in. Since the plastic is clear, it barely shows. I even use this method on N scale people.
I find that if small model people or animals are being placed on foam or a soft surface then one trick is to drill (with a very small drill) a hole up into one or both feet and glue a piece of thin wire into the hole, leaving about 7 or 8 mm showing. Push these into foam and people/animals will stay upright. If you move them the tiny hole left in the foam doesn’t even show, unlike glue.
To WK.
Try fixing tiny N gauge people in place, my only tip is using a touch of super glue on their feet, keeps them where you place them.
In reference to keeping the small HO people standing up is to cut clear plastic (like clear plastic packaging from products bought at the stores) into small platforms just enough to glue their feet onto. You can move them to different places if needed when you get tired of seeing in the same places.
I have found that a failry generouse spot of superglue on each foot is all that is needed and then hold firmly in place. Mine have stayed upright without problem.
Good luck!
My Christmas layout is a small layout with HO track to run On30 trains on it. I use small brads hot glued to the bottom of the feet, then just push the brads in anywhere I want them. The layout is made entirely out of Styrofoam.
Hi this is what I do and it works real well, I use small amount of finger wax, the stuff cashiers use to count paper bills etc, you can place the figures a new here and are easy to move when needed.
Hi If the surface is say gravel,grass, or sidewalk’s. I use a sewing pin with the head on it. And I use instant glue to stick the pin head onto the foot of the figure. Then stick the figure through.
Hi Sam. That is a great mod. But true most loco’s have front wheel pickup and that isn’t good anough to keep the connection. And when pulling a load the front will lift slightly decreasing the connection. Thank’s for the great info.
Hi,
I use tacky wax that is made for this purpose, figures can be moved about easily.
It’s also used to keep bolts etc on the end of screwdrivers to reach awkward places.
Terry
Hi Al, my favorite adhesive is E-6000. It stays slightly flexible when it dries. For figures, I glue them to a small 1/4″ x 1/4″ or so clear plastic sheet. Then I can move them around at will and you barely notice the clear plastic. It also works for gluing figures in locomotives or coaches. If you want to remove them, just pull and the glue will give. You then can rub off the excess and you would never know it had been there. Rob
You sure do have a lot of great tips. I print out most of them for future use. Keep up the great work. I do appreciate them and enjoy reading every one.
Use glue dots bought at any art store (Hobby Lobby). They can be moved and the dot easily removed. I also use them to hold window glass in.
WK,
I ran across a similar situation when I wanted to add a scale Nativity scene to the front of the church on my Christmas layout. My solution was to crazy glue the figures to a single clear piece of plastic cut from the packaging and sprinkle modeling snow to match the rest of the scenery. Blended in seamlessly.
Paul Y.
Easiest way to fix people to foam. Is to use clear plastic (the type used in windows of boxes for plastic kits) paper hole punch disks out. And contact glue them to the disks. All you have to do then is PVA glue the people to the foam this stops the contact adhesive from melting the foam. I found this was the best way to solve this problem. This works with 00(ho) and N gauges.
I really have nothing to add but want to thank everybody for the great tips some of which are new to me and of great help with mounting my figures.
There,s a lot of us about! N gauge that is We don,t have the advantage of a loft (or attic) nor a shed in the garden.No we live in a flat , so all our railway building has to be done on the kitchen table ( subject to “her in charge”s authorisation .So I have elected to build my layout in “billy” bookcases.
So far its been “where do we put the books ? and having to clear everything away after each session..But keep on keeping is my moto so far its been just 1 year of progress, several of backslipping but who knows ? One day it will be finished,…..HA HA
I dribble a little super glue into a jar-lid and dip the little people’s feet into it, after which they are placed with tweezers onto their locations, which – of course – have to be flat. Holding them steady for about 10 secs. is sufficient for the glue to set. I work in N Gauge and it works a treat.
Try it
wow wotta great post today Alistair
sooo much info
yup the loco modification is awsome
dude the O and S gauge mods are badaazzzz…always thought it was a great idea to MIX the to ‘same’ guages on one layout….and dont know why other guys havent gotten into it…great mods….
and as for the little peoples feets….
rubber glue and/or the small pieces of plastic works good for me….
I have a similair problem, but with a hornby 0-4-0, it loves stalling on an Atlas crossover.
There another loco shunts the wagons over the crossover, then the little loco shunts the wagons to their final destination.
I use blue tac. Get a small piece of blue tac & rub it with your fingers to get pliable. This makes it sticky & put on the underside feet of the people. The good thing with blue tac is they are easily removed if you want to change the scene without destroying the foam bed or item.
I use my best set of tweezers and regular plastic cement which works on rough surfaces better.
You could probably try double decking with suitable landscaping – hilly terrain, etc.
Sorry my response was to Joseph – to make use of available space or overcome space constraint –
You could probably try double decking with suitable landscaping – hilly terrain, etc.
To WK
I have an N Scale setup. Small people, big finger, big problem. I spray paper in various colors ,depending where the little guys are to go. Then hole punch in different piles and with tweezers and superglue put them on the little disc. after a while a dab of PVA glue on the bottom and place them where you want and bob,s your uncle.
Cheers Werner
Hi all the little people wanting to stay upright : trick I use is to” araldite” a small dressmakers pin to eachj figure: keep them pushed into a pice of blue styrafoam and when you want to place them on your foam layout just push them in they will stay pit as pin is as long or longer and acts as a ballance. Hope that helps and they leave hardly a mark when you want to re arrange them for a change maybe to fool the Grandkids for a bit of fun
I have had good success with rubber cement. It is not permanent so people can be moved, and does not damage the people. I work in Z, so good tweezers are a must !
Hi Guys/Gals:
To place any size figures be they people, animals, buildings etc.-please try “Liquid Nails Adhesive” clear 100% silicone adhesive found at most stores like “ACE” “Home Depot”, “Sears” and “Lowes'”. When you dab a bit on the base or feet it will stay/stand in place until you do something else with it. It is waterproof flexible sets in 6 hrs and cures in 16 hrs so says the label. Never timed it-never a need to. To keep your fingers clean-use toothpicks to keep the adhesive down where you want it to adhere. Also WD-40 will keep your fingers clean by putting it on a cloth or old sock and wipe your soiled areas clean. Has worked for me several years. Good gluing y’all.
Harold Jr. Grand Prairie, TX USA
Most craft stores have cleat sticky dots in two sizes or sticky glue both are clear and come off easy
Dear WK:
I don’t know what you have for glue where you live. In Canada’s elementary schools, we use a thick, white, and fluid (it spreads) glue. When it finally sets, the WHITE becomes TRANSPARENT.
In other words, the glob of glue forms a base for the HO person. The bottom of the glob that surrounds those tiny feet takes the shape of whatever shape is beneath them.
IF you want the base’ bottom to be flat, THEN pour the glue onto a flat surface.
IF you want to keep those feet in/on a base, THEN pour the glue onto Vaseline (any non-stick material) in order to lift off the miniature WITH A BASE.
Realize that the miniature can be glued to the layout table, but why struggle to move it someday?
Likewise, to have a worker on a slope, glob the glue and TIP THE WORKER.
Similarly, to have a statue atop a “bumpy” terrain, simply glob the figure atop the actual “bump,” OR atop a duplicate “bump.” Either way, the little guy will stand.
The significant end result is its tell-taless CLARITY.
WK,
I have asked the same question as to why HO people are not quite HO size. From my experience, I find HO people from Germany, UK, etc. are actually OO size, slightly too large for HO. (Actually, they are 15% oversize and they do not fit in doorways, etc.) I have some Bachmann figures that are actually HO. If you want true HO, look for American made figures. Find a brand or two you like, and stick with them.
Still in training,
Carl in Kansas
You can run two scales, Ho and Hon3, on track that is readily available, and just check you tube for dual scale railroads. It gives a lot of flexibility in railroading.
Take a small drill and drill up into the foot and leg. Clip off the head of a small brad nail or straight pin. Epoxy the clipped off portion into the drill hole, leaving about a 1/4 or 1/3 inch sticking out. Insert the pointed end into the foam sheet. This way, you can change positions as you like.
Regarding small people I also use straight pins. I cut the heads off to an appropriate length .Have never tried drilling holes as some of their legs are so small that I never could accomplish this. Instead I super glue the pins to the inside of a leg that won’t show. They are nearly invisible unless you are a rivet counter or “civil engineer”. This works good if you want to stand your figures on grass or gravel for instance. Of course you have to have a foam base to do this. To mount them on a hard surface, you will have to resort to glue, and there have been some good suggestions. I am fairly new to the hobby [about 2 years] and am learning a lot from your suggestions. Keep them coming. Bob
Joseph, I’m finalizing my “O” layout and have a “S” that I am running around the perimeter. Would love to learn more about how you combined the two. I have plenty of track to experiment on. Tks
Superglue a shirt pin to a foot let it dry make a hole in the foam with a similar sizes needle or pin sruck and it is ready to move when you want
Looks like everyone has the “people” issue nailed….so to speak. Ingenious fix Sam.
To Joseph, your twin gauge track is actually prototypical. I model the Delaware and Hudson, and for a period they were operating in two gauges, so many tracks had a third rail that had nothing to do with conductivity, just running the wheels. I am sticking with HO, but I like what you have done.
MN Dan …not to be confused [I hope] with Minnesota Fats
Rubber cement,Clay work to get people to stand and they can easily be removed
Good I information from everyone , thank you
SDG, St.Petersburg Fl
WK: I use scotch brand Adhesive dots to stick Ho people to my plywood table and to buildings and structures. Not perfect and you have to experiment with different sizes and thickness but I do not want to permanently glue them so this is best option I have found and have used it on over 200 Ho people. Good luck.
Talking about how to stand up little people on a layout you got your answer.The question now is ,Which is the better way?
Someone answer that!
The Critic
Super glue Adhesive bar none.
That is so creative having both S And O running on the same track and can mix it up. Im also an S gauger. More modern S then older Flyer but I do run my flyers. Great job
I clamp them with a clothes peg
Some of the most interesting railroading and track was all over America before the standardization of gauge at 4′ 81/2″ In order to serve the other gauges duel gauge track was fairly common, especially in cities where the different gauge railroads came in, often from opposite ends of the town. Switches and crossovers got pretty complicated, and are interesting to build for those modelers who still model duel gauge tracks. So having S and O combined track is pretty neat and also prototype!
John from Baltimore
WK, what I do with people is cut out clear plastic rounds or squares from flat tops of merchandise packaging material, dab of glue on the feet and placement on the cut out plastic. I do the same with any scenery items that won’t stand on their own.
Tree’s poles, fencing etc. Hope this helps.
Charles
Wilmington, N.C.
Pine tar–available at sporting goods stores is quite effective for making things (e.g., signs, people, animals) stick well but temporarily. I use it to keep “permanent” consists coupled in Z-Scale. Obviously not useful if you intend to perform switching /uncoupling operations. If you do use it near rolling stock—take great care not to get it on your rails or the pickups of your engines—that is a pain to clear up!
WK
I use a product called Glue Dots., they come on a roll and are dots of adhesive I purchase them at Hobby Lobby but should be available at any good craft/artist supply store .
Another way to get to to dual-gauge railroading. I acquired some Gargraves 3-rail track sections (the ones made with wood ties) and while messing with them realized that my On30 rolling stock would roll successfully on either of the outside rails and along with the center rail. I don’t feel up to working on turn-outs but double-ended tracks tied to On30 on one end and three rail O at the other or a diamond (cross-over) of the two gauges might allow an interesting transfer yard to be constructed. It might be a stretch with Lionel tubular track…
A thought about the figure mounting. If the plastic you glue the figure to is shiny, try using a bit of flat paint, either clear or matching the surface color to better blend it in. I love the idea!
Look goods.
So I have the same question for Z scale and T Guage (1/405) as the above at HO scale.
I was wondering if a small block of wood or plastic behind with double stick tape.
Sorry 1/450
Hi Al, I have noticed my name shows up once in a while with out me submitting any recent comments. I read your blog every day as it is my favorite mail. In a way it”s good some will know I’m still alive. Keep up the good work!
Frank Cortese
WK,
All these suggestions are great. Since you are using a foam base, try super-gluing a small-head nail to the feet and use another nail to make the hole. If the feet aren’t visible, use rubber cement/glue, as it peels off easily if you want to move the figure.
Making square holes in 1/16″ plywood for windows/doors are easy if you use the straight chisel tips from Xacto sets. I use the tip and hit the end with a small hammer.; makes a splinter free hole. When the tip gets dull, you can easily resharpen it with a diamond stone.
i use gorila glue tio bottom of a figure let it become tacky place it were i want it and it stays.i model in ho.8ftx16 ft.
For HO figures I use super glue gel. I glue them on a small square or oval of thin plastic and then paint the base the same as the background they will be on. In grassy areas I ad white glue and cover with grass or dirt depending on where they will be placed. This way I can place them or move them around as needed. For cows and horses I use pins with the heads cut off, heated then inserted into the belly close to a rear leg and paint the pin to match. Then push the pin into the ground cover. Works great for me.
To WK: The simplest way to position your small HO figures is buy a container of BARD’S TACKY WAX. It’s a waxy substance in a small 2″ round container made for this purpose. You apply a tiny bit to the feet of your figure and stick it down. I use a toothpick to apply it. You can move your figures and wipe it off cleanly from the feet, apply new and relocate if you desire. Don’t remember how much it costs, but not expensive and lasts forever unless you keep moving your figures daily. It can be found on-line.