Guy has been in touch with a vid and narrative of his European model trains:
“Hello Al,
My name is Guy de Valk, and I live in Brussels (Belgium).
I am 81 years old and I have recently started building a model railway based on the Belgian Railways (SNCB-NMBS). The location is completely fictitious.
Most of the Buildings are scratch built, some other from Superquick material.
I have made a short video and slideshow of a part of my attempt recreate the atmosphere of the Belgian Railways I knew in my youth…
Sorry my work is not perfect far from it, so please be indulgent.
My age and bad eyesight are probably the Reason for it … lol
The Station I tried to represent is a rural one, with a sawmill served by a private siding. The trackage is mainly Fleischmann and some Peco. The points are controlled by a wire in tube system by Mercontrol.
There is still an awful lot to do. The layout occupies a room of my house, entirely dedicated to my railway. It is 5 x 3 metres, so not very large… and it is located alongside 3 of the 4 Walls.
I am presently working on the left hand side. When that is finished I will start on the right hand side with a larger station and a “fiddle yard” underneath.
I join that video, just in case you’d like to publish it in oune of your messages .
Thank you for your interesting e-mail, they are so very welcome and enjoyable.
All the best to you and your loved ones.
Guy.
PS. Please find attached the video of Trignolles ! (my fictitious station)”
Latest ebay cheat sheet is here.
“Hi Al,
although I’ve kept quiet since my contribution, I still enjoy seeing and reading all the posts that come my way.
I have noticed that a number of people are using track layout software before starting the actual building of the layout. And so have I with my latest version, that is, however, still only on the drawing board. Like Glyn, I also use Märklin (because of my Swiss background), and have used RailModeler Pro for designing it. I think it’s the only one that works for Märklin with MacOS.
Now that it is ready to go to stage two, I wonder whether any of your readers have suggestions how to transpose the design onto the table? is it hit-or-miss like my previous three layouts, or are there any tools available?
Grateful for any suggestion
Andreas”
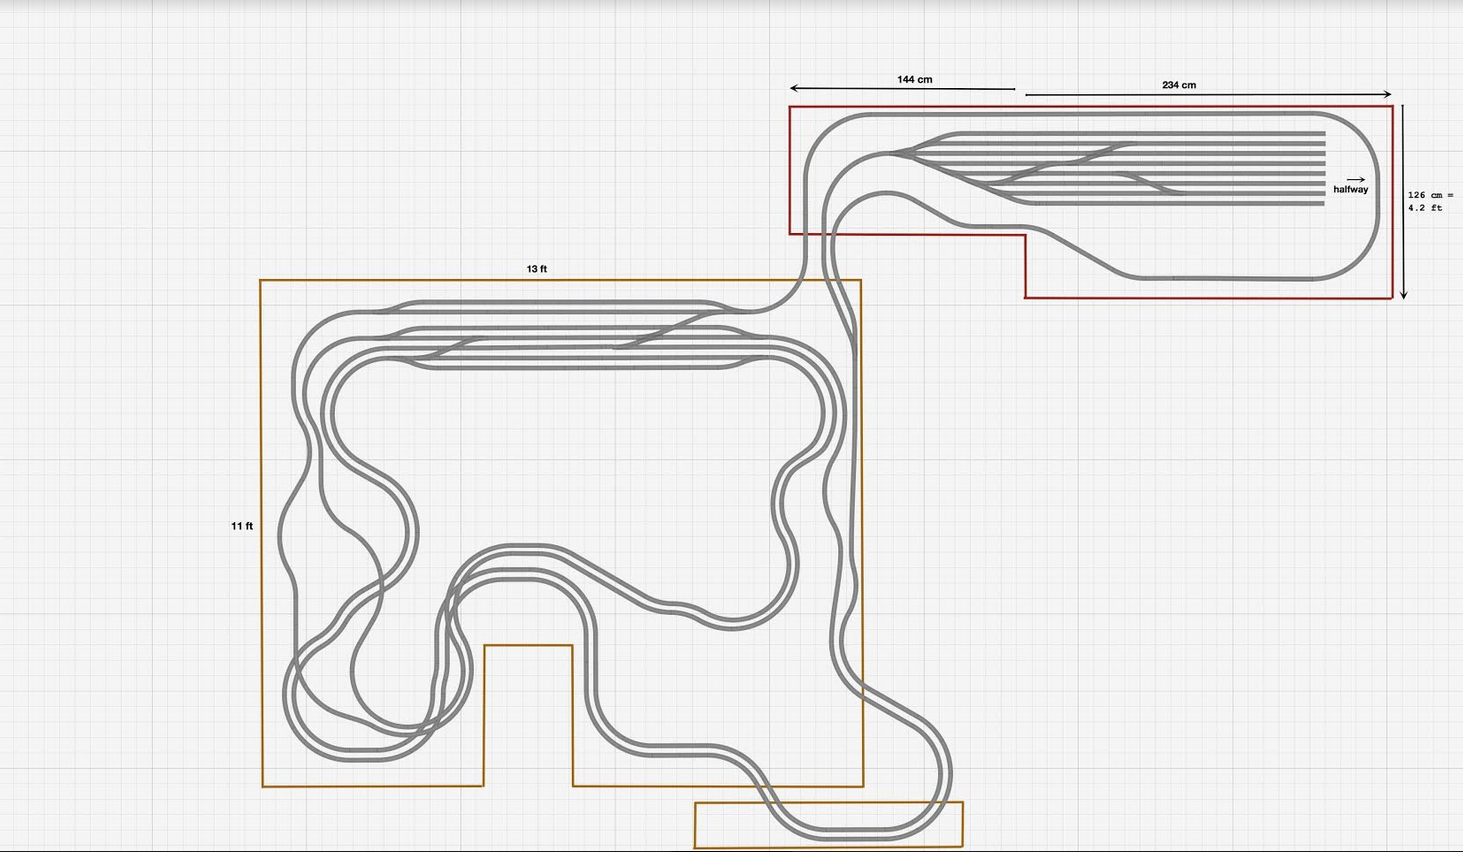
PS: I’m attaching a pic of my latest layout version, which may give readers an idea the “challenge”. eventually, there will be ups and downs, tunnels, flat and mountainous scenery. The red arrows give the direction the trains are traveling in.
A big thanks to Guy – I really enjoyed the video of his European model trains.
That’s all for today folks.
Please do keep ’em coming.
And if today is the day you get started on your layout, the Beginner’s Guide is here.
Best
Al
PS Latest ebay cheat sheet is here.


Guy:
Your layout is terrific, I can see a lot of time, effort and love went into it. I’m from the US, New York and after looking at your work I’m going to add a European section to my existing layout. I love the style of locomotive and coaches you have. Thank You for sharing.
John
Good to see a Belgian layout. Greetings from Ternat in Belgium.
Guy, I am very impressed with what you have accomplished. I love your European locomotives and cars as they go by the camera. I look forward to seeing more of your work as you progress. Your layout plans look fantastic! Thank you for sharing. Stephen
Andreus: I use SCARM to build my layout on my computer. It has a feature that will print out the layout in 1:1 scale on paper. When finished I just lay the paper plans on my train board, scotch tape or staple them down, and lay the actual track on top. I can then either go back and cut the 8×11″ paper version away from the tracks or cover it with ground cover so it isn’t seen.
It takes a lot of paper and printer ink, but it’s the easiest way I’ve found to transfer computer generated track plans into a finished project.
Terry (Idaho USA)
Guy,
A great railroad, and lots of stuff to do with the trains, like backing into the water stand for a refill. As to a perfect model, or railroad, I’ve never seen one (or worked for one either!!). The great model railroader John Allen, whose work many of us try to approach in our modeling, is noted as saying something like that when our miniature world is clean, straight and devoid of stuff everywhere, we ain’t on this planet. After I “finish” a model, I realize that it’s only 2/3 done! The weathering, trash, old tires, used sleepers, oil drums and scraps of wood, and of course people are all what make the model, and where the model lives, come alive. That’s the last 1/3 that wait to be included. Then and only then do our scenes live and breath. Guy, your scenes are just fine – not perfect!
John From Baltimore
Guy, is your layout open to visitors? I am in Brussels several times a year and would love to visit you. I have been to the Railroad museum in Brussels so many times they are offering me a job.
Nice job with this web site. I really appreciate it.
Magnificent!! Your layout presents such a realistic European flavor! The sounds especially; highly reminiscent of “ Von Ryan’s Express “.
Well Done!
Brendan
Andreas, I have a suggestion similar to T. Miller. Put your layout plans on a computer thumb drive. Find a copy / print shop (maybe several) who you feel is competent and price competitive. Have them take pictures of your plans. Then have the printer blow up your plans to the scale you need and the size limits of the his paper or equipment. Glue the plans down to your benchwork with temporary sticky glue. Sticky glue is not permanent so when the transfer is complete, just pull the paper up. Transfer the plans to your sub road bed. Pins might be one way. Another way might be cutting slots using a very sharp modeler’s knife about 1/16″ wide by 6″ to 12″ long leaving an uncut section about an 1″ long. Use a black felt tip pen and write over the slot leaving ink lines on your sub road bed. Pull the template up. If needed finish marking the 1″ spaces using a straight edge or a draftsman’s curve.
Hey Guy. I enjoyed your pictures and video. You have done a great job on your layout. You sure pay attention to detail. I was very impressed with you work. Thanks for sharing with us.
Andreas, I’m having trouble imagining how the layout plan fits into rooms, but here are a couple of comments on the track plan. There doesn’t seem much provision for shunting – no loco depot, no goods sidings or yards along the main line, or much opportunity for a slow freight to be overtaken. May not be your thing of course. Secondly, I assume the large single ended yard at top right is hidden storage, I think it’s asking for trouble to approach pointwork like that directly off a sharp curve, particularly as the route to the ‘top’ sidings creates a sharp reverse curve. Also I don’t quite see the point of the crossovers within that yard as it appears all trains would back in, so normally not needing a run-round? Good luck with it.
Hi Al,
Something I have found handy while doing prep work for track layout is to use the green painter’s tape to get an idea of what the final track will look like. It is not expensive and comes in a variety of widths when you are ready just lay your track base on top.
On another note, I will be using some LED lights for a whole range of areas, streets, houses, railway signals, etc. can any of your readers advise me on the best way to accomplish this I will be using 12v dc power, will I need to use a resistor with every LED or is there a way of grouping it?
Thanks for all you do Al, hope the dog is doing good.
Mike
Very relieved to note that Guy is 81 years old. I am “only” 80 and working on my first real layout. I am lucky enough to have two rooms in my basement devoted entirely to my trains so i look forward to sending in something when I am a little further forward.. God bless pre-war (i mean of course WW2) babies!
One way to transfer your layout to actual size is by using a grid system. I see your layout is on graph paper. Now draw a grid on your train table. Draw your layout one grid at a time on your train table. Where you have curves, locate the center of each radius, and draw your curve carefully. Place a nail at the center of the radius, and a pencil on a string, and carefully draw your radius. I used a thin strip of wood with a nail hole at one end, and pencil holes at various radii at the other end. Remember, the radius is to the centerline of the track. (Warning – with some engines, when it says it will handle an 18″ radius, it means 18″ and not 17.75″!)
Good luck,
Carl in Kansas
Excellent Guy- thanks for sharing with us!
Guy, wonderful layout. I can see you’ve done tons of work. Always nice to see a different persons ideas. Thanks for sharing. Paul….Ohio….USA
It is a very good layout, Guy.
Well done Guy , you have proved that we can still enjoy this hobby in our Golden Years , its something that gets our Grey matter working with a great deal of satisfaction when it all comes together ….Dangerous Dave
Thank you for your kind cmments … I am 82 now and still working on my layout. An update will be coming soon. I know it is not perfect, I Don’t aim at perfection. My main concern is that I wish to recreate the atmosphere of the railways I knew in my “Younger” years. I hope I will succeed eventually … All the best to all of you and to the followers of our wonderful hobby and all Railway modellers all over the world.
Just one suggestion, your crossovers are going to be more useable if placed bear the end of the siding tracks rather than as they are now shown near the middle. This allows for a longer string of cars to me moved from one track to another.
Tranferring from drawing to table is as matter of laying out the track, not connecting it together and see if you have enough space, as you said trial and error.
Guy,
Really like your ballast! Along the same theme as John Frye above, it looks as though it has been used, not like the perfectly manicured ballast of most layouts. Great job from one octogenarian to another.
Jim, Tracy CA
Hi, Guy –
Beautiful layout.
What I would most like to point out, however, is that your English is better than that of just about anyone else posting on this site.
Well done Guy.
I love the wild grass/rocks that you have put beside the tracks. It looks very realistic.
Guy, NSW Australia