Ray’s layout update

I have to start today’s post with some news I’ve been trying to put off for some time.

There’s no way to say it, other than I think it’s time to hang up my boots.

Every now and then I have a wobble over the site, but I’ve always said when it starts to cost me money, it’s time to call it a day.

And that day has come.

Perhaps it’s my own fault – I haven’t put the prices up on anything since I started the blog in 2010. Yet every year, everything gets more expensive.

I do love seeing what’s in my inbox each morning, but not enough to pay for the privilege.

Usually, the good months make up for the bad months, but recently, they have all been bad months.

So what to do?

I’m going to make my mind up in the New Year.

But in the meantime, to help ease the pain, I thought there is only one sensible course of action – run a sale for the Beginner’s Guide with a load of freebies.

If it helps keep the wolf from the door it would make a huge difference to me.

Don’t get me wrong, folks, I’m not asking for charity. You can help by investing in the Beginner’s Guide or any of the print-out-scenery.

I’d love to keep it going, but I can’t unless things improve.

I’ve made some wonderful online friends over the years, and it will make me sad to call it a day, but I do know you will all understand.

Anyway, fingers crossed for the sale. Let’s see what happens.

And now on to Eric.

He’s been back in touch after his last post:

“Al,

Thanks for getting my story up so quickly. It was great reading all those wonderful comments!

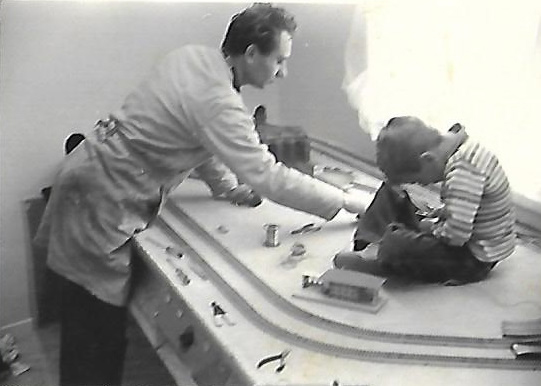
I’ve noticed a lot of people mentioning getting their start in the hobby way back in their childhood. The same with me. I was about 5 years old when my Grandpa who lived in Germany sent my Dad and me some Marklin HO trains.

I remember my dad starting a layout that we never finished as we ended up moving to Hawaii. This was back around 1965. I remember a photo of my Dad and me working on the train layout and I just happened to find it again! I have attached it.

Might be interesting to see if others may have photos of way back with their original train sets. It would be real fun to see a collection of old photos and you may want to ask if anyone has any they would like to share.

Please feel free to share my photo on your site if you like. It made me feel real good seeing my Dad again in the picture.

Thanks again for everything you are doing to share this hobby with the world!

Eric”

“Good morning Al,

I have sent you a number of emails over the years and you have posted some pictures I have sent you on more than one occasion.

It is awesome to get to see my work on your site for I know how many people, like me, enjoy your site and look forward to opening your emails for motivation, tips, and to see all the great work others are doing.

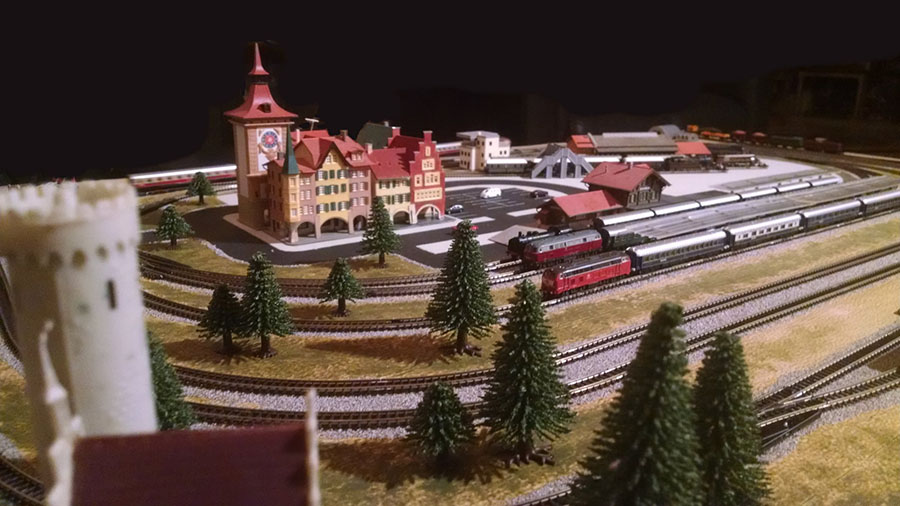
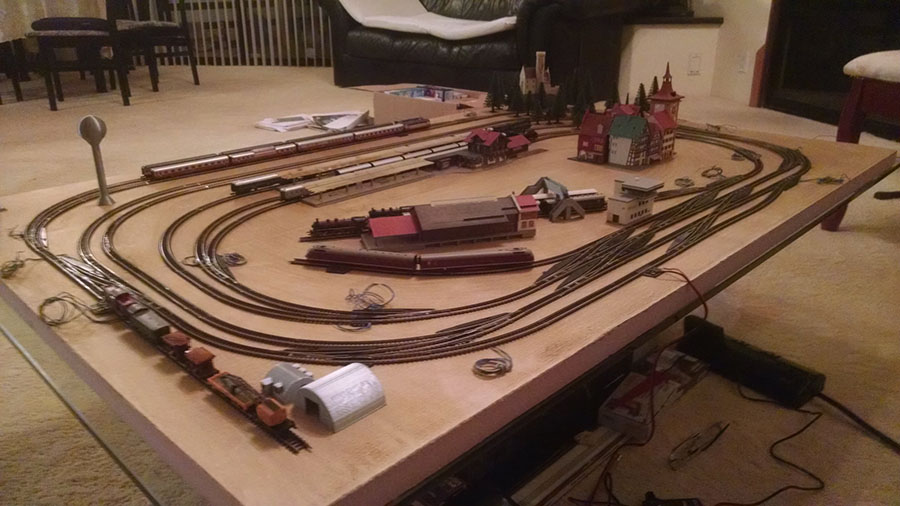
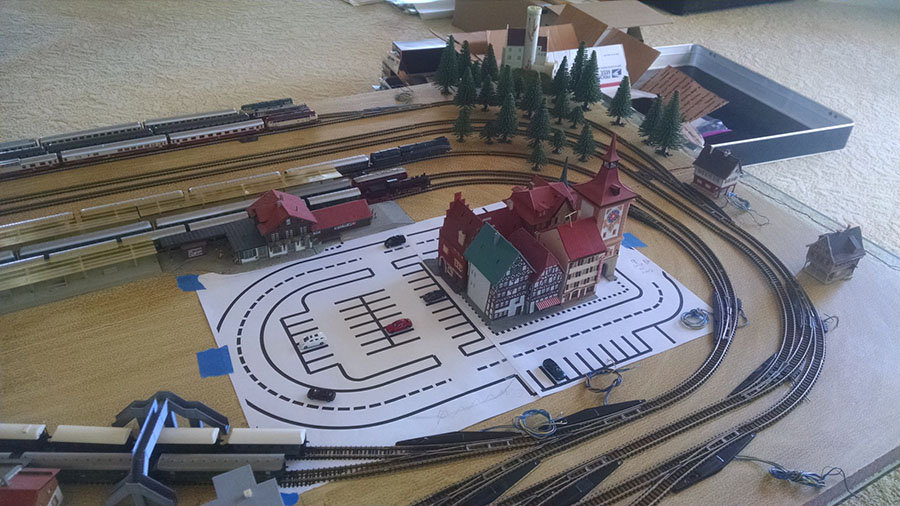
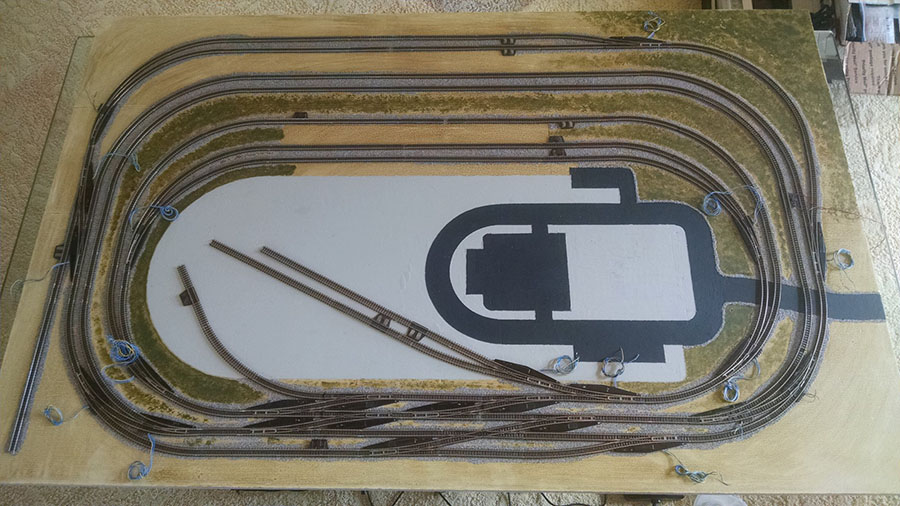
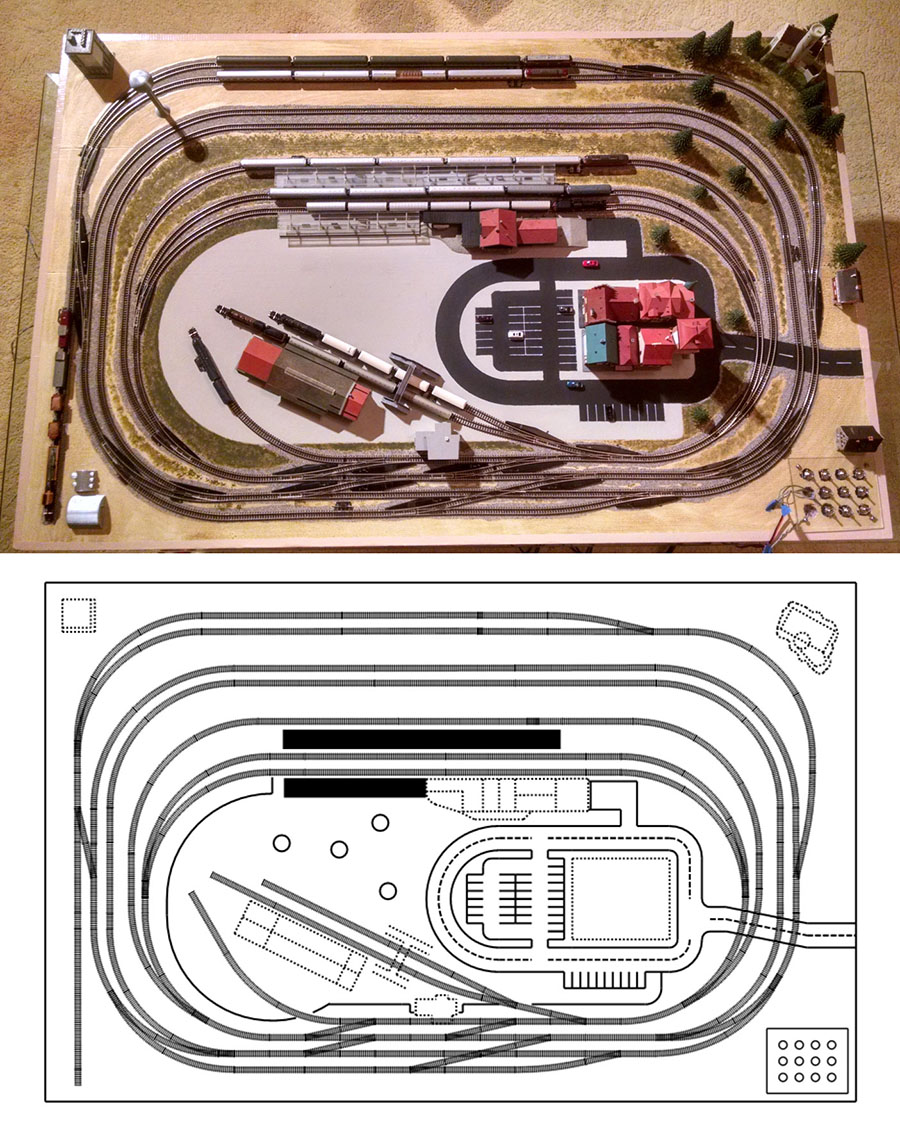
Recently, you reposted one of my emails with pictures of my N scale layout.

It stated as a 4X8 ft layout 5 years ago and is now approximately 180 sq ft.

I use Kato track and I switched over to DCC last year. I have 35 Kato switches.

The majority of my locomotives and rolling stock are from the US or Holland.

As you can see, not a specific prototype, I just model things I like and know.

I was once told that modeling is what you want it to be and there is no right or wrong way to set up YOUR layout.

Thus, I have a European section, a ski slope, a golf course, a New England fall scene with the leaves changing, a city, a circus, a carnival, fishing holes, beach, military base, and of course Worcester Union Station.

And many of my scenes originated from some of your emails where I liked something that someone else had done and figured to give it a try.

And of course my layout is constantly changing and evolving, however I think I have run out of space in my basement, so it will probably not expand any more. 🙂

I have attached a more recent video of the layout, which you can see has taken over my entire basement. 🙂

Thank you for hosting and sharing all the great “stuff” that is sent to you.

best,

Ray”


Latest ebay cheat sheet is here.

A big thanks to Eric and Ray (you can see one of Ray’s earlier posts here).

I do thoroughly agree with Ray when he says:

“I was once told that modeling is what you want it to be and there is no right or wrong way to set up YOUR layout.” Amen to that.

That’s all this time folks.

You can grab the Beginner’s Guide here.

And thank you all for your support over the years. It really has meant so much to me.

Best

Al

Bill answers your questions

You all know how much I love an update.

And not long ago, Bill sent in this fab update of his switching layout.

But quite a few questions came up – and Bill has been kind enough to record another video to answer them:

“Hi Al

I had a few questions posed in my post from the other day.

I made a video that shows how everything goes together and answers the questions some of my fellow modelers asked.

Thanks!

Bill”


Latest ebay cheat sheet is here.

A huge thanks to Bill!

There are more Bill’s posts here, in the hall of fame.

That’s all this time folks.

Please do keep ’em coming.

And don’t forget the Beginner’s Guide if today is the day you stop dreaming and start doing.

Best

Al

Z scale

Eric has been in touch with his Z scale – he’s done a fantastic job on his first ever layout too:

“I would like to share my first ever layout!!

I’m finally starting a project in Z scale after years of purchasing track and rolling stock.

This will be the first layout I have ever constructed. Been drawing up various layout plans using CadRail and finally have decided to start with a relatively small plan that I have come up with. The thing is I plan to bring this 4X2.5 foot layout with me in my RV!!!

Since this will be a layout that needs to be moved and stored vertically in the RV I want to keep it simple and clean by painting all the scenery elements such as dirt, grass, pavement, ballast, etc. and not using any form of “sprinkle on and glue” products.

The track will be secured to the board but buildings will be simple placed on the layout when needed and stored in a box with the rolling stock when stored.

The layout is based on the theme of a small Train Museum Village somewhere in scenic Germany sometime in the mid 1970’s. This concept allows me to run my 1970’s period trains along with older steam locomotive compositions of the 1930’s and 40’s as “museum trains”.

Over the years I had purchased rolling stock and locos based on what I though looked cool but I never considered that they came from many different time periods. Now that I’m actually building a layout, the “Train Museum Village” solved the problem of running different eras on the same layout.

The Z scale layout has two station areas. A double line “City Station” at the top and a triple line “Village Station” in the middle. It has a side spur on the lower left for parking of the “maintenance train”.

It also has three spurs to display the “museum trains” next to the Train Museum Building in the middle of the layout. It has a wonderful switching yard to move trains around. It also has a double Mainline that can run 2 trains at a time or a single train in a “folded figure 8”.

z scale train layout

Below is the layout. Trains run clockwise. This layout allows me to have 9 trains on the board with the ability to run 3 of them at the same time.

z scale track plan

In designing the layout there were a few major features that I was looking for:

1. Small, portable, and light weight so it could be brought along in an RV. It only measures 50 inches by 32 inches.

2. Scenery “painted” on and all structures and trees removeable for easy storage.

3. No need for electricity. I use two Ztrack Snail Speed Controllers that run on 9 volt batteries and do switching manually. (Diagram C)

4. A somewhat elaborate switching yard. I love the look of a switching yard. I really enjoy switching trains to different destinations.

5. Switching yard easily accessible. Since I’m switching manually the layout has all the switches right in front of me.

6. Ability to show a lot of engines and compositions from different eras. The layout allows 10 trains to be parked and isolated. (Diagram D)

7. Ability to run more than one train at a time. I can run 3 trains simultaneously. 2 on the mainline and 1 in the inner station circle. (Diagram B)

8. A relatively long Mainline. The design allows me to run 2 trains on the mainline (Diagram B) or one train in a “folded figure 8”. (Diagram A)

z scale track plan diagram

I would like to present a quick pictorial of how I constructed my layout.

First I painted the 1 inch foam board with 2 coats white primer:

model train benchwork


Next I used Woodland Scenics Earth Undercoat diluted 1 part paint to 2 parts water as per instructions and used a brush to paint on the “earth”. I kept things very thin and uneven and painted in the same direction as the track would be layed to create some strata:

base color for track


I then laid the track back on the board so that I could trace the track layout and the position of the buildings:

track layout

I changed the design of my parking lot so I printed out, full size, the parking and town area to see how it would fit on the layout:

track layout with buildings

Removed everything off the board and started with the pavement area first using Woodland Scenics Asphalt Top Coat. You can see the track tracing in the photo also:

woodland scenics road

I then painted the large concrete area adjacent to the parking area with Woodland Scenics Concrete Top Coat. I didn’t like the color as it was a bit too beige so I added some of the Asphalt black color to the bottle till it ended up a nice light concrete gray color:

woodlands scenics road

Now the interesting part, “painting” the track road bed. My first idea was to purchase some of the Krylon Granite spray paint and paint it on using a brush. Problem was that I could not find the “fine” granite. All they had locally was the “coarse” granite which would have been too big and out of scale. And being in Hawaii I couldn’t even purchase any online as it can’t be shipped here. So I reverted to plan “B”.

Following the z scale track tracings using a 3/4 inch foam brush I painted on a layer of Minwax Water Based Polycrylic Clear Matte. I then sprinkled on some Woodland Scenics Fine Ballast Gray Blend. I let it all dry overnight, swept off the extra ballast, and then applied two more coats of the Polycrylic over the ballast. It has dried very hard and I don’t think it will crumble off. It also gave some “relief” to the roadbed:

woodland scenics gray ballast

fine ballast

I then completed adding the other concrete areas over the pavement. By painting the concrete on top of the pavement it also gave a slight “relief” above the pavement:

ballast base for z scale

Now to painting the grass. I used Woodland Scenics Green Undercoat at full strength using a stencil brush and randomly dabbing the paint on it the areas I wanted grass. Kept things pretty thin in most areas allowing the brown earth to come through in places. Also tried to keep a thin area of earth next to the ballast as I often observe in the real thing:

ballast z scale

Next step was laying the track back on. Made sure everything was aligned correctly and used the Marklin track nails to keep the track in place. I wanted to be able to cleanly remove the track if needed in the future and that is why I decided not to ballast and glue directly over the track. It seems like my idea of placing the track on the completed ballasted track bed will work out very well and I’m quite satisfied:

z scale track layout

Here is an overhead photo with the buildings, trains, and other items placed on the layout. It is compared to the CadRail drawing. Still waiting for a few electrical parts to complete the build:

z scale track plan diagram

What I’ve put together has fulfilled everything I was looking for in a portable layout. I’m still looking at scratch building the “City Station” and there is still a lot of detail scenery painting work that I can work on in the future. It’s great that a lot of the work can be done “on the road” if I so desire. It’s been a real fun project and I look forward to playing with it for some time in the future.

If you have any questions or comments I would love to read them all.

Eric”

(More Z scale layouts here.)

And now on to Kaustav. You’ll remember him from his port layout:

“As my Wrightsville Port layout is coming to a conclusion, I am planning for my next projects.

There are many possibilities and there will be quite a few interesting things that I plan to do in Model Railroading in the coming months and years.

All these new projects will be DCC, unlike my current layout that runs on DC. On top of that I plan to use JMRI and computers to control my future layouts.

As I started planning, I thought why not make a series of videos with the basics of DCC and JMRI for others who are getting started with the hobby. I think DCC and computers expand the horizon of Model Railroading to a great extent, and gives immense opportunities to do a variety of things and have a lot of fun along the way.

However, while doing my own research I found that though there are a lot of resources available out there and many of which are fascinating and advances stuff, there isn’t really a ‘quick guide’ that consolidates all that you need to get started with both DCC and JMRI.

So this series of videos aim at providing that quick start reference for anyone who’s interested.

Here goes the first one in the queue – basics of DCC wiring. Hope you and viewers like it.

Kaustav”


Latest ebay cheat sheet is here.

A big thanks to Eric for sharing his z scale, and to Kaustav for his DCC video.

More Z scale layouts here.

That’s all for today folks.

Please do keep ’em coming.

And if today is the day you get started on your layout, the Beginner’s Guide is here.

Best

Al

PS Latest ebay cheat sheet is here.