Eric has been in touch with his Z scale – he’s done a fantastic job on his first ever layout too:
“I would like to share my first ever layout!!
I’m finally starting a project in Z scale after years of purchasing track and rolling stock.
This will be the first layout I have ever constructed. Been drawing up various layout plans using CadRail and finally have decided to start with a relatively small plan that I have come up with. The thing is I plan to bring this 4X2.5 foot layout with me in my RV!!!
Since this will be a layout that needs to be moved and stored vertically in the RV I want to keep it simple and clean by painting all the scenery elements such as dirt, grass, pavement, ballast, etc. and not using any form of “sprinkle on and glue” products.
The track will be secured to the board but buildings will be simple placed on the layout when needed and stored in a box with the rolling stock when stored.
The layout is based on the theme of a small Train Museum Village somewhere in scenic Germany sometime in the mid 1970’s. This concept allows me to run my 1970’s period trains along with older steam locomotive compositions of the 1930’s and 40’s as “museum trains”.
Over the years I had purchased rolling stock and locos based on what I though looked cool but I never considered that they came from many different time periods. Now that I’m actually building a layout, the “Train Museum Village” solved the problem of running different eras on the same layout.
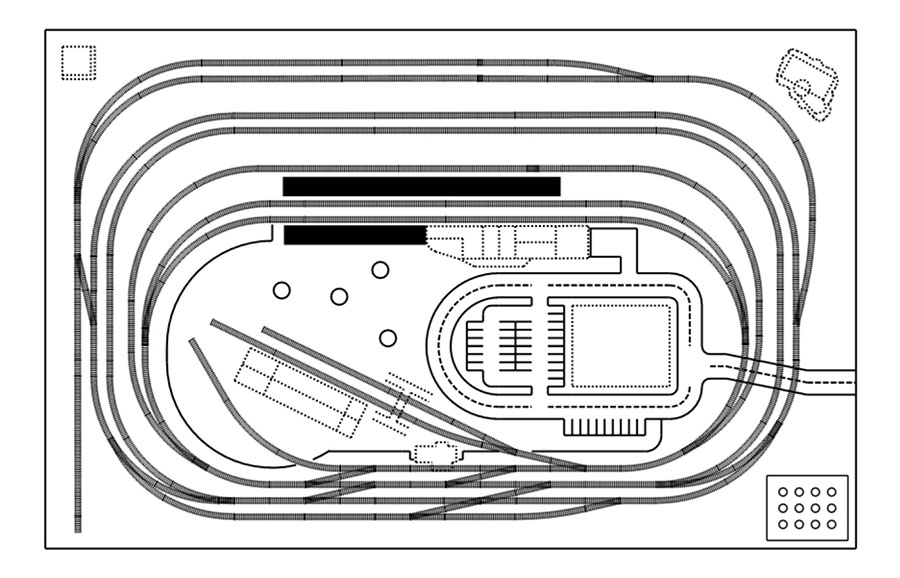
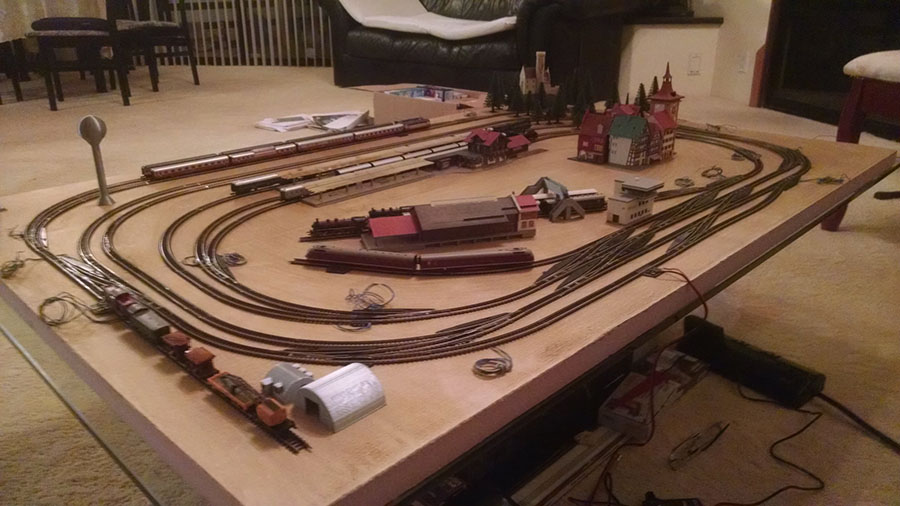
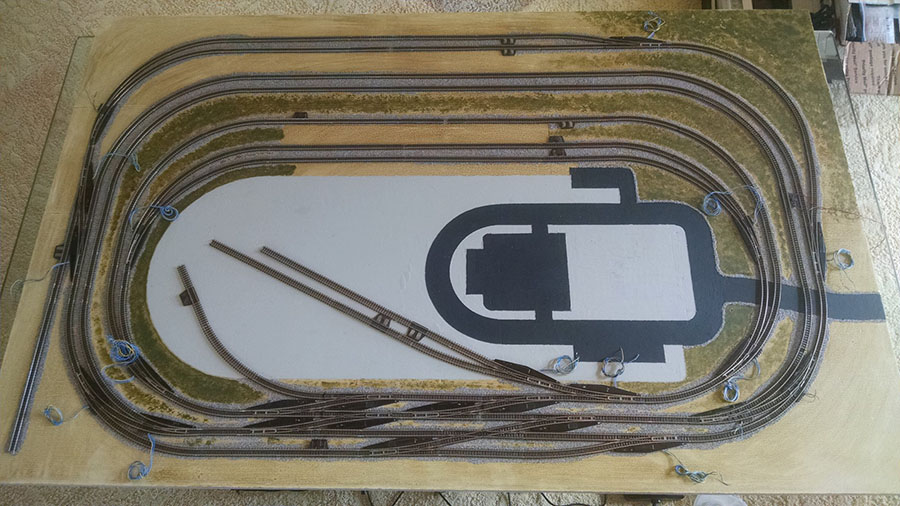
The Z scale layout has two station areas. A double line “City Station” at the top and a triple line “Village Station” in the middle. It has a side spur on the lower left for parking of the “maintenance train”.
It also has three spurs to display the “museum trains” next to the Train Museum Building in the middle of the layout. It has a wonderful switching yard to move trains around. It also has a double Mainline that can run 2 trains at a time or a single train in a “folded figure 8”.
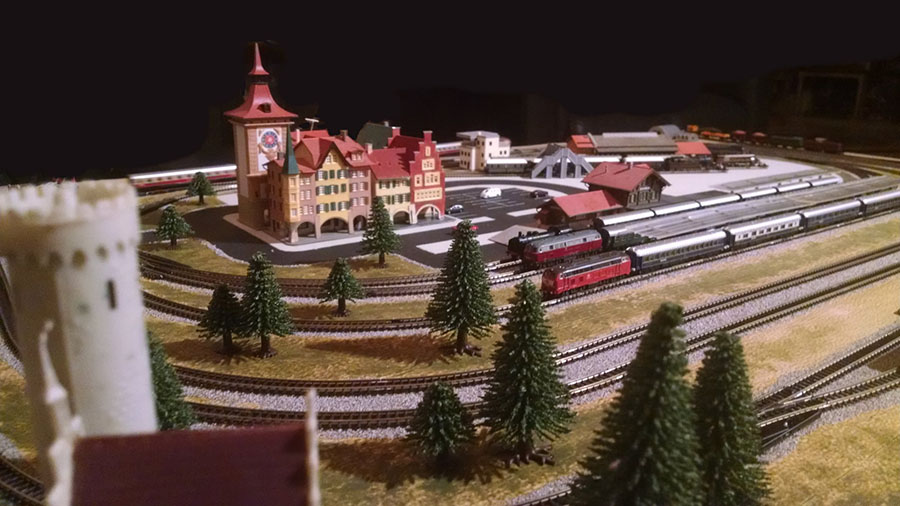
Below is the layout. Trains run clockwise. This layout allows me to have 9 trains on the board with the ability to run 3 of them at the same time.
In designing the layout there were a few major features that I was looking for:
1. Small, portable, and light weight so it could be brought along in an RV. It only measures 50 inches by 32 inches.
2. Scenery “painted” on and all structures and trees removeable for easy storage.
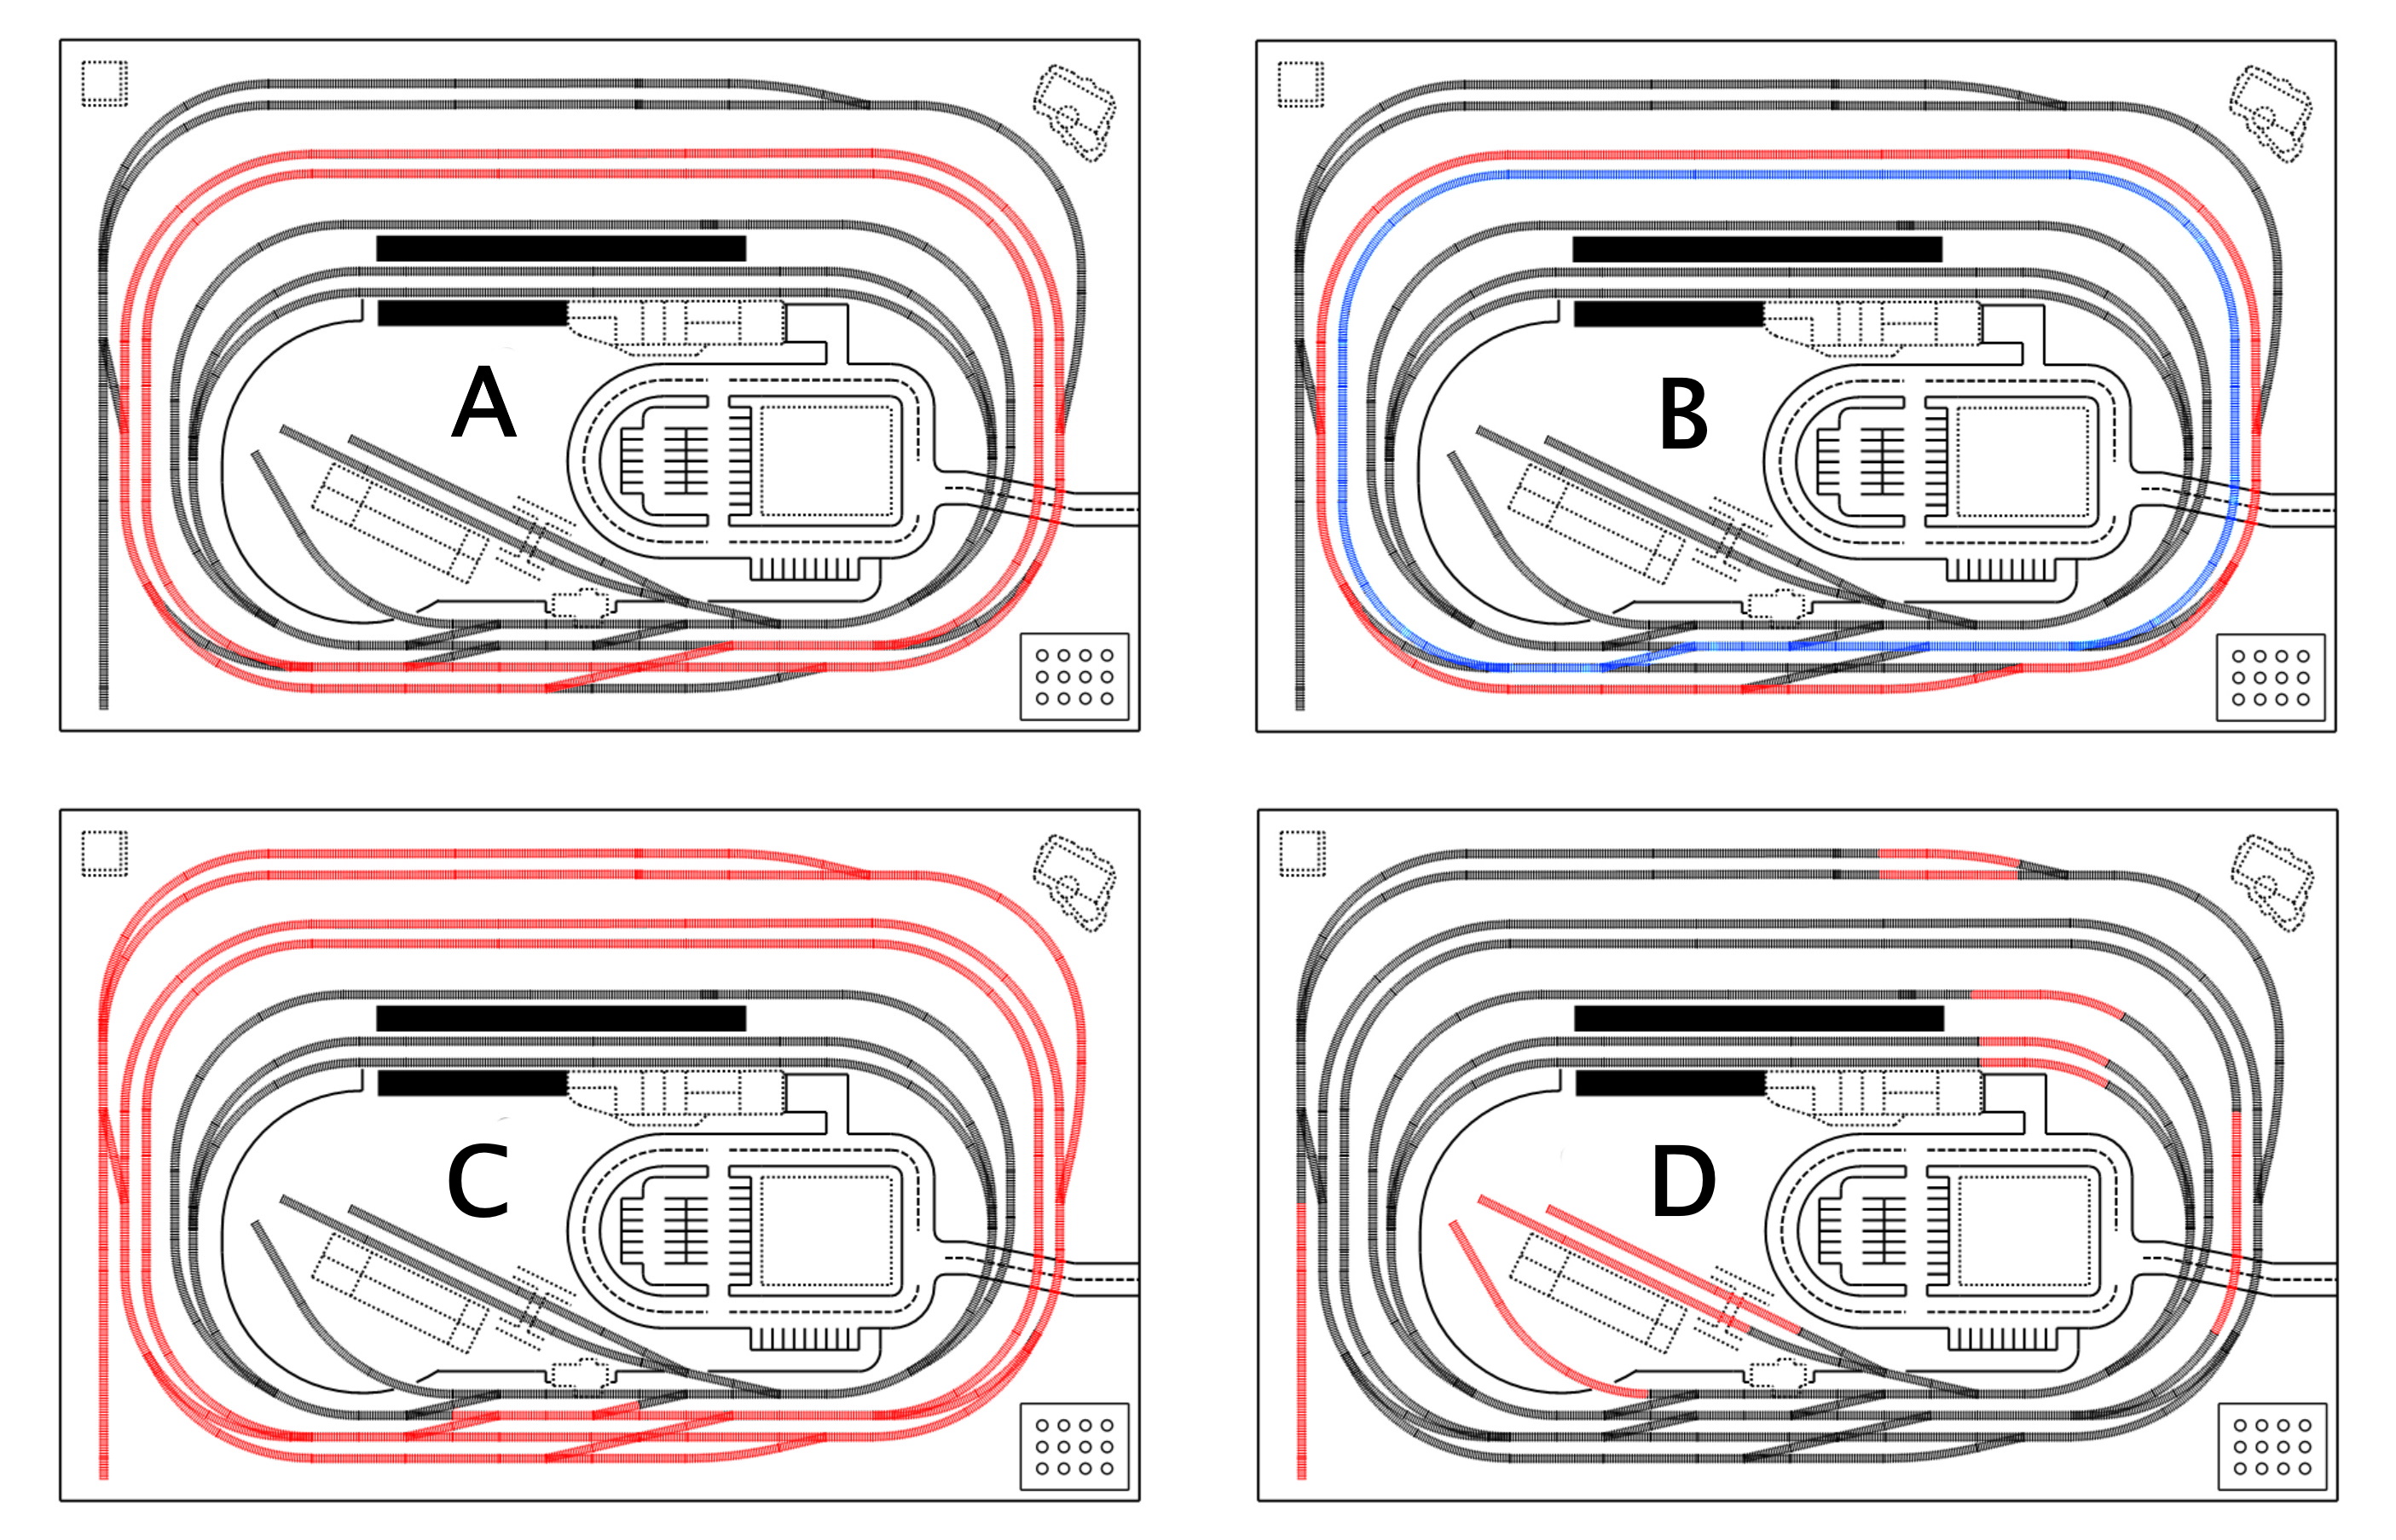
3. No need for electricity. I use two Ztrack Snail Speed Controllers that run on 9 volt batteries and do switching manually. (Diagram C)
4. A somewhat elaborate switching yard. I love the look of a switching yard. I really enjoy switching trains to different destinations.
5. Switching yard easily accessible. Since I’m switching manually the layout has all the switches right in front of me.
6. Ability to show a lot of engines and compositions from different eras. The layout allows 10 trains to be parked and isolated. (Diagram D)
7. Ability to run more than one train at a time. I can run 3 trains simultaneously. 2 on the mainline and 1 in the inner station circle. (Diagram B)
8. A relatively long Mainline. The design allows me to run 2 trains on the mainline (Diagram B) or one train in a “folded figure 8”. (Diagram A)
I would like to present a quick pictorial of how I constructed my layout.
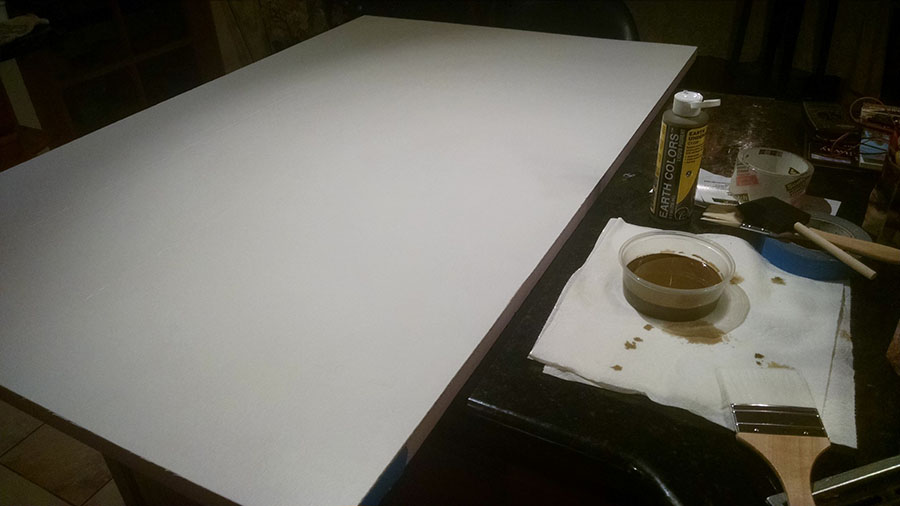
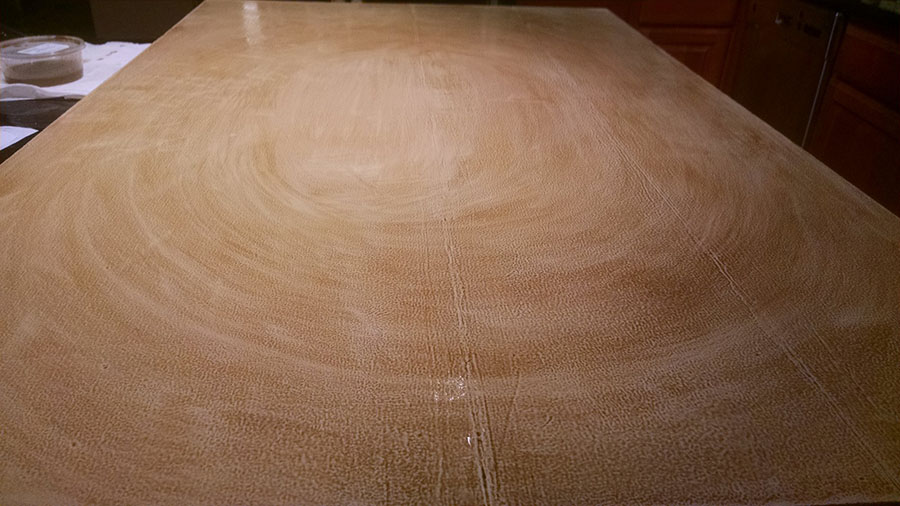
First I painted the 1 inch foam board with 2 coats white primer:
Next I used Woodland Scenics Earth Undercoat diluted 1 part paint to 2 parts water as per instructions and used a brush to paint on the “earth”. I kept things very thin and uneven and painted in the same direction as the track would be layed to create some strata:
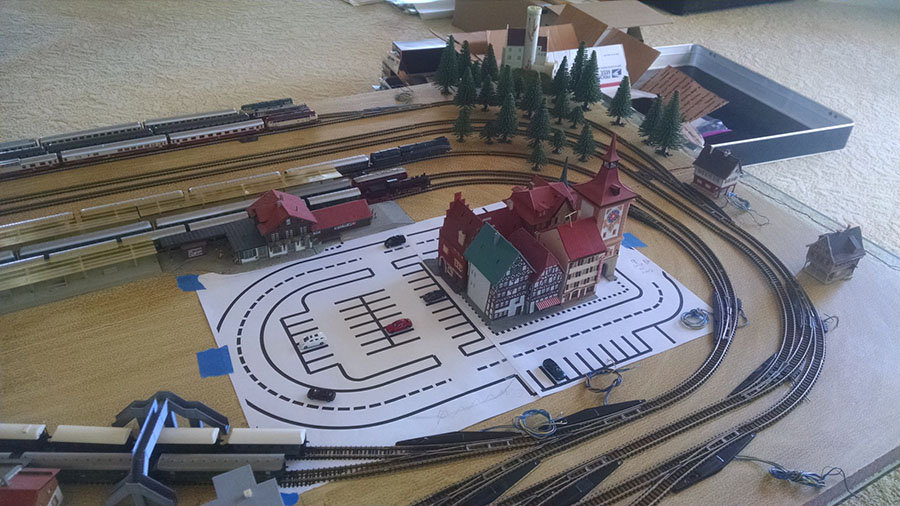
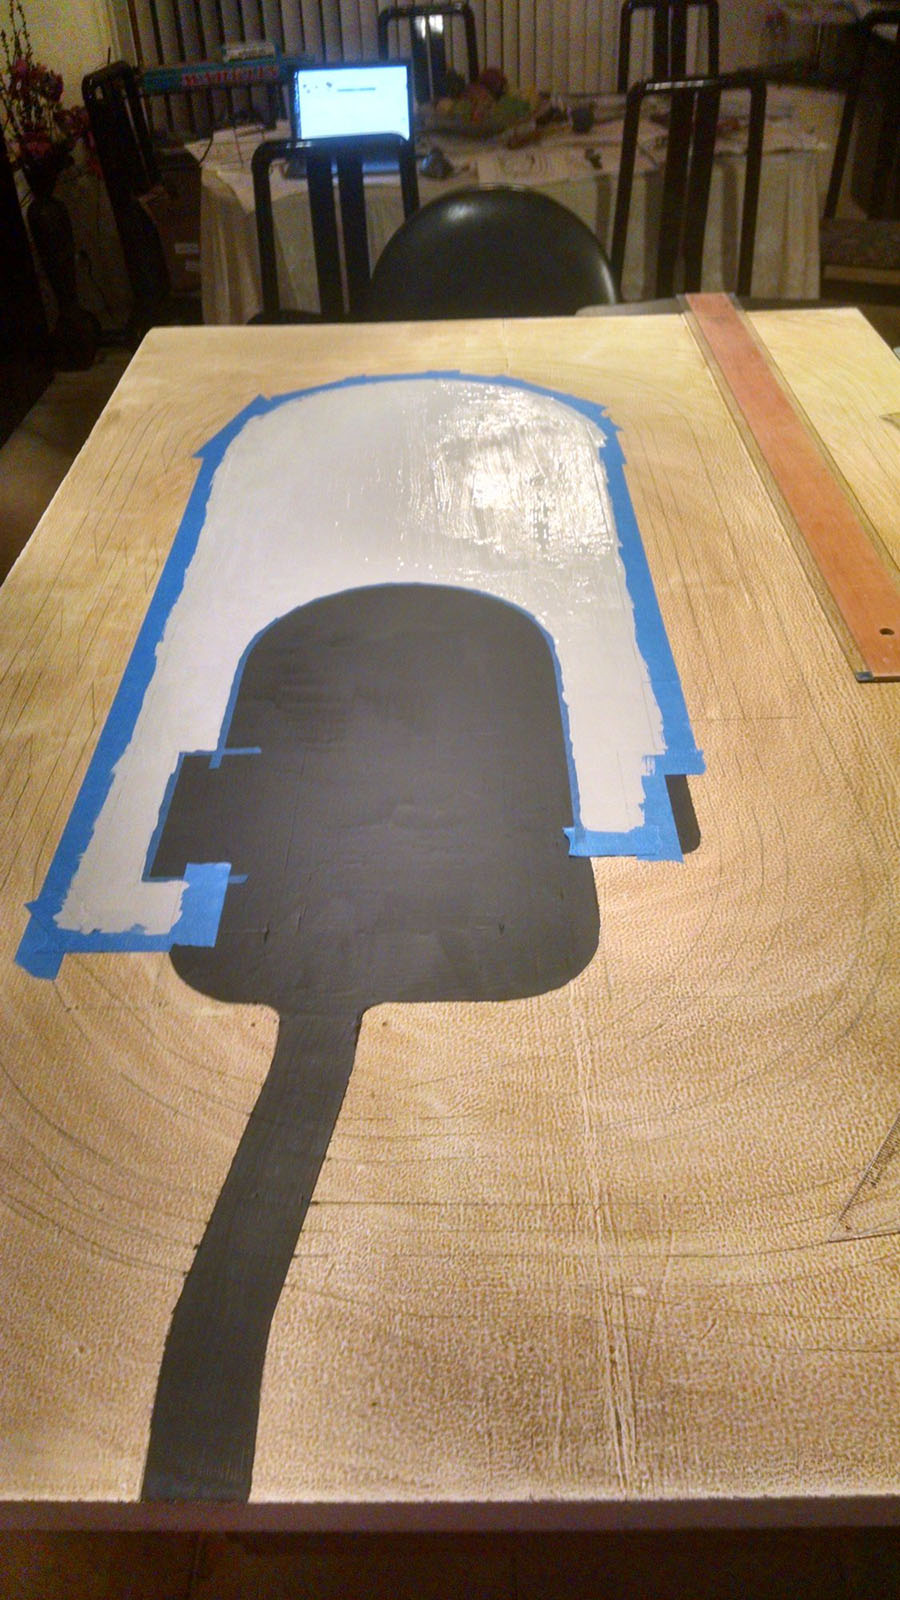
I then laid the track back on the board so that I could trace the track layout and the position of the buildings:
I changed the design of my parking lot so I printed out, full size, the parking and town area to see how it would fit on the layout:
Removed everything off the board and started with the pavement area first using Woodland Scenics Asphalt Top Coat. You can see the track tracing in the photo also:
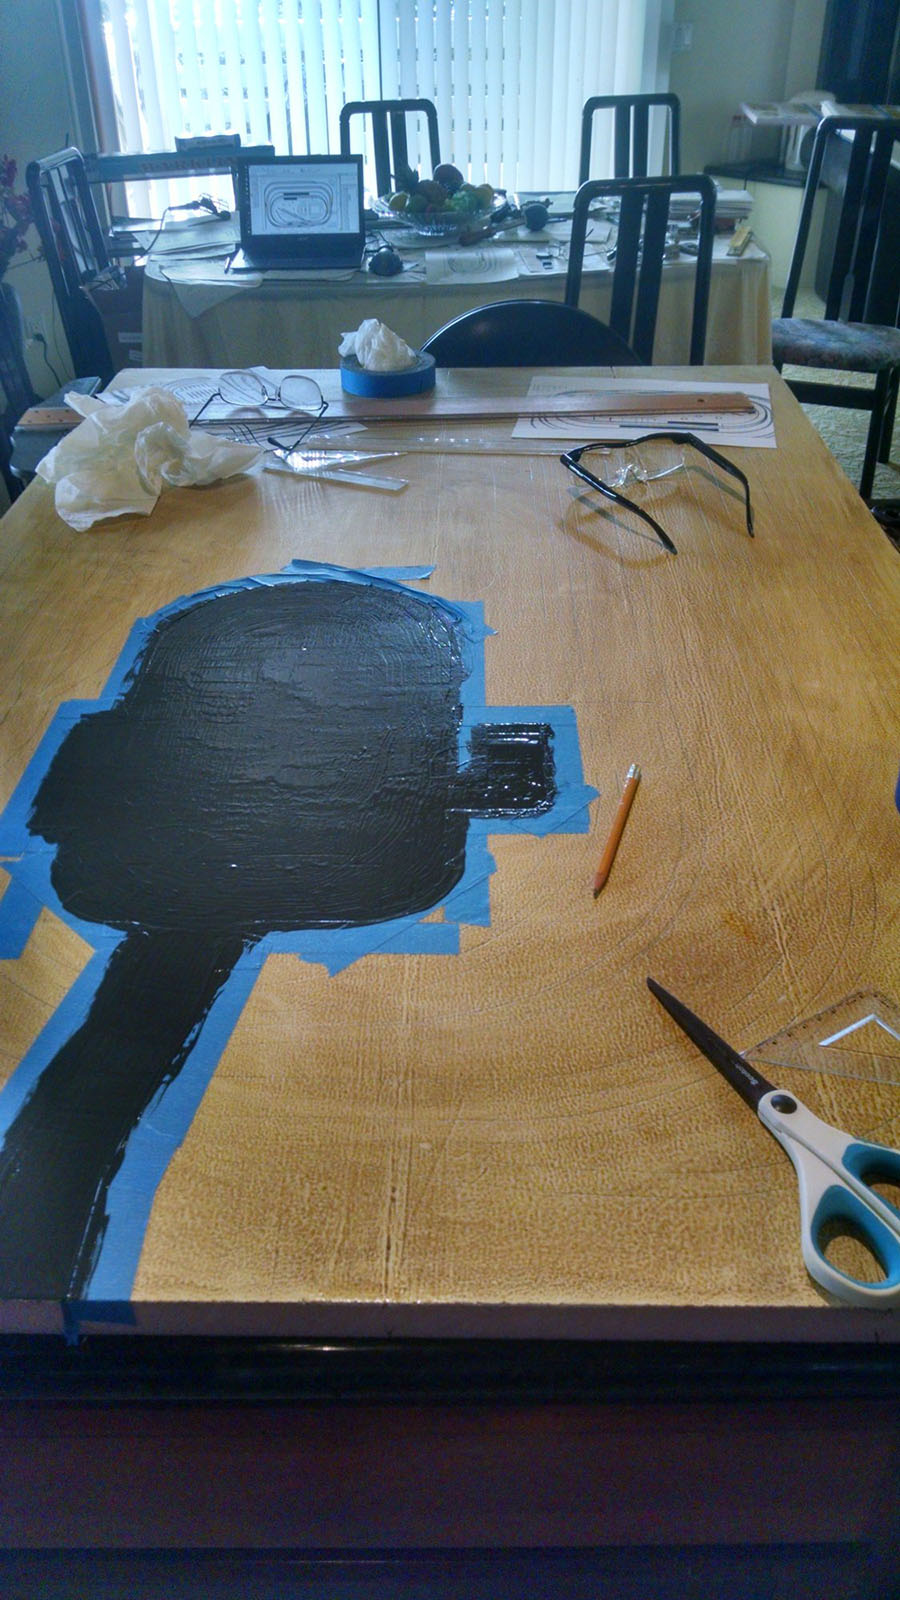
I then painted the large concrete area adjacent to the parking area with Woodland Scenics Concrete Top Coat. I didn’t like the color as it was a bit too beige so I added some of the Asphalt black color to the bottle till it ended up a nice light concrete gray color:
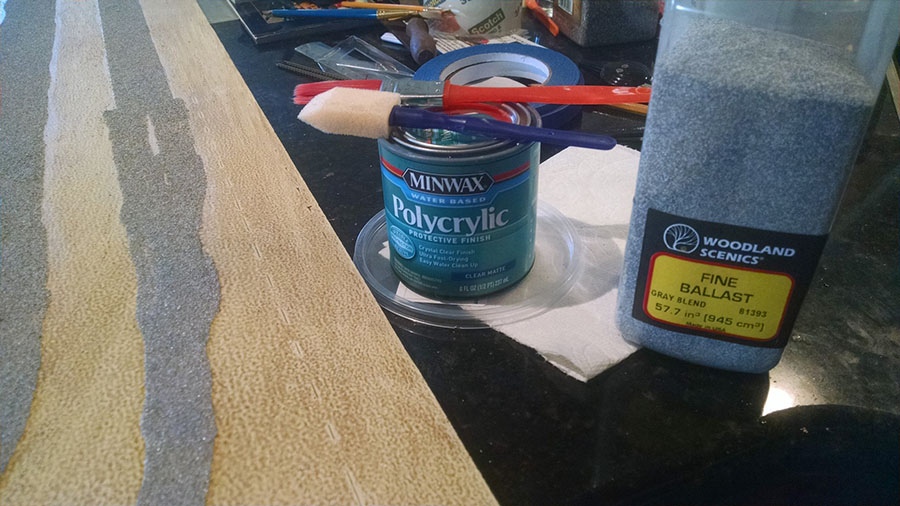
Now the interesting part, “painting” the track road bed. My first idea was to purchase some of the Krylon Granite spray paint and paint it on using a brush. Problem was that I could not find the “fine” granite. All they had locally was the “coarse” granite which would have been too big and out of scale. And being in Hawaii I couldn’t even purchase any online as it can’t be shipped here. So I reverted to plan “B”.
Following the z scale track tracings using a 3/4 inch foam brush I painted on a layer of Minwax Water Based Polycrylic Clear Matte. I then sprinkled on some Woodland Scenics Fine Ballast Gray Blend. I let it all dry overnight, swept off the extra ballast, and then applied two more coats of the Polycrylic over the ballast. It has dried very hard and I don’t think it will crumble off. It also gave some “relief” to the roadbed:
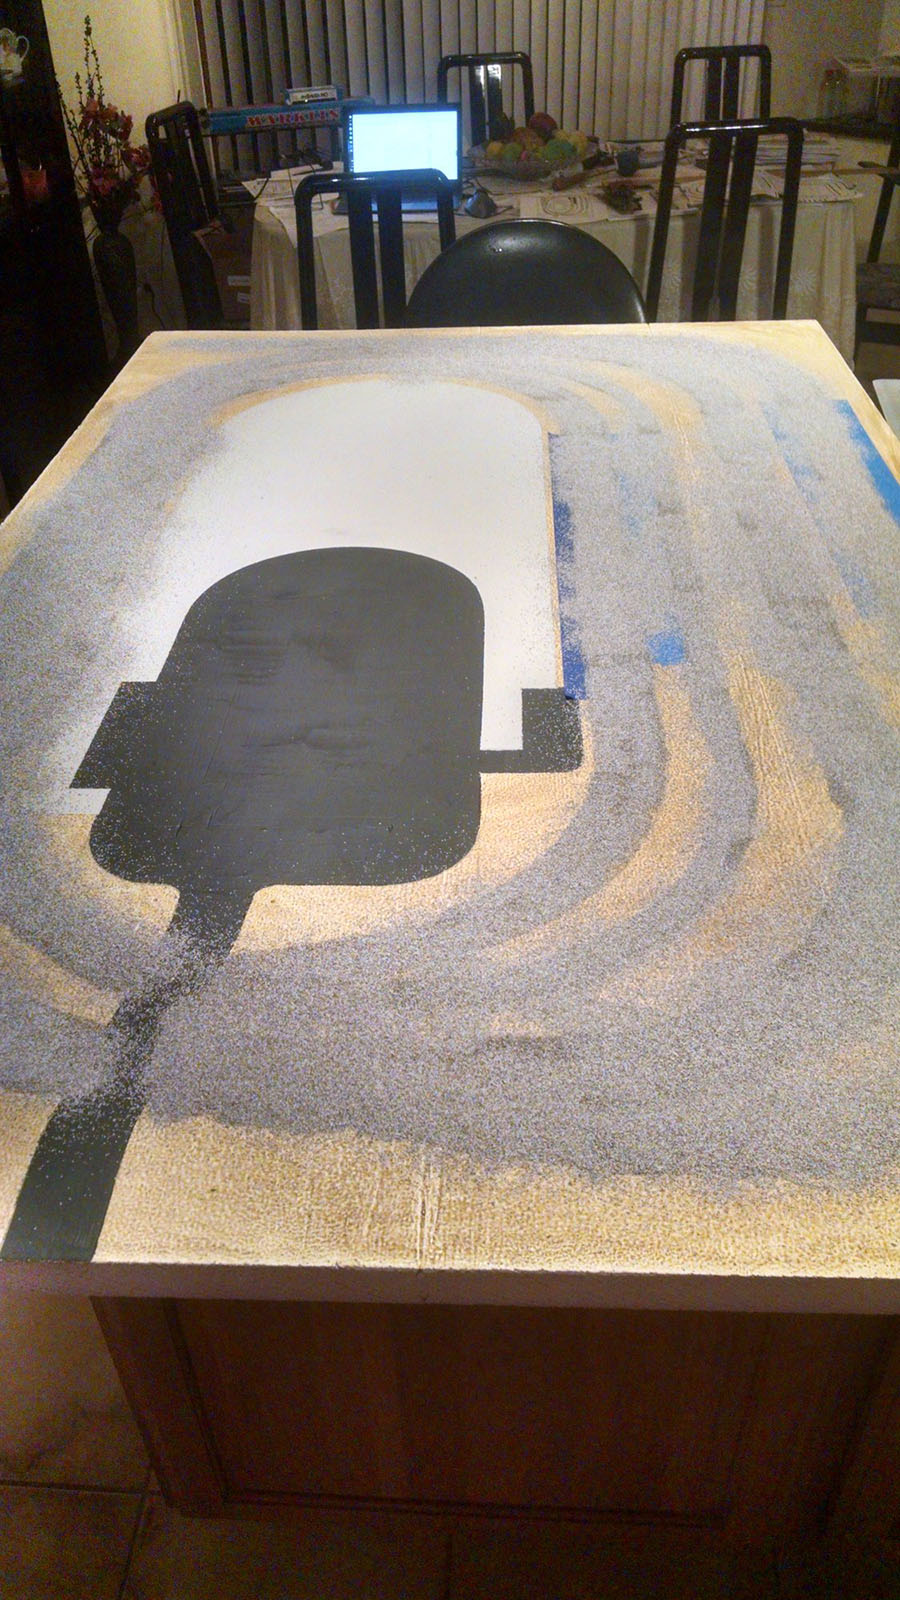
I then completed adding the other concrete areas over the pavement. By painting the concrete on top of the pavement it also gave a slight “relief” above the pavement:

Now to painting the grass. I used Woodland Scenics Green Undercoat at full strength using a stencil brush and randomly dabbing the paint on it the areas I wanted grass. Kept things pretty thin in most areas allowing the brown earth to come through in places. Also tried to keep a thin area of earth next to the ballast as I often observe in the real thing:
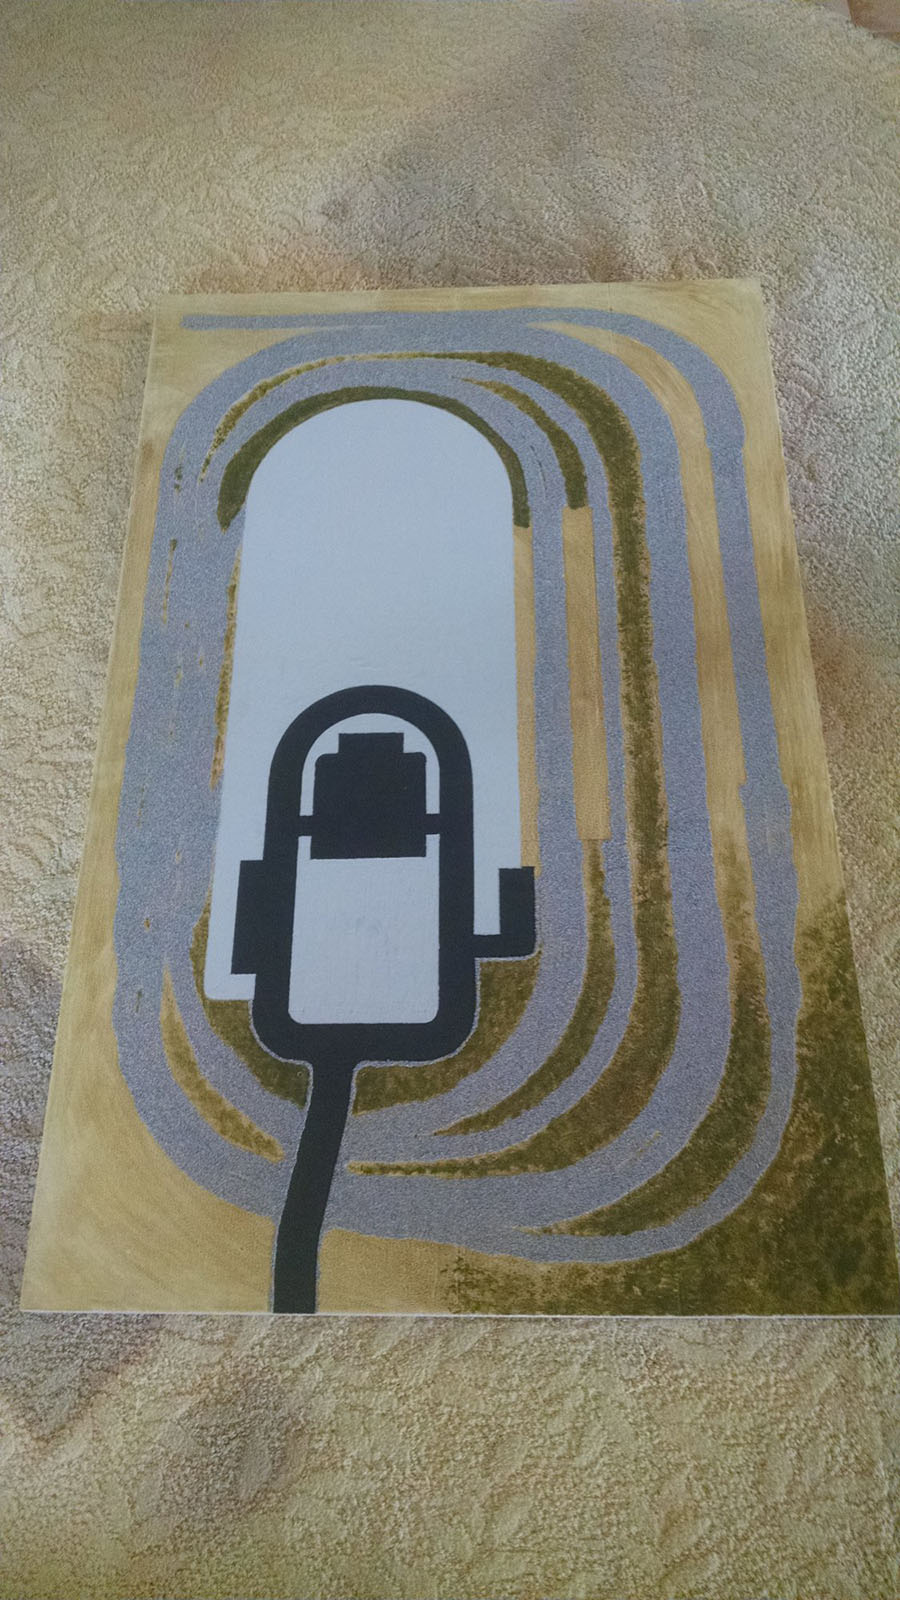
Next step was laying the track back on. Made sure everything was aligned correctly and used the Marklin track nails to keep the track in place. I wanted to be able to cleanly remove the track if needed in the future and that is why I decided not to ballast and glue directly over the track. It seems like my idea of placing the track on the completed ballasted track bed will work out very well and I’m quite satisfied:
Here is an overhead photo with the buildings, trains, and other items placed on the layout. It is compared to the CadRail drawing. Still waiting for a few electrical parts to complete the build:
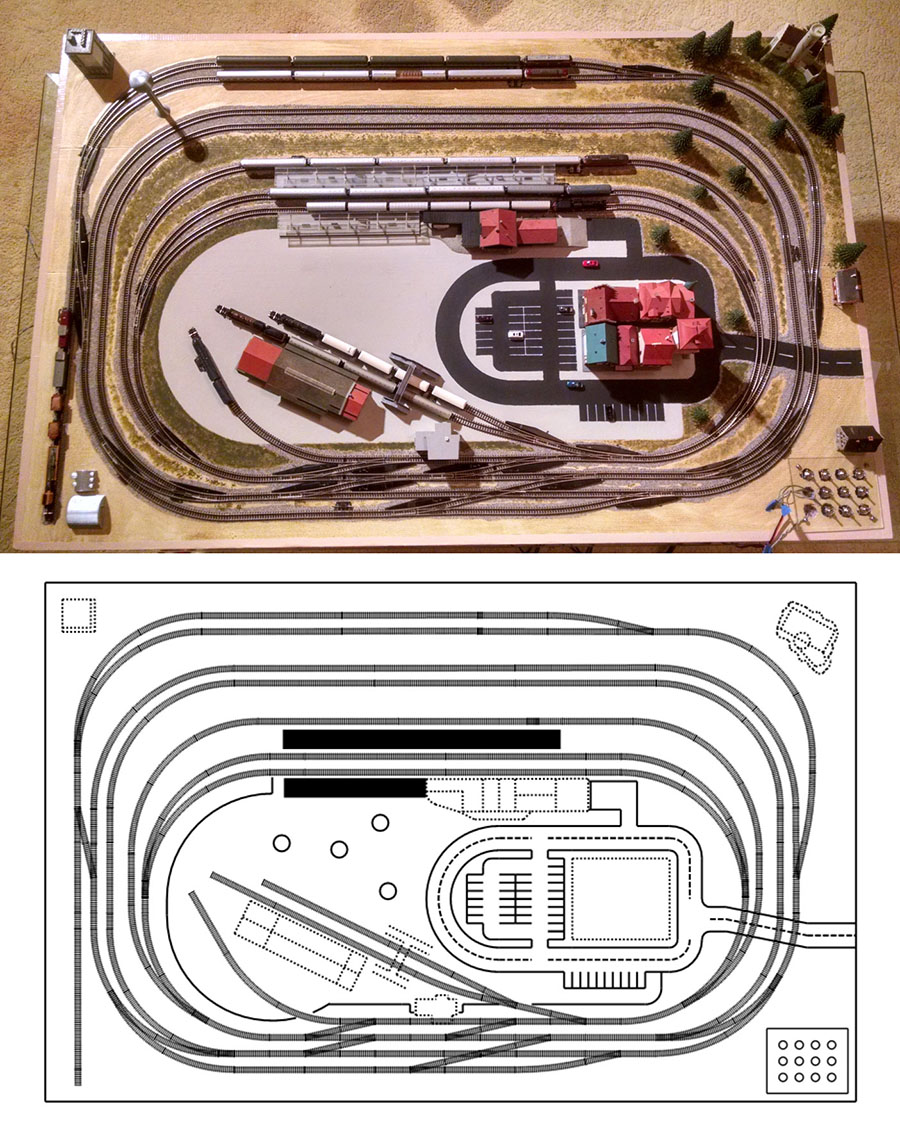
What I’ve put together has fulfilled everything I was looking for in a portable layout. I’m still looking at scratch building the “City Station” and there is still a lot of detail scenery painting work that I can work on in the future. It’s great that a lot of the work can be done “on the road” if I so desire. It’s been a real fun project and I look forward to playing with it for some time in the future.
If you have any questions or comments I would love to read them all.
Eric”
(More Z scale layouts here.)
And now on to Kaustav. You’ll remember him from his port layout:
“As my Wrightsville Port layout is coming to a conclusion, I am planning for my next projects.
There are many possibilities and there will be quite a few interesting things that I plan to do in Model Railroading in the coming months and years.
All these new projects will be DCC, unlike my current layout that runs on DC. On top of that I plan to use JMRI and computers to control my future layouts.
As I started planning, I thought why not make a series of videos with the basics of DCC and JMRI for others who are getting started with the hobby. I think DCC and computers expand the horizon of Model Railroading to a great extent, and gives immense opportunities to do a variety of things and have a lot of fun along the way.
However, while doing my own research I found that though there are a lot of resources available out there and many of which are fascinating and advances stuff, there isn’t really a ‘quick guide’ that consolidates all that you need to get started with both DCC and JMRI.
So this series of videos aim at providing that quick start reference for anyone who’s interested.
Here goes the first one in the queue – basics of DCC wiring. Hope you and viewers like it.
Kaustav”
Latest ebay cheat sheet is here.
A big thanks to Eric for sharing his z scale, and to Kaustav for his DCC video.
More Z scale layouts here.
That’s all for today folks.
Please do keep ’em coming.
And if today is the day you get started on your layout, the Beginner’s Guide is here.
Best
Al
PS Latest ebay cheat sheet is here.


Thanks, got a lot of info.
Great job Eric! You obviously put years of studying and planning in before you put pencil to paper(I’m old school…sorry). I’m in that stage right now. On my 6th redesign of an N Scale Railroad that if necessary can be disassembled and moved. A real nightmare. It’s also my first solo attempt at this. Back in 1953, my dad built an HO Railroad in his garage. Then using his rolling stock and locomotives, my brother and I built one in our garage. I’m 67 years old now and well, boys and their toys! Got bit by the bug to build a Railroad. Keep up the good job!
Great job guys. I love model railroading and in my new train room/ enclosed air conditioned and heated porch I have started my z gauge layout filled by n, ho, o and g gauges. My ho gauge layout will have as it’s stars my 5-6-6-4 Challenger steam engine with all sorts of nice features and it’s big brother my 4-8-8-4 steam engine Big Boy . I have to make the curves wide enough to allow easy running. Also if articulated helps they both have that feature
Ed Martin
Philippians 4:13
Eric, A serious amount of pre-planning went into your layout. I prefer to lay my tracks in the design in my head and then adjust to suit, then plan out the rest with what’s left available. In the old days we didn’t have computers and the planning software that you have today, so I go as I have always done. But very well done, it’s looking good and very compact. Happy Modelling from one Eric to another..
Great detail and thoughtfulness put into this. A person wouldn’t believe it was a first layout and portable. It is evident a lot of research and patience as well as know how went into this project. A lot of time spent testing different ideas, I suspect. Commendations!!!
Very nice detailed write up. Nice design. Got some useful information about keeping some extra trains isolated but visible on my N scale layout.
Great job…..very very nice layout. I am building my layout in HO scale…….I can not imagine working in Z scale……..Anyway…….great looking layout.
Very inspired by your work what can be done with lots of planning. Limited in space and need for portability your design has wet my appetite to stop thinking and start planning and building. Thanks
Eric,
Beautiful concept, and it looks like you have made a lot of progress.
Only one thought:
The way the crossovers are arranged you can only change loops a train is on in one direction. There are extra crossovers in front of the station, maybe flip some to go the other direction?
Hello Eric. Great layout idea. I have a Z scale layout inside a glass topped coffee table. It is nowhere as extensive as yours. What is the brand name of the 9v speed controllers that you are using? I am trying to put together a small/cheap/simple Z set for a few of my grandsons and it sounds like the controllers that you are using would work perfectly for that project. Thanks, and keep the great work!
Small scale genious. I have a small drive in movie n-scale layout onthe top of a portable bar. I have three sets running on two levels with a lot of scenery.. My famiy thinks I’m nuts. I all started in 1950 in Brooklyn, N.Y., when Mom bought Dad a Lionel 027 Union Pacific deisel pair for his first Christmas gift. I took over from there and am still at it. I plan on creating a third level. N scale trains can be very long 25-50 cars, unlike the old Lionel sets which did not have that capability. Great job of planning and photographing the build. You should be commended for some precise work.
Thanks for all the great comments and suggestions!! .
Mike, the controllers are Blueline Ztrack Snail Speed Controllers sold by ztrackcenter.com. Great little controller that works on the PWM concept. Trains can run real slow if you want them to.
Ken, the layout is designed for the trains to only run clockwise on the loops. Maybe not very prototypical but it keeps things simple and allows me to run the trains from one station to the other and run multiple trains at the same time.
Robert, yes indeed. I read many times here on Al’s blog that the hardest thing was to get started. I had some extra time on my hands so I decided to jump in!
Eric and Bob, yes I worked up a lot of ideas using the CadRail software to work out different designs. I must have over 100 different layout plans sitting in my computer. Most of them are huge full room layouts. I have found that working with a certain theme and designing the layout around what type of rolling stock you have and also what type of buildings and scenery you have on hand makes it easier to focus on creating a workable result. Also working out the designs on the computer is very fast and you don’t have the wear and tear on your fragile track pieces. Creating designs on the computer is kind of a hobby all on it’s own! You should see the Grand Canyon – Williams layout I created.
Richard, I’m 60 years old and I’m looking forward to be retiring with this great hobby! I have been purchasing track and stock for many years – mostly off of ebay – but it was only the last three months that I dove into researching the internet to figure out the best way to actually get started. Foam board, ballasting, Woodland Scenic products, painting techniques, Ztrack Snail Controllers, this and other forums, are all things I discovered on the internet just in the past three months.
All in all it’s been a fun “first attempt” at actually building a working layout. It will serve it’s purpose well. I do look forward to start on one of my big layouts when I eventually find a new home somewhere out there in the great USA. I’m actually in the process of selling my home and property here in Hawaii and relocating to the mainland. So it may be a few years before I will be able to get started on a new project. Anyone want to buy my 5 acre estate here in Hawaii?!!
Thanks to all of you once again!
Very impressive, great plan and execution!
Wow Eric im currently building my first z gauge layout on 2 72″ x 30″ boards that will join together but yours is way better looking than mine and seems to have more space for track too i would love to see how you wired the track up and separated to keep loops isolated absolutely amazing job fair your 1st layout
paul
Eric, and I thought I was mad going to N gauge!! Thank heavens for magnifying glasses.
Looking great so far, keep on having fun.
.
Eric
Great layout. planning and approach to problem solving. Z scale- OMG! Keep us posted and maybe send a video in the future
Kaustev
Great to hear from the master! As always you are the guru that we all gain wisdom from. I pray for you and all in India right now. Our hobby is a great stress reliever in these trying times.
All be well & safe
George from LI, NY
Seems there’s no end to where one constructs there layout. This one I see is resting on a glass top table in the dining room .Well so much for Sunday dinner.
By the way which room is missing a door.
We now know this hobby brings out the imagination in all of us.
The Critic
My Railroad is going look something like that. That Kool.!!!!
Question for Dangerous Dave, with so many trains running at the same time, how many boosters do you use
Eric, you did a super job on your layout. I really like the track layout you have. It provides so many of options to run your trains. Your layout is beautiful and your write up was so detailed. I really enjoyed reading and looking at what you have done.
WOW What a great start and another Z scaler too boot!!!!
Eric, Great layout, I’m planning an n scale layout, your approach gives me some ideas for ground cover- Thanks! Most impressing is that you’ve designed something for travel and your RV- wow! Just goes to show the lengths model railroaders will go to so we can play with our trains. Great job! Cary in KY
Hy all, this is a tip for all, especially new to model rR. Spray on stone is available at ace Hardware in colors and texture in spray cans. Makes a great ballast before you set the track. Very easy to use, and not much overspray. Good luck, Bob