There are quite a few N-scale U-shaped layouts on the blog now – and here’s another from Gregory:
“Hi Al;
I’ve been reading your newsletter for a few years now, and I’ve decided to send in something of my own in case you’d find it useful to other members.
A little bit of background; I’ve had steam in my blood at least as far back as the age of 4. It runs through the family. My father introduced me to model trains at an early age, though I love any number of aspects of railroads, railroading and trains.
My earliest remembered experiences involve some HO trackage on a table my dad had built prior for his own collection of N-Scale, and then moving into G Scale sometime shortly thereafter. Most of my childhood revolved around G scale since it was easier for a child to work with, plus my father had some issues of arthritis creeping in with his own hands.
As I grew up, I also developed an interest in live steam, and of course, the real thing was the ultimate thrill for me. I left the hobby to the side during high school as other commitments didn’t really allow for much of anything else, but the spark was still inside, and after I turned 18 and had a license to drive, I started going to a local hobby shop to browse, and to a nearby station at night to watch the trains going through.
This kept up through college and a few years after I finished, the bug was back in full. While having an apartment of my own, I started working on a layout in N scale, using some leftover stock of my father’s, and building a new collection up.
I put that to the side when I got married and became a step-dad to two wonderful children, but I introduced them to the ideas, along with my step father, and my own dad, who’s layout was now the major occupant of a 20 x 20 room in his basement.
Finally, a year or so ago, we moved to a new duplex with room in the basement for me to restart building a layout in earnest.
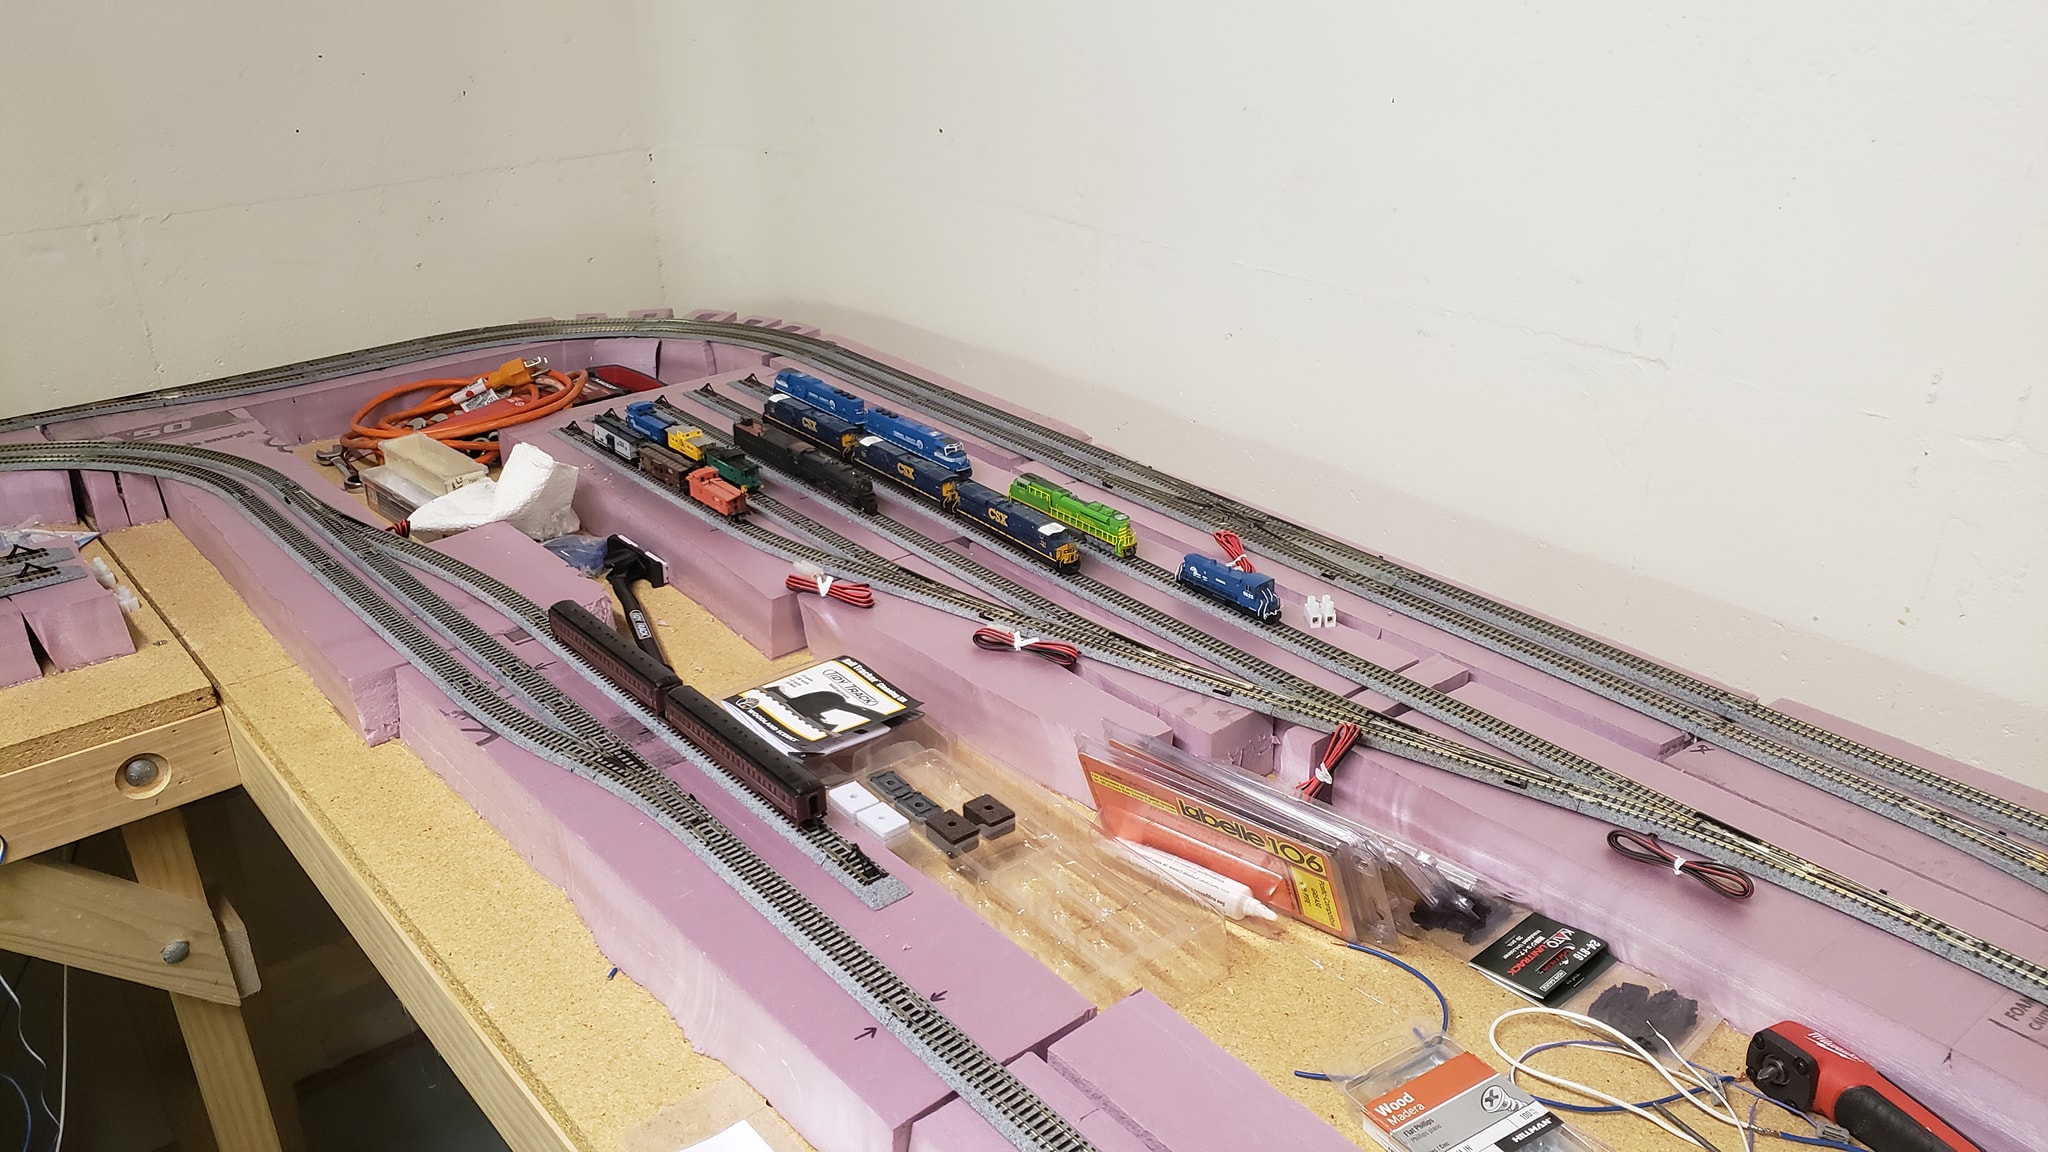
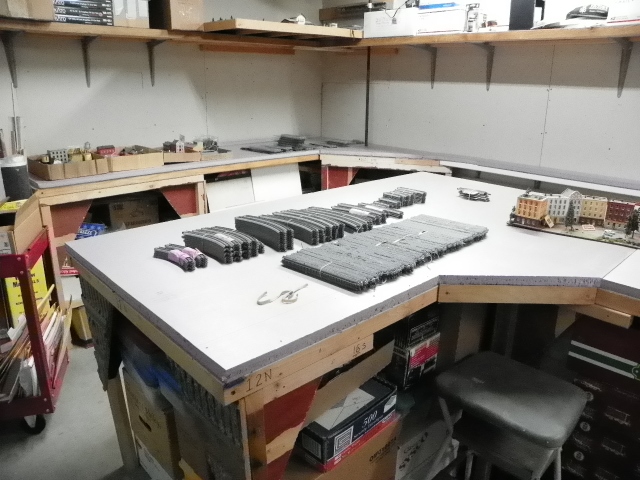
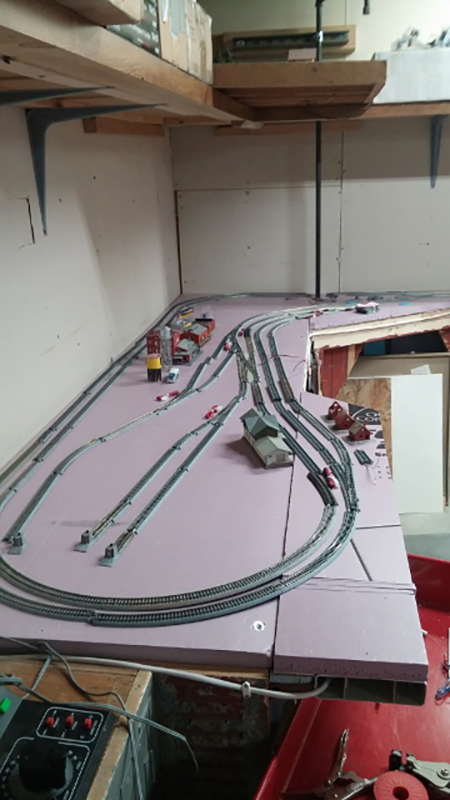
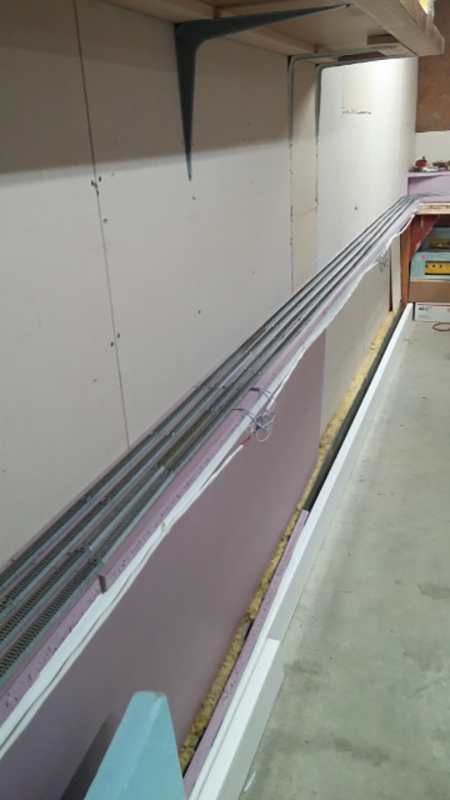
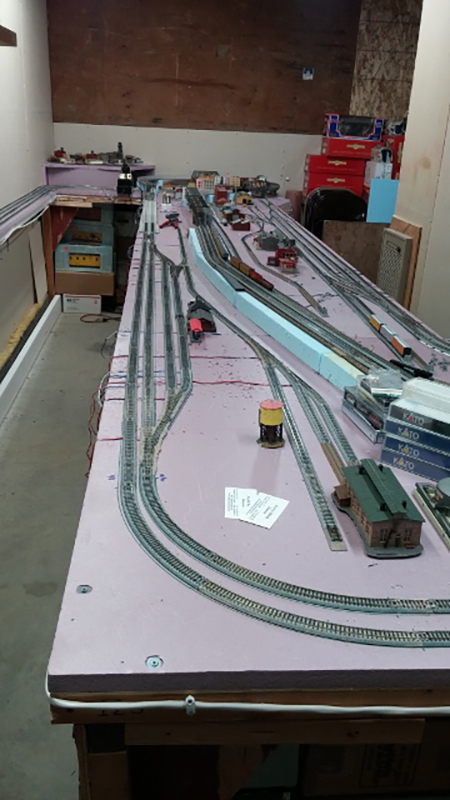
It’s been slow progress, because budgets have to be watched at all times, but it’s been more meaningful as a result. My son and daughter aid me in regularly working our layout, a 11.5 x 12 N-scale U-shaped layouts, built in sections for the inevitable day when we have a home of our own.
We have a long way to go, but we have enough wiring on the mainline done to run our equipment most of the way around the layout (though not without some rough spots, since nothing is fastened down or smoothed out just yet. I’ll share some photos for you if you’d like, and I’m detailing my build more on my YouTube channel and personal website.
The layout is run using a DCC system, just because I was able to get a good price and it allowed for a bit more ease in some regards with the wiring. The kids have picked up some woodworking skills, the basics of wiring and even have started learning skills in soldering.
There is a long way to go before this layout will have a “finished” look, though as my dad always says, an empire like this is never truly finished.
I’m approaching 40 now and I try to use this layout as an inspiration to my generation (and younger ones) that this is such an amazing hobby, because there are so many things you can do and learn in the process of participating.
My kids (14 and 13 now) regularly show friends and teachers the work we do as well, and it seems to be piquing interests in others. Hopefully that will lead to this hobby having a bright future in this age of video games and electronic toys.
I hope, if you share, that your readers enjoy, and if you would like, I will continue to send updates as the layout grows.
my new loco arrived yesterday (the xmas present to myself ) one of the buffers was missing so rang the retailer who instantly said send it back, so no video of my new train, its one of the new 67 class in the pullman livery, looked very good.
So just did a short video on my phone of the Deltics blasting away, quality not great due to been taken on phone.
Firstly, I must compliment you on a stunning site full of the most useful tips and instructables.
But I don’t want to be a taker and not offer something in return, however, modern technology and I don’t always sit comfortably around the same table so I am unsure as to how to submit my little offering.
Living in South Africa with a most unfavourable exchange rate makes the railway hobby more challenging than it is for our counterparts in Europe or the Americas so necessity becomes the mother of invention and we have to find affordable alternatives.
So being old school and not following the DCC trend, my objective has been to develop cheaper methods to achieve similar ends within affordable limits.
Toward that end, I have devised a couple of low cost systems and include one here that if you think it is a worthwhile addition, please feel free to distribute it as you see fit.
Thank you once again for your superb contribution to the hobby and may it continue for years to come.
I am sure that we all cruise the internet of things looking for effective ways of producing items for our layouts.
I was lucky enough to find a youtube video which provided the simplest method that I have found so I don’t take the credit for the idea but pass it on in written format for those of you who wish to use it.
For those of you who would prefer the video link, it is below:
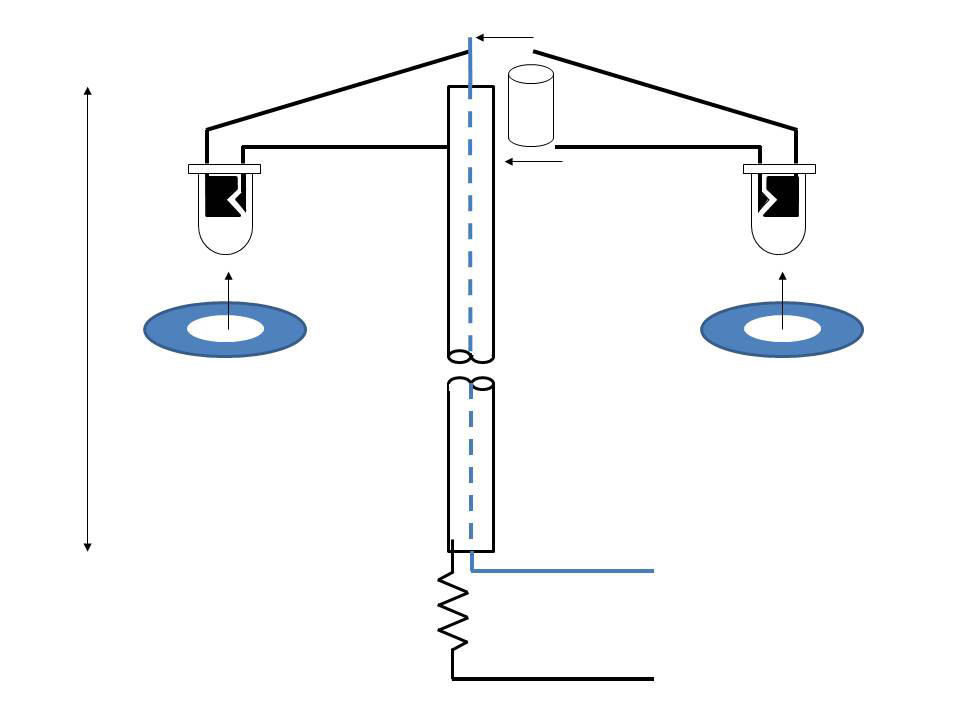
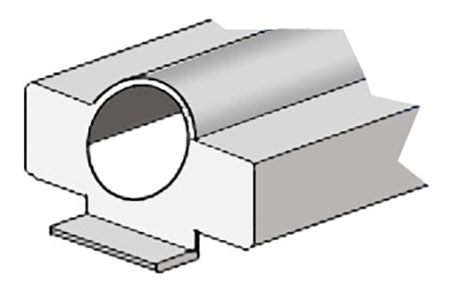
I found the parts for the model train street lamps to be relatively easy to source locally. Below is a sketch of the assembly:
I found that the most difficult part of the exercise was drilling the 3mm holes through the brass paper binders (You can get a box of 100 for about R35.00).
Firstly, they are not brass but brass plated steel. Secondly, being so small and smooth, how the heck do you hold them without causing damage?
Trial and error succeeded at the end of the day and I was just thankful that I did not need to make too many of them.
So, what do you need to make these lights (and of course, you could make single lamp types just as easily)?
2 white LED’s 1 ±800Ω resister 6 -8mm of heat shrink ±90mm of 2.5mm brass tube 2 paper binders A whole heap of patience.
• Open the paper binder pins outward and cut off leaving approximately 2mm of each pin
• Press the paper binder into a piece of soft-ish wood and drill the 3mm hole (I suggest start with a smaller drill and work up to a 3mm
• Remove the paper binder head from the soft wood and trim off the remainder of the “legs”
• Now bend the legs of the LEDs to the desired shape remembering that the anode leg (the longer one) is to be soldered onto the pole
• Bend the anode leg around the pole and solder into position making sure that the cathode leg terminates approximately 3mm above the pole
• Slip a piece of thin wire (once again, I use CAT5 network cable stripped down to individual pairs) up through the brass tube
• Pop the heat shrink onto the end of the pole
• Solder the wire to the cathode leg of the LED and shrink to a tight fit
• Solder the resister to the INSIDE of the base of the pole
• Attach the “lamp shade” made from the paper binder with a drop of super glue
• Paint to the desired colour remembering NOT to paint the LED or the inside of the paper binder.
• Drill a hole in the base board or platform and connect …. As easy as that, your model train street lamps are done.
One could (I suppose) call me a “Colonial”, but I only discovered many years into my model train adventures (obsession) that my great-great-grandfather heralded from the city of Bristol and quite coincidently, the bulk of my collecting over the years was the GWR.
Not realizing the full extent of the task, I had in my ignorance embarked on the program of building/ collecting as many of the GWR locomotives that I could. In my research, I discovered the wonderful GWR.ORG site (http://www.greatwestern.org.uk/loco_draw.htm) which provides many drawings of the GWR locomotives and has become an indispensable tool in the objective.
One such sample was the 15XX class 0-6-0T which I tackled as follows.
Firstly, with the use of Photoshop, I scaled the drawing to 1:76 (OO).
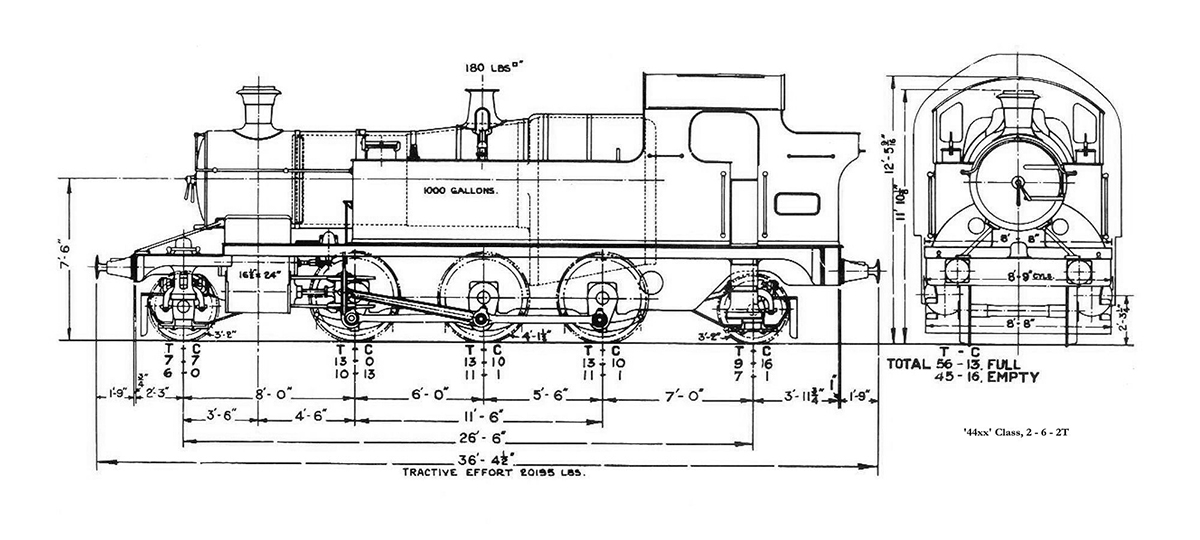
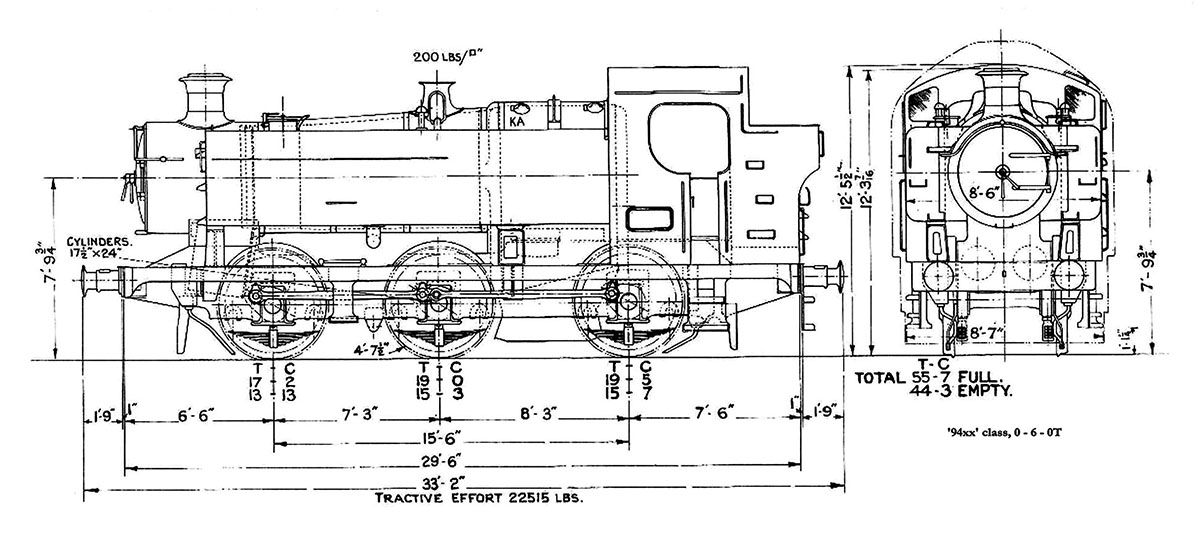
I then went looking for another loco drawing the approximately fitted the required dimensions and discovered that the 44xx Class 2-6-2T had about the right wheel arrangement. In similar fashion, the 94XX Class had a body that could be modified to resemble a “close-enough” fit.
Armed with this information, I climbed onto eBay in search of an unwanted sample of each and was lucky to get both of these Lima models at roughly the same time for approximately £8.00 each and with the unfavourable rate of exchange, took the plunge with scant concern for my bank manager’s reprimand.
With excitement bubbling in my brain and an itch in my hand to grab a scalpel, I went AWOL from work and rushed to my workbench where I immediately stripped the 44XX Class down to the chassis (Carefully storing the body for a possible future conversion) and removed the front bogie and rear truck.
Similar treatment was given to the 94XX Class with the chassis being stored away and the body was test fitted onto the 44XX Class chassis to determine how much cutting/building was needed.
VOILA!!!! Very little so the project was to go ahead at “full steam”.
Remember that constant reference to the drawing(s) will be necessary throughout the process. Putting the chassis aside, my attentions turned to modifying the 94XX Class body. Remove the water filler caps and other loose fittings from the top and sides of the tanks and store them safely for later use.
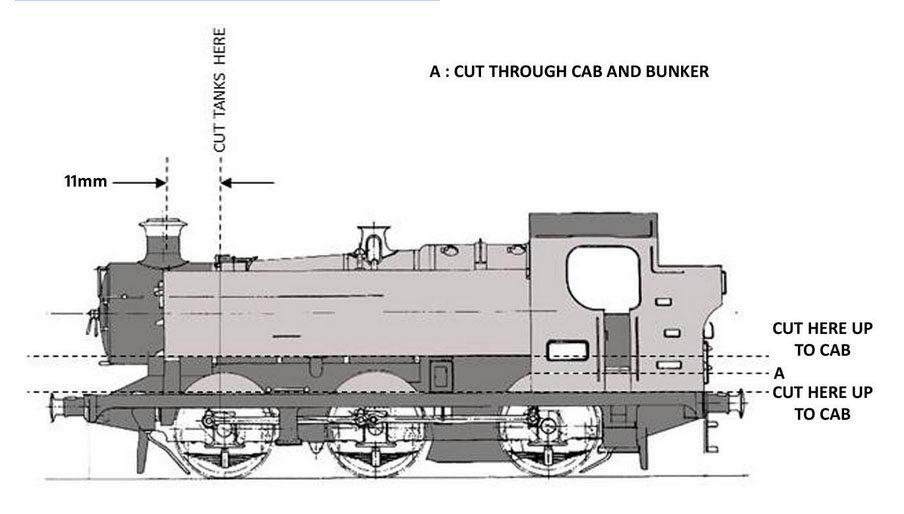
MODIFYING THE 94XX CLASS BODY
Having scaled both the 15XX Class and the 94XX Class with Photoshop, I was able to superimpose the one image over the other and this clearly displayed what and where to cut.
The tanks on either side had to be shortened by 11mm and every attempt must be made to preserve the front face of the original tanks which are shaved off and re-glued onto the shortened tanks.
Remember that the thickness of the front face material must be factored into your calculation. This will retain the correct image of the shortened tanks. I used a scalpel with a No 10 blade for this exercise as well as a number of band-aid plasters for when the scalpel enthusiastically slipped. Tamiya putty hid all the mistakes rather effectively.
Now, if you are not feeling brave, you can cut right across the tanks and the boiler and fit the loose smoke box from the 44XX Class.
Although not entirely correct, places the chimney a little too far back and renders the original 44XX Class body almost useless, it certainly is the easiest option.
The alternative is to cut the tanks away from the existing boiler and fill in with styrene sheet and Tamiya putty. This is largely dependent on your modelling skills and confidence. When cutting away the footplate, keep a small section of footplate in the centre to fit under the smokebox of the 44XX Class chassis.
Next is the section below the level of the tanks. Once again there are two options.
Firstly, for simplicity sake, remove everything below the tanks up to the front of the cab. Where visible, cover the front of the cab with styrene sheet sections cut to shape allowing clearance for the motor and glue in place. This leaves a cab side that is a little too tall and not prototype accurate but does allow for easier fitment to the 44XX Class chassis.
The second (and more accurate method) is to cut everything below the pannier tanks away. It is important that a straight line cut is achieved below the cab and coal bunker. I achieved this by lining up a steel ruler with the bottom of the tanks and scribing a line through to the rear on both sides of the cab/bunker and then joined the scribed lines across the rear.
The initial cut was achieved with a cutting disk on a dremel leaving approximately 0.5mm material below the line and the balance of the footplate intact. Holding a piece of 180 grit sandpaper on a flat surface, this additional material was sanded away to achieve the straight line.
Cut away the foot plate in front of the “Cab” line as well as the excess material above the foot plate from the original cab. Smooth this down using 180 grit sandpaper on a flat surface as per the above. (note that as you will have two very thin and flimsy sections of footplate, it will be easier to perform this operation before you cut away the front section).
Once you are happy with the result, glue into place below the cab and fill in the necessary areas with styrene sheet. You will also have to cut away and either increase the height of the rear buffer beam or make a new one to fit.
The downside of using the second method is that a substantial portion of the motor and its workings will be visible but this can be hidden with the fitment of some styrene sheet from your scrap box and painted matt black in the final stages.
Irrespective of which method is selected, a 2mm thick piece of styrene sheet from your scrap box must be fitted across the inside of the bunker for mounting onto the 44XX Class chassis and the position is determined by fitting the body to the chassis. The same fixing hole on the chassis is used for this purpose.
MODIFYING THE 44XX CLASS CHASSIS
Apart from removing the bogie and the pony, not much is required here. Fortunately the front buffer beam is part of the chassis and can remain as is. The only modifications that I did was to remove any rounded chassis bottom sections which curved around the pony and the front bogie.
FINISHING TOUCHES
The 94XX Class body has recesses for the water filler caps that are cut away when shortening the tanks. In order to replace these, the recessed portion of the caps are cut/sanded away and then the caps are glued in position. New holes are drilled for the hand rails and these are re-fitted.
Depending on the era you are modelling, the body is then painted in GWR green or BR black and the applicable decals are applied.
CONCLUSION
That is about it guys. I have picked up that I made a few mistakes which are to be corrected. The body line on the cab is too low and I have not yet finished the little touches including the repair to the front buffers.
Depending on your modelling skills and attention to detail, I am sure that much more can be done to your model.
I concede that there are probably a number of errors that our rivet counters will comment on but the model is a “good enough” representation of a 1500 Class produced on the cheap.
The alternative would be to purchase an expensive brass etched model and have MANY more hours of enjoyment in the process. I am happy with my results and I hope this will provide some inspiration to at least one more enthusiast.
Andrew”
My word – a huge thanks to Andrew for sharing his model train street lamps, and his loco builds too – what a wondeful project.
I think the older we get, the less we use our imgination and creative skills, but Andrew proves they are still there if we put our minds to it! So it got me thinking – please do leave a comment below if you’ve bashed anything in a similiar fashion.
That’s all for today folks.
Please do keep ’em coming.
And don’t forget the the Beginner’s Guide is here if you wan to take those first steps on your very own layout.
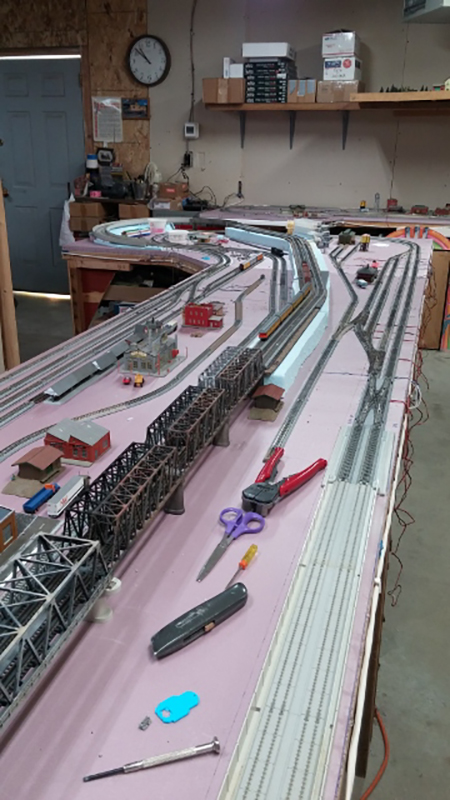
Dick’s been in touch – he’s added to the collection of large N scale layouts on the blog. Looks amazing too:
“I am nearly 79 years old now. My first train layout was a Marx train set on a 4 x 8 board in 1947.
Through the years I have built layouts in N, HO, O27, G, and 1.5″ scale 7.5″ gauge.
Now the ‘ol bod can’t do the Limbo Rock anymore and is supposed to adhere to a maximum weight lifting of 15 pounds, (a mug of coffee and a big cinnamon roll, hahahaha).
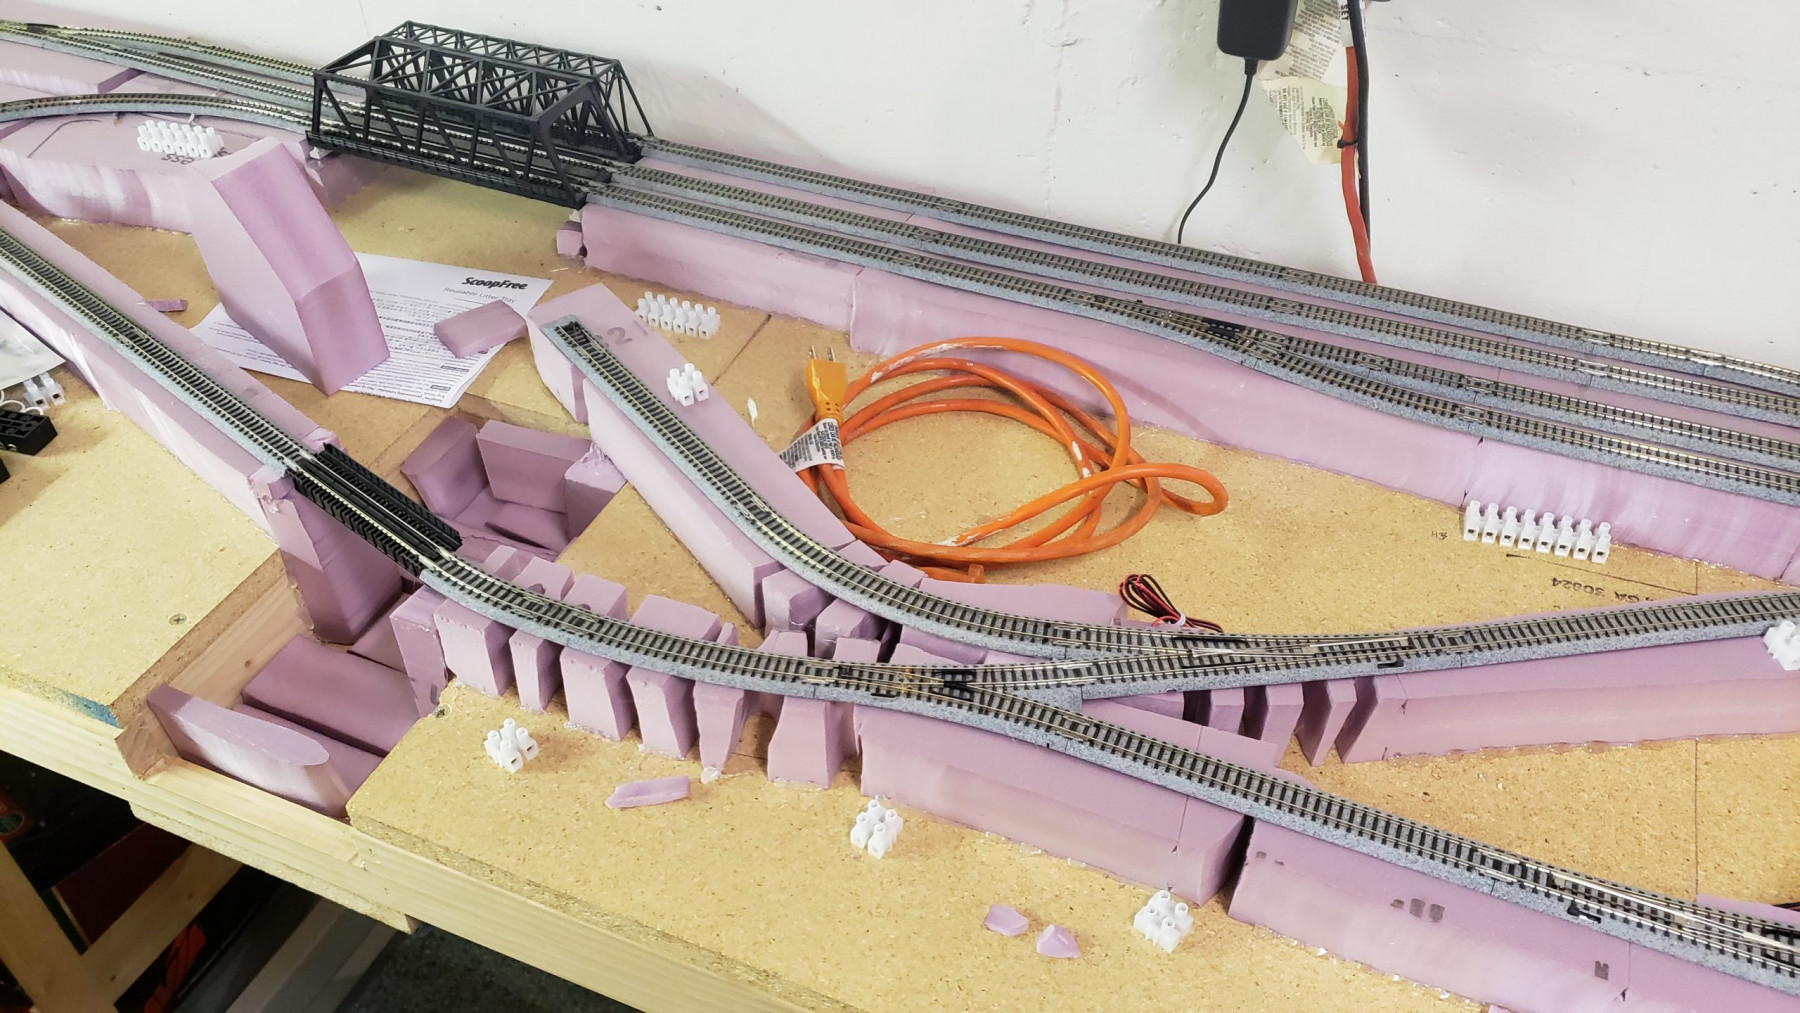
So I am downsizing my huge hoard of G scale trains and have started a new N scale layout in our garage.
I read 3 mystery novels written by Janet Dawson which all take place on the California Zephyr. Her descriptions of the Zephyr, and the route are terrific. I decided to build this layout to feature the California Zephyr.
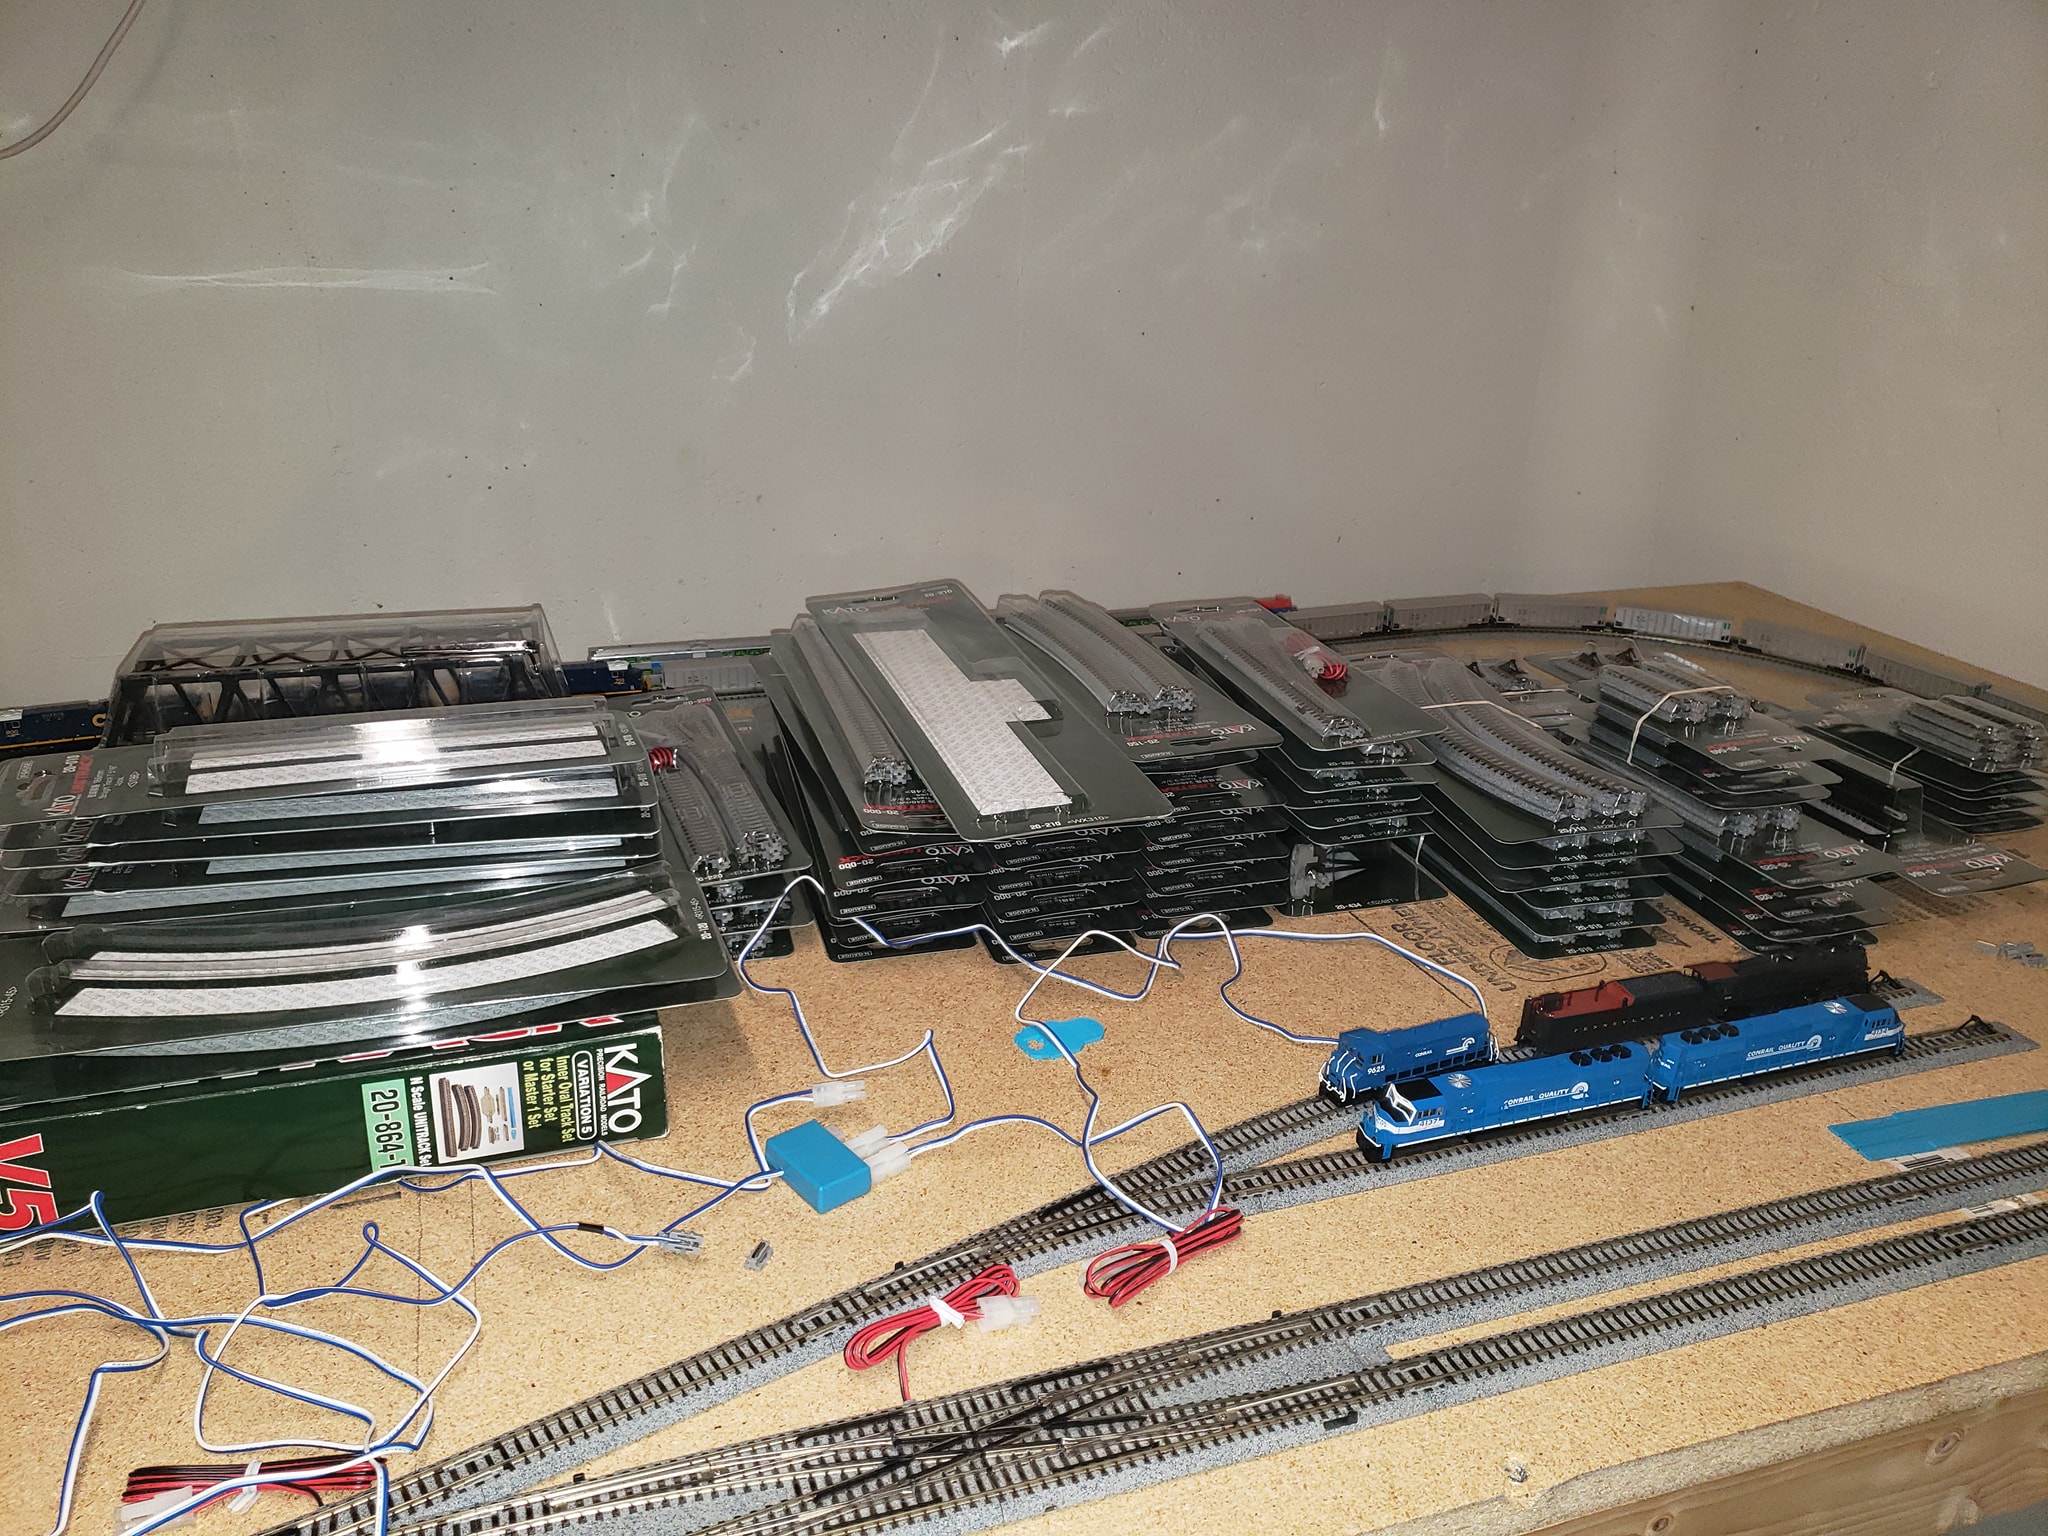
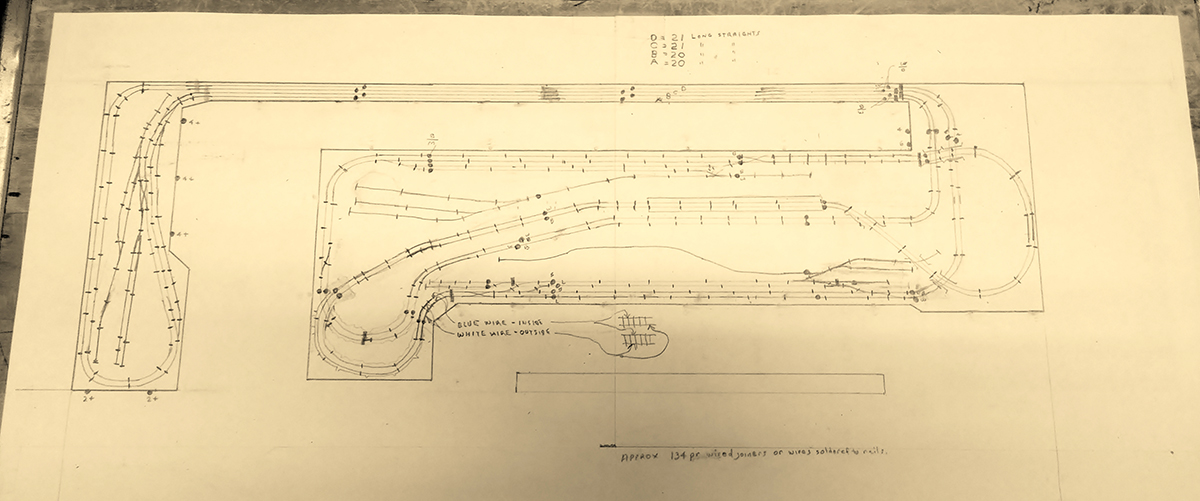
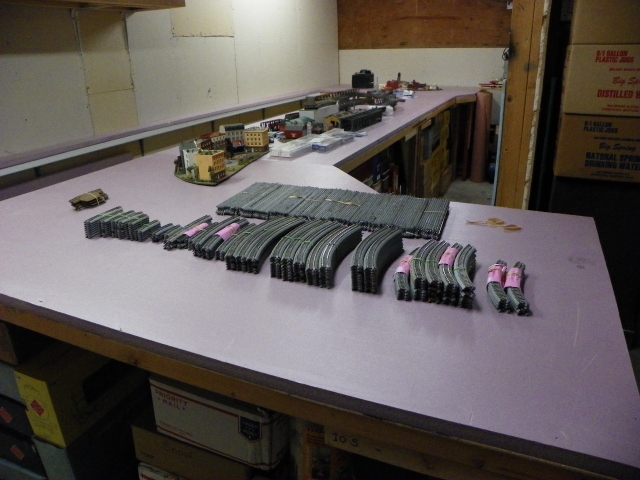
For 9 months I gathered Kato unitrack, and Kato Ca Zephyr train sets and in September I put together tables and started.
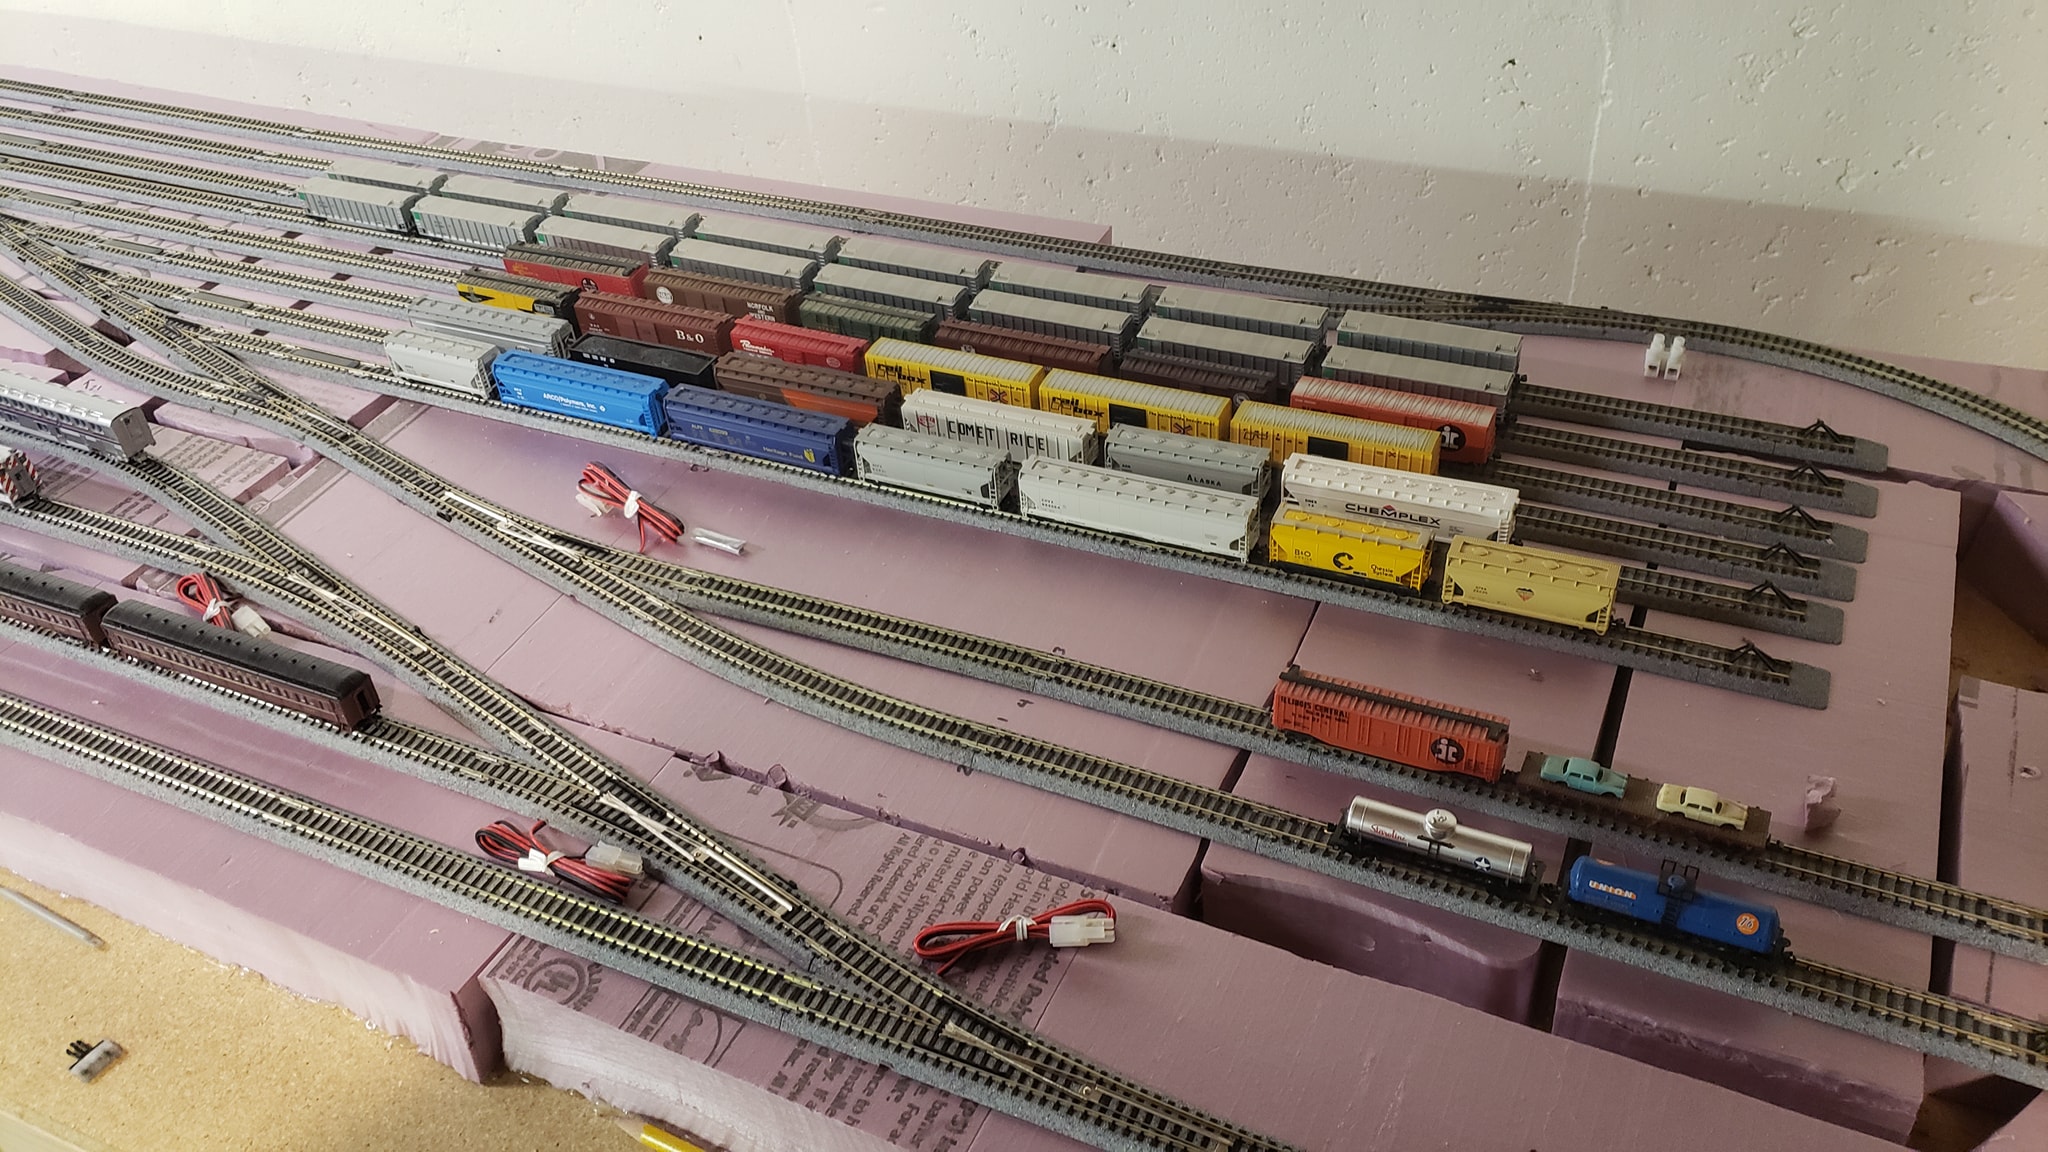
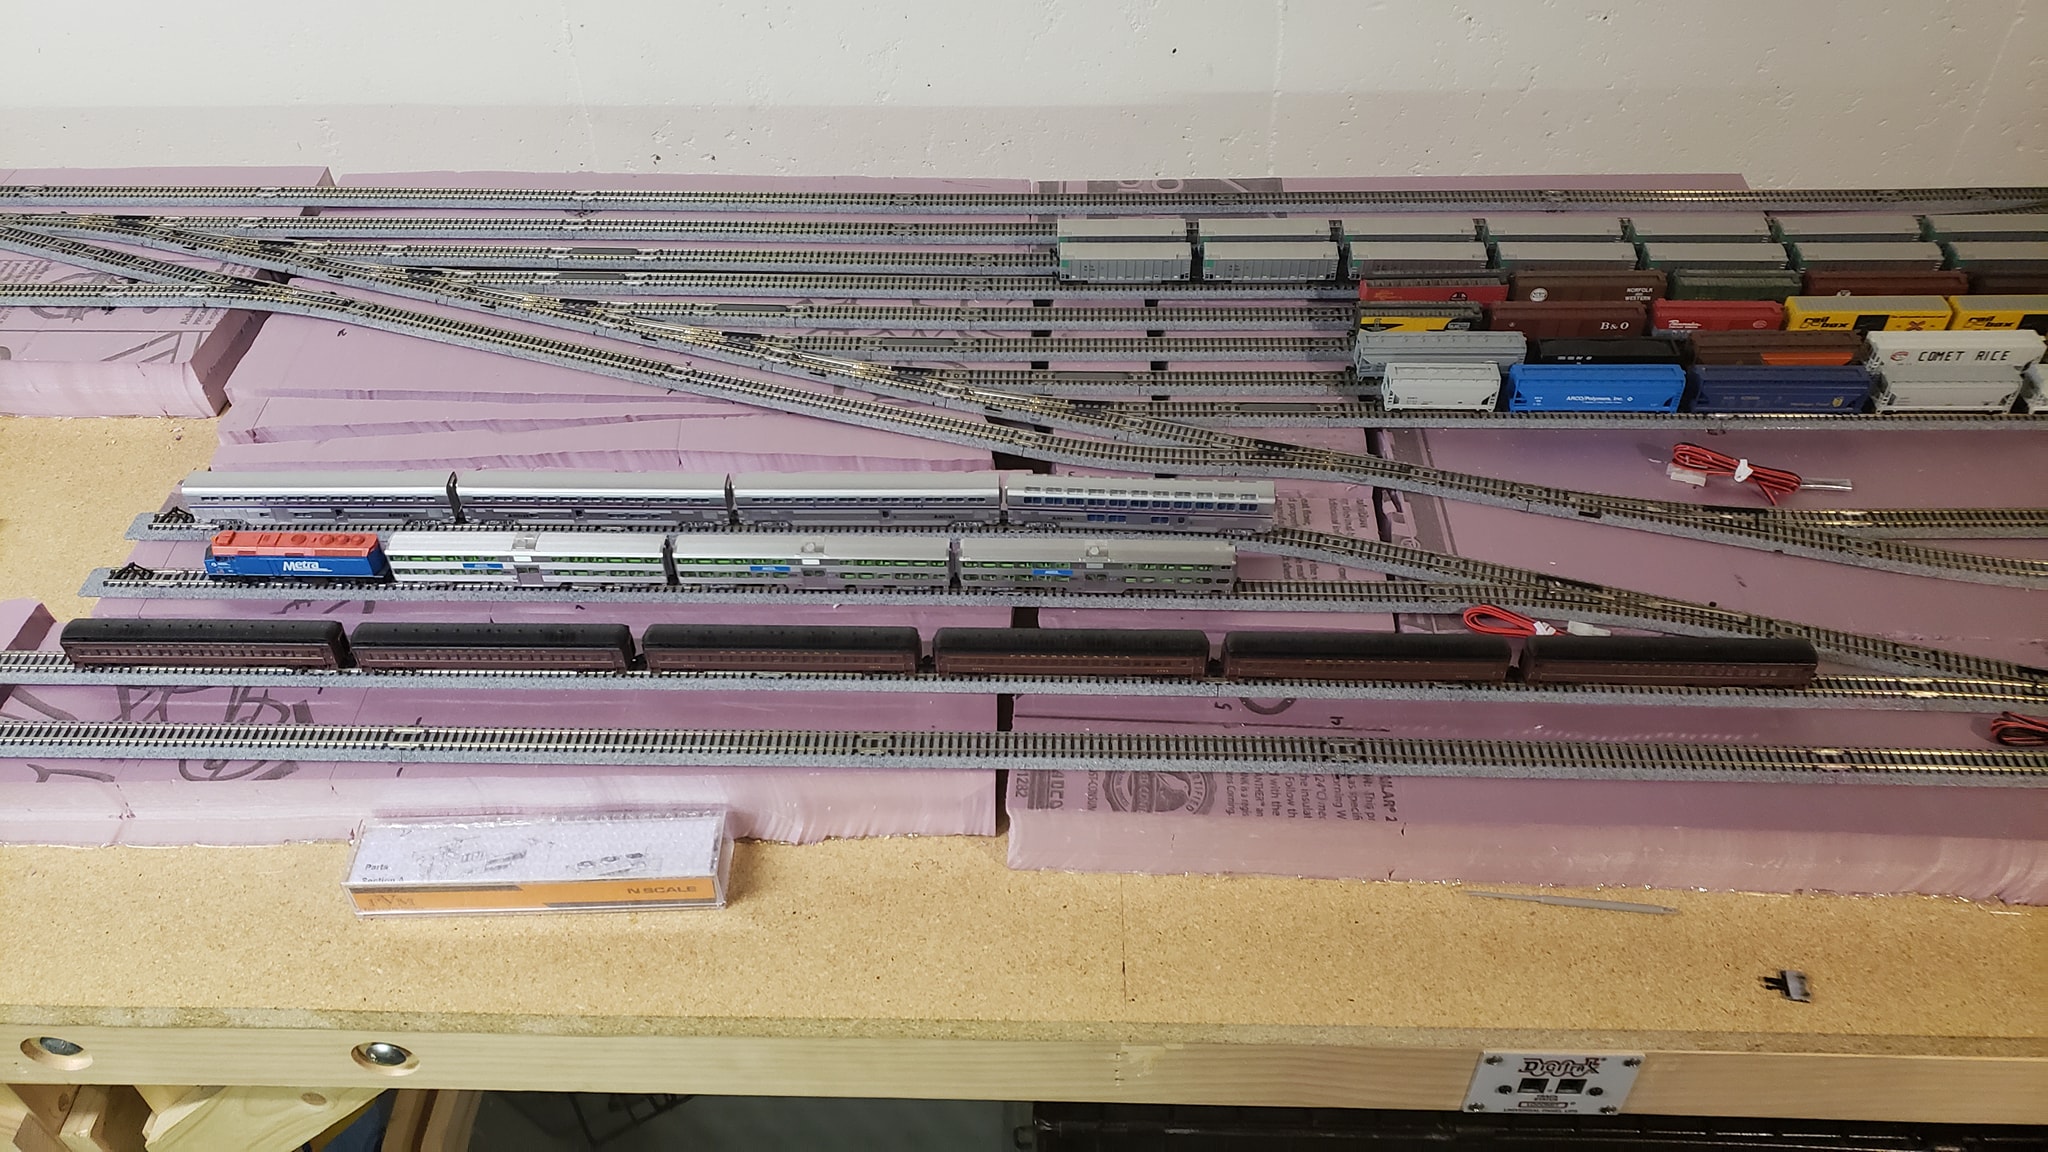
After drawing and trying out different track arrangements I finally settled on one that would give a 2 track mainline that is approximately 145 feet long.
There is freight running available also.
Two main ideas I needed to use to accomodate a very bad back was NO duck unders, no lift or drop bridges though I could possibly add a lift bridge later, and all my wiring will be on top as I simply can’t wire underneath anymore.
All the tables have a 1″ foam top layed on plywood tops The layout consists of 5 tables and one long vinyl fence board, so the layout can be dismantled later when it becomes necessary.
This is a DCC operation. I was able to put 3 towns on the layout so it consists of Chicago Illinois, Denver Colorado, Salt Lake City Utah, and finally to San Francisco California, which is also Chicago for now. Later I may figure a way for an expansion to add a seperate space for San Francisco.
Currently I have severa; track feeder wires to a 12 AWG bus line that runs along the edge of the tables. There will be removable fascia added to cover the wiring. Trenches are dug for the feeder wires to go from the track to the bus line. A seperate bus line will be run for the Kato turnouts. Copper tape will be used for led lighting of buildings etc.
More pictures to follow Al.
Thanks much and happy new Year.
Dick”
“Hi Al
Hope the new year finds you and your legion of followers doing well 😀
I’ve been making progress on my switching layout and have sent you a link to a video showing it in operation.
I followed what Dangerous Dave and others have been doing and am using a Polaroid Cube camera to get engineer level views of the layout.
Still a work in progress learning how to use it and then splice scenes together but I’m having fun on all things with the layout.