Just short and sweet today – but I absolutely loved this tip!
“Use Play-Doh to make molds for scrap yard parts, cast with any two part resin.
Edward”
(Image is clickable)

Big thanks to Edward for sharing.
Latest ebay cheat sheet is here.
Best
Al

Just short and sweet today – but I absolutely loved this tip!
“Use Play-Doh to make molds for scrap yard parts, cast with any two part resin.
Edward”
(Image is clickable)
Big thanks to Edward for sharing.
Latest ebay cheat sheet is here.
Best
Al
“Hello Al and O-Gauge fans!
After 7 months of part-time work on my O-gauge layout, I have some additional details and photos on this emerging 240 sq ft model railroad. Progress has proceeded in areas of electrical, space, and track. For this article, I have included some photos that show results of the completed electrical, space, and track construction work.
Electrical improvements included wiring separate color-coded wire buses for 18VAC for running trains, 15VAC for operating manual turnouts, 12VDC to power accessories, block signals, switch signals, lighting, etc., an additional bus for running conventional trains (to be installed later), and a spare 3-wire bus.
I now have space to add some scenes that will make things come alive. It took a while, but I installed shelves under the bench work to store items used often and purchased six light-weight drawers (with casters) to store things. Some of the original wiring was cleaned up to improve appearance and access. I now control 9 turnouts using the MTH DCS remote and control 5 turnouts manually. The turnouts that are controlled manually using momentary switches will support freight yard action. They seem to be a lot more convenient to operate (i.e. “UP” for turn and “DOWN” for straight). Trying to control 9 switches from the remote while piloting and monitoring up to four engines in motion is very challenging and more often than not, result in model-scale disasters.
The majority of the new track installed support freight yards. Additional space was added to the layout to allow extra room for businesses, roads, and scenery. Although a stable theme has not yet been established, there are three areas that will support freight activities that include a staging branch for accepting cars from and assembling cars for freight trains. There are tentative plans to add some elevated track to support non-digital trains later that would rise above the landscape. The bridge by the door is a drop-down unit that replaced a lift-up version that was not very appealing and that required frequent adjustments and tweaking.
More track work was necessary to include freight yard action separate from the main lines. Scenes will include a mountainous area with a waterfall, a serene pasture for cows and horses, a city scape, train station, locomotive maintenance, business scenes, and an elevated town that will cover the mainline tracks in one of the corners.
Scenery is a key factor to model railroading and should evolve incrementally. I plan to develop each scene to ensure the theme comes together gracefully. A follow-up article will be produced after some scenery is completed.
Thank you in advance for your due diligence in maintaining this forum. I appreciate and enjoy the articles, photos, and videos your followers are sharing with us, too!
-Dick-”


“Hi Al. Best tip I can give anyone – If your track work does not work flawlessly, no amount of electronics. scenery, realism, operations, etc will ever make you want to head for the train room. Take your time on the track work, make if bullet proof, and everything else will be a delight!
Mark”
“Use Play-Doh to make molds for scrap yard parts, cast with any two part resin.
Edward”
“My name is David Kennedy and I just did my first Model railroad. It is an HO scale sceen from circa 1861 in northern Georgia (USA) It took me about 5 months to build it. It is on a 4′ X 8′ piece of plywood. I routed out the wood for the river. The mountains were made of a cardboard frame and plaster of paris. I hand painted some of the figures and I build some of the models. Please share the pictures with others. I hope you and other can enjoy.
David”


Thanks to everyone who has contributed. Just absolutely loved Edwards Play-doh tip. Brilliant!
Keep ’em coming.
And don’t forget the Beginner’s Guide is here if you want to get going on your layout.
Best
Al
PS Latest ebay cheat sheet is here.
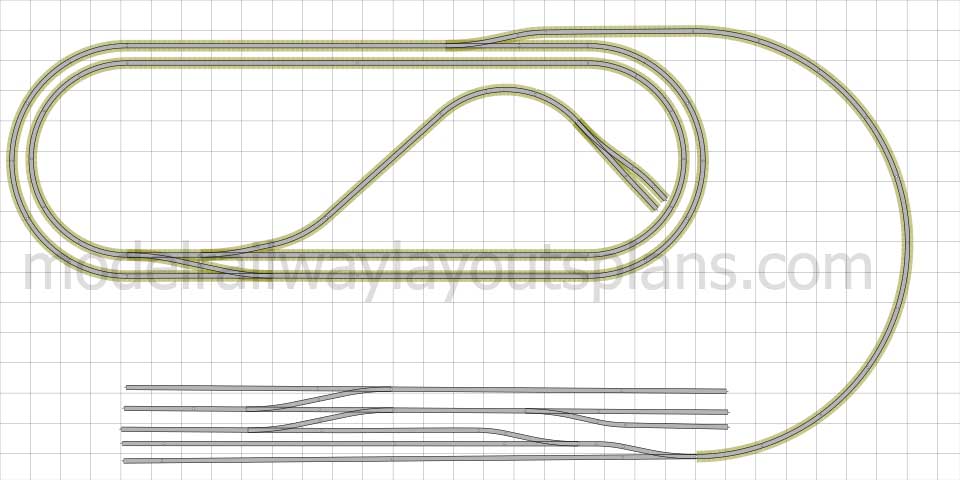
Tom’s been in touch with his DCC track layout:
“Heres a few of my stage 1 almost finish track is 6.2 mtrs long each side x 3.2 mtrs wide
5 mainlines and 15 branch lines ..
all dcc controlled trains, points etc
with all trains having dcc sound cards to their own proper sounds…………….thanks
tom”


“Well, seeing as how I am the least handy person on this planet, and cheap to boot, here are a couple:
Since my layout is in a permanent winter mode, I wrapped the plywood bases in white bedsheets —
It makes a a great “canvas” for laying down landscaping and a SUPERB conduit to run the wiring between the sheets and the wood – no drilling required.
The “snow” is actually a ceramic product: Duncan’s no-fire snow, available, among others, online at Amazon. You can paint or sculpt it on, and it dries to a plaster-like state.
More recently I wanted to add some ice-covered ponds, and as I dislike mixing chemicals, etc. for water effects, I went to the nearest drugstore and purchased a couple of ladies’ hand mirrors, you know, the kind they carry in their purses. I laid down some snow and partially buried them, feathering the edges with more snow.
But then I wanted a larger ice-covered swamp or pond, and here comes the cheapest solution of all: I headed to the kitchen, ripped off a good-sized sheet of food clingwrap (like Saran Wrap), painted the bedsheet in the colors I wanted to show through, and laid the wrap on top with a little landscape cement. You can make it smooth or rippled, and it looks great!
I hope these help.
Bill”
“I am new to this hobby and learn a lot by my mistakes.
The buildings you build usually are put together with super glue.
If you get super glue on your fingers and thumb, it will take days to get it off.
Solution: spend $3.00 for Nitrile disposable gloves, ten to a pack. (not latex, one size fits all.)
It will be the best 30 cents you ever spent per pair! Just throw them away when done.
Bruce
Fallbrook, California”
A big thanks to Bruce, Bill and to Tom for sharing his DCC track layout.
That’s all for today folks.
Please do keep ’em coming.
And if today is the day you grab the bull by the horns, the Beginner’s Guide is here.
Best
Al
PS Latest ebay cheat sheet is here.
PPS More HO scale train layouts here if that’s your thing.

And there’s the Silly Discount bundle too.
