Model railway layouts – Caroline’s

Caroline’s added to the model railway layouts on the blog:

“Hi Al,

I’ve enjoyed receiving all the e-mails of other members railway layouts, the hints and tips I’ve picked up have been really useful.

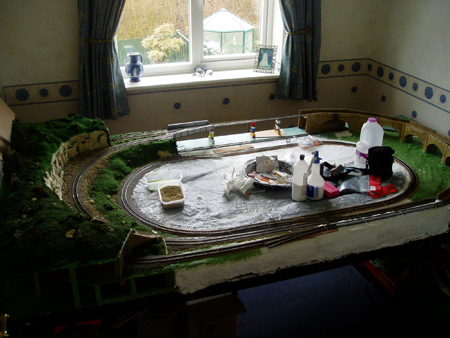
The layout I’m creating is for my 13 year old son, though I started it when he was 10!

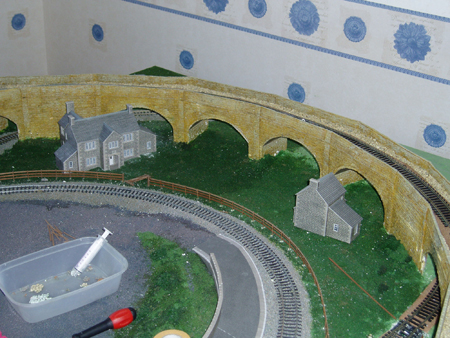
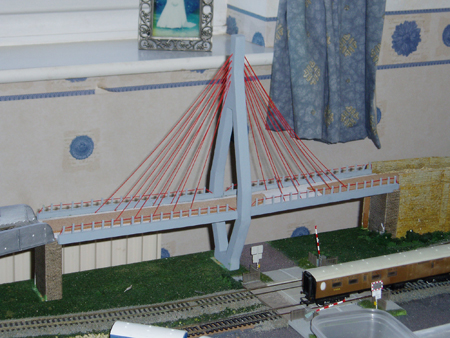
My husband helped make the baseboard for it, but that’s as far as his creative skills went, the rest has been designed and constructed by myself aided by a list of what my son wanted to be included in the layout. Namely, a viaduct, a modern suspension bridge, as many tunnels as we could fit in, a girder bridge, a level crossing, farm houses and most importantly all the coal mine buildings which his Grandparents had bought him one Christmas.

During construction, I found Lego had is uses, it came in very handy in supporting the track in places!

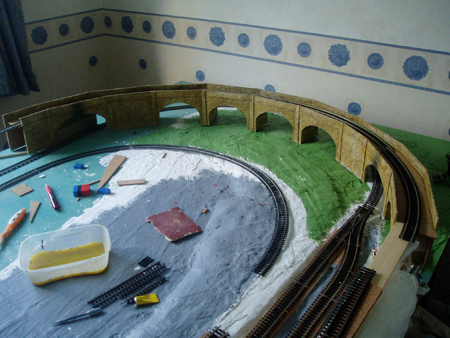
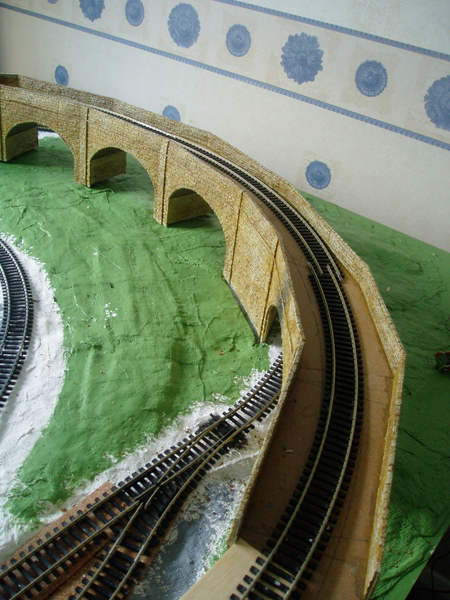
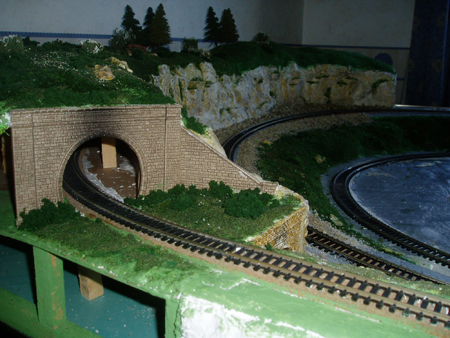
The viaduct was made from scratch from Wills plastic sheets, it has a plywood core and the plastic sheets were stuck to the plywood.

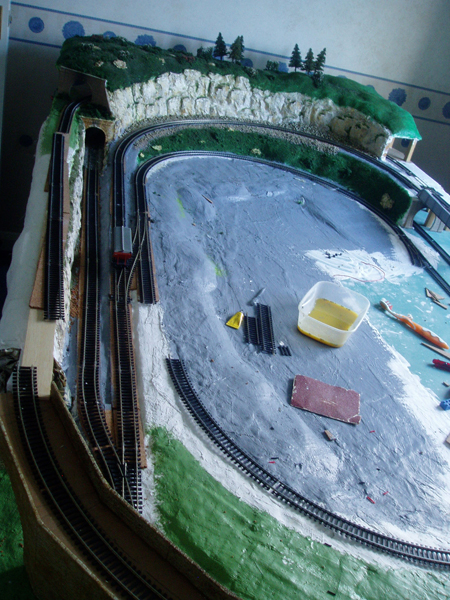
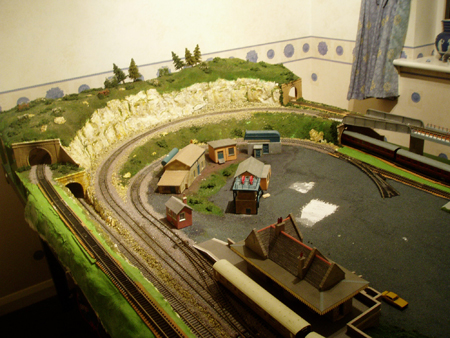
There are two tunnels and an incline, on which I have tested all engines and they all manage the slope easily pulling both wagons and coaches.

The tunnels were covered with ‘Modroc’ and the rocky sides were made with plaster of paris rock and strata moulds which I’m really pleased with.

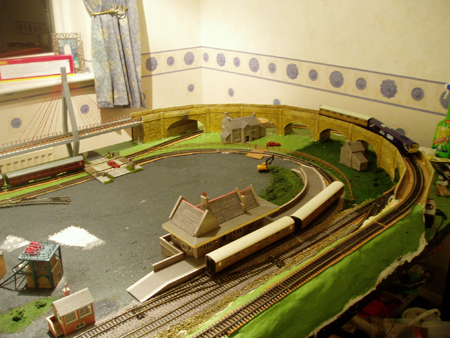
The station and platform are both Metcalfe card models, as are the farm houses. The little signal box was a free Metcalfe model that came with a magazine.

It is still work in progress – all model railway layouts are! But at least the end is now in sight.

Caroline”

model railway layouts

model railway layouts


model railway layouts

model railway layouts

model train track plan

model railway layouts

model railway layouts

model railway layouts


I think Caroline has done an excellent job for her son. Three years in the making too! If there’s one thing this site demonstrates, is that layouts take forever, and they are never finished…

Thanks to Caroline for adding to the model railway layouts on the blog.

Don’t forget to check out the latest ebay cheat sheet.

That’s all for today folks.

Please do keep ’em coming.

And if today is the day you stop dreaming and start doing, the Beginner’s Guide is here.

Best

Al

PS More HO scale train layouts here if that’s your thing.


Need buildings for your layout? Have a look at the Silly Discount bundle.

Alan’s first OO scale layout

Alan’s sent in his first OO scale layout:

“Hi Al,

I’m a first time subscriber to your site and would like to share my experience for what it’s worth.

Recently retired I decided to spend some of my newly required spare time building my first model railway.

I spent the first little while avidly reading and digesting the numerous articles etc. on your site and many thanks to all your subscribers for their fabulous contribution.

I started by devoting a spare room to the project.

Unfortunately the room is fairly small and allowing a bit of space to manoeuvre in, the layout ended up being 2.5m wide x 2.3 m deep(8 ft x 7.5 ft) with a cut out roughly in the middle 1.1m x 0.7m.

I would greatly appreciate any comments / criticism your readers might have.

OO scale

OO scale

Base constructed from 18mm MDF board with 90 x 18 stiffening planks around all edges. I next lined the base with 30mm polystyrene sheet and started thinking about track layout.

OO scale

Preparing for the river.

Next came the background landscaping. The tunnels are lift off to enable track maintenance.


Started doing the ballast. Not my favourite part of railroading!

model train track plan

There is approx. 26m (85ft) of track with just the one power connection shown above. I use a Hornby digital “Select “controller which drives 3 locos and 8 point motors.

Alan”


A wonderful narrative from Alan on his OO scale. I love seeing the layouts from the very start. I think he’s done a fine job!

I particularly liked the step by step approach, which you can find in the just like this.

Best

Al

PS Latest ebay cheat sheet is here.


Smoke and lights

I’m posting John’s question below for two reasons.

Firstly, it made me laugh out loud. I feel his pain.

And secondly, it struck a chord with me because he’s keen to solve the problem for his son.

So have a look below.

Any takers?

“Hey Al,

I have asked quite a few fellow model railroaders, hobby shop owners, and book store owners. I get the same answer from them. The question is about basic wiring on my HO scale model layout. I just want a simple answer. The answers are way too complicated.

I.E. – If I want to know how to fish trout in basic terms I’d expect a simple answer to get me interested and wanting to know more. I would expect the answer to be:

1.) You need a fishing pole

2.) You need fishing line

3.) You need a hook

4.) You need a worm for bait

5.) Tie the fishing line to the pole

6.) Tie the other end of the fishing line to the hook

7.) Put the worm on the end of the hook

8.) Find a stream with trout

9.) Go upstream and then let go of the fishing line

10.) Hang on to the fishing pole and let the stream carry the hook and worm to the trout

11.) Don’t let go of the fishing pole

12.) Every now a then give the bait a little snag to attract the trout

13.) Let the trout bite the bait and get hooked

14.) Put your pole down on the ground

15.) Start grabbing the line to retrieve the trout

16.) With the trout out of the water, grab the trout by the mouth watching you don’t get hooked

17.) Unhook the hook

18.) Hold you fish to show it off

The answers I got wasn’t anything I was looking for. I got questions instead do you have any LED lights?, how many engines do you have?, where is your roundhouse?, are you using DCC? and other amazing questions. I was asking the question!

All I wanted to know was how do you wire a railroad track that I want to use more than 2 engines.

I am now 41 years old and involved with model railroads, more than ever, since I was 4 years old. I been involved with a couple of RR clubs but they only wanted to do scenery and benchwork, never doing anything with wiring.

I have blown 4 power packs (controllers) so far. I also have read 4 books on wiring. The only thing I am getting out of them is that 1 rail is positive and 1 rail should be negative. I an extremely detailed in scenery and benchwork which is why the RR clubs put me in there.

I went to college for web and graphic design but I am a Certified Nurse Aide now. I think the controllers blew when I flipped the engine on the switch to different tracks. I am just lost.

Is there anything you could send me (by email) to get this wiring issue under control.

I don’t want to have a bunch of separate lines running on different tracks. Or PLEASE make a YouTube video on basic wiring. Simple wiring for 3 (or more tracks) that can run 2 or more engines.

I have a an 11 year old son who wants me to figure this out. I want this knowledge to make him feel proud.

Right now, he is only building cars, scenery, and playing with the figures.

I really don’t want to blow any more controllers. I really think you can help me because I subscribe to your newsletter. Thank you for reading this and hopefully replying.

Sincerely,

John”


“Hi Al , just made this video showing lights and a smoking Loco , also near the end shows how things go wrong on my layout, as happens no doubt with many.

Regards

Dave”


Another cracking video from Dangerous Dave.

We all learn the hard way, except for those that take the plunge with the Beginner’s Guide.

Heading off to ebay? Here’s the latest ebay cheat sheet.

That’s all this time. Please keep ’em coming.

Best

Al