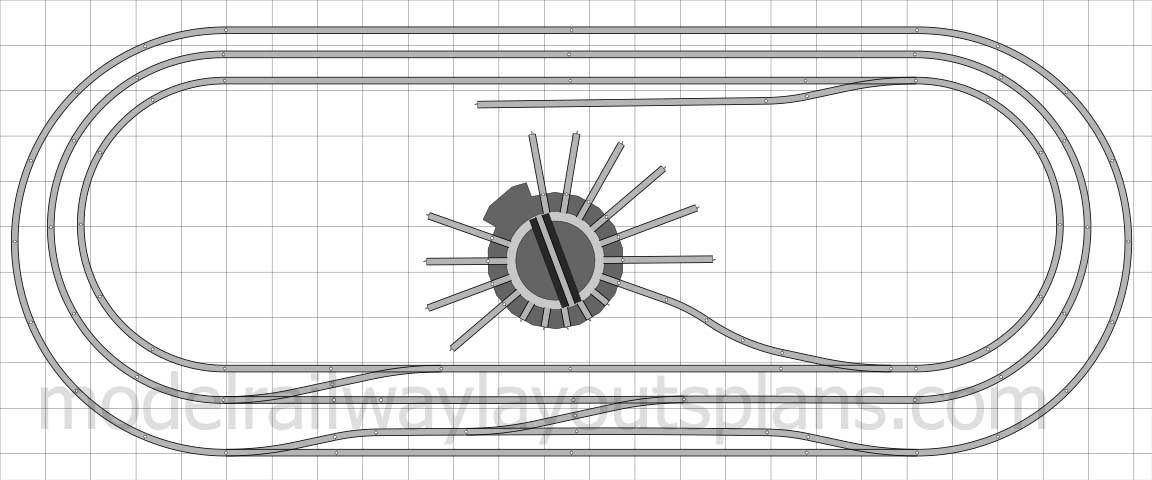
Just thought I would send a few pictures of my “N” scale layout.
It’s 3 X 7. I’ve been working on it for a couple of years but am about disband it as the curves don’t allow me to run any of my larger engines or long cars.
I run regular power to it, not DCC. I have too many engines to switch to DCC.
I have been collecting “N” scale engines since 1964 and haven’t set up a layout until a couple of years ago.
As to amount of time I have in it, that’s hard to say as I work on it only once in a while.
My next project will on a 4 X 8 board and I’ve been getting a lot of hints from your emails which I really appreciate.
Many modelers have great tips and hints which we can all use.
Thanks for setting this web site up and all the work you put into it.
Dick in California”
Now on to Jim:
“The one thing I have not yet come apon is a good track sensor for “N” gauge. The ones for HO work but are not to are not even close for scale.
I use .030 fibre optic for my signal lights The strand goes under the board to a bye colour LED. DC power one direction for red– reverse current for green and AC gives a yellow orange .
Jim”
Hi Al,
I to learnt the hard way and in the end decided that the most important factor on any railway is its wiring I hence came up with the ideas shown
As you will see in the diagrams of one of the sections of my layout all the wiring is cable tied and hot clued to the base board, believe me NONE of these wires move!!
Each section of layout has its own control board i.e.for points, lighting etc. There is still only one DCC controller, and a couple of transformers for the whole layout which is connected to each board by mini plugs.
If a short circuit occurs then you can disconnect each section of layout till the short circuit clears, you then know that the fault lies in that section.
As I am now in the Autumn of my life climbing under boards etc is not so easy, so another little tip, after you have completed a section of layout wiring PHOTOGRAPH IT it makes life a lot easier when tracing those wires, and don’t forget to label items its to easy to forget whats what.
Lawrence”
“Did you get part 2 of ‘Accidents Happen’, Alastair?
Thought it would have gone down better than part 1 ….you got a good response from part 1.
I enjoy all the tips and layout pictures and look forward to each new post.
I have been working on my own 00 Scale layout since June.
I came into the possession of a DCC Loco with sound in May and I was hooked.
I immediately started planning my own. I decided to name it The Great Western England Railway or GWER.
The area I am modeling I call Farland.
The main Station is Farland Howe and the country station at the other end of the layout and the highest point on the loop is called Shell Hill.
My wife’s name is Michelle, so Shell Hill.
I hope you enjoy the pictures.
I live in Colorado, USA which is a long way from the UK, but I have traveled there many times and lived in London as a kid for a few months. It made a lasting impression.
Rob”
“I rebuilt the old 1950 lionel plastic train.
I cut the train half and built the coffee sticks on the half train. And see the boxcars. I too rebuilt them.
I removed the plastic boxcars. I kept the metal flatbeds and the wheels, built the wooden coffee sticks on the flatbeds.
Michael”
“Hi …try this one ….made a set up with a lake in it …made the sunken row boats a dock pilings sticking up from the bottom ….painted all the under water sceanes..
But here was the trick ..I made a whole in the deepest part of the lake.
An put a plug in it ….then I mixed up enough clear wall paper ( cellophane glue )paste pored it in to where I wanted the water line to be an stopped …
A few days later the top started to harden …an if you moved the dock ever so slightly the movement left like water ripples on the surface of the transparent paste ……
when it got to the hardness necessary to hold the load I pulled the plug ….an when the unhardened glue ran out ….you could see through the top layer an see all the thing under water …..you know plants ,rocks, anchors