The talented Dave has been in touch again with his latest update: new locos!
Don’t forget to save your hard earned money with the latest ‘ebay cheat sheet‘.
Best
Al
The talented Dave has been in touch again with his latest update: new locos!
Don’t forget to save your hard earned money with the latest ‘ebay cheat sheet‘.
Best
Al
Roger has been in touch with a very clever N scale truss bridge:
“Hello Al
Love your site – so much useful stuff – and so friendly. It’s a fabulous thing you do for us all and I’m sure your hard work is well appreciated.
I’m sending you a bit of stupidity. I like a few visual jokes on my layout and I’ve just constructed this unusual N scale truss bridge. Cost me nothing at all – just a coat of paint. Got to add some detail, re-paint, weather it and give it rust – but it looks surprisingly good in situ. In theory you could build a three metre bridge for no cost – but you’d have to shave five times a day.
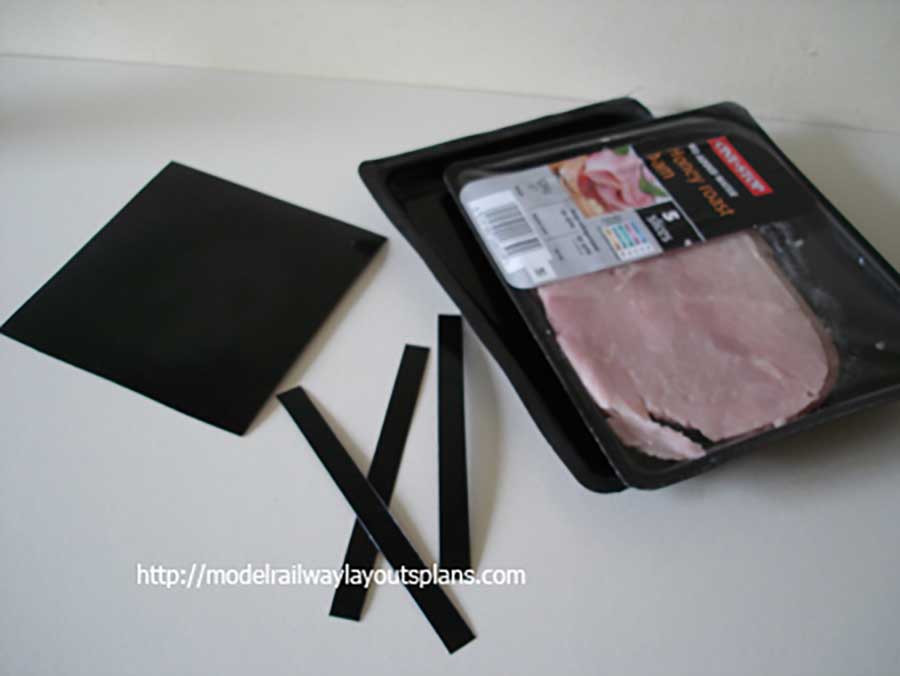
Used superglue – poly-cement doesn’t like the chilled food packaging – which incidentally I use for hundreds of things – free plastic sheeting – strong and flexible – and the clear variety is great for glazing which I’m sure everyone has discovered.
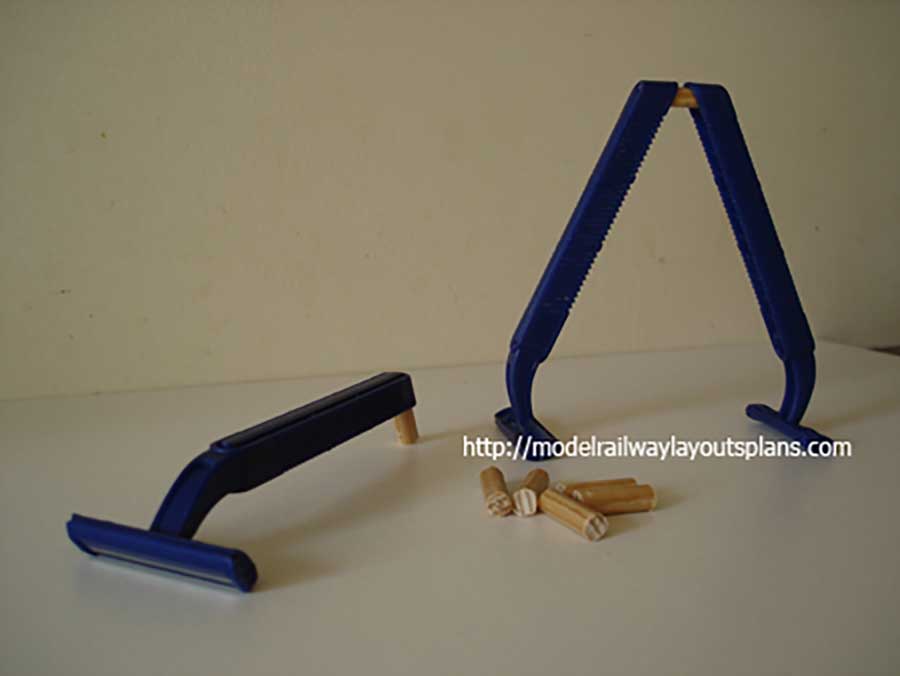
Think I’ve cut the truss bridge cross-members too thick so I’ll whip them off and create a more intricate design as it’s N scale after all. I know there are much cleverer folks than me out there so it would be interesting to see what they can come up with using these things. They’re much too interesting to waste – and everything made of plastic goes in my box!
Thanks again, Al – for all you do.
Best wishes.
Roger.”
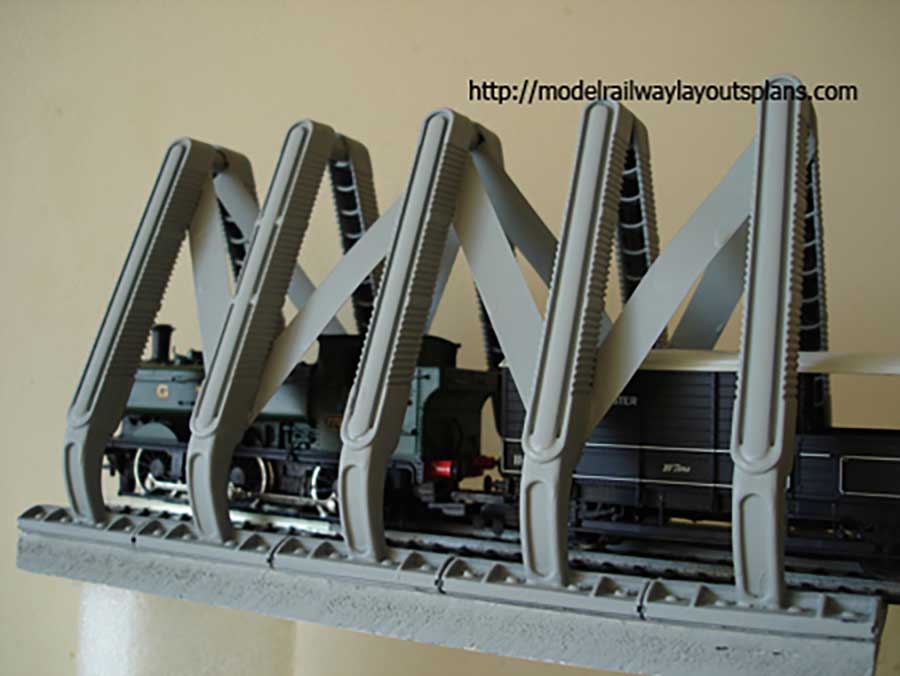
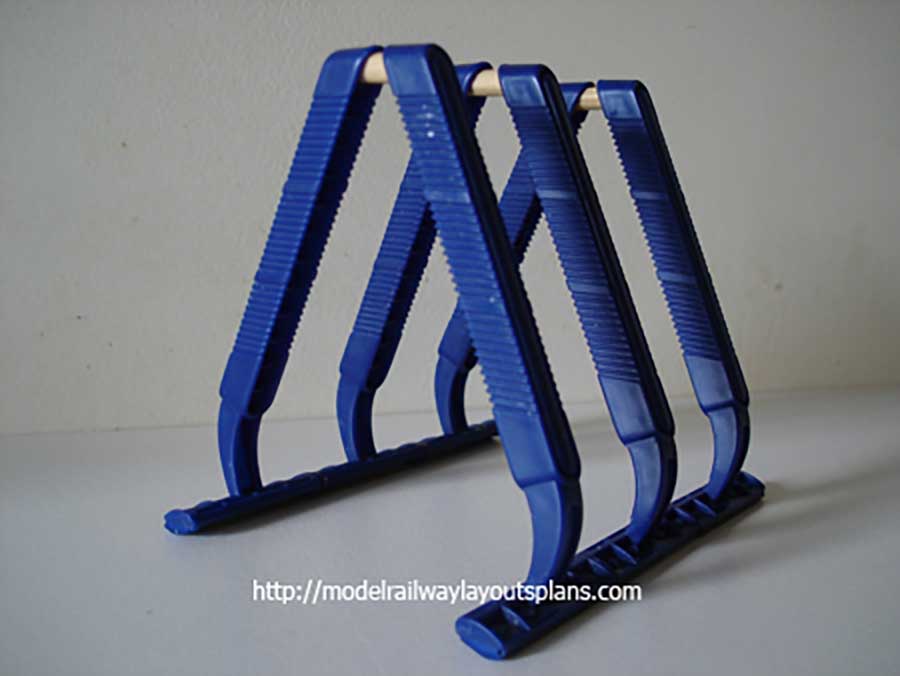
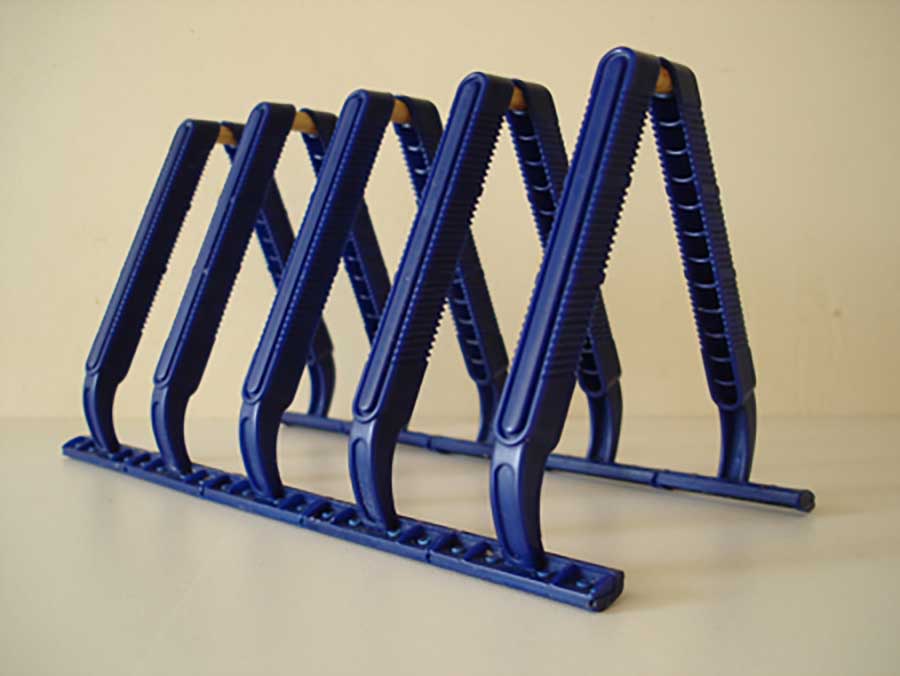
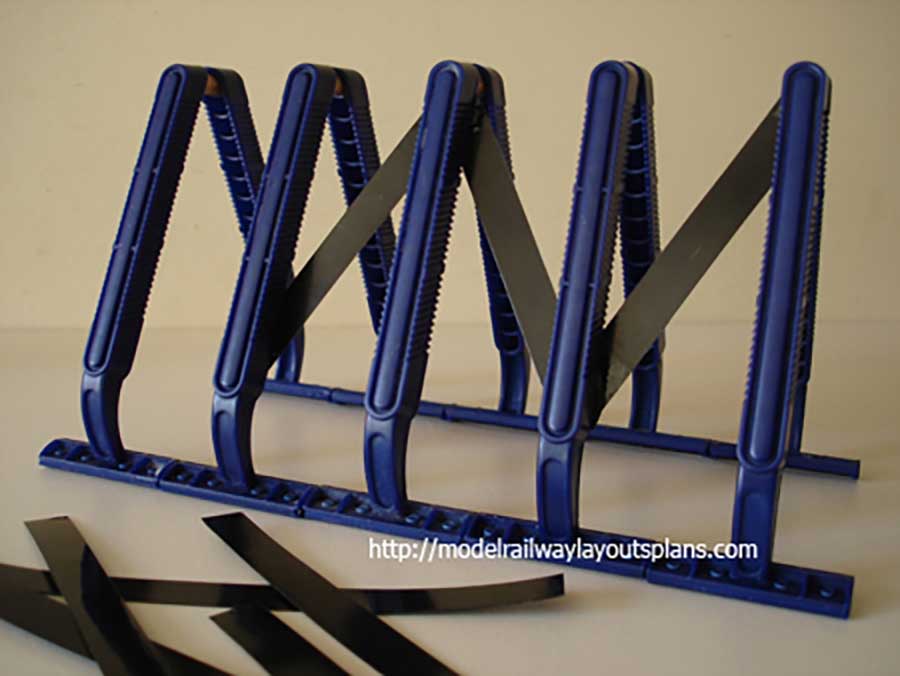
N scale truss bridge:
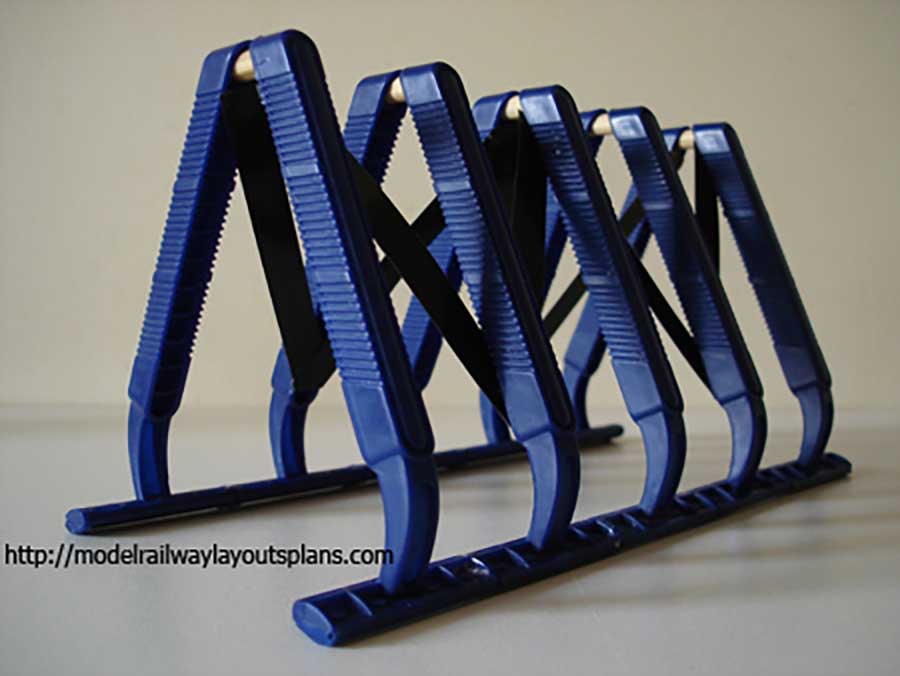
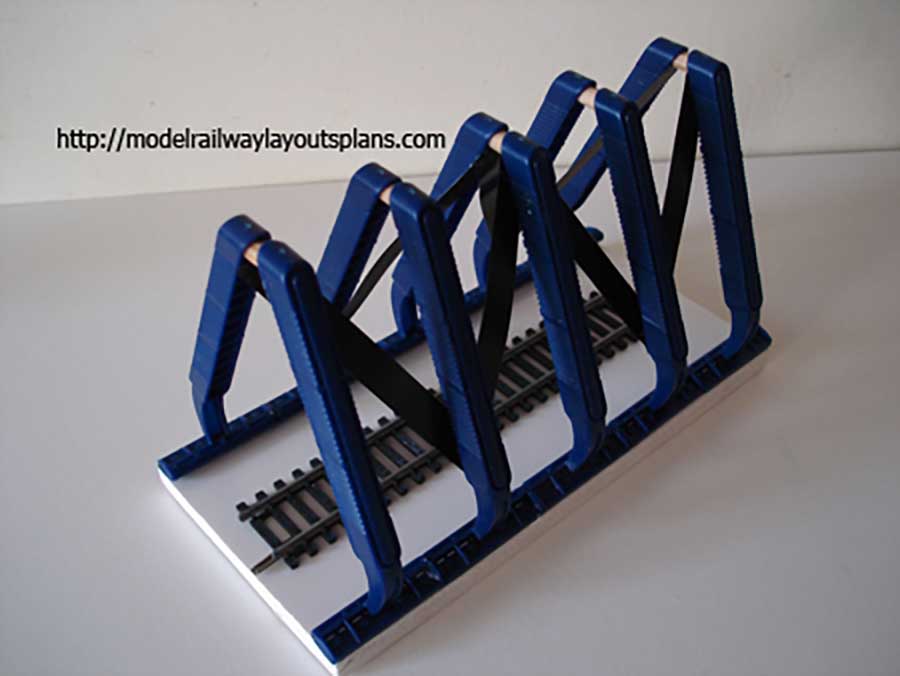
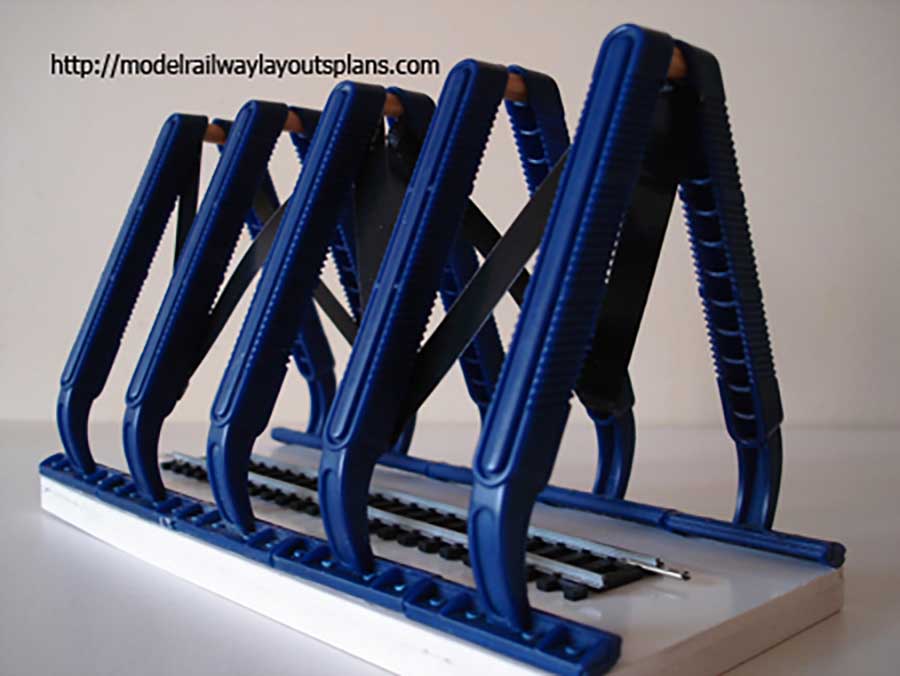
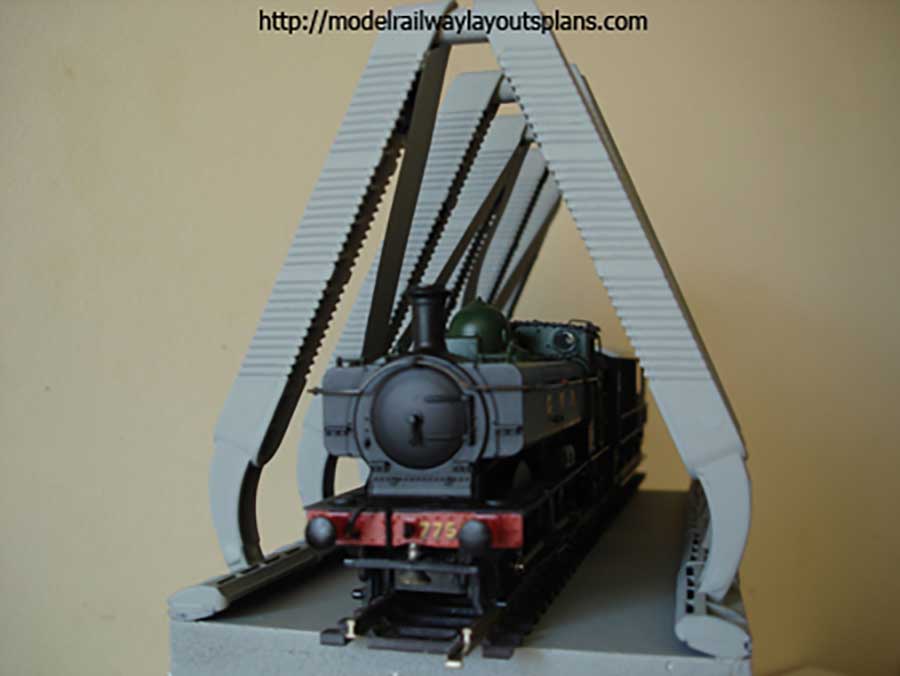
How about that? A bridge from Razors!
Just brilliant. Utterly brilliant. A huge thank you to Roger for sharing his N scale truss bridge.
Tips like these save a fortune. And with the money you do save, get more out of it with the latest ‘ebay cheat sheet’. You’ll save even more!
Keep the tips rolling in.
Best
Al
PS Looking for the Beginner’s Guide? It’s here.
Got this in from Tony. I think it has all the makings of a great train layout!
Hello Alastair, find pics for a 4M x 2M HO layout in figure 8. Still under construction but base board, track risers and track laid and ballast.
The tunnels and mountains are constructed from broken styrene boxes, expanding foam and plaster cloth.
I am in North Queensland Australia so this layout will be a rainforest and bush layout. Have left the “mess” in the pics to show some of the materials.

To make tunnels/mountain, I first made a box section with openings for the tunnels and spray painted inside with flat black waterbase acrylic.
As can be seen there is a roof for the mountain to go on top. The mountain is constructed by breaking up styrene boxes (got these from the fuit and vegtable section of a large supermarket as ithey are what the transport cold produce are are usually trash) and randomly placing them on the tunnel roof.
I then fill in everything with triple expanding foam (in an aersol, $14 from a large hardware store chain). Took 3 cans. This all tapers down onto the base board. I break the styrene by hand as this gives a more random pattern to the edges . Also by using the broken styrene boxes and no expanding foam I can create a cave in the layout as seen above the tunnel opening. You can also see the expanding foam and broken styrene in the same pic.


Once the expanding foam has cured (24hrs) I then “carve it” using an electric carving knife ($10 Ebay) and a “surform”
I just chop and hack any old way to obtain random shapes and because I do this I don’t become set in a pattern.

With the surform I can create the mountain and river waterfall. Once shaped I then covered it in plaster cloth. I did not use wadded newspaper as a fellow modeller had an insect problem from the newspaper.

After the plaster cloth hardens (24hrs) I then mix up a soup mixture of plaster and dab this on to reinforce the hardshell.

Cant really see it in the photos but at the bottom of the waterfall is a pond with river coming of this. Next step will be a mixture of grey acrylic primer mixed with water and plaster to prime the scene.

Regards,
Tony”
An excellent ‘how to’, Tony, thank you very much.
That’s all for today folks.
Please do keep ’em coming.
And if today is the day you decide to join in the fun, the Beginner’s Guide is here.
Best
Al
PS Latest ebay cheat sheet is here.
PPS More HO scale train layouts here if that’s your thing.

