Brian’s been in touch with is HO shelf layout construction:
“Hi Al,
Here’s how I started my new layout.
I put this together starting in May, of my “layout” to present time.
Building a double deck U shaped point to point shelf Layout in HO scale – 3 foot narrow gauge – Hon3
This is where it all started in May 2016 in a standard car garage of 20ft x 10ft. I had to put in a drywall 6ft in from the garage door for a storeroom accessed from the front. This left an area of 14ft x 10ft for my layout. Train room is accessed from a door in the right hand side back in the first photo. Curtains were replaced with horizontal blinds. At the window will be my work desk with a view out to the Knysna lagoon. Not sure how much work will get done with a view like that.

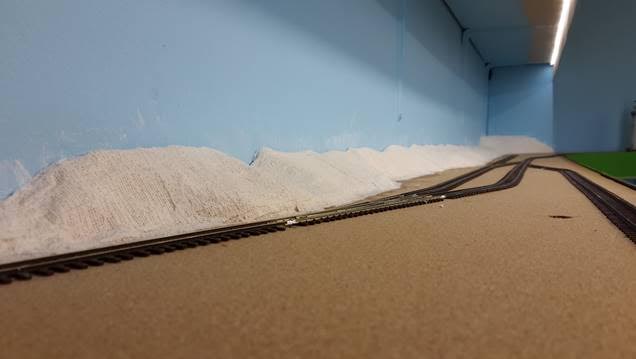
First photo is the garage from the entrance.
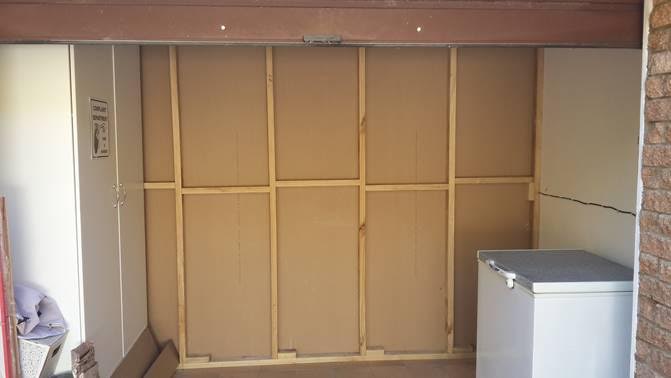
Second photo shows the drywall. Needs a rhino board covering on this side.

The decision had to be made that there would be no connection between the upper deck and the lower deck with a difference of 15 inches between the two levels. A gradient between the two leves would be too steep and take up a lot of real estate (space) and a helix to connect the two levels is out of the question. (it would take up an area of 16 square feet minium).
Next was to figure out a workable height of the lower level from the floor, now 47 inches. (made my previous layout too low and was not happy with it at 40 inches) The upper level is now at 62 inches which is just below my eye level. My eye level is at 67 inches.
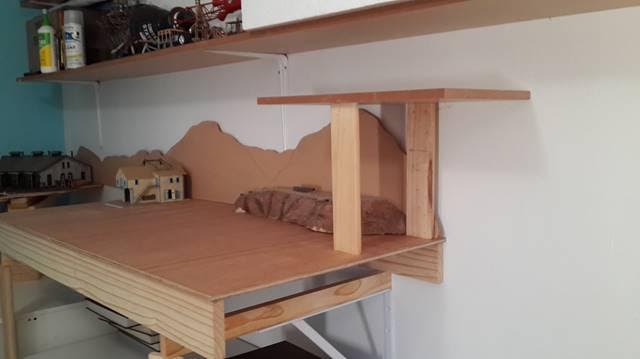
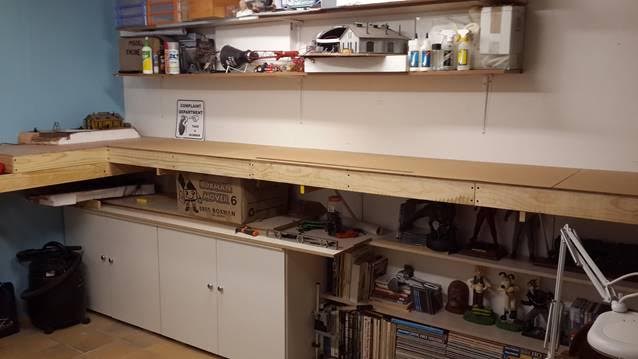
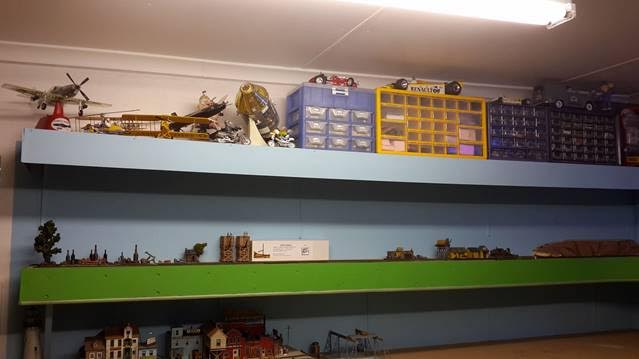
In the photos below of my HO shelf layout construction, I had to make sure that there was enough packing space as well as book shelves under the layout for other “model stuff”. I put the top shelf in before the start. (The highest one)

HO shelf layout construction:
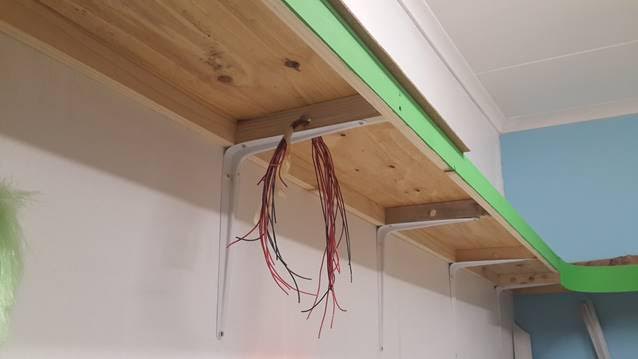
Once the shelves were fixed in place, I drilled holes in the cross braces for the buss wires. At this stage I felt that I had to put the facia boards on to get a feel of how the layout would look. The blue light at the top back is for night time operation when the main lights are switched off.
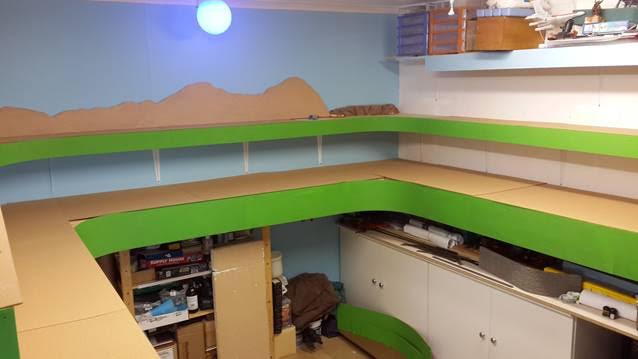

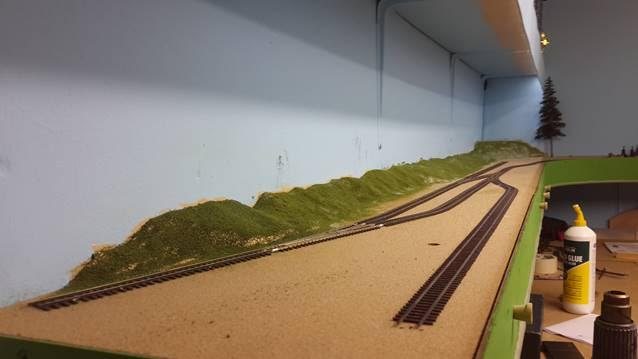
A panoramic photo of the layout prior to putting strip lights under and behind the facia boards. In the photo below, my Red Hook Warf kits will be placed in the new bigger harbour area on the lower left level.

I put LED strip lights in place right around the layout. The top levels have lights behind the valances attached the top shelves. (Photo below) The clear rubber tubing split lengthwise was put under each valance as a protection against banging my head against the lower edge of the Masonite.
Once all the buss wires were in place and connected to both levels, the plug in points (3 sets of twin express Net) was inserted into the facia in appropriate places. These are for my Lenz DCC system. I have three controllers (throttles) and can be plugged in any of the plug in points around the layout. Although they are all on the front of the lower level facia board, the upper level is operated from all of them. The lower level boards are two foot wide and the upper level boards are 1 foot wide. All have a layer of 3 mm cork over 12mm plywood.
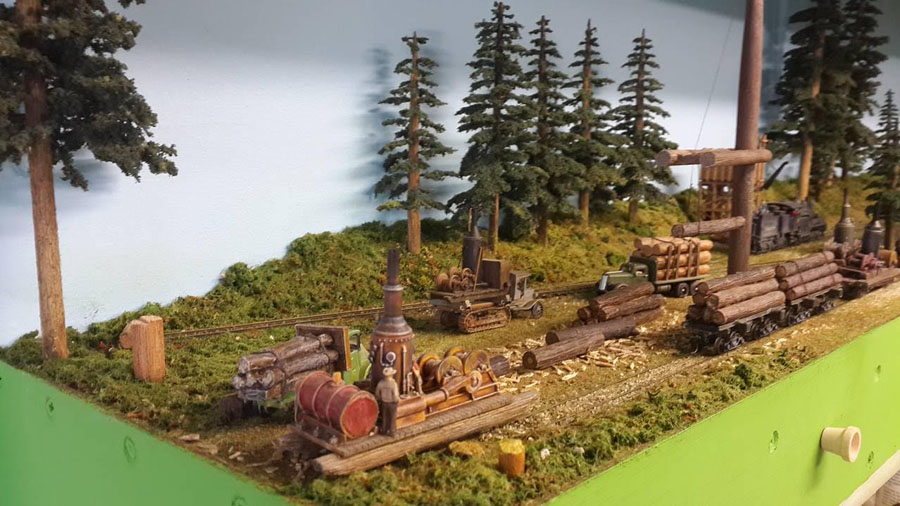
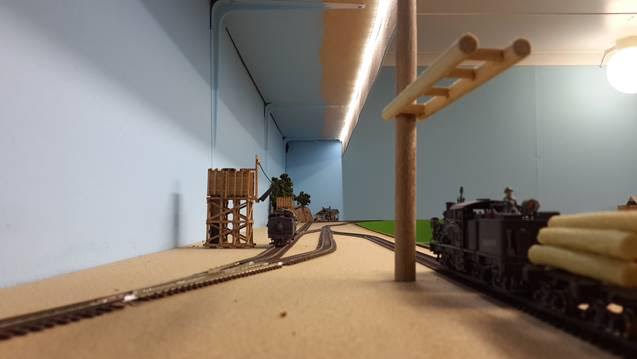
When the decision was made to not connect the two levels as the upper level was going to be a logging operation whereby logs would be cut and loaded on the left side (camp 4) and the taken around to the right hand side of the layout to the yard. There the log train would be sorted and then taken to the sawmill. (This section is still under construction) The photos below show how the track was marked and laid out according to the track plan to ensure clearances were maintained. The Spar tree for loading the logs can be seen in the foreground.
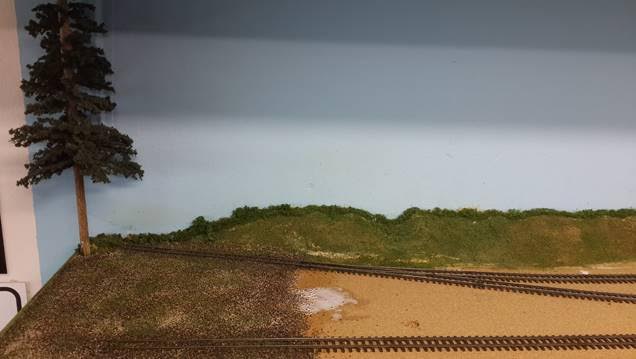
For the HO shelf layout construction, plaster covered polystyrene was used to form a background hill and was painted a tan colour. Woodland scenics ground foam was added and glued down.

Ground cover (sifted builders sand) was added as a test to see if it gave me the right effect that I was wanting to achieve. I was happy with this and carried on doing the rest of the logging area knowing that a lot of it will be covered with all sorts of debris such as grass, bushes, wood shavings and sawdust.


In the photo above left, a tall pine tree was added to partially hide the shelf bracket holding the shelf above. Right picture has more ground cover and trees added. All the smaller trees are from Woodland scenics and the tall pine trees are from Grand Central Gems. Another tall pine tree was used to hide the line of light reflected on the wall at the far end created by the upper light strip.
As a rough ground cover mainly under the trees in the background, I used a chopped up mixture of four different colours of Lichen from Preiser, different shades of glade grass and placed quite a few tree stumps from various suppliers around the area.
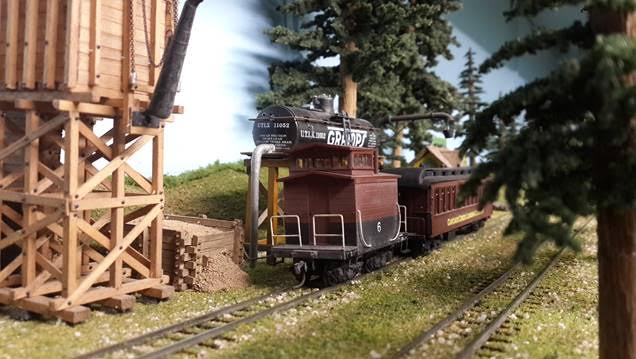
Next came the necessary facilities such as water, oil and sand for the locomotives. On this logging level, I run 2 three truck Shays, 2 Heislers and occasionally a 2-6-6-2 logging locomotive. In the photo below right, I like to have trees in the foreground, as in real life you have to look through the trees to see what is behind them. The coach behind the trees belongs to the Cascade Creek Lumber Co and is used to bring the loggers up to the camp for a day’s work.
A few photos taken around the logging area.


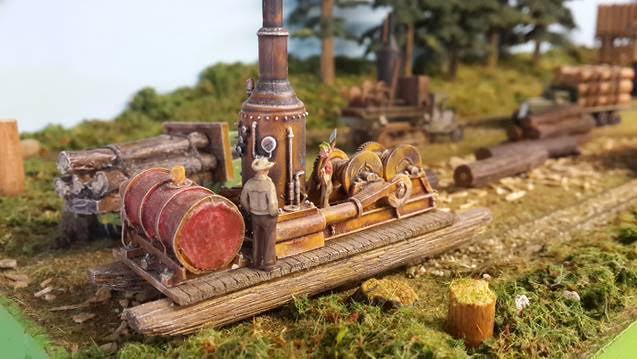
This is as far as I have got on the layout as far as scenery is concerned. This leg of the layout is now fully operational and needs the finishing touches such as figures, clouds on the background and tall weeds around the trees. The foreground has a steam donkey for loading and pulling logs in.

A lot of work still to be done before I get to the lower level. 9 months work from start to its current state.
Regards
Brian”
A huge thank you to Brian for sharing his HO shelf layout construction – hope you enjoyed it as much as I did. Amazing stuff.
You can see more of Brian’s posts in the Hall of Fame.
That’s all for today folks.
Please do keep ’em coming.
And if today is the day you get started on your layout, the Beginner’s Guide is here.
Best
Al
PS Latest ebay cheat sheet is here.
PPS More HO scale train layouts here if that’s your thing.


Jolly good !
Superb Brian!
WOW!!! Wonderfully beautiful. I’m envious as I have to wait another 3-5 months to start my new layout. A correct approach you have is to be able to operate willl in construction. Bruce in SC USA
Staggering that you have done so much work in such a short time. Well done.
If you can*t manage a spiral you will have to try a lift.
Well done ✅
Nice pesentation …
Well thought out, and executed professionally
Thanks for sharing
Very nicely done and presented. I am starting a small 1 level HO in a storage shed out back. Thanks for some great ideas.Tom in AZ
Timely presentation for me. Just completed 10.5′ x 10.5′ three shelf layout. Many great ideas for my next phase.
GREAT!!!
Well done Brian. To get from level to the next, did you consider an elevator arrangement? That system has a lot going for it when you think about it!
Pete
Perfectly executed! Great Imagineering at work. Am planning on something similar, so will NOT copy you, but you gave me great ideas, thank you. Looking forward to more from you.
Really gives the impression of the wide open outdoors in a small space. Ground work and trees are excellent. Thanks for sharing and taking the time to get photos during construction, great job! Cary in Kentucky
WOW !!!
Very Impressive ,
the average person seeing a layout like this can’t imagine how much time gets put into a layout like this
Steve
Are these N Scale or HO?
Beautiful layout, Brian. I can’t wait to see the ‘finished’ project. (I know they never really are.)
Brian, your HOn3 layout is beautifully done. They scenery is fabulous. It definitely shows that you took your time with this layout and again – it is FABULOUS. Thank you for a job well done.
Well done hope to see more.
neat layout, interesting what you can have on a shelf.
Beautiful work! Great attention to detail! Cheers! NJ Mark
that is great stuff something showing from the start always gets me interested thanks for sharing hope to see more .
Very well done..
Masterful execution…
John from California
excellence use of space and, super layout. will watch for more photos as you progress.
ken in iowa
very nice layout, with excellent scenery. however, part of this layout has been published on your website before, showing his shays and water tower,etc.
At 70 years old, I have “played” with all of the guages and brands but when I said “played” I meant it. Time to get serious now and have some real fun (creative). I wait for every communication from all of you and have learned much more than 70 years can claim. I have my plan made (so you think I have thought about it long enough), I have my materials (I think – knowing each day will bring more) and I have my rolling stock. I even have time ( I have retired)
It will be 18′ x 13′ and 6′ on each side. This will be in various panels for ease of transportation.(At 70, I may or may not get to finish it BUT I want it transportable to my grandsons house without cutting a hole in the basement wall to get it out. (read too many stories about guys who build boats and face that problem. Trains just like a boat. Plan, Plan,Plan) Now get to work.
Beautiful, love those trees. We were passing the White Mountain line once but had a long way still to drive so just stopped to see the train. I asked the lass in the station “I’m afraid I haven’t got time for a ride but would you mind if just pop inside and photograph your Climax?” But she said “Why no, sir, it’s full admission or nothing!” Had to photograph no. 6 of the fence.
Rod
Awesome shelve layout Brian. Well done. Love running my CN engine layout. Up to a dozen CN engines in my engine collection. Happy railroading.
love this layout!!!!!
Great Layout
Very well done Brian,
One of your photos took me straight back into the forests in the Canadian Rockies where I was a couple of years ago. (Not by train but by R.V.) Great memories; a great layout.
Peter (70 ++)
Excellent work Brian. Look forward to seeing it progress.
Laurence
Very nice to be able to review all your work in a progressive view. I am now more motivated to get on with my own work. Fortunately, mine is in an adjacent heated building, a necessity for seasonal access, in rural, central Ontario. Love your donkey engine, and the general logging theme.
– BullfrogEH in Ontario.
Great job!! The work looks to be excellent and well thought out. My only issue is the height of the second level. I hope you have many very tall friends because the level you used for the 2nd level is 67″ and that is my total height making my eve level about 63/64″. I am rather average height in the community I live in and that makes it so that I could not observe the second level of your layout in any manner other than on a lift of some type or through the photos/videos of that part of you wonderful project.
Excellent work Brian. I am anxiously awaiting future installments. I’m not in the “game” anymore but I really appreciate the effort and quality of your work. Mike
With regard to the comment about the height of the upper level ar 67 inches, I have a 2 step stool for vertically challenged people including my wife in order for them to stand on and view the layout at a height convenient for themselves. I also use it when working on the top level to make sure all is okay. – Brian
A correction to the above comment, the top level is only 62 inches (5ft – 2 in) from the floor. My eyes are 67 inches (I am 6ft – 1in tall) when standing on the floor. – Brian
Great layout. How do you manage to keep everywhere so tidy whilst you are doing it. Mines a right mess at the moment.
Very very nice layout keep up the great work
I should be in my garage doing a “Brian” layout! Wow! I really like his work.
Great work Brian in such a short time. i have spent the past 5 years buying everything for a layout (1st one after a 30 year Hiatus) and trying to get my head around how I am going to do it. I have a room 17’1/2″x 11’1/2″ and after reading what you have dome you have given me the motivation and the ideas I needed to get me started in my N scale 2 deck layout, Thanks Brian.
Harry
Perth Western Australia