Brian’s been back in touch. There are some fab model railroad harbor layouts on the blog, but Brian’s really does stand out:
“I thought that I would send an update of the progress of my layout. I hope you can use it.
I have started on the lower level at the end where my harbour will be situated.
It has to be a well thought out process as once the water (Woodland Scenics realistic water) has been poured, it will be too late to add any submerged debris that would be found in and around harbours.
The only things left to do after the ‘water’ has been poured is to place the boats that have lights on them, the marker buoy as well as the barge in place to determine where I have to drill holes through the ‘water’ for the wires to go underneath to the buss wires below the layout.
Remembering that the holes cannot be drilled before the water has been poured as you would have a huge mess on the floor under the layout. The harbour area has to be well sealed beforehand.
Once I have everything in its correct place and happy with the layout of the harbour, they will be all removed, a thin layer of very watery plaster will be poured to ensure the base of the harbour will be level. I will then paint the plaster to the correct colour, add the debris and then only can I pour the ‘water’.
The attached photos show the progress to date.
Below is the base of the harbour area with the cork overlay.
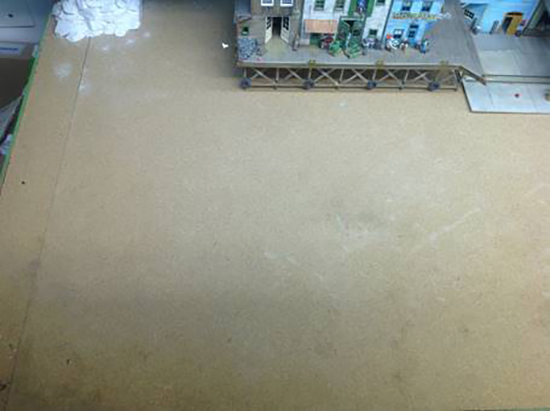
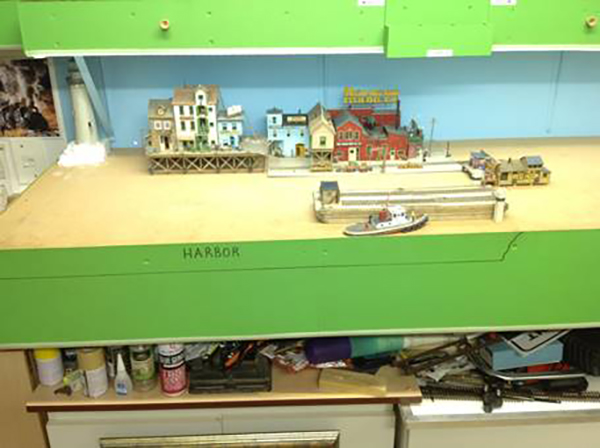
Basic layout of what I would like in the harbour.
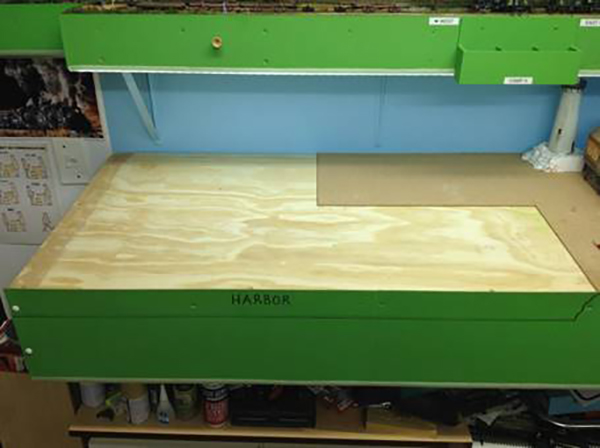
By removing the cork here, I was able to mark out the cutting area.
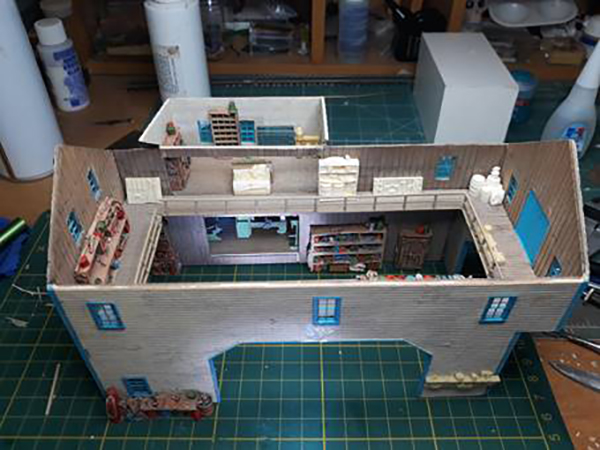
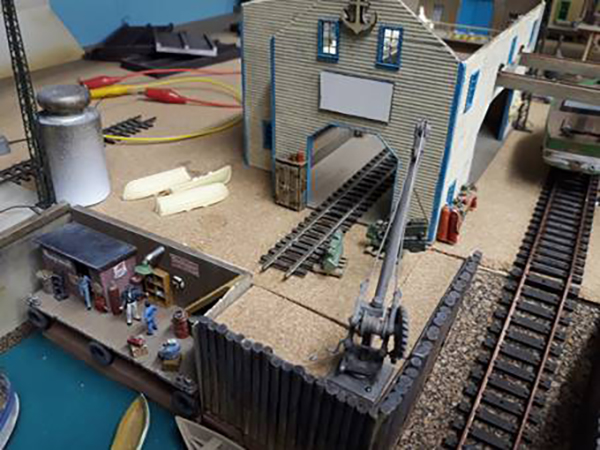
Made a few changes – the cardboard mock-up of a building (boat repair shop) on the right hand side below was changed to a scratch built one which is about 75% complete. See photos of it a bit lower down.
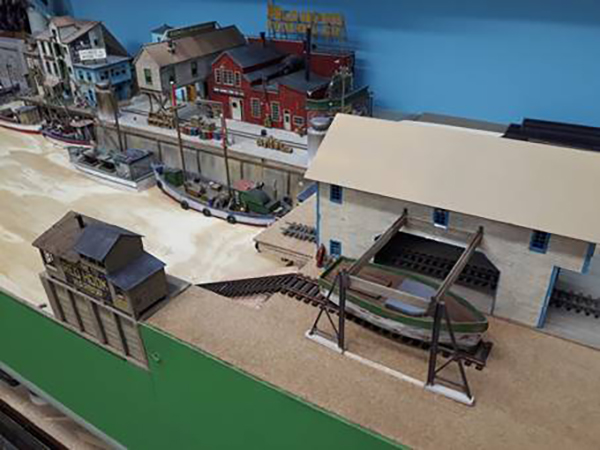
This is the ’new boat repair shop at the top of the ramp.

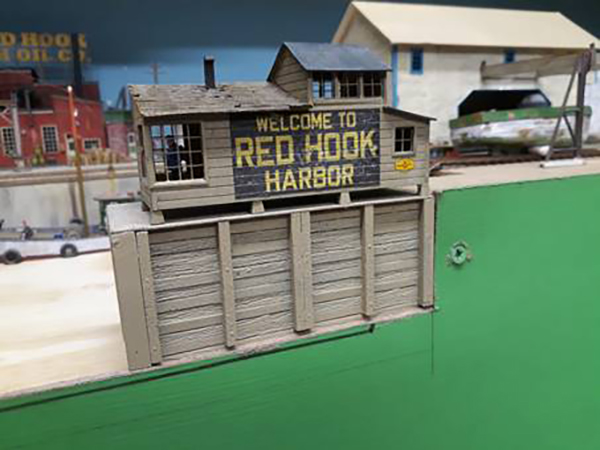
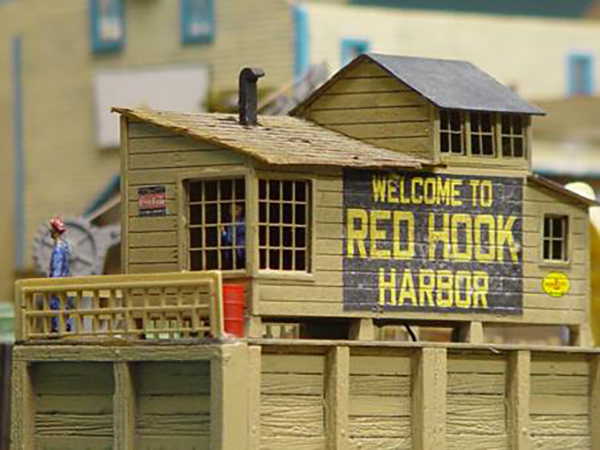
This is Red Hook harbour masters office where he has a full view of his harbour.
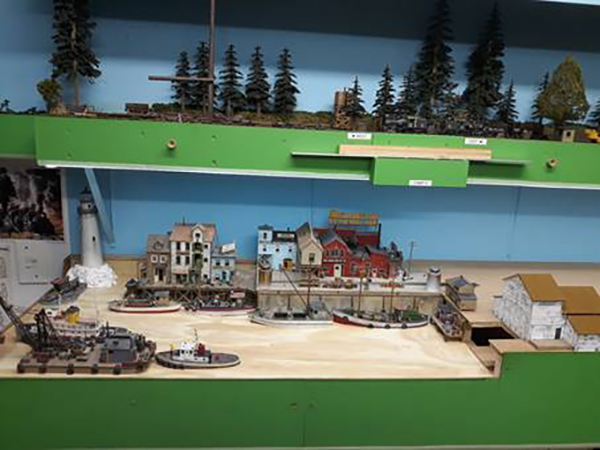
A view of the harbour.
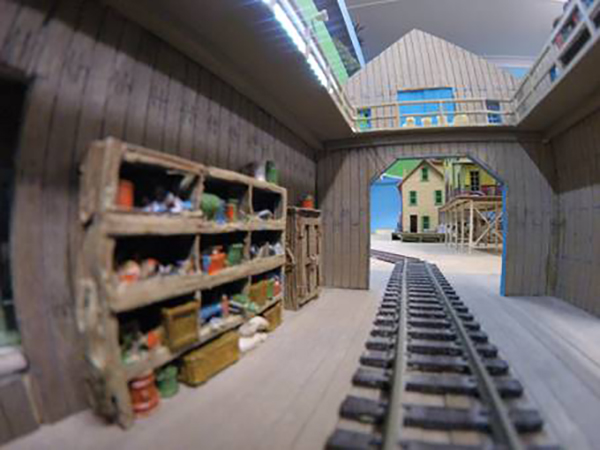
The interior of the boat repair shop with a few castings still to be painted and weathered.
A fully equipped workshop inside to enable all sorts of repairs to the boats brought in.
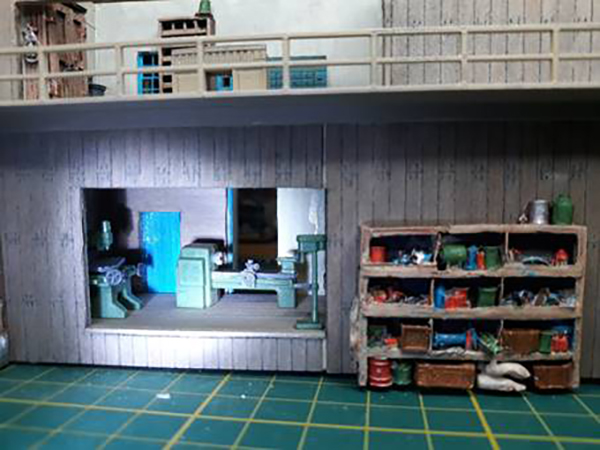
Here is another inside view of the repair shop. The rail line brings in all types of equipment needed for the boat repairs as well as bringing in small boats for repairs.
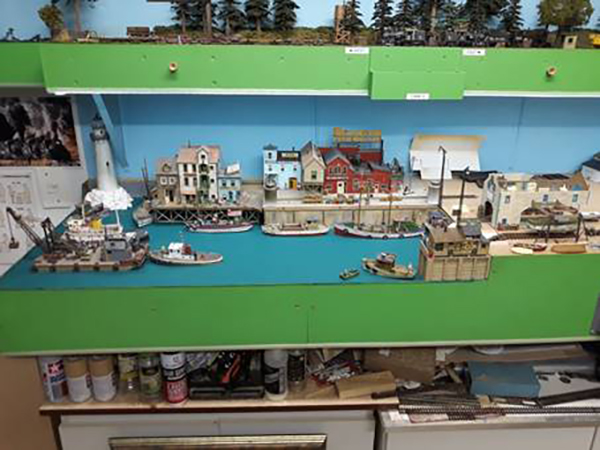
An overall view of the harbour with the buildings correctly placed. The green base coat is just for effect. It will be covered with plaster and then painted the correct colour and the realistic water will be poured last.
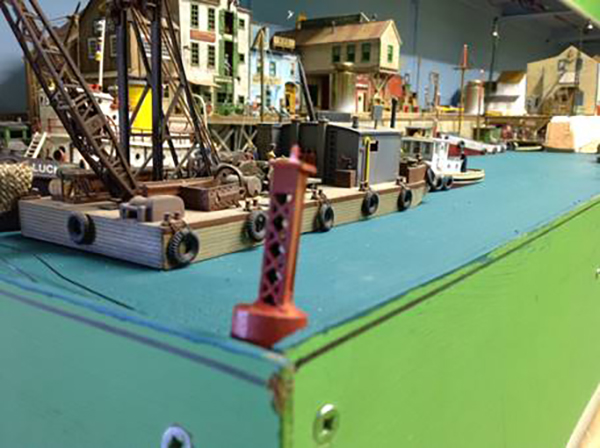
There is a working marker buoy with a flashing red light at the entrance to the harbour.
The boat ramp with a boat dolly.
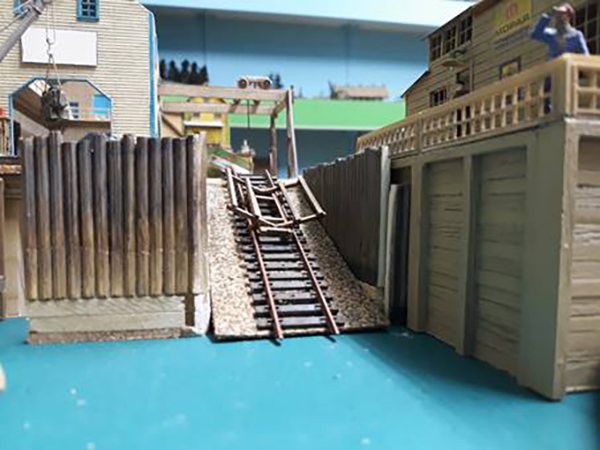
The parts below the pilings will be hidden once the plaster and water is in place.
A dockside crane used to load equipment from the dockside.
A close up view of the harbour masters office with him inside looking out across his harbour.
The street lamp was repaired outside the bar and now patrons are waiting for it to open.

After eight hours of electrical work on the lighting, all the buildings with full interior detail and lighting all done.
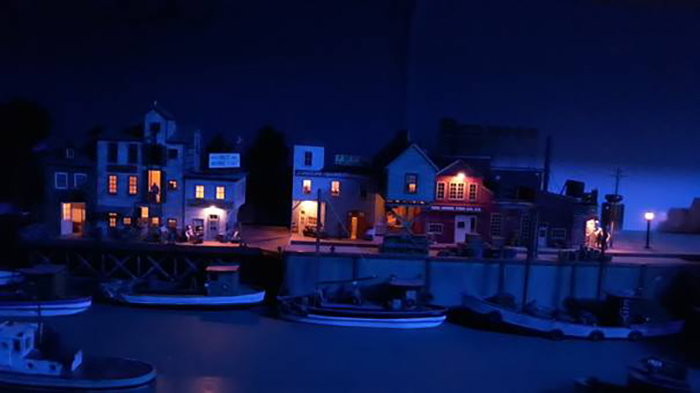
The photo above was taken with only a blue ceiling light and a timed exposure. It gives the effect of a full moon night.
There is still a lot of work to be done here. I have to sort out wiring circuits for the different buildings, boats and boat repair shop which will have seven lights inside and outside of it.
The lighthouse works but I need to find a circuit that imitates a revolving light. At the moment, it just comes on and off at short intervals.
Then I will connect the harbour to the rest of the trackwork on the lower level of my double deck layout.
Brian”
A huge thanks to Brian for adding to the model railroad harbor layouts – a wonderful update. I do love seeing how your layouts progress. Stunning stuff.
You can see more of Brian in the Hall of Fame.
That’s all for today folks.
Please do keep ’em coming.
And if today is the day you get started on your layout, the Beginner’s Guide is here.
Best
Al
PS Latest ebay cheat sheet is here.
PPS More HO scale train layouts here if that’s your thing.


Very nice modeling. I love the boat repair building, the harbor buoy is a great touch. A word of caution with the Walthers water. If poured over 1/4″ – 6mm thick it takes forever to dry, so layers are best.
John from Baltimore
It always amazes me the talent that exists in this hobby.
I can hardly wait to see the finished product!!! Stunning layout by yet another truly talented contributor to this web site!!!
What an outstanding job! Looks great!
Woodland Scenics water was a disaster on my layout. Six months after curing, numerous bubbles developed, some as big as golf balls. Had to cut out and re-do the whole water feature using a better, more stable product.
Beautiful Brian, exceptional detail, love it.
Forgive a rivet counter, but are you sure your buoy is the right color? “Red Right Returning” implies you would be entering the harbor from the left edge, squeezing between the the buoy and your barge. If you mean that you should enter from the long side, or the front, or outside the buoy from the left, the buoy should be green. Possibly best to point this out before you glue it all down, I figured!
Otherwise it’s a wonderful piece of work!
love that work shop. Awesome job. Very pleasing diorama of a busy water front.
Please keep us posted on the finish and its final place in the layout.
George from NY
Red right returning is only for United States North America waters. The rest of the world is different. I think it’s called zone 1, maybe zone 2. Found this out on a cruise in the Med last year.
Beautiful. It reminds me of Maine. Don.t use realistic water. It is only good for small streams. Use their “Deep water Clear” with tint. It works much better. I used it for my river and coal harbor in my past posts. You will be much happier. Use their calculator to figure the amount you will need. Based on your pictures, you will need a lot. It is at Hobby Lobby. Use their 40% off coupons. Take a friend and give him a coupon off the net. Go several weeks. If you need four boxes, it would save you about $50.00
Absolutely outstanding harbor area. Very nicely done…..looks great.
Absolutely outstanding harbor area. Very nice job !!!
The Buoy is correct as the barge is dredging the channel. This is a fabulous looking harbor! Even at night it looks a little seedy. I worked in the shipyards in Washington state and this brings back so many memories. I can name a dozen towns where this scene could be.
Exceptional Work
Wow! Very impressive.
Hi Brian — I’m not a mariner so I can’t speak to content accuracy as others have pointed out. However, I can say with certainty that the visual appeal of a harbor setting is almost instinctual for us humans. You’ve captured the feeling beautifully throughout the scene. The weathering effects are great. And the super detailing is awesome; especially within the workshop. And do take heed about being very careful with the choice of water product. It would be a shame to spoil this spectacular scene and your efforts with a bad water product — Arnie, Staten Island, NY
Great job I eill keep this in mind for my layout under construction.
Love It – Give me great ideas for my layout
I’m thinking you’ll need multiple LEDs going on and off in sequence for the rotating beacon. Just a suggestion – probably just a couple. Excellent diorama !!!
So real that I can almost smell the fish & creosote! Jim from CB.
Oh, that’s just great, Brian
Not sure how things work across the pond,but here in FL(USA) there are no rails to put boats in the water,so I would possibly re-think my boat launch ramp.I could see boats coming into the shop by rail for very large ones,but most in my view are trucked or towed in on trailers,Should be an excellent addition to your layout.I would also think about a “store” where the boaters can buy equipment and upgrades.Most marinas have one big or small if you have the room along with a parking area for employees.Anxious to see the finished product
This was really cool…… I was impressed with the detail inside the buildings…….you gave me some great Ideas for the engine house I am scratch building..
Great Job..
Your lighting is masterful. It was worth the 8 hours for a few buildings to get such a great effect. Cheers! NJ Mark
Regarding the light house beacon. Perhaps 6 leds timed to go off and on in rapid sequence driven by an arduino nano?? Perhaps every 10 milliseconds. When led 2 lights, led 1 goes dark…etc. Then a one second pause before it starts again? For more resolution, use more leds, for a smoother sweep of the light effect. If it gets too bright, use resistors to drop the current and the brightness. Perhaps the inner surface of the beacon house should have a shiny reflective surface so the light only goes out the windows? just ideas.
Wow! That is art!
Hey for a rotating light in your light house look online there are very low cost rotating light houses you can use them for the parts you need I have one the reflector rotates and a single bulb is in the center of it non turning in its socket gives the effect of a true rotating light for a few bucks .
Very nice the whole diorama works ,includeing the lighting and interior s
the multiple LED’s is a good idea, but also try putting a 0.1uF across the LED this will cause the LED to gradually increase in brightness then gradually decrease in brightness as the next stage gradually increases. You may need to experiment with the capacitor value to get the fading just right. Also make sure the dropping resistor wattage is high enough to take the full supply voltage, remember W=V*V/R
Hi Brian (from another Brian in the UK)
Yes, be very careful with any pouring/curing water products. I also have had problems with the Woodland Scenics product which bubbled and cracked within 24 hours of pouring. Temperature and possibly humidity could be a cause of the problem – I never got an acceptable response from Woodland Scenics. So after digging my pond out, I used several layers of ModPodge which is an excellent product (normally used by artists) – its so easy to work with as the main bulk of your water mass and a lot cheaper than proprietary water products. Various effects can be added using other water effects products from Villejo, Deluxe Materials, Woodland Scenics. Have a look at ‘Sea Port Water’ on YouTube to see a spectacular harbour model using ModPodge. Good luck. Brian
Wow! I can smell the ocean from Indiana, USA! I am beginning a small lake scene with camping and hunting (altho I do neither!) and the water suggestions are a great help. Also gave me motivation to light more of the small structures, something I am just now learning to do. best, Rob
After the water sets then drill holes for lights no?
This is great! Loving railroads and sailing as I do, this is the best of both. My father was a fireman on a steam locomotive during the 2nd WW and I own a sailboat. I live within 500 yards of the UP here in Kansas! An Indiana expatriate, Hoosier for ever! My best, Russ
International convention for channel markers (buoys) is to keep the red marker on your port ( left) side), and green to your starboard (right) when going upstream. The reverse applies going downstream. Entering a harbour would be regarded as going upstream. So, this lifelong boating addict thinks you got it right!
Love the harbour scene – excellent work! Terry from Oz
One of my favorites. Reminded me of the little river towns along the US side of the St. Lawrence Seaway, Alexander Bay, NY being one.
Nicely done. You have some great modeling skills and have created a scene with so much detail. Thanks for sharing.
Jim AZ
Oh this is what I needed for guidance as I get ready to finish the seaport area on my N scale California Zephyr Route. Very nice work and pictures, also enjoyed reading the comments
Brian thank you for sharing.
Dick from Hardin Mt USA
Brian, wonderfully put together. Very nice attention to detail and I love how your wood bulkhead transitions into the fascia of the layout. Everyone will be excited to see how it’s coming together. Thanks Al for being the catalyst for our great hobby..
Everyone needs inspiration and encouragement!
There is a lighthouse LED circuit available on Ebay for $18.99 that emulates a rotating light. The description is “Lighthouse Light, LED Circuit for Model Light Houses, Evan Designs [Warm White]”. They have both warm and cool light versions.