Cary has been in touch again with an update. This time he shows us how he makes his G scale people.
“My name is Cary in Crestwood, Kentucky. I’m 52 years old and started work on my garden railroad about 3 years ago.
It’s been slow going but I may be able to finally start laying track spring 2017. I did a post earlier this year on some of the buildings I was making, if you’d like to see it, it’s here.
I always like seeing how people lay out their garden railroad in relation to their yard and house. In my case I selected a location in the woods behind my house. It’s heavily shaded which is nice, but I’ll have some cleanup every spring removing leaves and branches. The project has required a lot more digging than I anticipated chopping through roots and digging up rocks. I just finished running power to the site. I rented a trencher and ran about 100 feet of 10 gauge underground cable.
Here’s the layout so you have an idea of size:
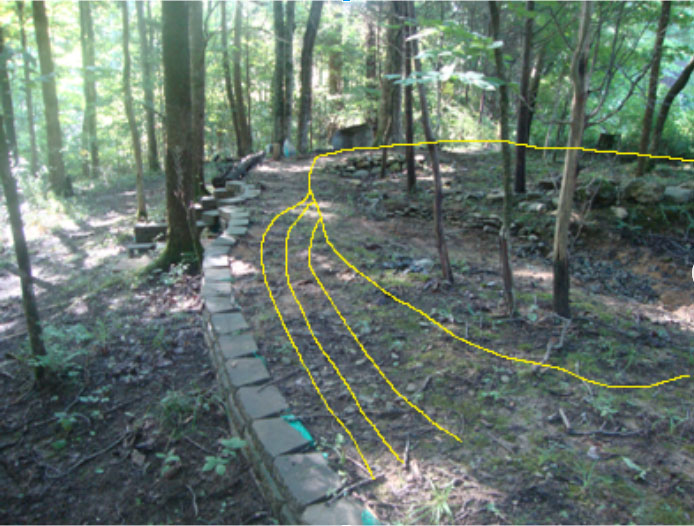
The initial layout will consist of one loop and 3 dead end storage tracks. The operator’s station is raised to waist height so I can operate the switches without bending over.
I have just a little more ground work to do then I’ll be building a small deck to have a place to sit, relax, and watch the trains run. Then it’s on to laying track. I’m using LGB track and plan to solder the pieces into 6-8 foot sections. Those large sections will be joined together by a jumper wire soldered across the joint to allow for expansion/contraction. I plan to dig a 4-6 inch deep trench, fill with dense grade gravel, put the track on top and then ballast with more dense grade rock. If anyone has experience in this area, I would love to hear your comments.
Operator’s Station
Storage tracks will run parallel with this retaining wall for ease of access.
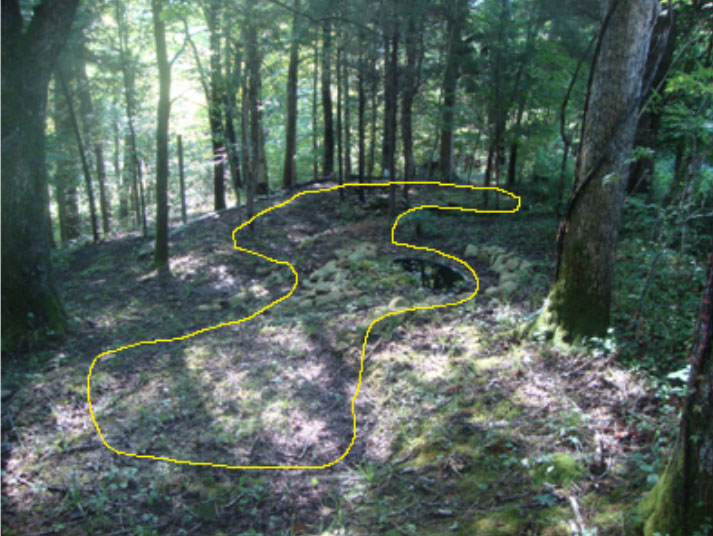
This is a view from the opposite end, the track will climb 2.5% grade to a high point behind the pond and then start the descent as it travels through town #2 and back to the operator’s station.
G scale people:
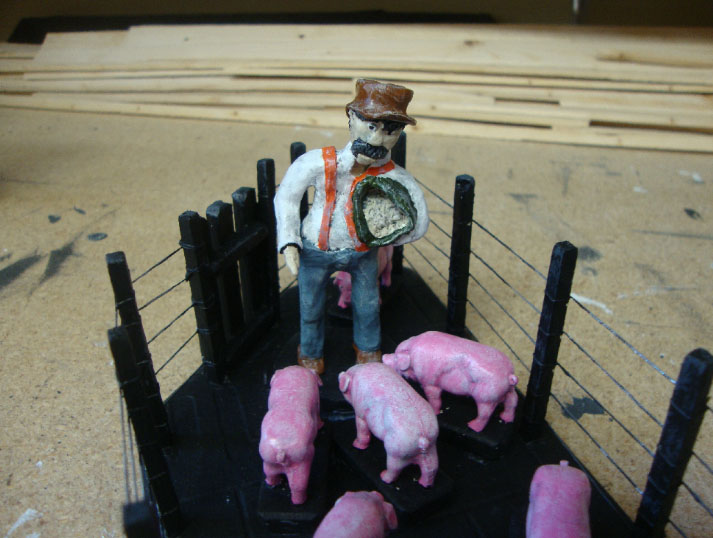
I’ve started using clay to sculpt figures. It takes some time and patience, but I’ve been quite pleased with the results. The Pig Farmer was my first attempt, could not believe how well he turned out. (I purchased the pigs)
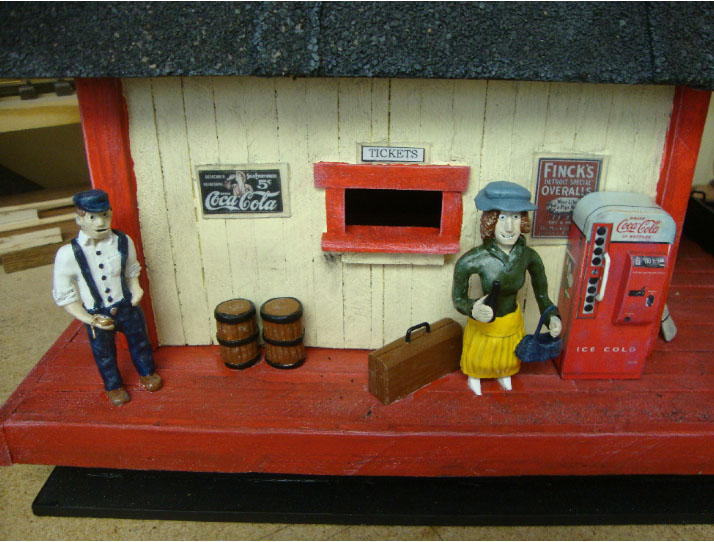
The Station Attendant and Lady Passenger drinking a coke. The coke machine came from a template I found at paperdiorama.com. The paper template is glued to a block of wood and then I applied several coats of clear polyurethane. The small barrels are also clay.
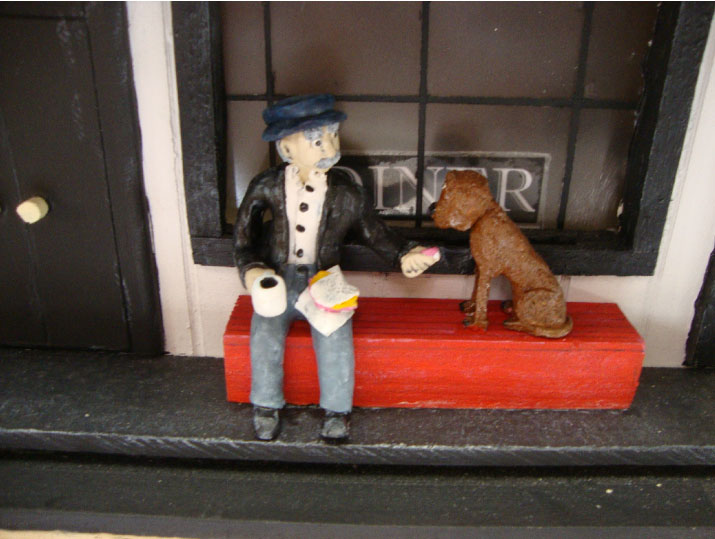
The Old Man and his Dog
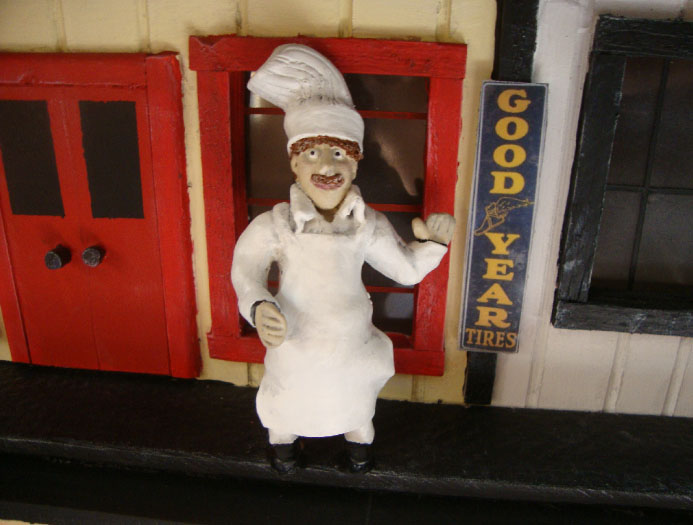
The Baker
You start with a wire skeleton clamped between two pieces of wood. I’ve attached a piece a wax paper to the top of the wood clamp so the feet don’t stick to the wood.
From there I build up the body features with clay. After that I roll out thin sheets of clay for clothing, add hats, beards etc…
I’m using Sculpey clay. You can leave it out as long as you like. It gets little hard but then just work it a bit and it softens up again. Once your done sculpting put it in the oven at 275F and 15 minutes for every 1/4 inch of thickness. Once it’s fully cured you can sand and paint although I’ve found it doesn’t need sanding. I picked up 1.75 pounds of clay and a kit of sculpting tools for about $20 at the local hobby store. I like the idea that I can now make the specialty pieces I want inexpensively instead of trying to find them and buy them.
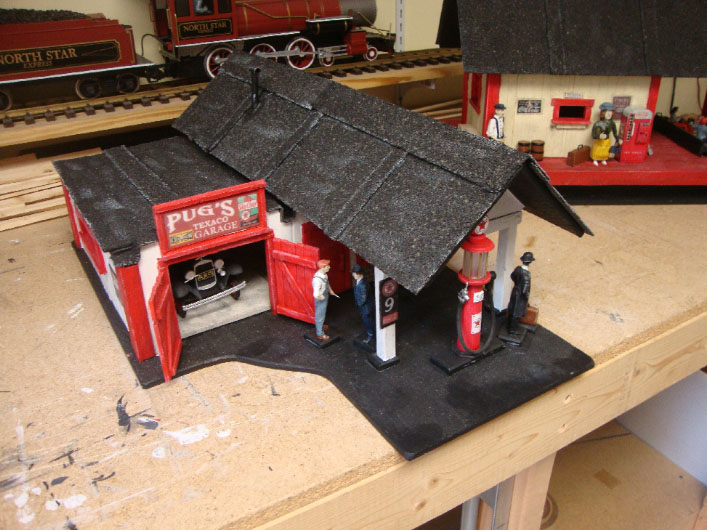
Here’s another project I recently completed, Pug’s Texaco and Garage. The base is concrete backer board, the vehicle is a 1/24 scale woody plastic model I thought too fragile to sit outdoors unprotected, but in the garage it works. The walls are birch plywood, the roof is also concrete board with real shingle material.
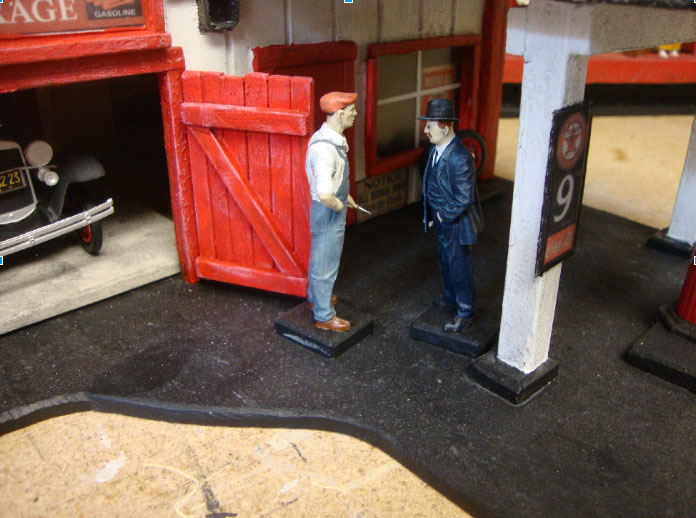
These are not clay figures. It was a kit of G scale people called Henry Ford and Company 1/24 scale. Kit #24003 made by the ICM company. The figures are highly detailed and were a joy to paint.
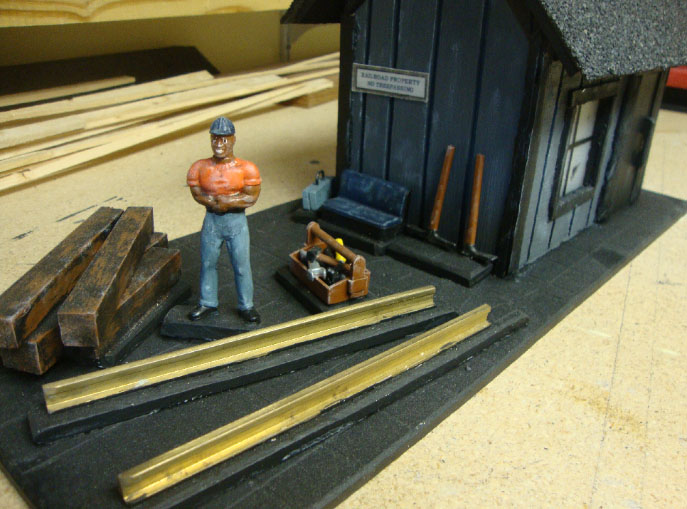
You’ll notice that the figures and accessories are raised. That’s so when I cover the base with dirt, they won’t look like they are buried up to their ankles.
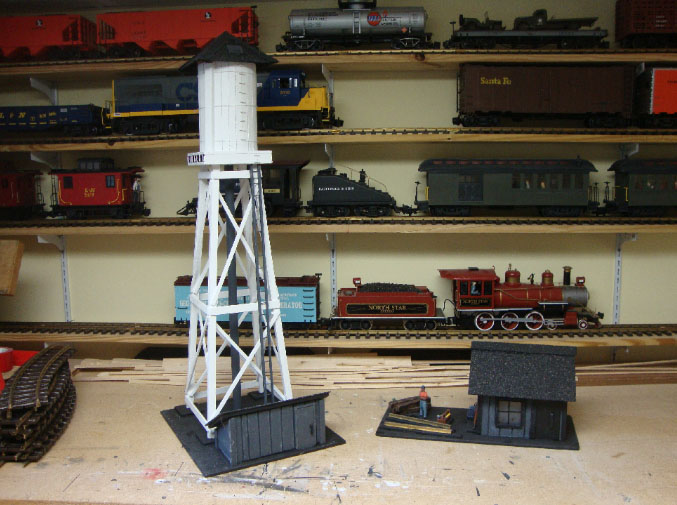
Here’s a few other projects, the town water tower and a track maintenance shed.
This figure was a toy as are the tools. Again everything is raised so when I cover the base with dirt, hopefully the items appear to be resting on top of the dirt.
Thanks to Alastair for sending the posts, it’s great to see what everyone is doing. Again, if anyone has experience laying G scale track outdoors, I’d be very interested in what you’ve learned.
Thanks, Cary”
As you all know, I do love seeing how a layout comes to life over the months, and Cary hasn’t disappointed. I can’t wait to see the next one. I think his G scale people from clay are wonderful.
A huge thanks to Cary for sharing his G scale people.
That’s all for today folks.
Please do keep ’em coming.
And if today is the day you get started on your layout, the Beginner’s Guide is here.
Best
Al
PS Latest ebay cheat sheet is here.
PPS More HO scale train layouts here if that’s your thing.







A big well done-keep it going.
I’am in the process of showing my rail club – thanks.
Ian (Germany)
Looks like you have been preparing for a while. Looking forward to seeing pictures of the actual layout. Best wishes.
WOW!!! Your figures look amazing, well done. Your garden layout will be wonderful. Can’t wait to see to see it coming along.
Great to see your efforts. Questions – I have been toying with the idea of a Garden layout. What is the best source of tracks at reasonable prices in bulk?
This is unbelivable!!!!!! You must have the talent and paitence of a saint! I read all of these post and love them. This one really blows me away I have a good area for something like this I live in a wooded are in the mountains of Arizona. Problem is I`m 73 and on fixed income I guess i have to stay with my HO and N scale. I sure envy you and look forward to seeing your progress. Hope you are having a great time. Tom in AZ
question: what is your age? Are you young enough to finish such a project. I’ve known of several people who have tried to do like you, build a garden railroad but started too late in life and never finished, they were called home to that garden railroad in the sky. Now I wish you good luck and keep the pictures coming.
Oh, my daughter is coming in from Erie,Pa. Wednesday and has promised me she would help me to send pictures of my layout. I’m sure most of you will be impressed. The theme is around the 50-60’s eastern mountains. Lee Barry,CEO LZPMRR.
A couple of G scale clubs here in AZ have switched to battery run engines. That eliminates continually dealing with power issues in the tracks!
It is nice to see a simple, but very good plan. The detailed buildings and characters will certainly add to the enjoyment. I am impressed and envious.
Very neat work on the scenery, men, etc.
Cary, might I recommend to put down either tar paper or heavy gauge black plastic in the bottom of your ditches, so you not experience seedlings of trees and weeds to grow up between your tracks and grading. No maintenance later. Wish my land in Maryland was flat and try a shot at backyard trains. Nice area and hope all goes well with track laying in 2017!
Regards
I love to watch the trains running on an out door layout , it looks like the real thing if you can set down low and view it from the level of the track .
You have a great eye or the scale of things to go with the trains guy !
George
Nice work! Your layout should really be nice. I only wish I had a yard like that! But alas, just a tract-home yard. I do have some room for a layout along the side fence where I have a planter, but not much room for a turn-around so I have to figure that out. I thought about making buildings out of Lego. There’s a LEGOLAND near us so you can really see what can be done. Although Lego is pricey it will certainly hold up to the weather.
I had 500 ft of LGB track in my back yard in Illinois and had no problems but here in Florida the salt air is a killer and went to battery power and had no problems only with wiring to the switches.
I like what you have done so far.
Paul From Down under
Beautiful job Cary with the modeling and handmade clay figures. Very creative! It’s good therapy and a source of pride when you can make it yourself; and at a fraction of what they would cost retail (if you could even find what you want). I look forward to seeing more as the project progresses. – Arnie
Very nice job on the figures! Looking at them I have the feeling that everything will be a top quality job. walt
Thanks for everyone’s comment, it’s so great to share my projects with other enthusiasts.
In regards to track, I started with LGB track when I began collecting and plan to stick with it. It may be more expensive than some of the others but has a reputation for very high quality. As far as my age, I’m 52. I’ve got another 10 years or so to work and hope to have much of my railroad completed by the time I retire. Of course there’s always expansion and already thinking about that. Thanks for the suggestion of lining my roadbed trench with plastic for weed control, sounds like the voice of experience and I will follow your advice. I know most garden railroaders eventually go to battery but I like the idea of “unlimited” power so I’m going to go for track power by soldering my track and hope for the best. Battery can always be a plan B if I needed it.
Thanks again and good luck everyone! Cary
Can’t wait to see the track in place and those wonderful buildings and people you’ve fashioned. Continued success! Cheers! NJ Mark
Job well done. I especially like the detail you get on your figures…
Tree roots grow and move the ground, so cut the roots back under the tracks…and be prepared for leaf maintenance every fall…keeping the tracks and wheels clean will have you going to battery power soon….advice from old rookie..
Good time laying track before your knees give out…
JP in Clayton. CA
Gary, you asked about track laying. Commercial grade landscape fabric under the track – drains but restricts growth. If your track is to be powered, looks like that is your plan, use 2 screw rail clamps and spray joints with graphite lock lubricant as you assemble. Graphite conducts electricity and reduces corrosion. Dick BCSME
Cary, your layout is quite impressive. Great planning and execution, can’t wait to see the finished layout. The clay people are extremely well done as are the buildings you have been working on. You are very creative and talented, keep up the awesome work.
Linda from Pennsylvania
I just dismantled my ‘G’ gauge layout. I’m 95 and unable to get up and down anymore. I laid my initial track in 1990 on 1″ foam board. Don’t recall the name but it had foil paper over the board both sides. I spot glued the track to the board with Construction adhesive. I then placed ballast under and over the board. so just track would show, . It has lasted almost 30 years with little maintenance. Western Pennsylvania
I like the idea of clay figures, which I assume can be adapted to any scale, if you have the eyes for it. BUT, the woman next to the coke machine is really ugly, perhaps some plastic surgery would help. Great looking and ambitious project.
Gene
Cary –
Thanks for the idea of using clay to make figures. I had thought about making molds for figures and whatever “odd stuff” I may need for a layout. Now, all I need is clay and a lot of thinking as to what should be on the layout.
Excellent work on your figures and accessories and thanks again for the clay idea. Wish I had thought of that.
Cary, I’m impressed with your clay figures and homemade structures. Great work!
James
Cary……the figures and buildings are fantastic. Love the guy on the bench with the dog. Keep sending updates on your progress
I could not be more impressed! Simply amazing work and detail. Looking forward to future updates and watching your G scale grow!
Outstanding, you doing a great job! One recommendation I have what I did on my layout I use aristocrat track but used LGB turnouts. Aristocraft track screws together and they have longer straight sections, it also saved me a whole lot of money! Just a thought. Where I live we can have a 100° weather and have frost and snow in the winter time. The track held up very well and I did just float it like the real one. Keep keep up the good work and enjoy your train!
Hi Cary,
My garden railway has operated for 8 years with very little maintenance. About 1/4 of the railway is layed on short pile artificial grass. Drainage is placed under the artificial grass. The artificial grass retains the track in place with no fixings. About 1/4 of the railway is at ground level. I dug a shallow trench filled with coarse gravel. Placed 20 mm of 7 mm washed gravel. Layed track on top and bedded in with more 7mm gravel. About 1/2 of the track is above ground on 12 mm marine plywood (coated with wood preserver used in boat building), supported with steel angle iron posts in 100 mm deep concrete. Galvanised angle iron supports the edges of the marine plywood and prevents detailed trains from falling. Bridges are made from cedar. All rail is 12 foot lengths to minimise number of joints. All joints are zinc coated. Rail joiners are clamped onto the rail with SS Track Locking Device purchased from Roll-Ez Wheels Inc, Al Kramer.
The track is mostly fixed in place on straight sections above ground. Curved sections are free to move to allow for expansion/contraction. The station area is 4 tracks mostly under cover awning.
Maintenance requires spraying ground level track with weed killer 2 times each year. Weeds do not grow in the artificial grass. Vacuuming leaves up from the artificial grass.
I use an LGB track cleaner to clean the brass rail.
I’m getting ready to start my first G scale outdoor layout. I would love to correspond with Gary and others in my region (Illinois, midwest) I have plenty of equipment and track as well as real-estate for a modest layout. Looking forward to spring
Looks great.!!!! I always wanted a outside train set; But would be afraid of the outside elements.
Cary. Your description of how you made the lay models is fantastic. Thank you for posting your layout, wait for the next segment. 👍