Rod’s been in touch again with some sound model train set up advice.
Anyone who has toiled over creating a layout will read his piece below and nod in agreement.
And if you haven’t taken the plunge yet, read Rod’s words again and again before you start. Then keep going back to them.
“Dear Al,
My Diano Marina layout was in the Cardiff exhibition last weekend and this has borne in on me a few things that I think it’s too late to worry about now, but which I wish I’d thought to plan in to the design at the time of building.
Firstly, access: we’re all getting older and frailer, but at least three potential operators have such trouble getting down under the baseboards (or at least getting up again once inside) that having the controls inside the doughnut was a serious problem for them.
I have seen layouts that have a lifting section to let you in, and there’s a place on mine where I could have done this (major reconstruction job now, so not really an option) and as even I am now starting to get sore joints and back it would have paid dividends.
Secondly, section breaks: I hate wiring work and so I left a few block sections to end just at handy baseboard joints which reduced the cross-baseboard-joint wire connections required (yay!) but means operators who rarely see the layout have to remember not just which line their train is on and which signal to stop at, but whether the train can then be isolated by the switch on the control panel or only by the points ahead of it.
Since I’ve done my best to blend in the baseboard joints scenicly, it isn’t that easy to tell whether the loco has passed the block joint. We had a few runaway trains because of this. That bit of extra wiring work would have been well worthwhile.
Third, lighting: although we were in a sort of conservatory extension, and it was plenty light during the day, when the sun went in it was very obvious we lacked an overhead lighting rig.
The baseboard legs are only 2″x 1″ so I don’t want to add the weight of a whole pelmet structure, even if I was willing to spare the time and cost of making it, but I should have planned it in.
The street and platform lights I added recently were much appreciated and it leaves me regretting I didn’t make provision for internal lighting when I was making the buildings.
Finally, wiring again: like Topsy it just growed, and although I have kept lists of what wire goes to what pin of each plug terminal (better than nothing) I had no overall schematic or determined colour scheme, so when you look under a baseboard it is a daunting mass of wire, mostly red, white and yellow, running in all directions, and you wonder where to start when looking for a fault. Having a clear system and record would have helped.
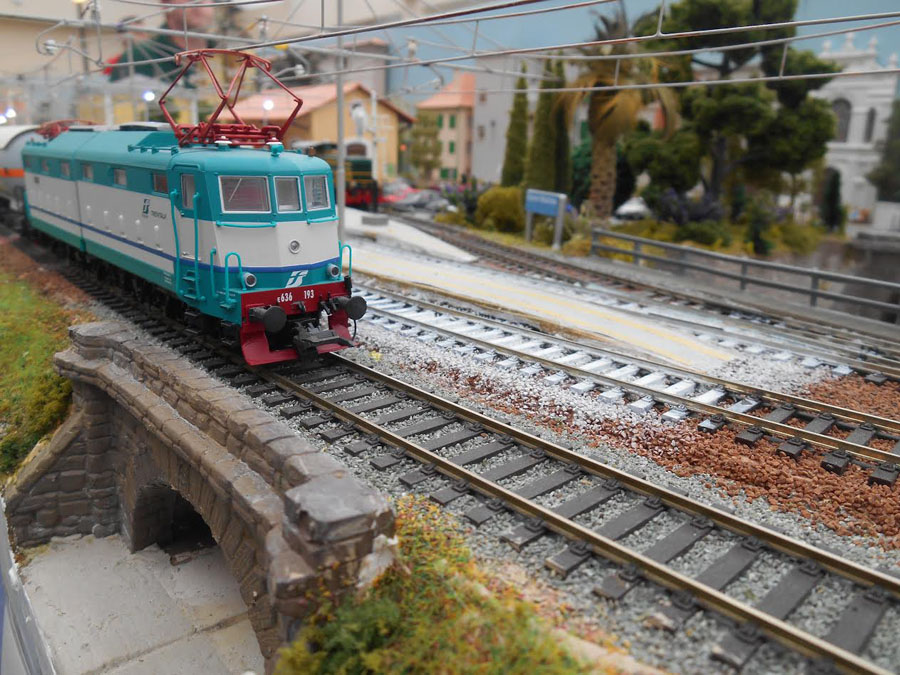
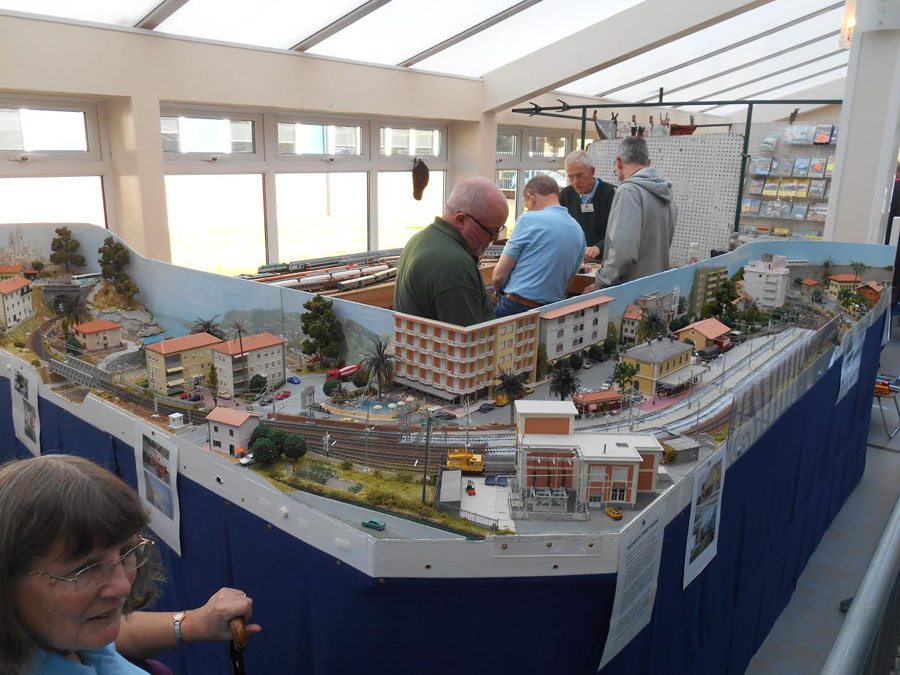
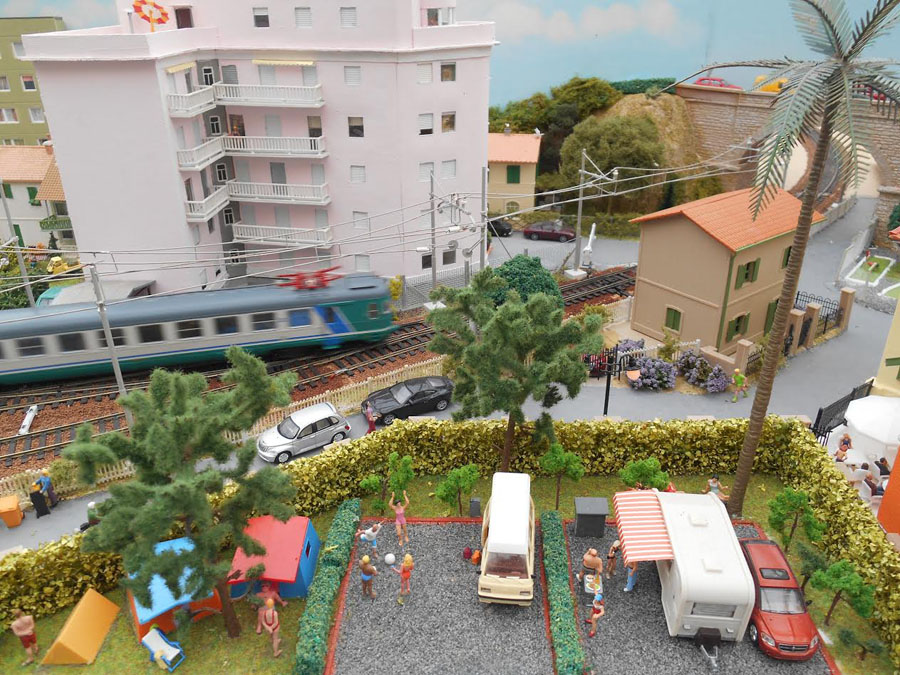
Hope this assists someone to avoid my mistakes. The photos show the layout in situ, with several friends inside trying to work out why nothing’s moving, and my wife Sue outside talking to the public to prevent them distracting the operators: secondly, an E636 on the propane tanks standing just over an electrically crucial baseboard joint which is 3″ past the bridge abutment; and finally an EMU passing the campground, with one lonely streetlight visible but none in any of the buildings. The big pink monster in particular has all solid floors and no interiors except in the penthouses. Oops.
Rod”
Sound model train set up advice from Rod. You can see more of his fantastic layout here.
And now on to Brian. I love his stuff – I have no idea how he gets so much character in to his scenes – but I find them stunning. Also, for some reason I’m real sucker for dock yard scenes. Anyway,
I hope you enjoy it as much as I did.
“Hi Al
A few photos of my soon to be constructed harbor on the lower level of my new layout.
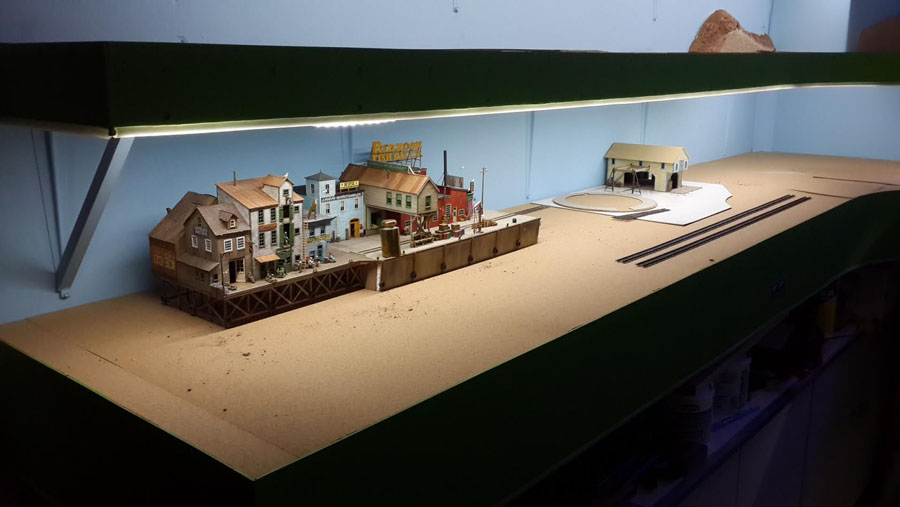
First pic of my 9 building wharf from my old layout placed in its new position.
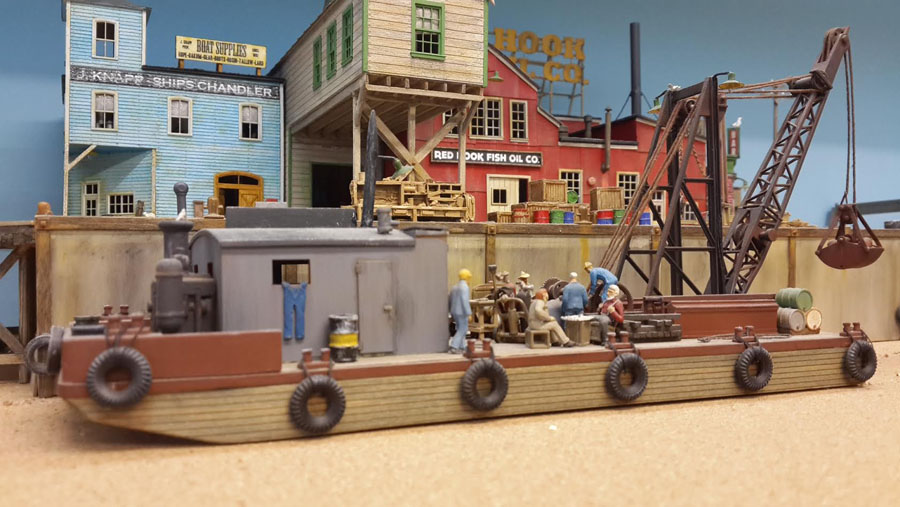
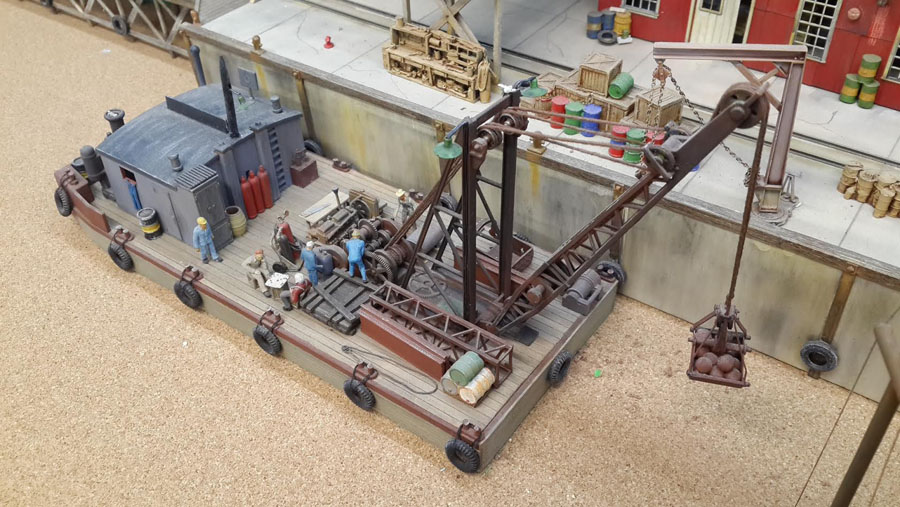
Second pic of ‘engineers’ sorting out a problem on my contractors barge at wharf side.
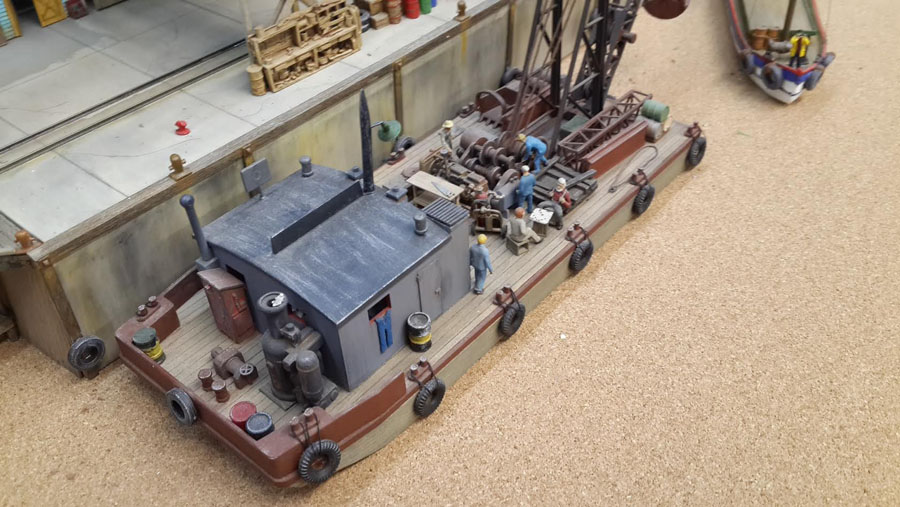
Third pic is of the captain looking out ahead for a good fishing spot for the next catch.
Next lot of pics is the barge berthed at the quayside while ‘repairs’ are being carried.
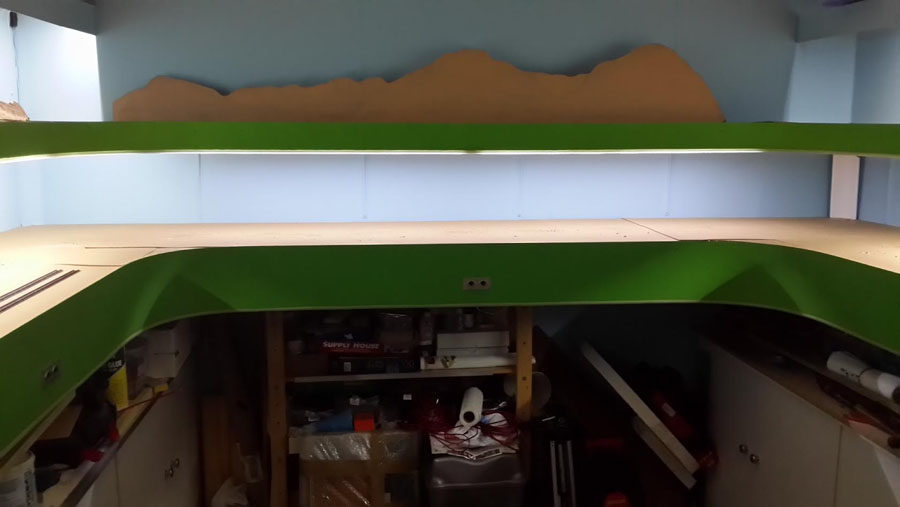
Last pic shows LED strip lights have been placed under all the levels which lights up the shelves in the proper areas on the double deck HO scale layout.
Will keep you posted on the progress.
All the best
Brian”


You can see more of Brian’s layout in the Hall of Fame. And if you fancy making your buildings just like his, have a look at his ‘how to’ here.
That’s all this time folks.
A big thanks to Rod for sharing his model train set up advice.
Please do keep them coming – just mail me!
And if Rod and Brian have got you chomping at the bit to get started, don’t forget the Beginner’s Guide is here.
Best
Al
PS Latest ebay cheat is here. HO stuff going silly at the mo.


Thanks for sharing Al. That is great advice from Rod and the pics of Brians layout are awesome. Keep em coming.
Cary B
Brian…..BEEEEEOOOOTIIIFULLLLLLLL!!!!!!!!!!
Rod’s layout is stunning, such great work. The only problem I see, is a beginner
Probably doesn’t know what he is talking about. I have plenty of experience with wiring, and I had trouble following his narrative. Terms he used are not familiar to
Me except that at my age,I understand his concern with access,and getting up and out if you can get under the bench work. But an amazing layout, I just wish my Danville & Western RR was half that.
Danny,Warwick,RI
Hi Rod.
With ref to your wiring, I always have blocks (colour coded for ease) on the baseboard top making links a lot easier without having to dive under to fix wiring all the time.
On my layouts I liked raised sections for the town/ village on removable boards so you site the houses etc and drill through for your light and link all the wires under the board where you can work on it in the light. Then it is easy to just lay the board back into place on the layout fully working as soon as plugged in. Try it next time you start building. Yes my hatch is low too, or too low:-)
Eric (Leeds) UK
I was reading about light under a layout as you get older. I found and bought these round LED lights that run off a 9 volt battery. They stick on the layout under neath When they see motion the turn on for a few minutes then turn off. They have been a great for me a stroke patient to work on the layout. While under the layout working they stay on.
Thank you Eric, I do have a raised area of scenery over some existing wiring and point motors on my “to do” list, to prettify the entry to the fiddle yard, as this is the bit you first see if you open the door from the lounge to the railway room, so I will give the removable board idea a try there when I get round to it, thanks.
Sorry Danny, we do use different terms here. The layout is DC with what we call “cab control” (bit of a misleading name in itself I feel) ie the track is divided into sections (blocks) each of which can be fed from either of the two controllers via a double pole, double throw, centre off switch on the control panel. This means the guy on the main controller can, say, take the Platform and East Main blocks and drive a departing eastbound passenger train, while the guy on the Fiddleyard (staging sidings) controller can take over the Goods Loop and West Main blocks to drive the westbound tanker train away in the other direction. But at the end of some of these blocks you come to a bit of track that’s just fed from the heel-end of the points (turnout) and if you stop a loco there it’s only isolated by turning the points against it. I ought to have bitten the bullet and put the extra feeds in so the block for each line went right to the heel of the points.
Incidentally, the layout is made up of seven sections each 4’6″ long and the electrical connections are mostly 37 pin D plugs.
Rod
Boggles the mind, so ingenious. Hats off to some really creative minds.
great layout lost for words keep sending more info starting a new layout and making a list so as to remember thanks.
Everything is so impressive. Can’t think of any other superlatives. Cheers! NJ Mark
Al,
Rod’s comment regards overhead lighting. I went to the Sydney Model Train Exhibition early October and at one Layout I made a comment to the Operator that his overhead lights were pointing out, not in. Could not take photos! Viewfinder was awash with this light.
Michael
Michael, I’ve spent long hours working a layout where the lighting was over the front of the layout and shielded from the public by a pelmet, but not from us inside, the result being a thumping headache. You need a sort of trough arrangement really but it starts getting pretty heavy. I did see one layout where the inside of the trough was painted orange, gave a lovely warm Mediterranean feel from an ordinary ‘daylight’ tube. I will design-in a light rig on the next layout.
Rod
Great information from Rod and superlative modeling by Brian. Appropriate and adequate lighting is always a concern both over and under the layout. I struggle with “daylight “ lighting versus “warm” lighting with my layout. I use track lighting and I can switch from daylight to warm by replacing bulbs. In photos, there is a markedly different and stark contrast in color and effect. It’s difficult to choose.
Thanks for sharing and a happy and healthy New Year.
Jim AZ
Rod,
I agree 100% with your comments about access and wiring plan/color code. My layout is basically two different builds and while I failed to learn the lesson about the access, I at least got the religion about wiring. Consequently, issues in the new build are so, so much easier to correct. New builders in the planning stage would do well to heed your words.
As I once said about Rods great laytout , where’s the beach ? People don’t usually camp in town. Lol
Robert, there is some beach on the layout, but round to the left side beyond the station. The railway runs a few blocks back from the sea in town, but comes right along the shoreline as you get out to the suburbs. There really is a large campsite just north of the railway, it’s only a few minutes’ walk from there over a level crossing and down a side street to the beach. I must put together a few ‘real and model’ comparison pics for Al. The layout is booked to be going to the Warley National model railway exhibition at the NEC in November 2022, assuming we don’t have to have any more Covid lockdowns, if you’d like to see it.
Beautiful work from both of you, Rod & Brian! Good advice on all fronts Rod. If I ever get to more than a test layout or planning stage, I’ll keep them in mind.
Will, I know the feeling, I need to free up space now to build anything new at home, but I get a bit of modelling done on the layouts at local clubs, which is a nice, collaborative thing and keeps your hand in. If you would like a full layout ‘one day’ but don’t have room yet, you could plan it to include a small scene that could be built and operated on its own but fit into the bigger plan later, possibly just what we call a ‘shunting plank’, just a yard or two long and a few inches wide. You can have a lot of fun with a couple of sidings, a few wagons and a little switching loco.
Looks good. I hope mine turns out that goods.