Dangerous Dave has been in touch again with he’s model train duck under.
If he’s new to you, you can see more about him in the Hall of Fame.
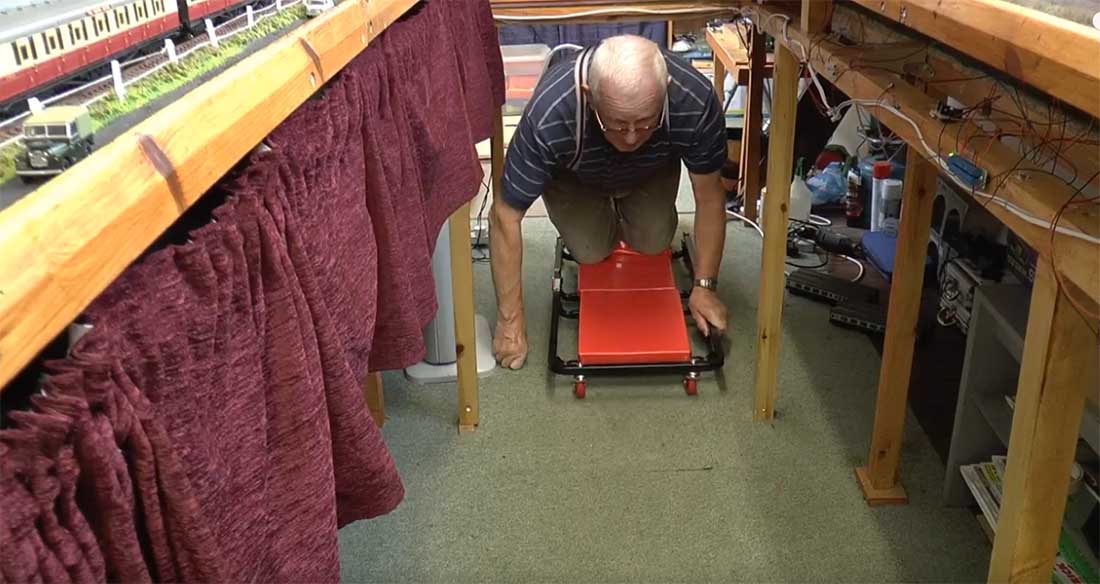
“Hi Al,
Well after the video showing how i have problems getting under my layout to access the middle , and I used the mechanics trolley to get under there , I have now come up with a far better solution ..think this will appeal to a lot of the older members who have problems getting down on there knees ..this now is my answer
At least it should bring a smile to a few faces
Regards
Dave”
Latest ebay cheat sheet is here.
There are quite a few post on the blog now that also use the mechanic’s creeper chair to get ‘in’ their layout, or just to get under it and do some wiring without putting thier back’s out.
This one springs to mind – and it’s a fab layout too:
And then there’s Joe’s. I remember Joe’s better than anybody elses, because he made his, with some model railroad ingenuity. I’m not joking, have a look at it, it’s brilliant:
How to wire model train for DCC.
There’s quite a few more on the blog, but you get the idea. And what’s the big takeaway of all this?
Make your benchwork too low, and you can’t get under it and working on your layout is painful. Make it too high and you can’t reach anything on it, and the little peeps can’t enjoy your beautiful layout.
A big thanks to Dave for sharing his model train duck under. He was also kind enough to go through the Beginner’s Guide too.
That’s all for today folks.
Please do keep ’em coming.
Best
Al
PS Latest ebay cheat sheet is here.
PPS More HO scale train layouts here if that’s your thing.


Dave What about getting under your layout to wire in your many lighted additions? Billboards, house lights, flashing signs etc? Working upside down under the fixed layout must be a nightmare for an elderly person.
Hi Dave.
This video coming when it did made me chuckle as I was just thinking about making access to my centre area without having to crawl, my idea is cut through my main front area so I can walk in and have an end to end layout unfortunately this will do away with the yards but one has to compensate for adding a year or two, we’re not 29 anymore, I think I’m now 31 but my body doesn’t agree.
Keep up the good work.
Regards
Eric (Leeds) UK.
Dave, your track aging should be patented clearly the most authentic track I’ve ever seen and i have seen a lot of layouts. Should do another “how to”episode so all modelers can do it.
Kind regrads
peter in Oz
Neat, thank you
Excellent ideas…As we railroad people age we need tips like this.
Many thanks.
Brilliant Dave. These crawlers are available quite easily too so I think I’ll be taking advice of your idea very soon.
Thanks Dave. Great idea! From the video, it appears you’re still more limber than I.
You have a sharp and creative mind.
Love it!!!
Well hi Dave from Tom in Payson AZ across the pond as they say. I like the grab bars good idea I`m 74 and know well with bad knees and back the fun of crawling under my large HO layout. So my solution I just tore it all down. went and bought a large new shed building for my back yard. I plan to rebuild and make it only about 2 feet wide all around the building. Easer to reach on top and bottom, It will be next to another shed with a HO layout already in progress, Im going to run a cosway between buildings with plexaglass sides to see trains go from one to the other. I may use your grab bar idea on several locations so I can get up better with my bad knees. Thanks for your tip. Any ideas on my plan will be nice. Tom
The Colorado Model Railroad Museum has done the same thing with rails in places were you would need to otherwise crawl , just like Dave’s. I must say speaking as a senior with a bad back it works. For those places where it is too low to stoop the mechanics dolly along with the rails works. Another thing, it is a good idea to have step ladder nearby to help get up from a kneeling position
Dave’s latest video does confirm that we all have problems with our layouts in one way or another and getting ones not so young and lithe bodies into and then out of the middle operating area will always be a problem that will only become more and more difficult as time marches on.
I take his point that it might be difficult to have an upwards opening gate as he has two levels of tracks.
However, I do think that a simple solution would be to have two separate and hinged upwards opening gates. The upper track gate could be lifted to open upwards and be hinged on the right hand side. This would then expose the lower tracks, which could easily then swing upwards and be hinged on the left hand side. Both gates would need to have their hinges mounted above the tops of their respective baseboards and when opened, they should hinge beyond 90 degrees and be placed against a stop of some sort to stay open. The upper gate could easily rest on the lower gate when closed for running and the lower gate would be supported on a simple ledge on the baseboard at the opposite end to the hinge point.
Both gates could also have dowels fixed on their undersides that locate into corresponding holes when closed to ensure side to side track alignment.
Flexible electrical feeds to drop down power feeds on the hinge side and for the non hinged side, a simple screw head or copper tab strategically positioned on the underside of the gate, that would mate up with a sprung copper strip on the fixed baseboard side would provide good electrical continuity.
Would be interested in any other ideas.
Keep up the good work Dave. Always interesting to see his reports and from all the other modellers from around the world too. I always like to see where they are from when they mention their location.
Mike, Andover. UK
Made me think about access and table height when I start my layout. Thanks Dave
Excellent tip Dave. Think I’ll give it a go.
What is the table height where you crawl under with the grab bars?
Great idea Dave. Will give it a try w/mine.
Hey there Dave…
Excellent solution to a thorny problem – thanx for sharing… it looks as though the floor dolly will remain a useful item for accessing those hard-to-get-at places under the layout (wiring, etc)… all the best, gov… 😉
-Bob W, NH, USA
Use the same mechanics creeper.However when I started my layout(table building) I put a large screw eye in at the far end,then ran a few towards where you have to enter and ran some nice FUZZY industrial rope so I can pull myself back and forth.However I am still a young 61 and will use this idea when I can no longer do that.Thanks for the tip.Great thoughts on here you never really think about
Dave once again you have come up trumps with inspiration…
I have not done anything for over a year now owing to work commitments, but I do need to change the shelf, as it was MDF which has warped, will change for plywood soon. Keep it up with the inspirational videos.
Regards
Russell
Very nice to help senior citizens, such as myself, with aids to work under the table. If you build your layout at eye level standing or setting on a bar stool, I would suggest that you use a small 4 wheeled mechanics stool and it will be low enough for one to clear ones’ head and work above with your arms. Of coarse, make the width of the leg post wide enough for you and the stool and only put leg re-reinforcements parallel to the longest lengths of the table, so you can transverse down the isles under the table. You have built a layout on top of a layout and that may present more future issues. You had your reasons to do it that way, right or wrong. Always enjoy your camera work, keep on rolling and producing more. Thanks!
Well, I’m definitely not as advanced a modeler as Dave is, but at age 79 I can certainly identify with “getting down” difficulties. And I’m afraid if I used Dave’s solution they might find me under the layout some day, suffering from dehydration from being unable to crawl back out!
So my solution is to increase my small 3×6 tinplate layout to a larger 4×9 one that’s placed on a table stuck up against a wall where I can easily pull it out to gain backside access. Plus all my wiring is going on top of this table but also under a surface ground covering of earth colored carpet. Small drilled holes in the carpet will allow earth colors of brown and green wiring to rise to connect with tracks and accessories. Of course it’s nowhere near as realistic as Dave’s layout is, but then consisting mostly of Marx tinplate rolling stock it doesn’t really have to be! And it’s still a great deal of fun for me!
Skip L.
Just a thought, for those like Dave wanting an access flap through a two-level section of baseboard, I suppose it might be possible to use a vertical hinge, and curved baseboard joint, at an angle, so the moveable section would swing out sideways? Tricky to keep the alignment right on the lower level, of course. Put in mind of it by the swing bridges I used to see driving through Barry Docks.
Rod
Hi, all! I rigged up a mechanics creeper with some pieces of plywood so as to have a seat and a backrest that are slightly tilted back. It gives me enough support so that I can lean back a little to see what I an working on and it is comfortable enough that I sometimes fall asleep under the layout (don’t tell my wife, she thinks I am “working” all the time I get down under there!)
Norm in York, PA, USA
I think you are doing a wonderful job, I use a garage creeper, it is low enough to be able to sit on and do what is needed.
Bob
Very clever…
Great video…
Kudos Dave to your unique cure to the problem. I am hoping that the rods you are using to support yourself are quite strong and solid and NOT curtain rods, most of which wouldnt be strong enough to support you, should you lose your balance and have to put your full weight on them.
Something else that might be helpful, I was an aircraft and boat mechanic for 35 years and I had to wear wrist braces also, for a long time. My doctor told me to be sure to wear them to bed at nite, because most of the injury occurs in your sleep. Hope this helps
I use an Adjustable Rolling Stool which I can scoot under the layout with the seat lowered and raise it while under an access opening. My stool has a tray just above the rollers where I can carry tools or parts to where I’m working.
well done Dave a nice simple idea probably a lot of time involved but well worth it.
Thank you all for your comments and suggestions ….I have gone one step further now ..have put a old office chair on wheels there so now I just sit on the chair and wheel myself through the gap ..maybe Al will post the video later …to answer the question on height ..I have 3 ft.. 7″ clearance there to go under which of course is my layout board height ..so now I can just lower my head and and in I go …It has one side made of a curtain rod , but got a middle support on it but as said it would be wise to buy the strongest piece you can …like a lot of us older modellers , I suffer with arthritis in knees ,wrists, shoulders , but now this is a great help to me …I know and a lot suggest I should make a open and close lift up type of trap door with the rails matching up …its a big task to do now with me also having 2 levels ..but this way I can manage very well ..thanks again for all your supports and suggestions ….Dangerous Dave
I built a swing in bridge with two tracks on it. A slide rod locks it in place, and I added a small piece of angled wood into the side receptacle to aline the tracks. I’m happy with the results so far.
Herb in NC, USA