If you’ve ever wondered how to weather a model train, Eric has sent in this fabulous ‘how to’.
Some of you may remember the wonderful pictures Eric sent in some time ago of his ‘weathered’ trains.
Hope you like it as much as I did.
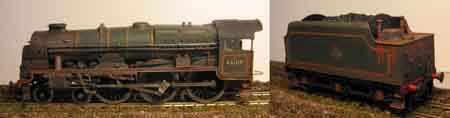
“For this third instalment in my series about weathering, I’ll explain how I weathered my « Royal Scot » , composed of my 2-3-0 green BR steam engine « Royal Scot » (Airfix) and two ex-LMS coaches from Märklin (taken from a « Hogwarts Express » train set, best known as the « Harry Potter Train »).
For those who does not know about the story, the “Harry Potter” train is in fact a well-known train that rides for tourists and train fans: the “Jacobite”, riding the Scottish rails between Fort William and Mallaigh on the line from Glasgow to the Isle of Skye, and where you’ll find the famous (or now infamous) Glenn Finann Viaduct (the curved concrete viaduct seen in the Harry Potter movies).
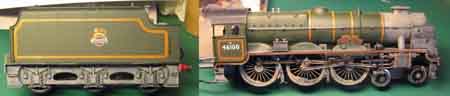
You’ll see here below the Airfix locomotive and the two Märklin coaches (OO Scale).

I wanted to depict a train riding in the late 60’s, at the end of the steam era in the Scottish Highlands, on a train from London to Skye on the old LMS lines…
The first step was to disassemble the body of the Tender from its chassis and, then, cut the wires connecting the engine to the motor in the tender (I’ll later install a small connector and a DCC decoder).
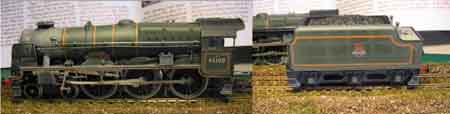
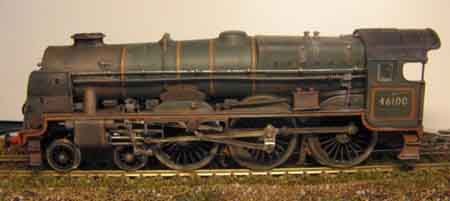
Once the engine and the tender separated, you find the space to weather a model train. I start by brushing a coat of « Dirt » paint (8 parts of “Black Glaze” for one of “Smoke”, three of “Dark Flesh”, one of “Glossy Black” and five of “foundation White).
This mix is drybrushed on the chassis, wheels, and even on the front of the locomotive’s body (the part in black) and the steam deflectors (the Elephant Ears, as we call them) without forgetting the cab’s roof.
Then I prepare a mix of « Dark Green » with a bit of my « Dirt » mix to lighten and tone it down before brushing a wash of this mix on the green parts of the locomotive and tender bodies.
The first layer wiped dry with a sponge, the next ones brushed dry with a Filbert brush, as a “Glacis” in artistic painting.
After this, I prepare my « Grime » mix (one part of « Smoke » for three of « Black Glaze ») that I brush as a « Glacis » lightly diluted on all the areas first weathered with the « Dirt » mix.
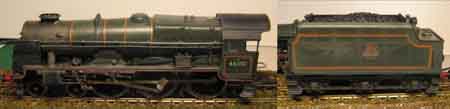
Then I prepare my own « Rust » mix, composed of three parts of « Cavalry Brown » for one of « Burnt Umber » or of « Chocolate Brown ».
I then drybrush this mix on the locomotive’s and tender’s bodies, and also on the tender’s chassis.
As you can see, the trick with how to weather a model trains is lots of dry brush work.
The Locomotive’s chassis also receive a drybrush of “Rust”, but not as heavy as on the other parts, and I mostly concentrate on the front buffers, the footsteps and some other parts of the chassis.
I then prepare some « fresh Rust » (one part of « Smoke » for three of « Cavalry Brown ») and highlight some of my previous rust application spots and also apply some « rust leaks » on the tender where water spills from the tank when loading or near some steam valves.
The leaks are applied with a round brush and for this diluted at a ratio of one part of paint for two parts of water.
I prepare next a mix of one part of « Black Glaze » for one part of « Foundation White ».
I brush it very lightly with a small round brush near the water tank and the valves to represent lime streaks where there are some water or steam leaks.
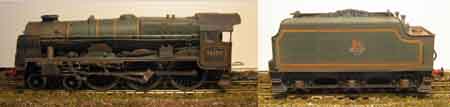
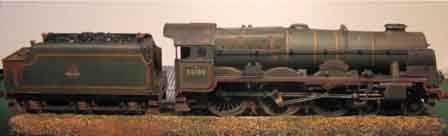
The last step is to apply a « control coat » of « Grimmy Black ».
I prepare a wash of “Black Glaze” diluted at a ratio of one part of “Black Glaze” for three of water, and brush a liberal coat of it on the entirety of the engine and the tender, being thorough especially on the wheels and the driving rods.
The last steps of the « detailing » would be first a drybrush of light grey (mix of « Black Glaze » and « Foundation White ») to highlight the details on the inside of the cab, then a brush of « Glossy Black » on the tender’s coal load to make it look more realistic, and finally applying some of this « Glossy Black » on the handrails and tubes on the engine’s body and also on the buffers (greasiest parts).
The last thing to do then will be to reconnect the locomotive to its tender and put it on the tracks to admire the final result.
Just amazing. A big thank you to Eric for sharing how to weather a model train. He’s also done a ‘how to’ on the carriages and the people, which I shall mail next time.
Comments still coming in thick and fast on the ‘ebay cheat sheet‘. They are all appreciated. Thank you.
Best
Al

No one’s ever mentioned using artist chalks for weathering? Applied with a Q-tip or small sponge tipped device. Colors can be redone over with no painting involved or not using a clear coat either. No- it’s not coming off, smudging or wearing off, seems to imbed in whatever material applied too.
Also a century can be added to plastic/wood structures and even glue removed by lightly sandblasting things (yup, have sandblaster, great Xmas idea). Takes that shine always there away and glue mistakes disappear; then using chalks…talk about realism and it’s satisfaction of work, at least mine anyways. Even just plain dust can add to things, not meaning fur balls, cob webs or similar. Just what accumulates from being there.
Regards, Rich🤔
I really enjoy seeing the pics of what everyone has done with their models and layouts, but I do wish that folks would consider submitting pics with higher resolution. Some of the photos are so small that I cannot see any sort of useful detail, such as the photos in this article.
Just as an alternative weathering method.
I airbrush opaque watercolor found at Michaels or art stores. These are usually cheap paints made for children..
I use a dual action airbrush using a low PSI setting. If possible follow a photo of the real thing
If you mess up you can always wash it of and try again. The trick is to go slowly and let the paint dry. Fix with Dullcoat
Eric
What a wonderful display of talent and a great narrative. Much thanks for sharing. Weathering is a fine art because less is more is the rule. Lets see these beauties running.
A few weathering points. There has always been a point of view that the world in our mind is a clean and orderly place, and many modelers leave it the way it came out of the box, or paint bottle/spray can. Others, like me, are in the camp that a 50 year old building has 50 years of life and, like people, shows it. In fact I’ve chosen to model a part of the world where money left and so did the budget to re-paint, clear trash, and fix roadway potholes. My method is to dry-brush and paint the aging basics, then with a soft “make-up” brush apply weathering chalk, then add derbies, overflowing dumpsters, and detritus. Cars in my West Virginia world are dusty, and trucks have dents. As for the lower resolution pictures, I’ve yet to figure how to get the email system to allow me to send anything over 2 or 3 meg in size. If there’s a trick please advise.
John from Baltimore
“Rust is a must” I always learn from stuff like this. Shiney rolling stock is OK around the Christmas tree, Model Railroads need dirt, rust, leaky oil drums. I started weathering with my paint brush cleaning jar at the end of a project. I still do that with an assortment of colors, black, rust, browns, grays. I still chuckle at taking your new $400 loco, all shiny and new, and then weather and detail it…tools, cans, boxes, even trash in a can, shovels, picks. Have Fun.
Wow ! All of your comments are of wonderful use. Just goes to show you what someone with a vision and creativity can accomplish with what is around them. Bravo gentlemen.