Gary’s been in touch with a very impressive start to his layout. Have a look at his folding model railroad table:
“Hello Allister –
Long time subscriber, first time contributor.
Been getting your emails for several years now and I often go straight to looking at just the pictures.
But as I’ve matured, I’ve come to appreciate the accompanying stories as well.
As you say, it’s all about making a start, isn’t it? Well, I’ve started and there’s no turning back now.
This will be my first, and last, train layout; mainly because we’ll be downsizing in a couple of years, and this is the only chance I’ll have to build my own layout.
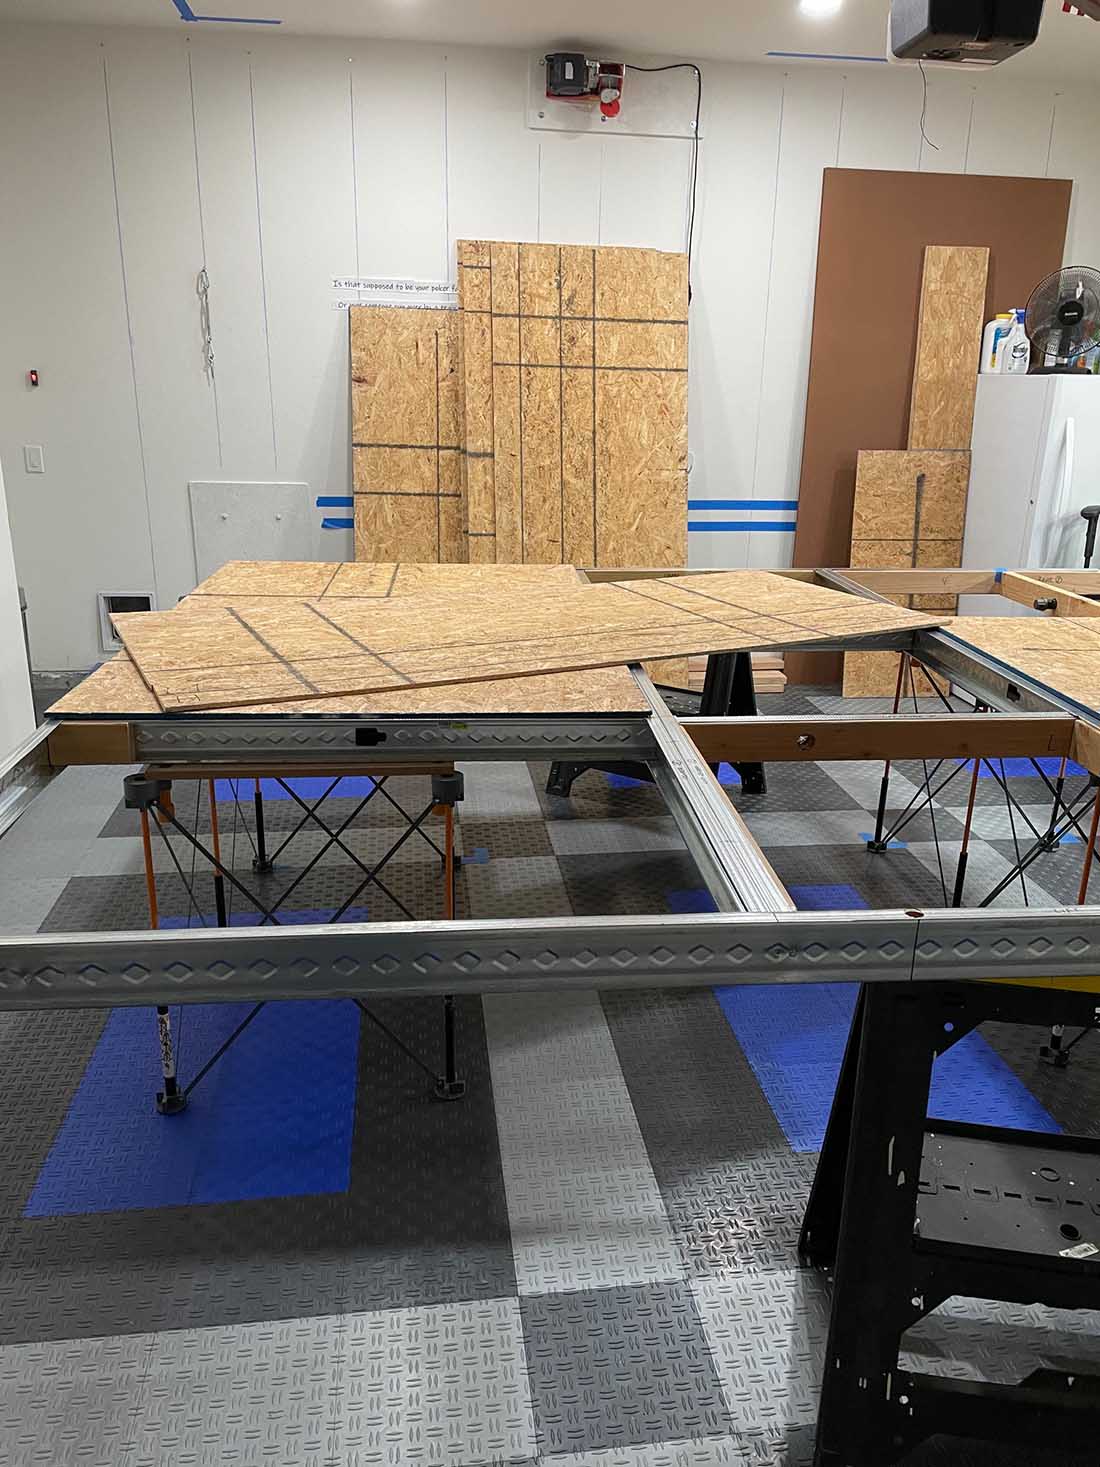
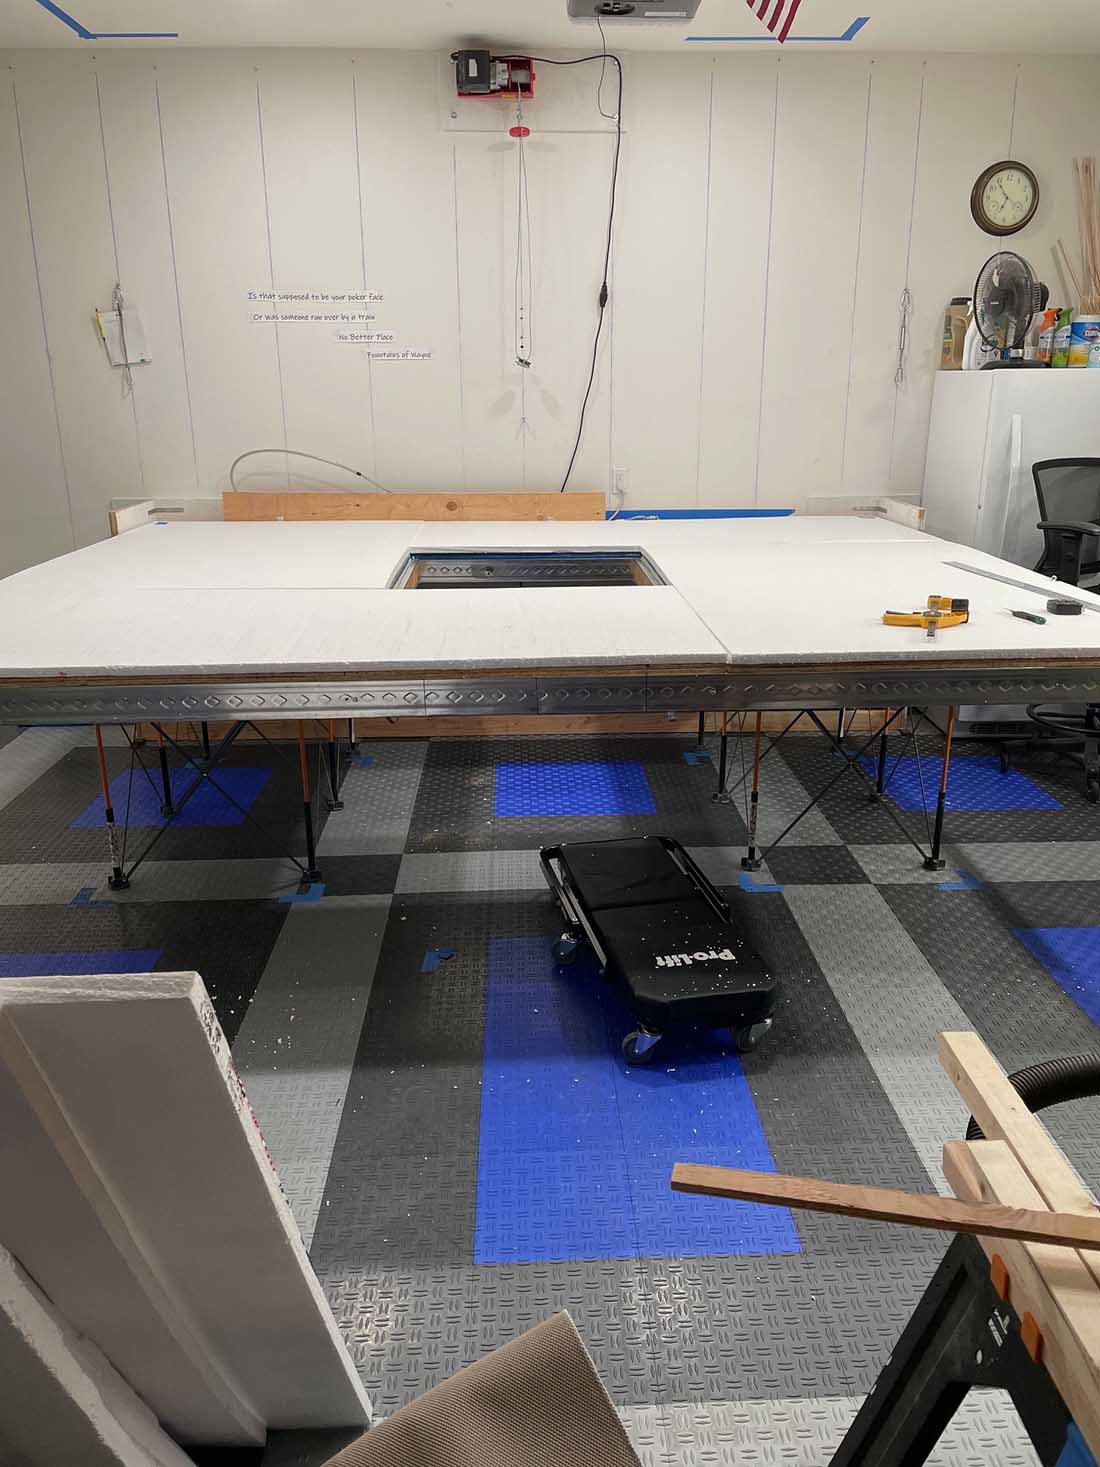
We don’t have a spare room in the house, so the garage was the next logical place to build a folding train table.
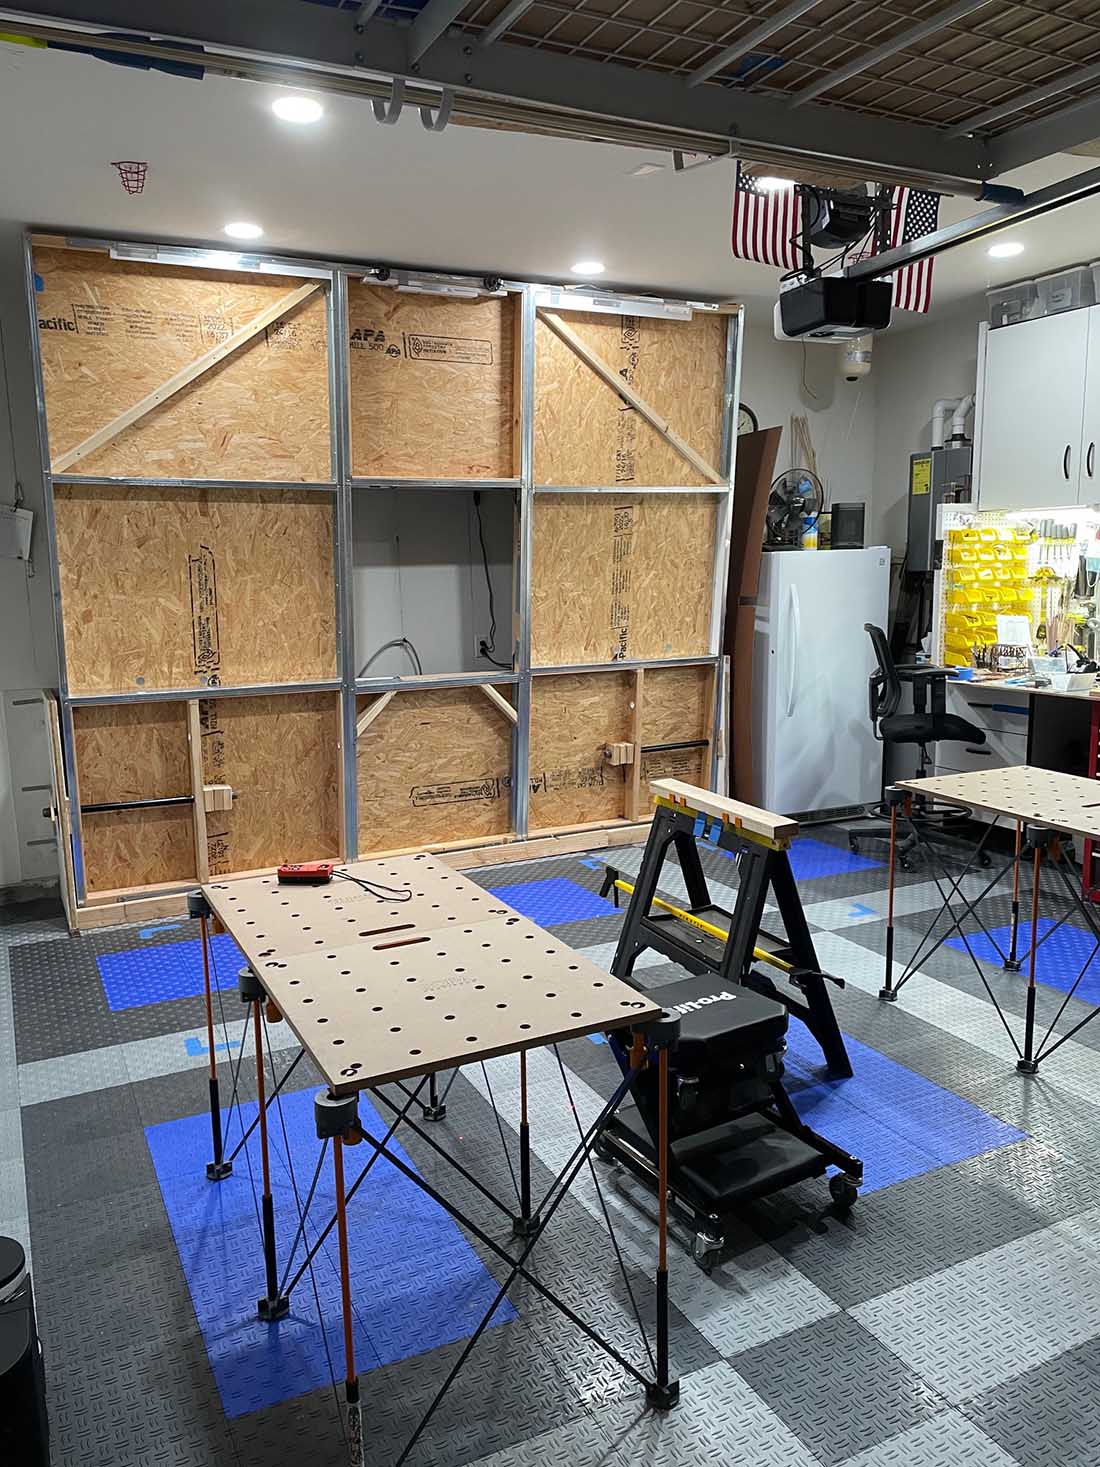
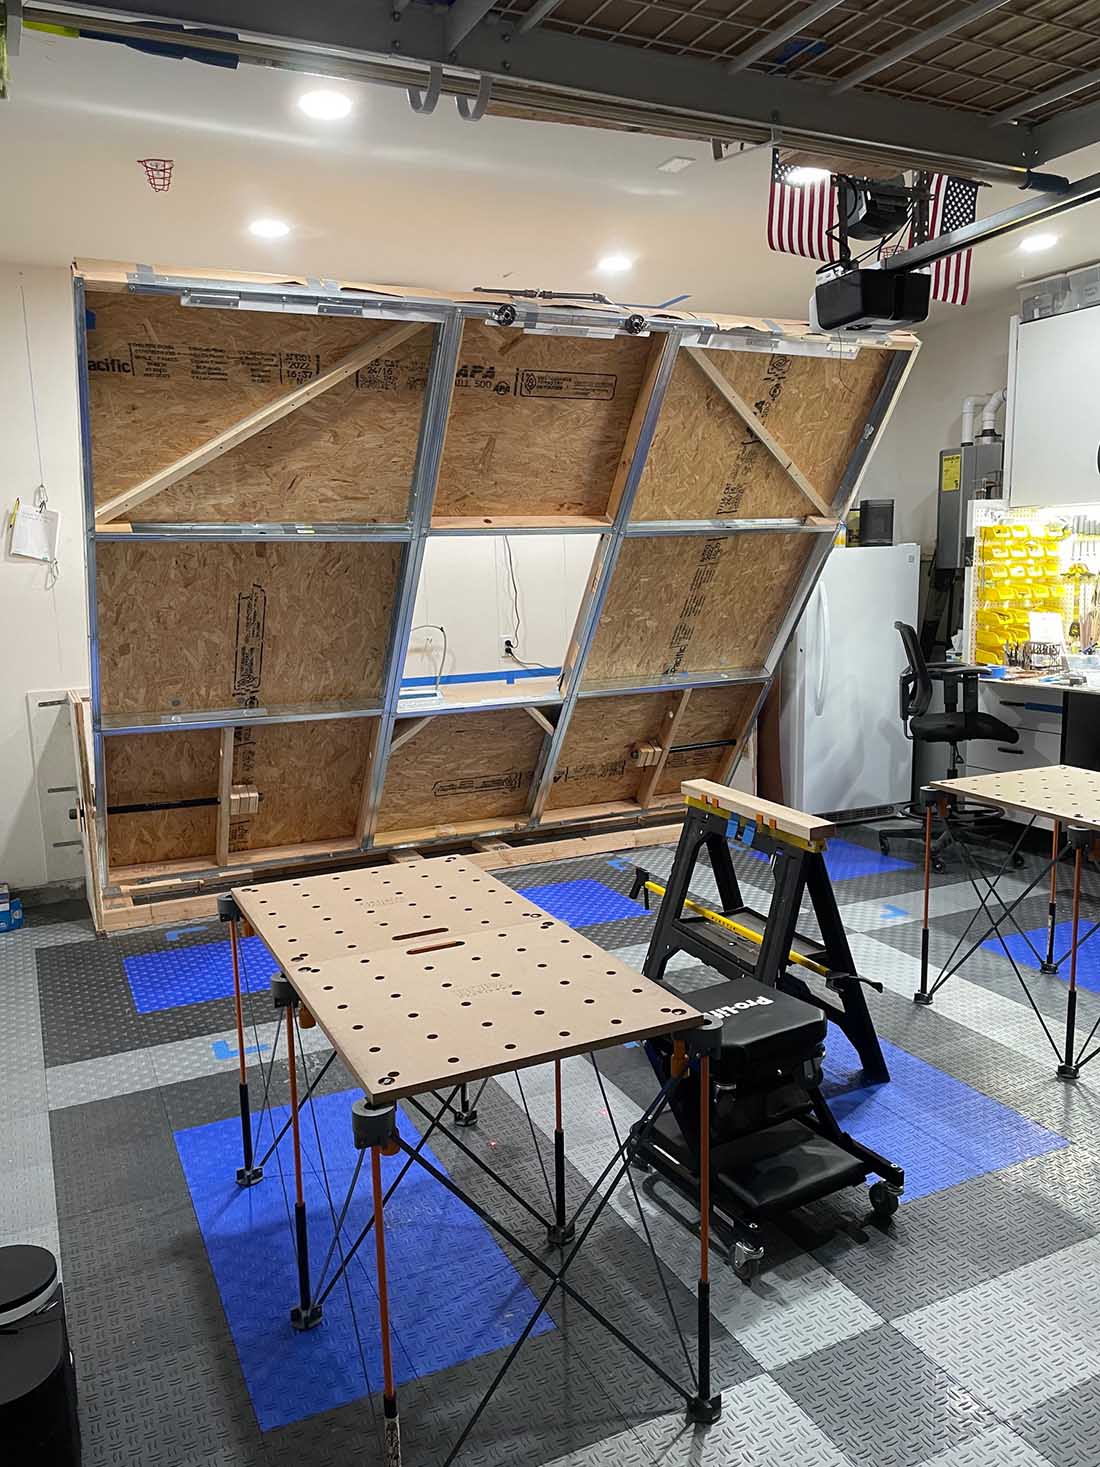
However, I still wanted to be able to park the car in the garage, so that led me to do some creative thinking. I settled on a “Murphy bed” style for my table.
It seemed like a good idea at the time, and there’s been some issues I’ve encountered and fixed during the build. This may not be the best way to build a model train table, but I’m committed to it now.
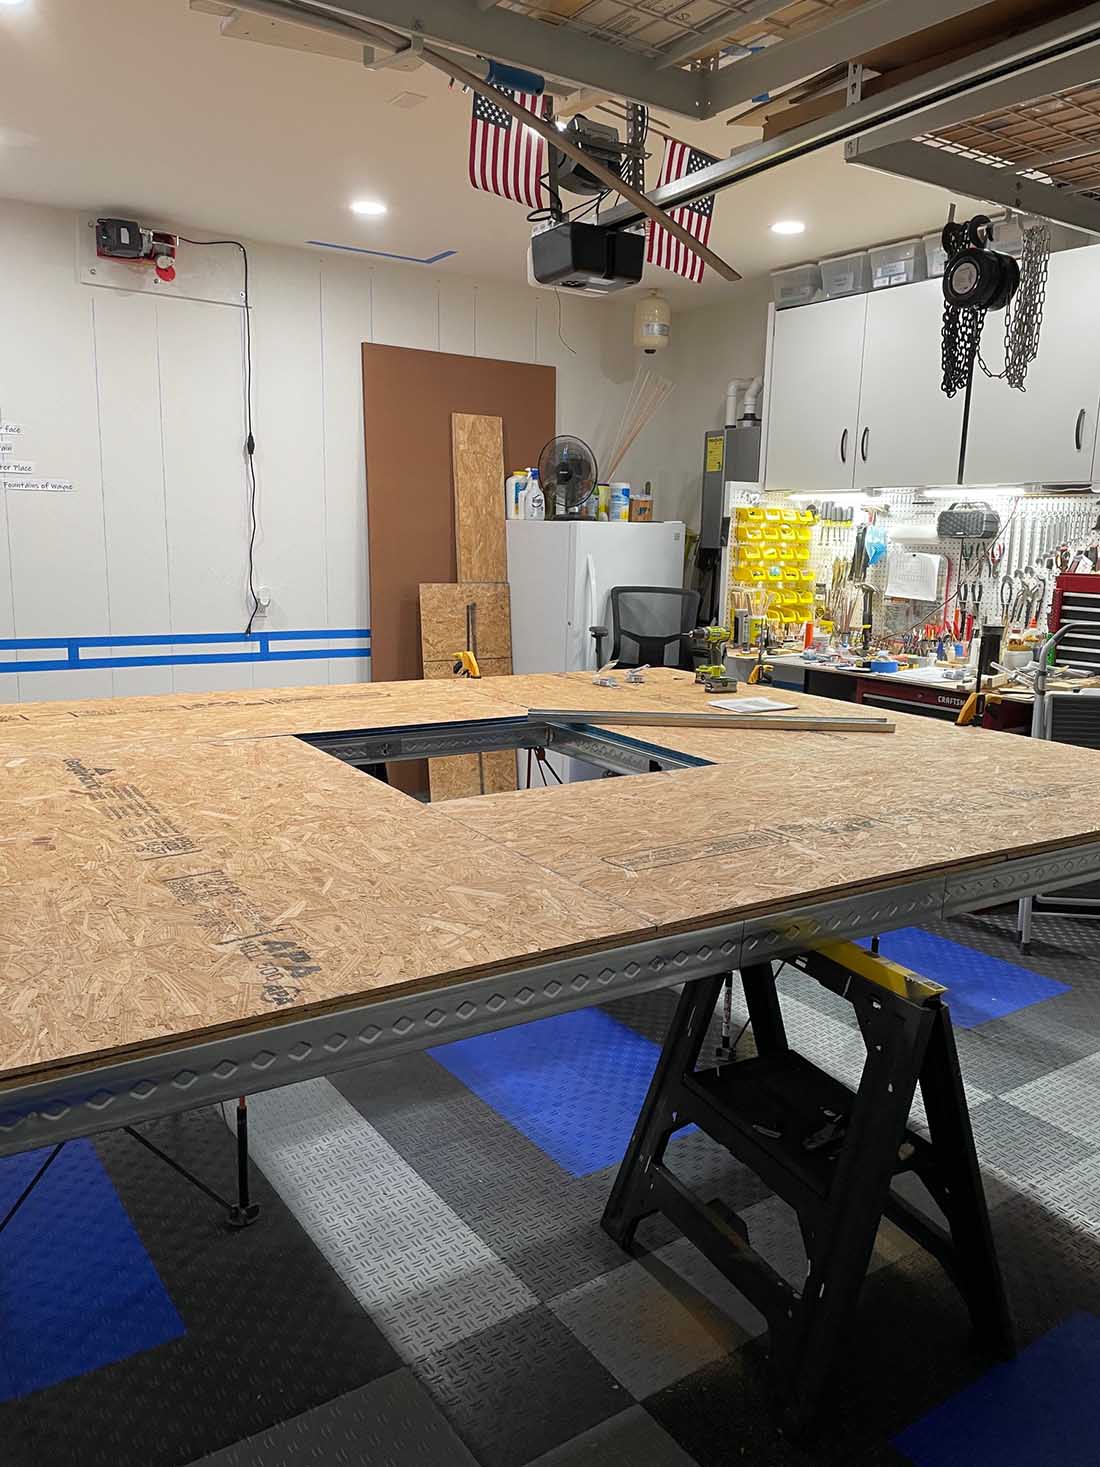
It’s 9’ x 11’ made of two alternating layers of 7/16” plywood, and a 1” foam layer on top. I’m hoping the overlapping plywood will add more structural integrity to the table. It does, but there were other areas that needed reinforcement.
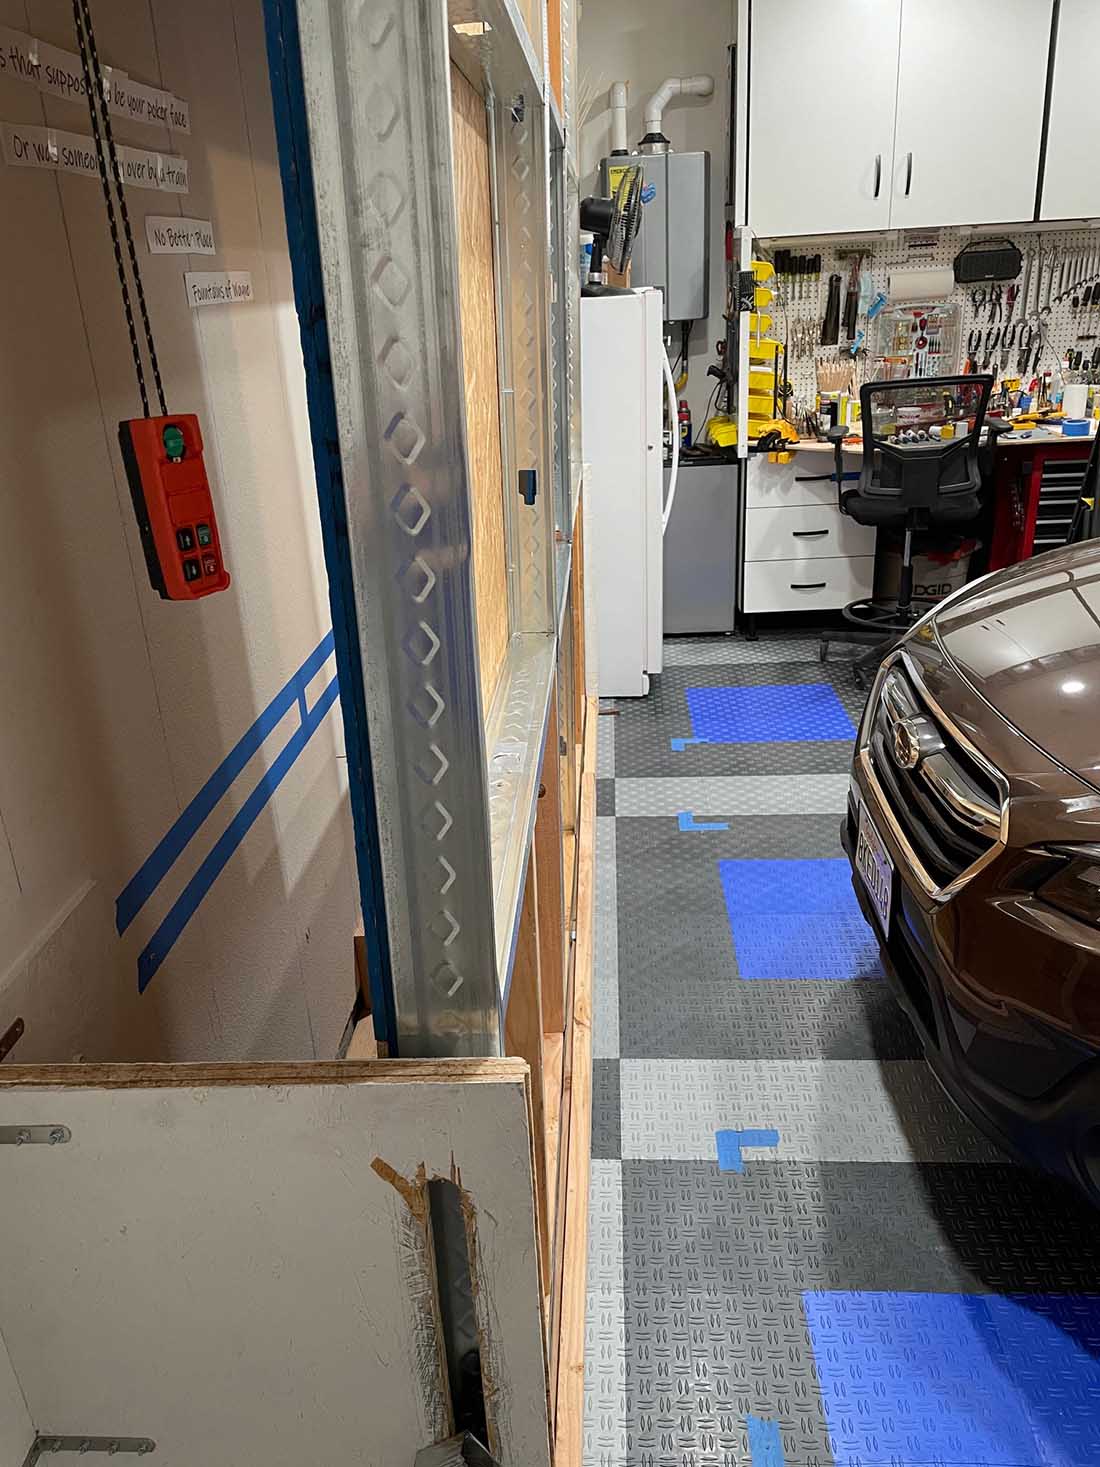
The galvanized steel studs provide a frame for the 2 x 4s that make up the front and rear lift areas. Everything, and I do mean everything, is glued, and screwed so it’s as solid as I can get it at this point.
Lifting the front and rear sections is done with a 440lb cable hoist with a wireless remote (I’ll describe that process in my next post).
The folding model railroad table sits on two 4’x2’ Centipede workbenches with a 1” tabletop. There’ll be another supporting structure in front of the table that will hold all the operating controls (haven’t quite figured out how that is going to work yet).
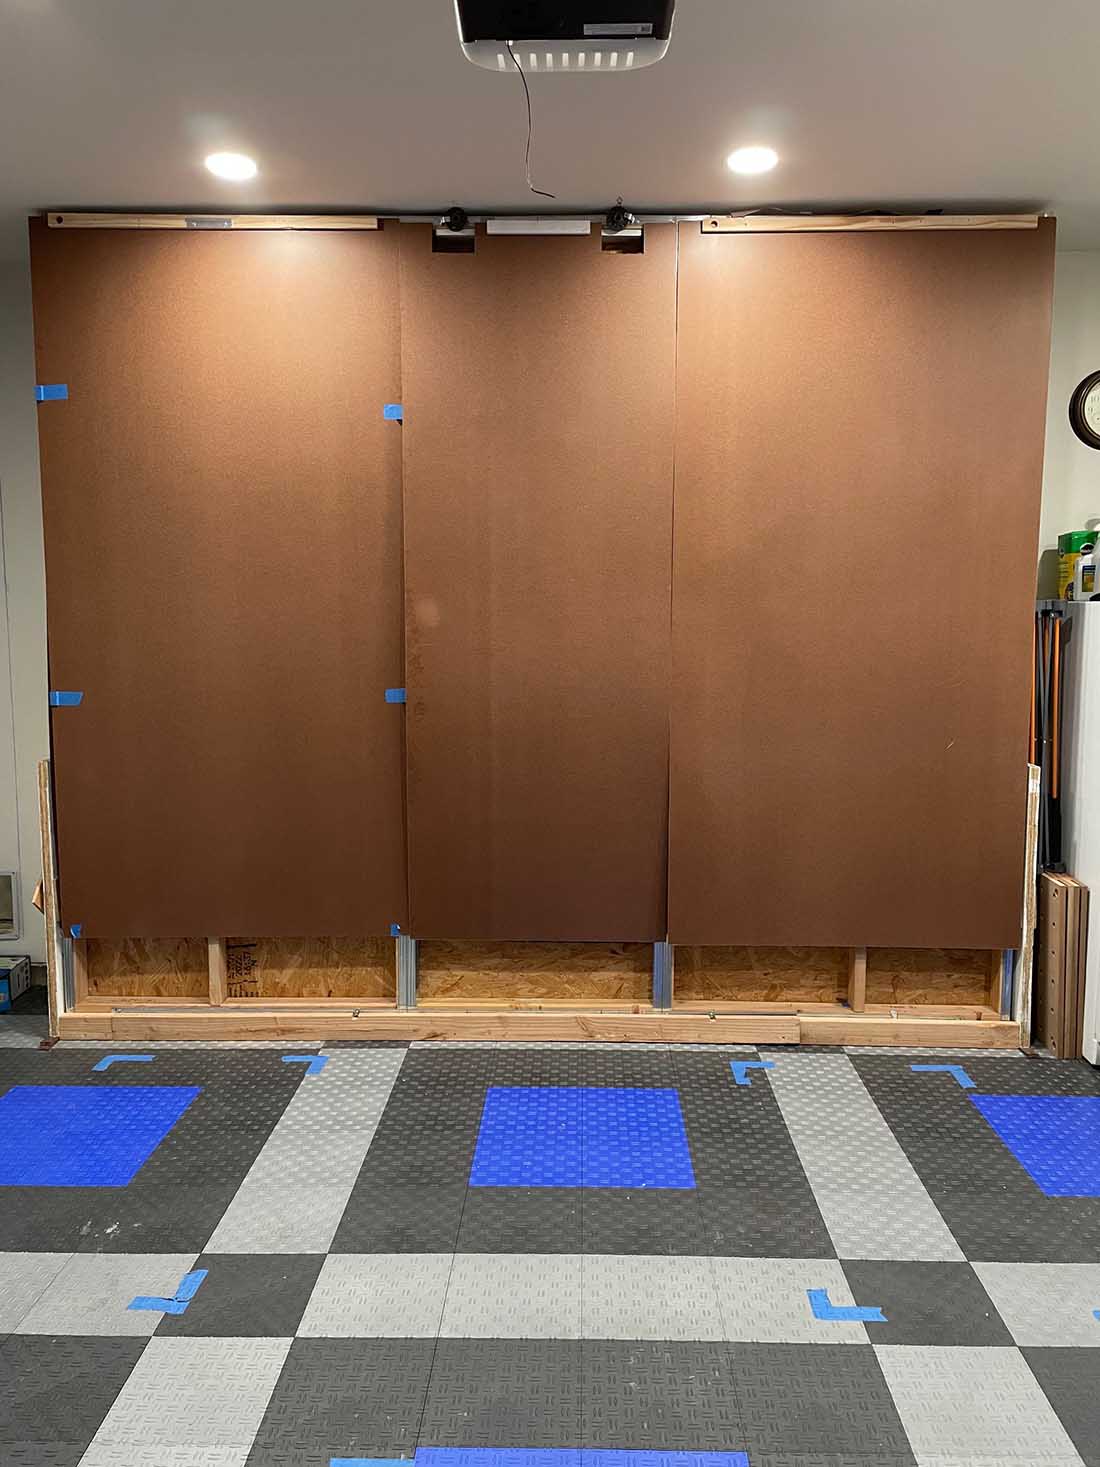
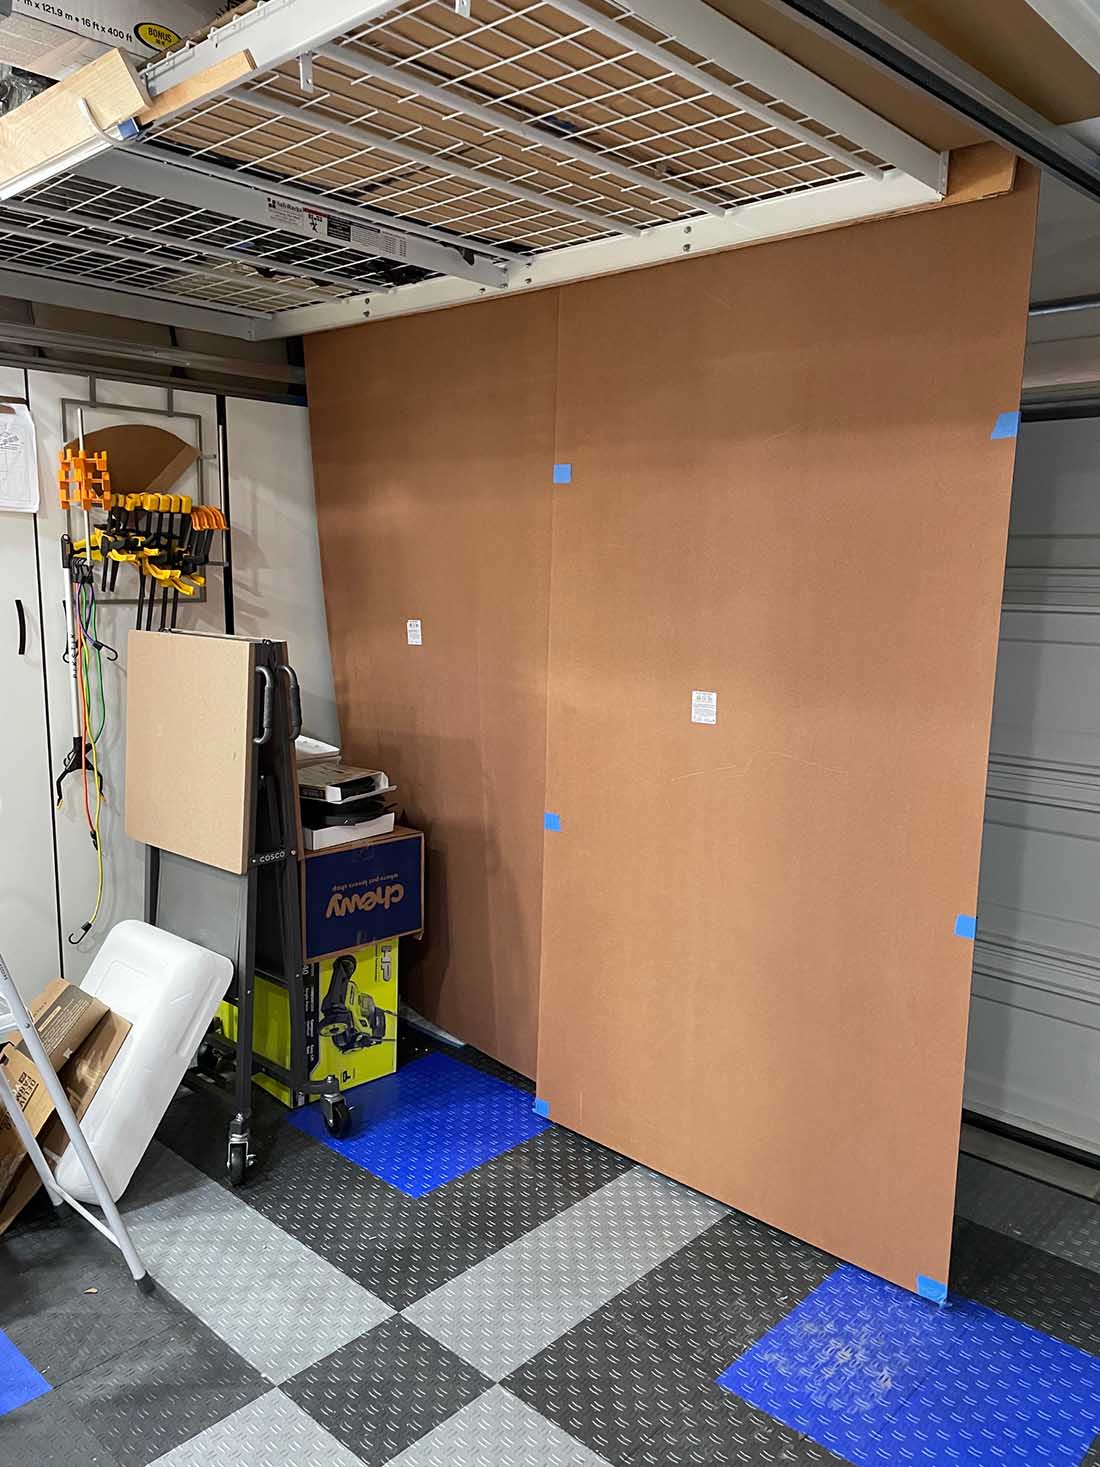
There’s about 20” between the car and the table, so there’s enough room to easily walk between the two. The hardboard panels are hung using French Cleat hangers and kept in place with 1”x2”x1/2” magnets (These panels are just to hide the wiring, but it also provides a 30 second upper body work-out for me when I move them).
The panels are stored on a Safe Rack storage shelf, using the same type of hangers.
For the railrod layout, I started with a sketch I made on the back of a large desk calendar. I covered the table with brown wrapping paper and then I transferred the sketch to it.
Once the pencil sketch was finalized, I went over it with a wide tipped Sharpie. It took a couple of passes, but the ink bled through the paper and onto the white foam board. From there I was able to figure out how to place everything.
I think I’ve covered the basics of this project, and I’ll post more later, but I don’t recommend building a table like this to anyone.
I’m retired so I have a lot of time on my hands, but this project has certainly had its share of challenges and frustrations.
I apologize for the pictures being out of sequence. I’ll try to do better next time. Also, I’m considering heavily investing in companies that produce adhesive products as I’ll be spending a considerable amount of money in that area.
Gary”
Folding model railroad table:


A big thanks to Gary for sharing his folding model railroad table.
I do love seeing the problems the different problems this hobby throws up – and how you lot find a solution. Clever stuff.
Steve has a fold away layout too: 4×8 model railroad.
And there’s Jeff’s too: model railroads for small spaces.
Now on to Daryl – who had me smiling from ear to ear with these pics, because it looks great fun:
“Hello Alastair,
I really enjoy getting your post from all your readers. There are some very talented modeler’s out there. I especially enjoy seeing the ON3 layouts.
Someday I hope that I can have the time to build a layout as fabulous as the one I see on your post.
Thought I would send some pictures of the railroad I work on and see if any of your readers find behind the scenes of an operating railroad interesting.
The pictures you see are from the Black Hills Central Railroad ( The 1880’s Train, located in the Black Hills South Dakota) also have a FB group just started (1880 Train gettin greasy)
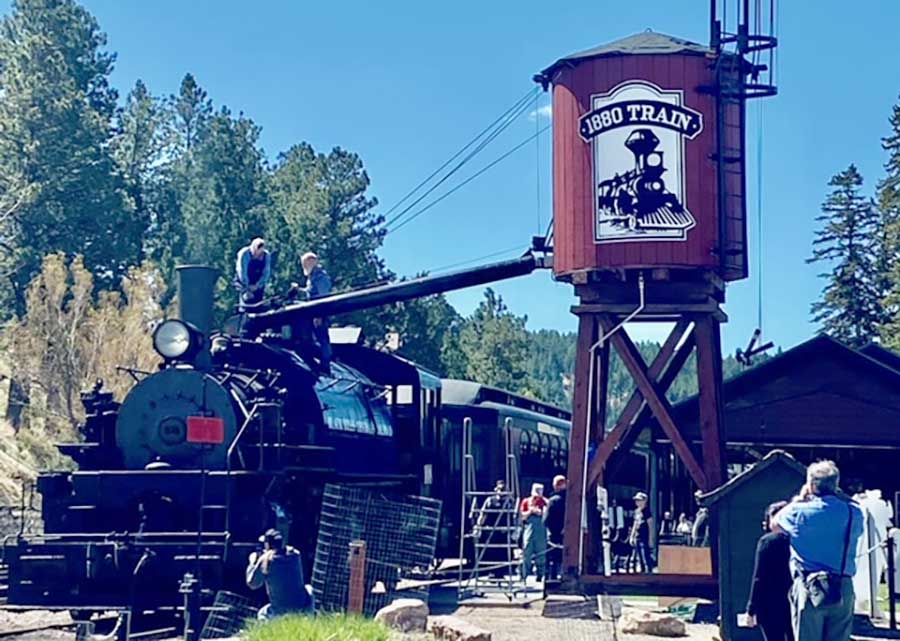
Filling the water tank on engine 108 before are trip from Hill City to Keystone. 10 mile run with 6% grade for over a mile.

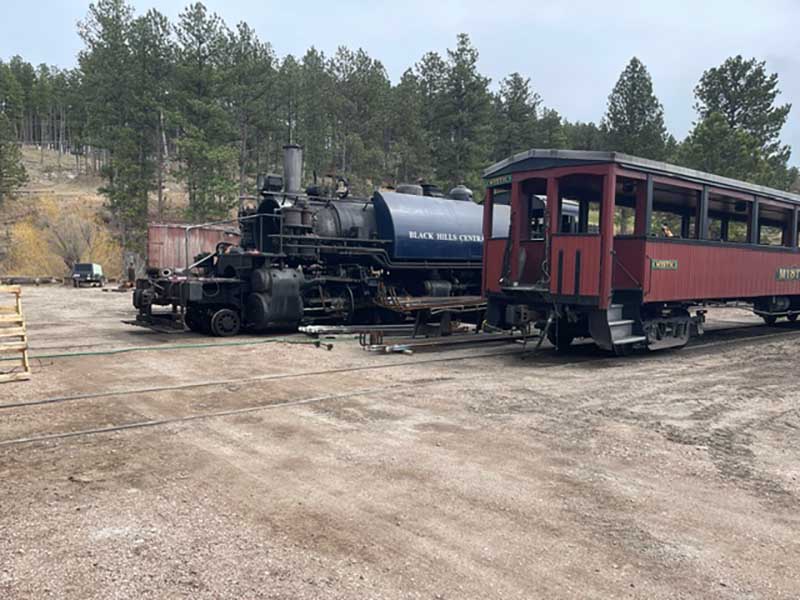
Engine being set on the pit being ready for a bath and firing up for the first time of the 2024 season.
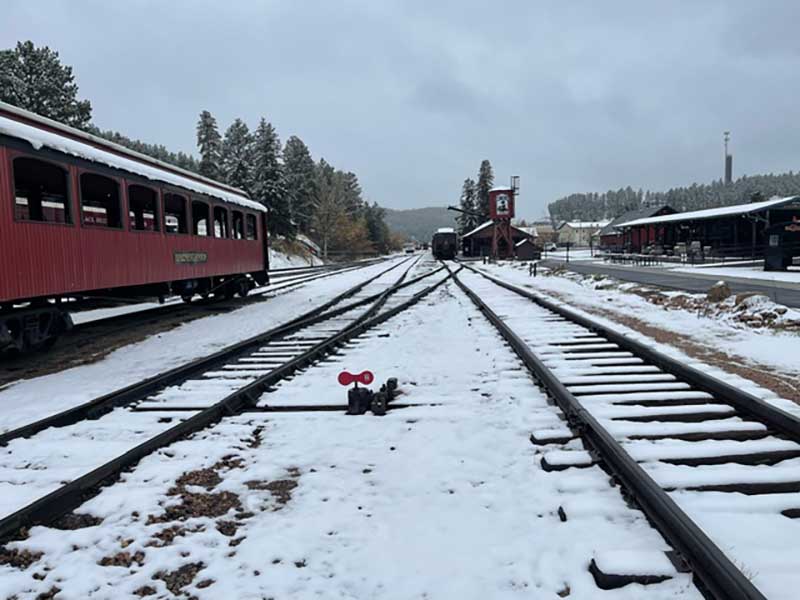
A late May snow.

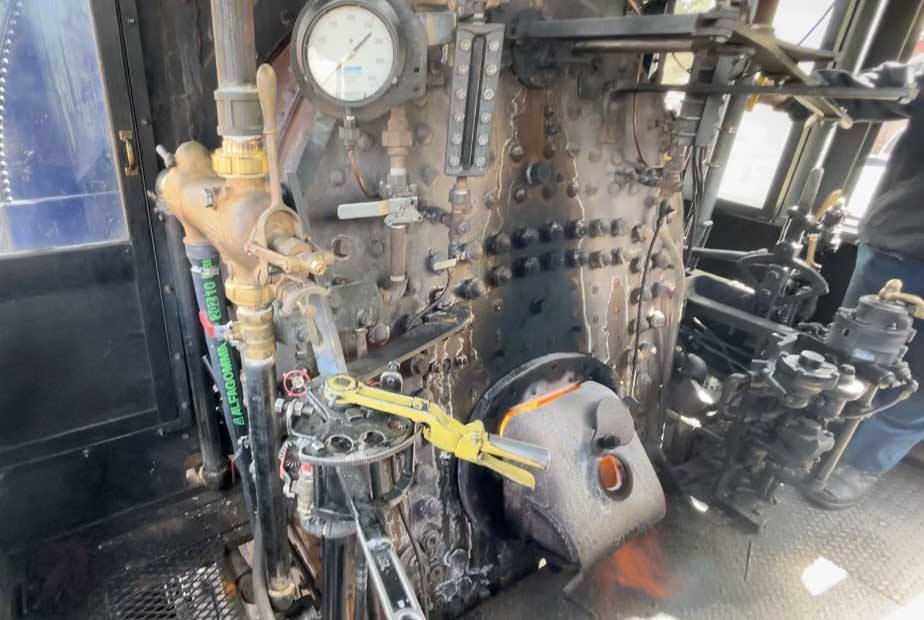
The Engineers stand. Controls for the top then left to right. Throttle, Main brake, reverser (Johnson Bar), hidden behind the reverser is the sight glass blow down, below that is the sander ( forward and reverse ) the the bell ringer and to the far right is the independent brake.
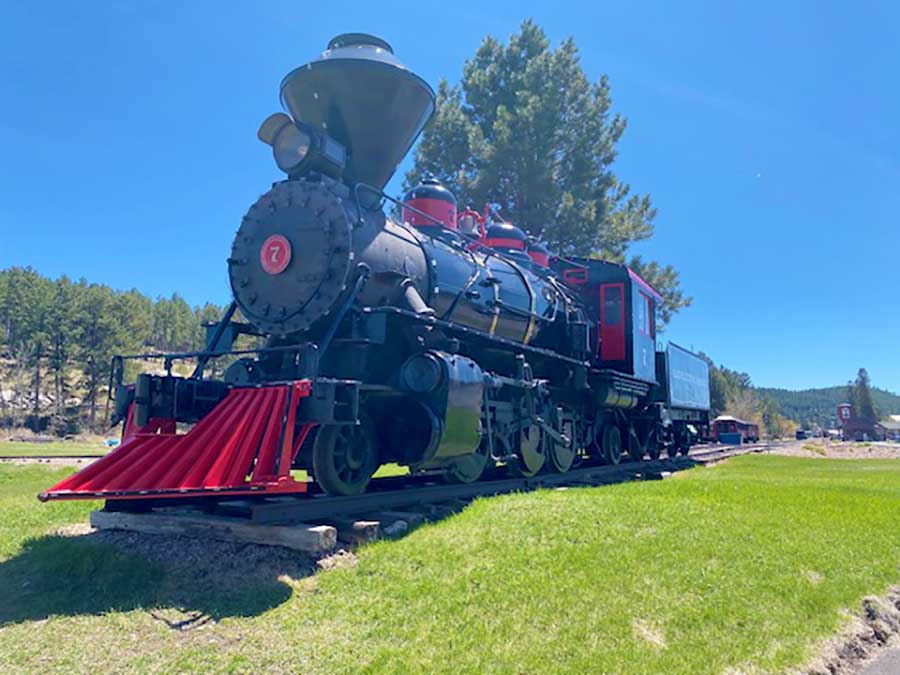
Our flagship engine, #7 a Prairie (Retired, has been used in many movies)

Installing super heaters in engine #110 after boiler repair.


And to round things up a view from the fireman’s side of the cab. “We don’t get to drive the train or ring the bell, but run short on steam and see who catches hell” the Fireman shows up 4am to check the water, check both sight glasses and blow them down, check the atomizer, blow out and check the blower, start the fire the fill all the sanders, tap around the whole engine checking for any lose nuts or bolts fix as needed, grease (and there are a lot of fittings).
When pressure reaches 150# start the compressor, test the brakes, test the whistle, the sanders, the bell, the head light, keep an eye on the pressure, if time allows steam the rods, clean the windows. Right before you leave to lash-up a quick oil around.
In the picture you see what the fireman is in charge of doesn’t look as complicated as the engineer but very important too.
The large gauge is the pressure gauge and right next to it is the sight glass. Just under that is the main manifold control, the large valve on the left is the injector (Seller’s 8.5) under that yellow handle is the fuel valve (firing valve) under that black is the draft door
Hope your readers enjoy something a little different. We are always working on something if interested.
Thanks Daryl
Fireman, Brakeman, mechanic
1880’s Train”
A big thanks to Daryl. His pics got me thinking, if your hobby is playing with real trains, please do share!
That’s all for today folks.
Please do keep ’em coming.
And if today is the day you get join in the fun, the Beginner’s Guide is here.
Best
Al
PS More HO scale train layouts here if that’s your thing.
Need buildings for your layout? Have a look at the Silly Discount bundle.

love old steam engines, to bad they are still not in use to this day
WOWZERS GARY! That system is pretty impressive – amazing!
And thanks to Daryl and all heritage line operators and volunteers who keep steam alive.
Best to all.
Brian, Wokingham, UK
When I first got married in 1986 I really discovered the value of small and portable layouts.
In the years since that time I have built many and Al Lee has featured several of them. Not every idea was a success but many were.
The key was to the the focus off wishes and to search for opportunities. It is entirely possible to build an enjoyable model railroad layout that fits on top of a bedroom dresser or a portable table.
Amazing, perfect reason to build or fix anything with this garage at hand. Just like seeing the workshop of this craftsman, I’d be afraid though to even change my oil here. Spill as much as I drain from motor. Mine remains best kept secret, noted flag display, do have exact same over garage back door. Great minds think alike, naw… mine are coincidence lol. Will look at as many photos of this project as can be shown anytime.
Steam, those things look like each was built with guesswork as they went along. Each one looks like a powder keg. Were they all like these, so much for that era from the inside looking out.
Rich
Just what gauge is that? And do you have a plan of your layout?
Nah, just kidding. Great to see close-ups of the prototype.
Greetings from Aotearoa New Zealand. Rob B
Fabulous idea for a space saving layout from Gary. Fun and run.
Getting a look at the guts of a steam engine, very cool too.
Well to the first poster that Murphy train table is quite the feat of ingenuity. Will be interesting to see your progress on that.
To the other poster from the black hills that brings back fond memories of childhood as I grew up in NE South Dakota but do make it back every year for pheasant and deer. My wife and I took a trip to the black hills in 2023 and had a wonderful time and of course rode the 1880 train! Thanks for keeping it running.
Daryl, so cool to be able to keep our history alive and preserve the knowledge of ‘how it works’.
Gary, I’m just a couple years away from ditching the job for the better part of life. I admire the ingenuity of the build and the compromises you have made with your spaces. I do have one question. When I think of a Murphy bed, it folds down from a fixed hinge into the same space and position each time. Is that how yours is? I couldn’t quite figure out the pivot. Also, when it is folded up, is the space from the table top to the wall adjustable so you can put buildings, hills etc. into your project without smashing them when you fold it up?
ive seen people use that type of hide away for gaming tables but until now not with trains, love it. nice job.
t’to see more detail on Gary’s folding layout because it’s a very interesting concept. I’ve seen the Murphy bed concept (or something similar), used for much smaller layouts. For example as one commenter has noted what gauge is it? It looks from the photos that it is N scale. If so, why the use of heavy 7/16’s plywood? Second, is the foam he is using really the white stuff? In the states that is low density polystyrene foam, not even very good for building up elevation in scenery. These comments are not meant to be critical but ojust to get a better understanding of Gary’s thinking and methods. Finally, I moving (I hope shortly) and downsizing too, Gary. As Alastair can tell you an operationally satisfying layout can be build in a very small space. In the U.K. they do it all the time.
Gary, That was an awesome idea to build a Murphy style table in your garage! I can’t wait to see the layout as it progresses! It was a good idea putting the opening in the middle as well! I wish I could put mine in the garage, but in sunny Florida it is just to darn hot 10 months out of the year! I would have to put in a separate A/C unit! Please keep us in the loop to see your progress!
Awesome job!
Very impressive design and construction photos of your Murphy bed layout construction methods. Your workmanship is superb! I did something similar in my train room, but my layout is only 4 x 8 feet. I attached one of the 4-foot edges to 1×4 board on the wall and attached the layout with large door hinges to the 1×4 so I can raise the layout to install wiring on the underside of it.
Daryl, Great photos of prototype steam railroading! I’ve just been reading about the Durango and Silverton Narrow Gauge RR and would like to ride it again. I think my dad took us on it about 65 years ago before D&RGW sold it off. I’ve also ridden the Cumbres and Toltec narrow-gauge railroad in New Mexico about 17 years ago. My hat is off to you folks who can still maintain and operate the grand old steam locomotives.
excellent
Great see the real workings of Steam Engines.
Have traveled the 1880 train line with my son and his family and my wife. Beautiful run (if a bit wet) and good facilities, still have the hoodie!
Great idea well executed! I’m designing a very similar concept (but considerably smaller), so I’d be interested in seeing your folding mechanism.
Great idea . Where there’s a will there’s a way .
Awesome photos of the old steam locomotives, don’t see those very often . Good to see the inner workings and the engineer’s perspective. Thanks for bringing that .
Great build !!
Daryl, Enjoyed the pictures and info. Next time I’m up that way I’ll have to check that out. I’ve been wanting an excuse to head that way. Maybe next summer. John