John’s been in touch – he has a question on his HO scale feeder wires.
Can anyone help?
“Al as always please keep it going.
I have included some pictures of my in progress HO gauge layout.
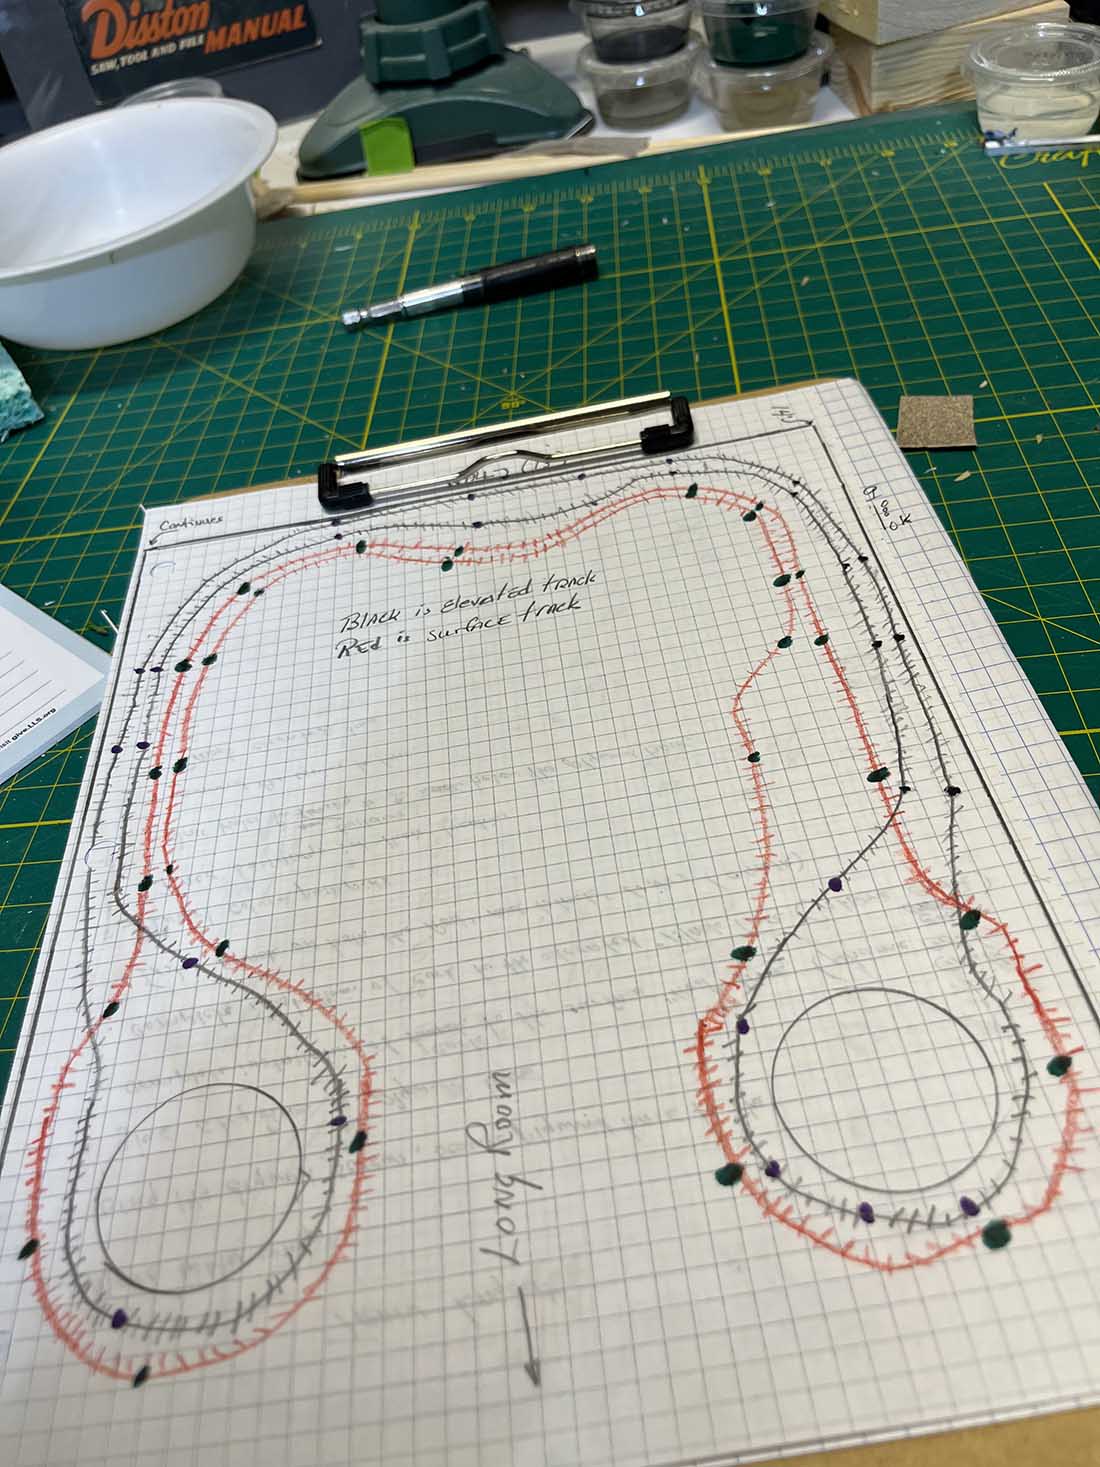
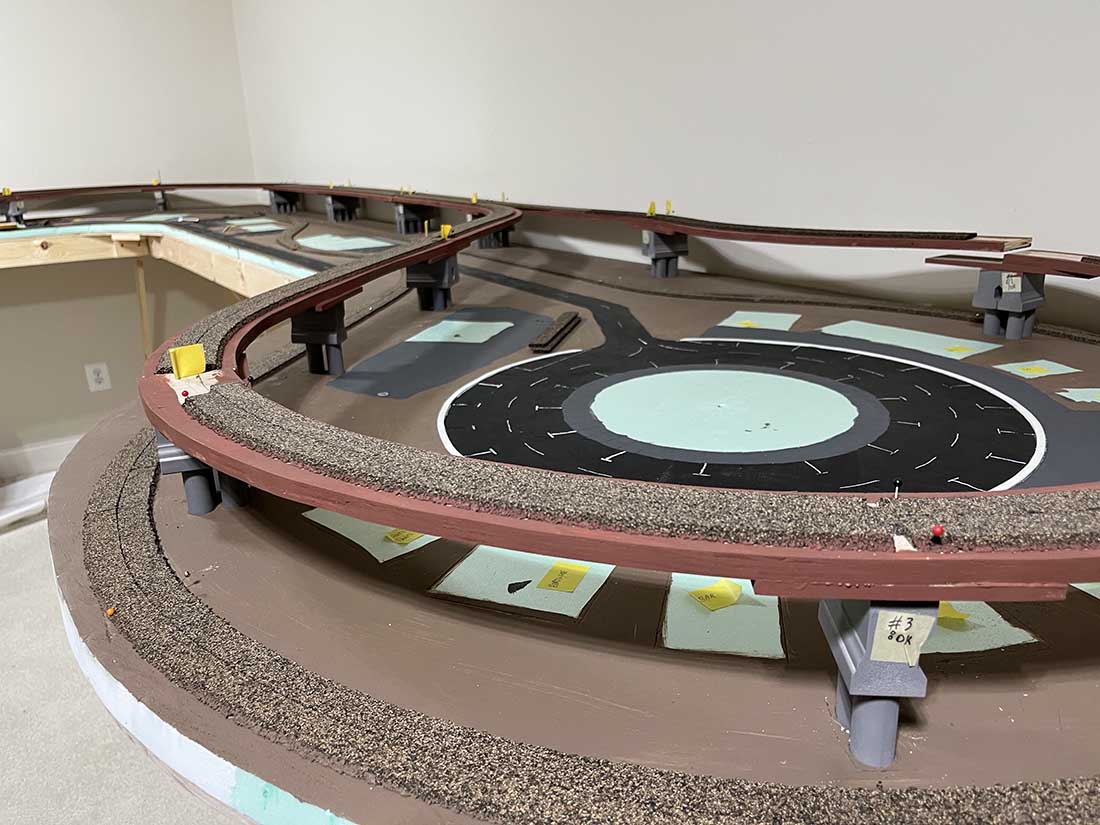
One shows the surface level “Red” track and elevated “Black” track.
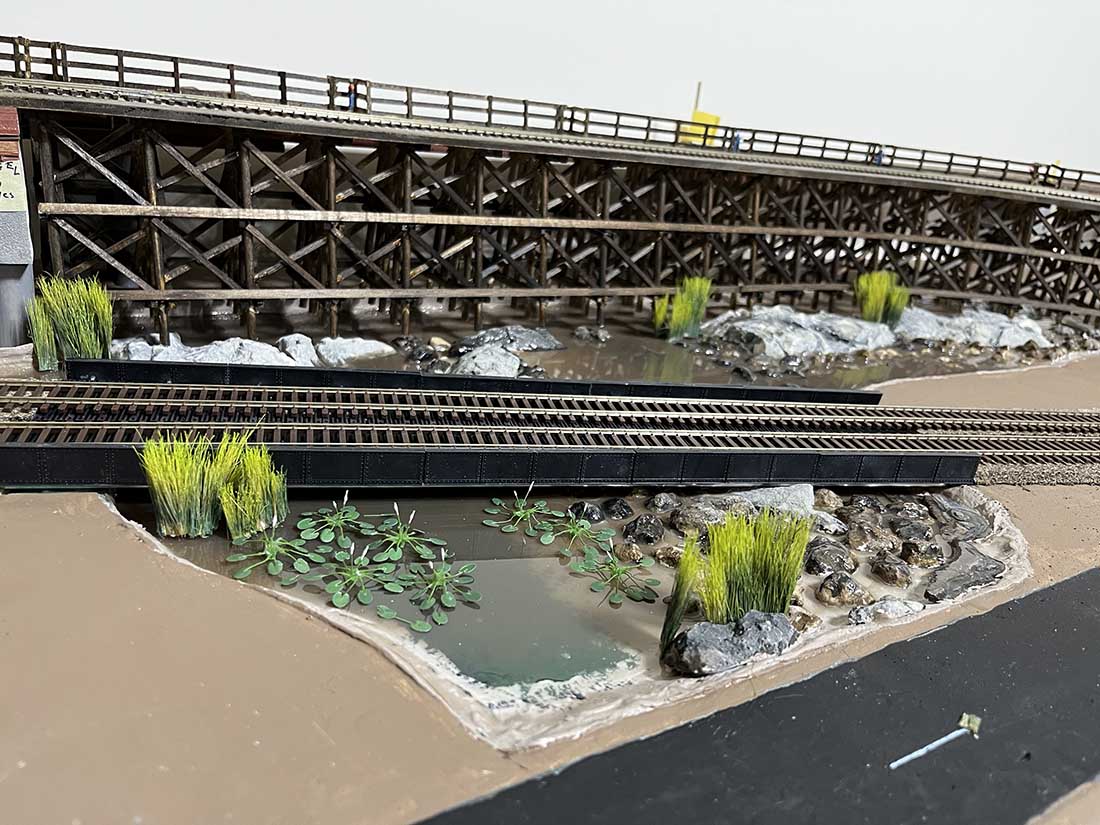
Another picture shows a waterway under a trestle bridge.
And the last one is a poor drawing of my track layout.
My intent is to have two trains going in opposite direction that never need to stop to show my granddaughter.
I have the cork pretty much completed for both the Red and Black lines and ready to install the track.
Here’s my dilemma , some of the track is so close to the wall it’s impossible to solder a feeder wire at those locations.
(I should have my head examined as to why I didn’t plan this out and put the building’s next to the wall and the track out front.)
Now to my fellow model railroaders, has anyone installed track and soldered feeder wires the following way?
I plan with the help of my brother to bend the flex track as necessary to follow the layout and mark the track where the predrilled feeder holes are.
Then I will move the track closer to me where it will be easier to solder the feeder wires.
I don’t know how in using flex track will work out.
At some point l may have to glue or use pushpins to install some of the track. I hope what I trying to do makes sense.
Also where should I start?
On the picture of the track drawing the dots are predrilled holes for the feeder wires.
John”
Who can help John? Please leave a comment below if you can.
Now on to Larry:
“Soon I’ll be sending you some pics of my current N scale layout project, number 5 or 6 for me in my 74 years of existence.
But herein I’d like to expand on the subject of 3D printing which an email to you from Michael brought up.
The dramatic narrative below is fiction (it could have happened) and will demonstrate the issue.
Recently a fellow modeler dropped by my residence, and after a few pleasantries he got to the point of his visit.
“Larry, I’m trying to finish off my model oil refinery diorama for the club meeting this afternoon. I need some scale ladders to place on the sides of the tanks.
Have you got any you can spare and I’ll gladly pay you the going rate.”
“Now, friend, you know full well I’m an N-scaler and you are an HO guy.”
“Yeah, I was just hoping . . . ”
“But I think I can still help you out,” I interrupted. “I’ll just download them from the internet and you can have them in a few minutes while you finish your coffee.”
“No, no, buddy. I don’t want those cardboard cutout thingies, you download and print on your inkjet or something. I’d like some scale plastic ladders to glue to my model. Today, if possible.”
“Yeah, that’s what I’ll do.”
“Have you lost it, man? You’re going to get me some actual, hold in my hand, miniature, HO scale ladders through the wires?”
“Yep!”
“This I gotta stay for.”
“Technology, my friend. Let me explain the plan.
I bought a 3D printer for myself for my 74th birthday a few months ago. It’s an inexpensive entry level unit that does a helluva job.
The internet literally has thousands of downloadable files which are the printer instructions, code if you will, for making almost anything, layer by plastic layer. And most of them are free to download.
There are basically two kinds of consumer version 3D printers, based either on resin or on a plastic filament fed into a heated nozzle that moves by stepper motors in three dimensions.
The PLA filament kind is my printer.”
“Free things? What’s the catch? Do we have to sign up, give out our identities? Or, I know, I know. We’ll be breaking some licensing agreements when we print and use the objects – yes?”
“Nope and nope. Most sites don’t require an account, and licenses are for personal hobby use. You’re not going to sell these on eBay, are you?” I asked, cocking an eyebrow.
“No, of course not.”
“OK, then. See, here?” I said, pointing to my computer screen. “I’ve already found a ladder file and downloaded it.
I now have to load it into my slicer program (explanation for a later date) and select how big we want it. Oh wait, the designer already made it in HO scale (1:87).
And, boom, I just created the special file for my brand of printer, put it on a micro SD chip and I’ll take the chip into the other room where my printer is,” I said accompanying my words with action.
Fifteen minutes later my friend walked out my front door carrying three 150mm long HO scale plastic ladders, ready for painting and gluing. A happy hobbyist, I do believe.
And me? I now have a file I can resize by 54% (in that free slicer program) and make a few ladders for my N-scale tanks.
==================
If you are intrigued, then I will give a few more details about how I, a retiree living currently in a country 8000 air miles from my home nation, got into 3D printing.
Although I have been building various layouts during the last couple of decades, getting my hands on materials, models and all hobby necessities has become ridiculously expensive.
I have no local hobby stores, so I must order off the web. But shipping costs are a killer. The US$12 part I want, costs US$30 to mail to me! I decided I would research a better way.
And the answer was – make the parts myself in my house. I researched 3D printing.
I read various reviews and instructional articles and watched hours of u-tub videos. I settled on the printer model(s) I thought I wanted and began to search where I could purchase it, fearing it would have to be an expensive shipment cost from the US.
But fate was on my side (for once) and a local computer store had my number one choice in stock at a very reasonable price and free shipping.
I added a 1kg (2.2 lbs) roll of filament (250 meters) to my order. I assembled the device, checked and double checked, tested, and I was now a 3D printing wizard (sort of).
Over the last month, I have successfully printed (with a few hiccups) N scale ladders, stairs, fences, retaining walls, tunnel portals, sign posts, barrels, crates, 50gal drums, a dual axle box van, trackside loading dock and ramp, a small shed, city water tank, a pump house, crude-oil jack pumps, cows, some upgrade parts like knobs and trim for the printer itself, and the list goes on.
Larry”

The photo above shows some of the items I have 3D printed (most undecorated), excluding the track, calipers, red car, and box car.
You can also play “Where’s Waldo?” for the two little 1:160 scale people. These are shown to give a sense of scale . Calipers are set to 10mm, which in N scale translates to about 5 feet prototype.
My financial justification for the outlay for a US$250 printer was as follows.
If we assume (in round numbers) that little detail parts come in lots costing US$10 and plastic structure kits cost US$25, just 10 purchases of ladders or stairs or cows or fences (total US$100) and six structure kits (total US$150) pays for the printer.
Not paying for shipping is the bonus. As for the media consumed in printing? 250 meters for US$20 is enough to make at least 100 small items.
The free slicer program I mentioned actually tells you how much media will be used; it even will calculate the cost for you if you enter what you pay for the filament roll you are using.
And, of course, there is the cost of wasted media and time due to the occasional human error. (Yeah, it’s like when you just printed out one of Al’s building plans, only to realize that you needed it in N scale, not HO!)
By my simple calculation, my printer’s ROI (return on investment) is 100% in one month, which is a great deal by most any standard.
If you have been reading analytically, you will have noticed two things. I did not mention making any new objects, only ones I can find on the internet already made and posted by others. That is because CAD (computer assisted design) programs are very challenging to me. My brain only goes so far.
But if you or a friend have the right synapses, most CAD programs (even the free ones) can output 3D printer usable code files.
The other thing I did not mention was people objects. There are people objects out there but most are “for sale”. Instead, I have chosen to order 100 painted N scale people from China for US$10 and free shipping (at least a couple dozen will be usable).
I am not endorsing any 3D products, but I will say that I was very pleased with the results of searches using the words, “Ender 3”, “Creality”, “Thingiverse” and “Cura 5.0”.
I am aware that my actions, if multiplied, will have a negative economic impact on the labor market, because workers who are placing extruded plastic into cardboard boxes, which are then placed in another cardboard box and placed in carbon emitting vehicles, will be less in demand. But there may be a few more real trees that survive. The PLA media I am using is supposed to be biodegradable (but there is some dispute).
One thing in life that is certain is change, including in your vocation and/or avocation. Artists of old had to mix their own pigments and support media. Artists today can choose from hundreds of premixed shades and medias. Does that make their output less worthy than the old-timers? I think not. So making your own plastic parts for your model railroad should be looked on as just another enhancement of your art.
Like Al reminds us – “Just get started.”
(Disclaimer: I do not work for, own stock in or have any contractual obligations to any persons or organizations in the 3D printing industry.)
Larry in the Land of Smiles”
A huge big thank you to Larry for sharing his 3D printer experience.
Please do post a comment below if you’ve had a good or bad experience with them.
There’s more 3D posts here if that’s your thing: Model train 3D print.
That’s all for today folks.
Please do keep ’em coming.
And if today is the day you get going on your layout, the Beginner’s Guide is here.
Best
Al
PS More HO scale train layouts here if that’s your thing.
Need buildings for your layout? Have a look at the Silly Discount bundle.

i like the layout, nice.
I have found that feeder wire only need to be 6/8 ft apart , so maybe you could be better cutting out the number that you have planned for ?..
For feeders in tight spots, solder the feeder wires to the bottom of each joiner, before breaking it free from its strip of joiners. Thus you have a pre-wired joiner. Drill a hole at the joint for the wire, push the wire down the hole and assemble the track sections. Complete the wiring connectio s and test.
I agree with David, you have way more feeders than required. In testing I ran my 17’x17′ with none ! just the power-packs. I’ll add just 2 feeders where I can easily get to the rails to solder.
John from Baltimore
the bridges are awesome & the setup is really well done. great work
John
Much too many dots. Listen to our best friend David, 6-8 ft and can be longer and between takeoffs generally.
Larry
Fantastic submission. There are many of us who are hesitant to enter this world of 3D intrigue and helpful guys like your self give us support we need. Many thanks.
Personally I refuse to pay $8 or more per person, not exactly what I want, and then fix or paint for my taste, for items on evil bay. I cant get S scale stuff at the Hobby store so this looks like the way.
Hey John, I agree with David regarding the number of feeder wires. Before I hooked my feeder wires to my main bus, I had only one feeder supplying my whole 75-80 foot layout. Just for the heck of it I put a locomotive and 10 cars on it to see how far it would go before dying. It went around the whole track! So I added 6 or 7 feeders and called it good. What you may find helpful in those tight spaces are to use the feeders that are already connected to rail joiners. Since they are solderless you don’t have to worry. I used them on my entire track and never had a problem. I like your layout, can’t wait to see final pics.
I am interested in which country Larry lives in please.
Brian – the HOn3 guy in Knysna RSA🇿🇦
John,
I worked in Trains since the 50’s and DCC since 95 …
Place your flex track down , drill your holes , then take small drops of CA and Secure your rail every 6” to the ties on one side of the track. This helps maintain its shape when sliding it closer to you to solder… Very, Very small drop of CA each time you make a drop….. Let the track stay in place over night before you move it close to you.. Be very patient and work slowly !!!! This works extremely well.
Worked in Train Department for 20 years.
Tom
I agree with Dangerous Dave- you only need feeder wires every 6-8’ to provide reliable track power. It makes life much simpler! Great start to your project and looks like it’s going to be a beautiful layout. Glyn
I too have started 3D printing structures for my HO layout. I have completed a 4-bay roundhouse, a coaling station, and a lumber yard. I have plans to make a water tower and a cement factory next.
There is a definite learning curve to 3D printing, but for me that is the fun of modeling.
Tom great solution to my problem. Putting a small amount of CA to hold the shape of the track. Never would have thought of that. I think I got a little carried away with the dots on the drawing. However I did try to have a feeder for every piece of flex hose (3 feet) and I’m hearing that maybe unnecessary. I made the elevated supports out of 3/4 “ center drilled dowels attached to a piece of window molding which is then attached to the plywood sub base, then cork and hopefully track. All have the feeder wire hole drilled through. The dowel portion goes through 1” styrofoam to 1/2 plywood base. Thanks to everyone for the help. John
i would really like to have more info about 3d printing and where to download plans. very intrigued.
What is CA?
if you connect the outside rail near the power pack, and the inside rail at the greatest distance, the rail losses will be equil around the entire layout. this also works for long strings of lamp post bulbs.
No rules stating that you MUST use the pre-drilled holes! Plus you don’t need a feeder on every piece of flex track. When installing flexible track, nail it in place using every hole. About a foot from the end, let the track stick out straight and solder it onto the next flex track. This is the best way to get a smooth turn in flex track. Any other method will result in a curve with an angle in it. Nail it at every hole. Flex track will always want to be straight again.
@Steve Boisvert CA is the acronym for the Alpha Cyanocrylate adhesives.
Steve B – CA is Cyanoacrylate, or superglue. SuperGlue I believe is a trademarked name, so people just say “CA” to cover all generic brands of superglue-style glues.
Larry – LOVE, LOVE, LOVE your post!! Thank you!! I wish I’d thought about making my own buildings before I bought all those kits….. though in truth I do love making the wood-based ones mostly from Campbell. I’m a modeler at heart.
Al, I hope this is the right place to leave a comment for Larry and 3d printing. I bought a 3d printer about six months ago at the ripe old age of 86. Everyone wanted a finished print. It took two hours for each print, so it has taken what seems like forever to print the number I will need so everyone can have one. Is it possible for you to have Larry email me? I would like to talk to him abought 3d printing in general and where he is located. Having no left side of my brain, (As you know, I am a disabled US Army Veteran). You have my permission to pass this a long to “Larry”.
Thank You ever so much Hat.
I place feeders/droppers on each piece of track and don’t solder rail joiners/fishplates. That way, if you need to remove a section of track, it can be done with little effort. I also solder the feeders to the underside of the track with the wire bent toward the middle, that way only one hole, in the center of the roadbed is required. It is easily covered by ballast. For N-Scale, you will need to remove one tie/sleeper before you can solder the feeder.
John…. as David previously said you have plenty. Just cut out the ones by the wall
I believe Atlas sells track joiners with wires soldered to the bottom. Might save a lot of time and soldering.
I’m surprised all modelers haven’t gotten a 3D printer.
There is a learning curve!!! But lots of videos to help.
They are slow but run by them selves.
One of the best emails from you Al! This was so informative, equally so for both! Thank you all, I’m going to search out 3D files to see what’s out there in feed warehouse land! I actually used free ware software decades ago. I’m lagging behind some of the email contributors, but lacked the curiosity to jump in! Thanks all!