Brian’s been back in touch with his HO scale model sawmill.
(You can see more of Brian here: Hall of Fame.)
“Hi Al, hope you can use this for your blog.
I have been off the layout and assembling a kit for a piece of real estate on the logging line.
Previously you posted my article on building an engine house by Fine Scale Miniatures and now I am using the same company to build this sawmill. I have 5 more of this manufacturer still to build. My layout is based in the 1930’s hence a lot of wood buildings.
There are a few people out there that have said – how can you build a collectors item when they are worth a small fortune. I do not buy collectors items to sit on a shelf, I buy them and assemble them to put on my layout where they will serve a purpose. (A perfect example of this was my Red Hook Wharf limited run kit of 300) 9 buildings in one kit. (See a previous posting)
This is the kit (below) and what it looks like when opening the box. A lot of wood and metal castings.
First thing to be done is do I paint or stain the wood? The instructions suggest painting it a faded red.
I opted to stain the wood as sawmills were built for the specific area that they were serving and when all was said and done, were disassembled and moved elsewhere.
I mixed up a mixture of acrylic thinners and a weathered black acrylic paint (btw: I only use acrylic paints – no fumes and cleans up easily with water) I put the mixture in a tray and put all the wood in it to soak. Some wood is harder than the others thereby giving a different shade which is what I wanted.
After a short period, I took them all out and placed them on paper towels to dry. By using acrylic this way, the wood does not warp. The whole building is assembled using a fast setting white wood glue (Alcolin cold glue) It dries clear if you happen to mess a bit.

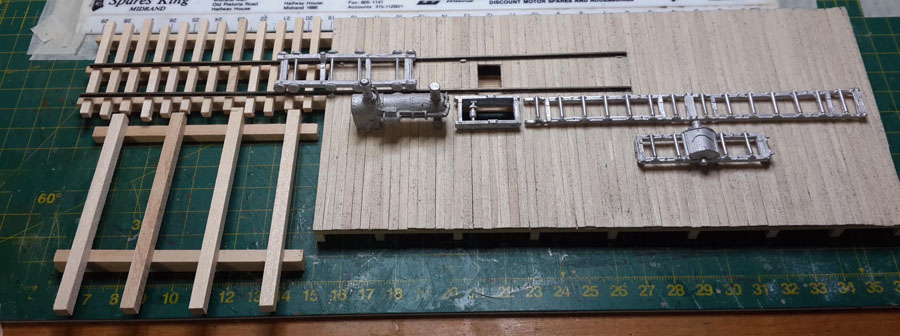
Next, I had to measure the area where it would be situated and then figure out how to modify the kit to suit. In this case, I had to narrow the the log loading deck as well as shortening the main work deck. The problem then arose on how to get the machinery to fit. Very simple after some thought, mirror image it vertically and hey presto, everything fitted very well.
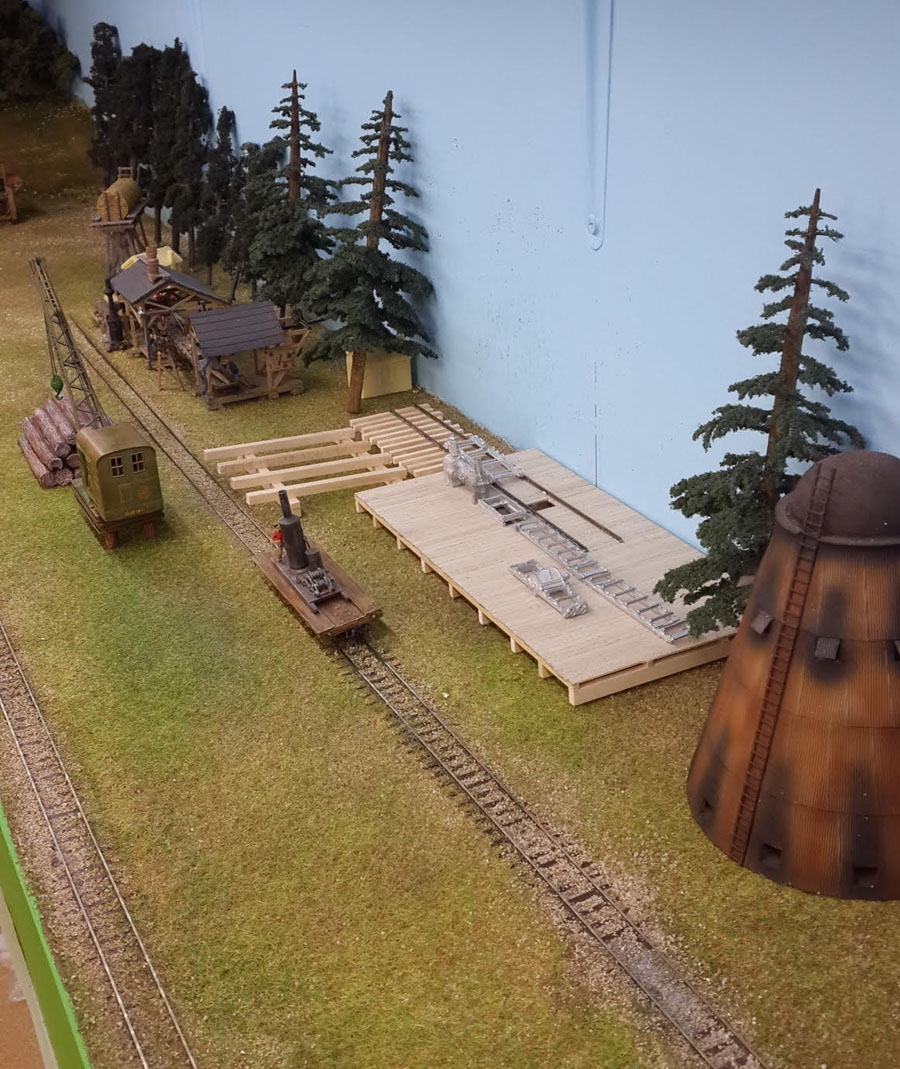
(Below) Here is where it is going to be placed. Note: trees are temporary and will be placed once the sawmill is complete and in place.
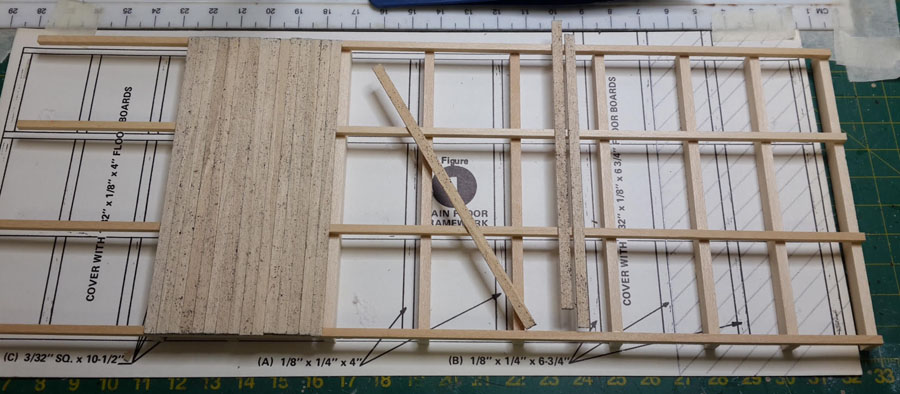
(Below) Here the floor is being assembled over the supplied template plank by plank on the already assembled deck. Time consuming but worth the effort.
(Below) After measuring and cutting the holes for the machinery, the rail (I opted for code 70) for the log carriage was measured and glued in place and the metal castings test fitted. (Minus the legs)
(Below) The rear planked wall is being assembled over another template. Note the pencilled crossed out area on the left to remind me where I must stop with the planking. Once complete, I turn it over and add the top corner bracing to each upright.

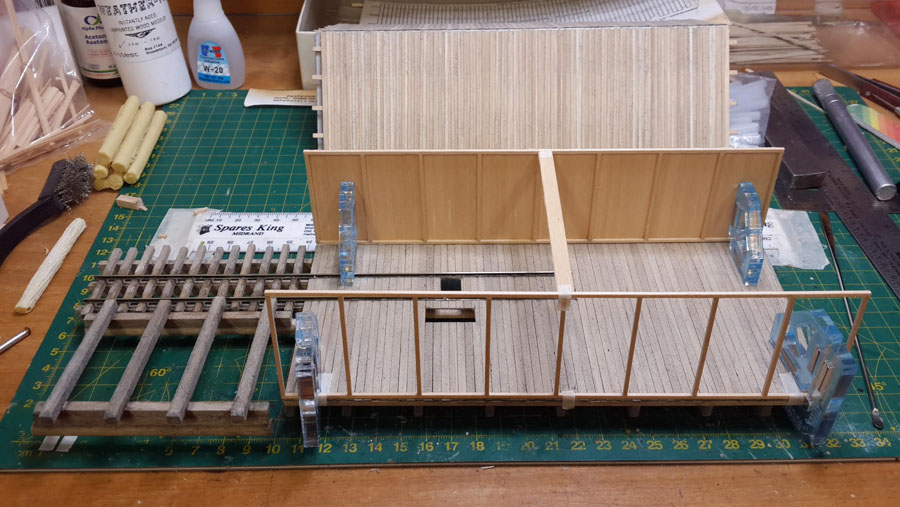
(Below) Here I use my very handy magnetic right clamps (available from Micro Mark in the USA) to hold the building together to see if everything is in it’s correct place.
You will note that the log loading deck (left) has been given the “well worn” look before getting a heavy wash of the stain. This section is not under the roof cover and is open to the elements.
The roof (double planked) behind the HO scale model sawmill has been completed and will have the roof trusses added once the main building is all glued together. It will be removable when finished.
A note: I purposely stain the wood a bit lighter in the beginning for the reason that if I need it a shade darker, I add another coat of stain the get the right color. It is easy to darken a color but not so easy to lighten it once it is too dark. I was not happy with the too lighter color floor in the second photo and added a second coat of the stain as seen above. This is something I will always remember having learnt from that mistake in the past.
To get this far in the construction of this kit, it has taken 25 hours of pain staking board by board assembly.
When I get further with the construction, I will send an update with more photographs.
Regards
Brian”
I do enjoy seeing Brian’s kitbashes – he is breathing a lot of life into his HO scale model sawmill.
Now on to Joe.
Joe has very kindly sent in another installment (his last one is here).
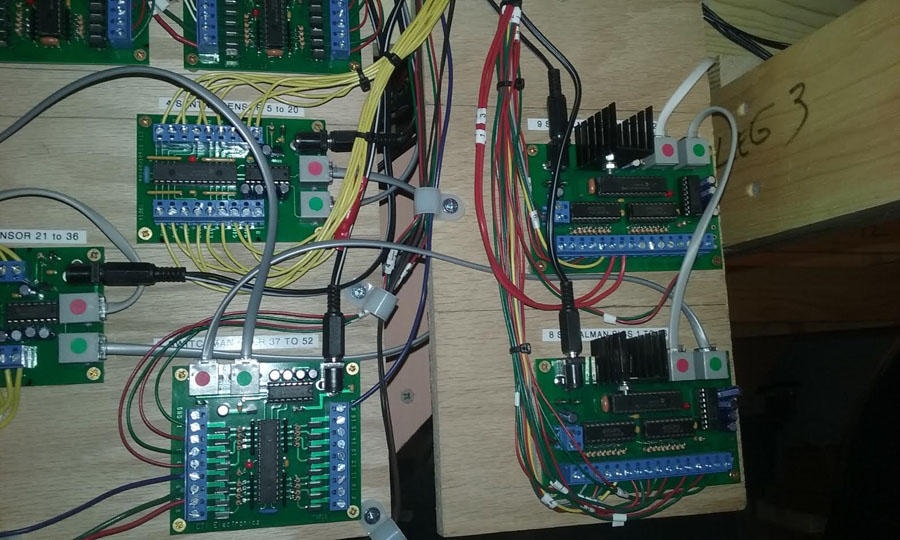
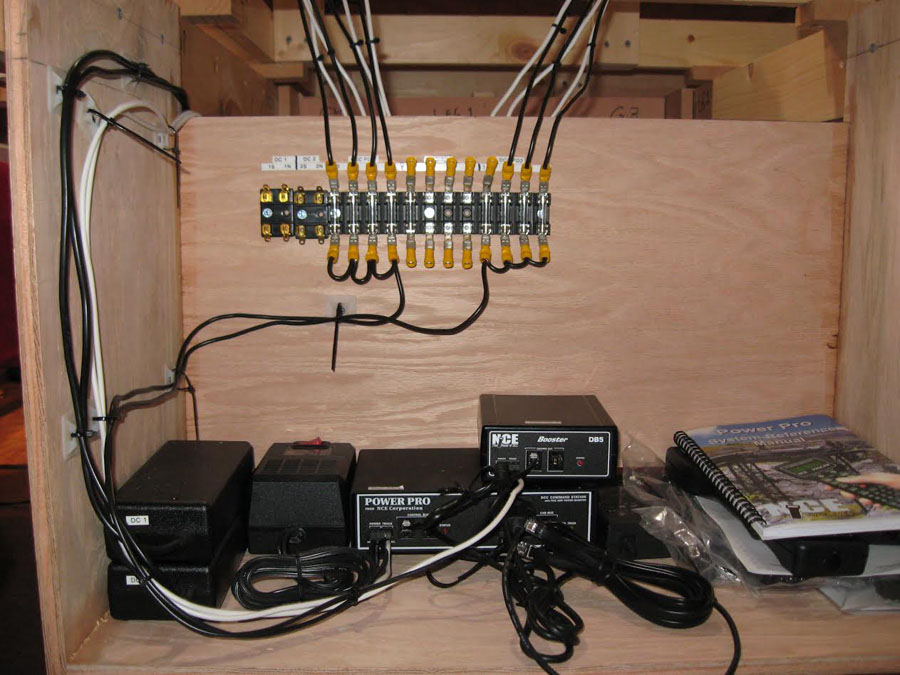
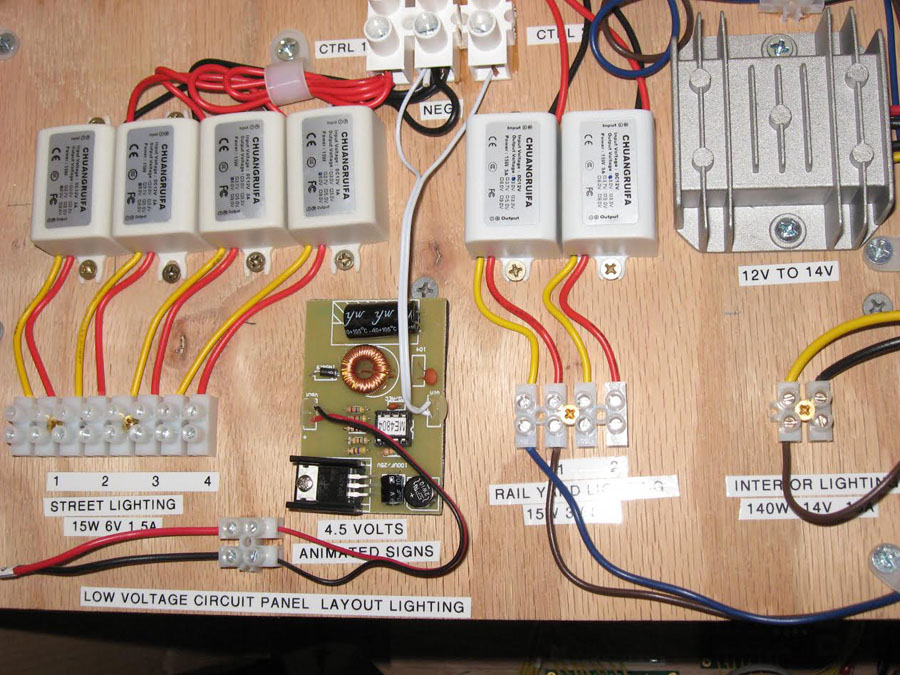
“This installment discusses the design concepts and control of my layout. I use the NCE DCC system for train control. My accessories are powered by two 12 volt 10 amp power packs, one for turnout and panel light operation, and one for all other accessories.
The layout was designed to simulate authentic railroad operations. It consists of a freight main line, a passenger commuter service, a freight classification and storage yard, industrial sidings, and engine and rolling stock repair and servicing facilities.
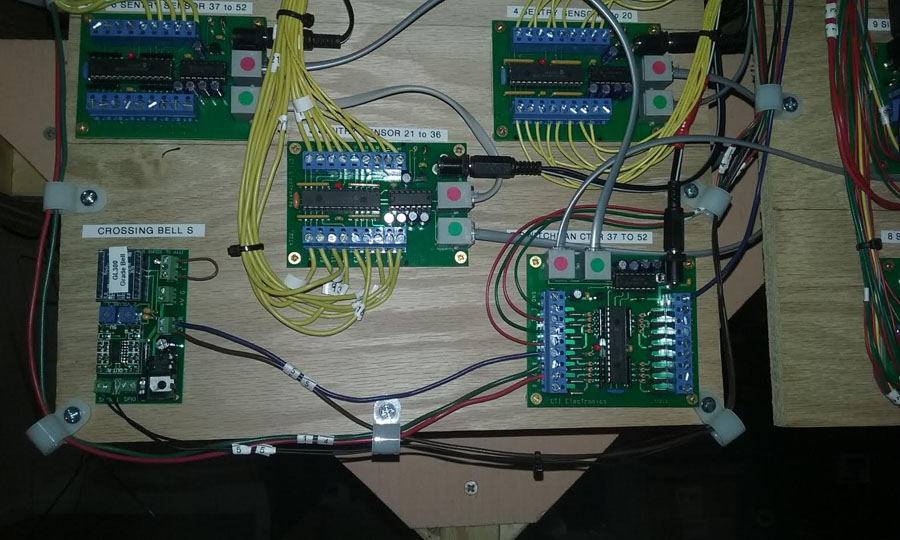
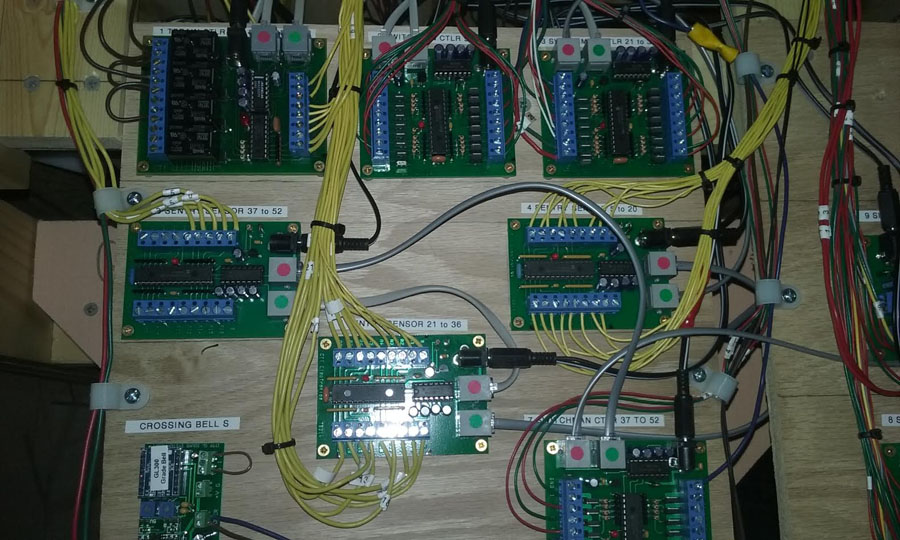
The freight main line and passenger commuter service are managed by computer and are fully automated. These sections use CTI’s Train Control Language (TCL) software and circuit boards and network. This application is quite capable and has extensive software functions to emulate real railroad operations, including blocking, signaling, etc. Non-railroad action such as street and building lighting, traffic lights, beacons, are all a cinch using this software. You will be amazed at the automation you can build with this application.
Many accessories require something lower than 12 volts, which means the use of resistors. Instead of spending considerable time soldering resistors on hundreds of accessories, I built a low voltage circuit panel which includes 3 volt, 4.5 volt, and 6 volt sub-circuits.
I have also built a 14 volt circuit for light bulbs that operate better at 14 volt than at 12 volt. You can see this panel in one of the photos. Finally, the entire layout is divided into numerous fuse-protected circuits which help minimize problem resolution should a short or mishap occur. All wiring is color coded to denote function, and I apply number tape on runs longer than three feet. To keep track of all the electrical assemblies, I created an operations manual to which I refer should any trouble shooting be required.
Because the layout was built to be disassembled, I have used Hitachi connectors extensively at each section boundary. If and when the layout would need to be moved, it would be a simple matter of disconnecting these connectors.
My next installment will include landscaping.
Thanks,
Joe”
Stunning stuff. A big thanks to Brian for sharing his HO scale model sawmill.
And thanks to Joe too – if you want to fast forward to his next missive, it’s here: 27×10 HO scale.
That’s all this time folks. Please do keep ’em coming. And if it’s got you all fired up, don’t forget the Beginner’s Guide is here
Best
Al
PS Latest ebay cheat sheet is here.
PPS More HO scale train layouts here if that’s your thing.


What a marvelous electrical system Joe
You have kept everything tidy which is the secret of a good setup making faultfinding easier and less likely.
What a great sawmill Brian,
I agree kits are for assembling and using, I have a few that I haven’t built yet but they will not sit on the shelf for long.
I’m very impressed by your wiring, mine started with a rough plan and the best intentions about colour coding, but I got a bit lazy, and it went slightly wild. I did however keep a list of what’s on each pin of each cross-board connector plug and finally got round to a block plan of all the electrical units, hopefully this will help tracing any faults in future.
Rod
Now that we have seen the wiring for the Space Shuttle can we see your layout. You have done a marvolous job and I hope to catch up with everything you wrote over the next couple of years. There seems to be no end to the technology one can build into their model railroad layout. Thanks Joe for the inspiration.
We Joe amazing! Only I though this was a fun model railroad hobby? Your great but like someone said looks like the space shuttle control pannel. I`m very impressed with your work, I now need to rethink mine…….a little. Tom Payson AZ
The old adage that neatness counts is on full display with that beautiful wiring. The worst thing is to have a beautiful layout, ruined by poor operation and faulty wiring. I totally agree with Brian, and I too use fine scale miniatures, for many of my projects, and have recently acquired a few of South River Model Works craftsman kits, and I believe they bring a layout from a toy to a different level. Beautiful work Brian.
This will be something to see when it is finished. I wonder how many hours it will take? This seems to be total devotion I hope his interest last and I am sure he will complete this wonderful parject
An awful lot of presumably expensive electronic modules on that layout.
I hate to think about adding up the total parts value.
Wow, Joe that is a beaut – I sure would like to see the schematics for it.
Mike
Excellent wiring concept! Will try to use some of your wiring gigs on my own “infant” layout.
wow great wiring….more than I can comprehend…
and the Sawmill model is priceless
keep em runnin fellas
st john in long ;beach calif
what wiring detail great job. nice saw mill model.
Id have a problem getting passed the first step in Joe’s wiring!
Really like the saw-mill project; must give it a try.
Tom (USA)
Wow, you see all that wiring is what scares me.
Keep up the great work Joe.
Wow, the wiring is outstanding! You have inspired me to go back and clean mine up! The sawmill model is great, I plan to give one of these kits a try in the future.
Joe, the wiring looked great but without an in-depth explanation of each photo and maybe a list of the parts – all is lost. I am sure your low voltage circuit panel(s) would be of interest,
I do not want to be involved with soldering 100’s of resisters of n values when a single feed of the correct led voltage can work.
Joe, kudos on giving us the inspiration to do it right.
Brian, I did not see anywhere posted a building permit for your structure, tsk, tsk, haha. You know, I bet it is in your wheelhouse to take an old dc engine motor, gear it down and actually make this sawmill cut some timber.
Nice job, and well worth the effort.
MN Dan
JOE…….Impressive…… were you an electrician or in electronics?
Brian….. great stuff……that is a great tutorial on scratch building……
The electrical wiring looked sharp and extremely well done. Loved the kit build as well. Both modelers are doing great!
I do have a simple tip to solve for low voltage situations and it’s one I have used for lighting effects. Take a standard train set transformer and a voltage tester. Adjust your speed control until you get the output voltage you are looking for. Use a marker to note the position on the throttle knob and transformer case. Next use a couple of plastic shims to make a good bonding surface between the knob and the case. Check that the knob now is somewhat locked in position. Remove the shims and rough up the case a little with sandpaper where the shims will go and apply a couple of drops of super glue and place the shims back in position. Then apply glue under the knob on the top of the shims. Quickly check output voltage again before glue grabs completely. Once the glue sets check to see that knob will not move. You now have a dedicated power supply at the correct voltage you need
Wow Joe! What an impressive looking layout you’ve undertaken to build! You must have spent years designing the layout framing and wiring plans. If so, it would be great if you could post a copy of the plans for us mere mortals. 🙂 The modular design of the framing and electrical makes a lot of sense in case you need to move it all in the future.
Brian: I remember how much I enjoyed your posts on constructing the FSM engine house kit. Now you’re building one of the FSM Old Time Sawmill kits that I have stashed away in my train room. Many years ago I built several Campbell Scale Models wooden structure kits and really enjoyed the process. I really appreciate you sharing the type of wood glue you use (Alcolin cold glue) as I have forgotten what glue to use on these wood kits. PVA, of course, works for wood, but can interfere with paints and stains if applied later. I hope you’ll share more photos of your progress on the sawmill along with your very helpful tips and techniques.
Love your saw mill
Looking great.!!!!!!! I hope mine turns out that good.
Wow Joe! Magnificent wiring and electrical work, unreal. I started trying to use color coded wiring (at a much smaller scale) but the costs grew to a level that when on job sites I would give a cardboard box for the electricians to toss any lengthy clippings in the box for my layout usage. Joe, you spared no expense on components and a wealth of knowledge on your finished product.
MAGNIFICENT!!!!!
Joe, you must be an engineer based on the neat wiring you have done. The wiring on my layout is horrible. I must try and redo it.