Today Peter shares his tip on his Kadee couplers:
“Hi Al,
For some time I have been toying with switching couplings on my rolling stock.
I have an 6 x 11 layout in my shed, set roughly in the early 1960’s. Most of my stock is rather old, acquired 2nd hand and has mixed couplings from different times.
Whilst the couplings worked satisfactorily I find it frustrating when trying to uncouple stock plus the fact I wanted to do shunting on my layout.
I watched with interest Dangerous Dave’s video on magnetic couplings, but they wouldn’t meet my shunting needs. So I have embarked on a mini project to change my couplings over to Kadee couplers, (other similar makes of coupling are available) as all I have seen and read about these seem to meet all my requirements plus they look really neat compared to other couplings.
I have to honest and upfront here, these couplings are not a cheap option, but still works out cheaper than replacing my existing rolling stock, and I would still have to purchase Kadee couplers made for NEM sockets, so that wouldn’t save much!
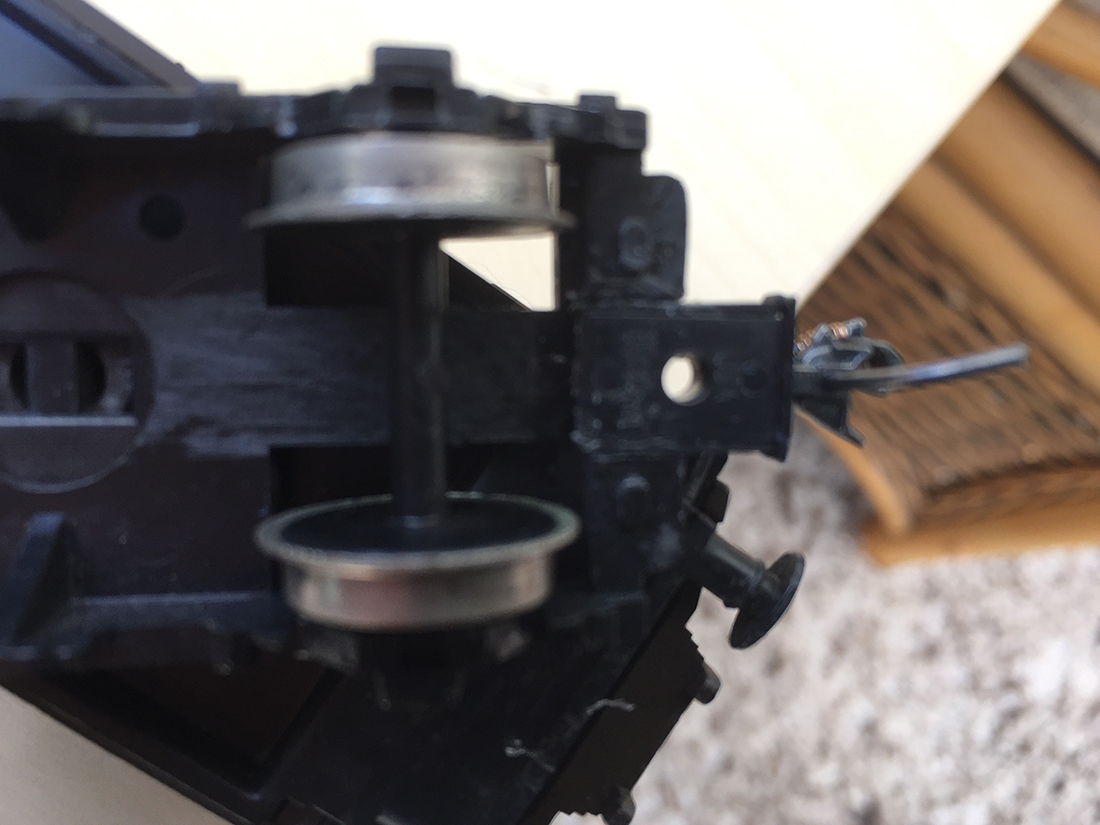
Whilst 5 out of my 6 locos have NEM sockets most of my rolling socket does not, so first off I had to find out what type and size couplers I needed, to this end I purchased a starter kit which has a wide variety of Kadee couplers, plus a gauge for setting the coupler and pin heights.
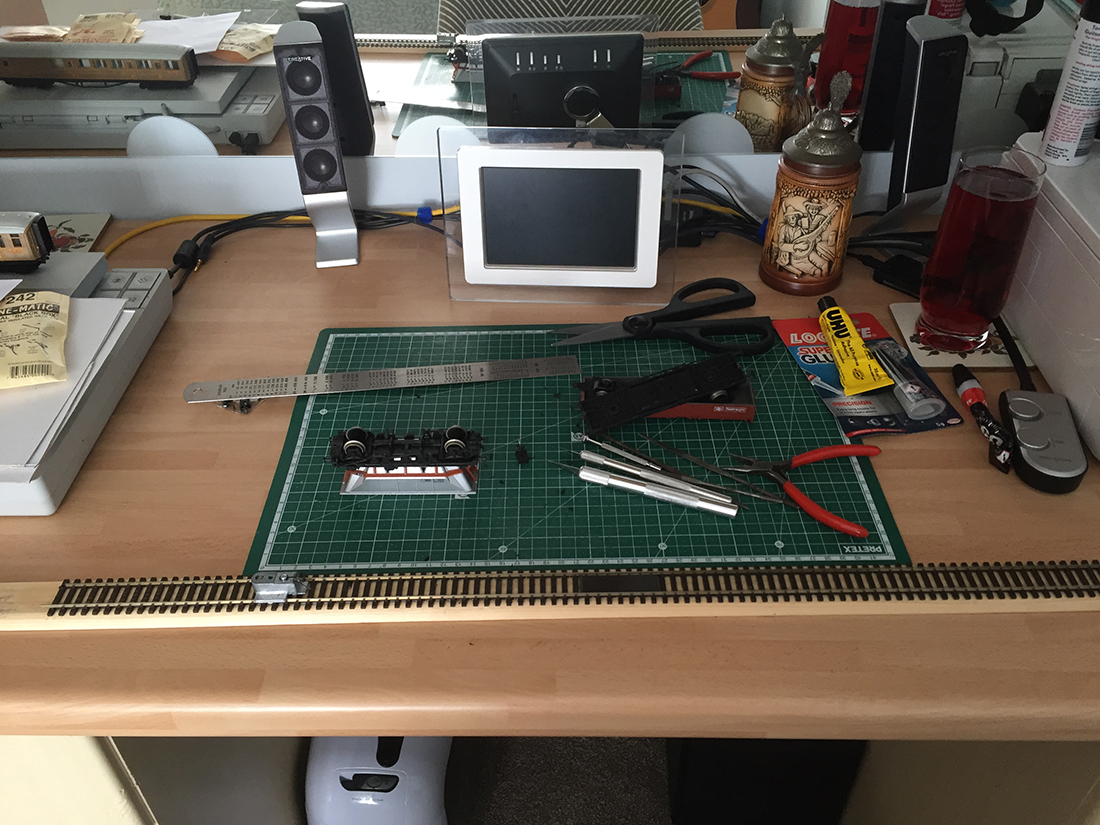
I set up a work area indoors (closer to the coffee machine😂) and worked through all my rolling stock to find out which couplers would best fit each wagon or coach, having done this I then compiled an order for the various bits required.
The kit also contained uncoupling magnets for both code 100 and code 83 (USA rail) but none for code 70 which is the standard I am using.
However it gives me a chance to try them out. On my layout I plan to use thin (2 to 3 mm) very strong magnets, available on eBay to place under the track at appropriate uncoupling positions.
You can see the uncoupling magnet and gauge in the photos below.
I decided not to fit NEM sockets onto this stock as I wasn’t going to change them again (famous last words!); I fitted the standard Kadee “gearbox” that took the whisker coupling, this seemed to offer the most compact option.
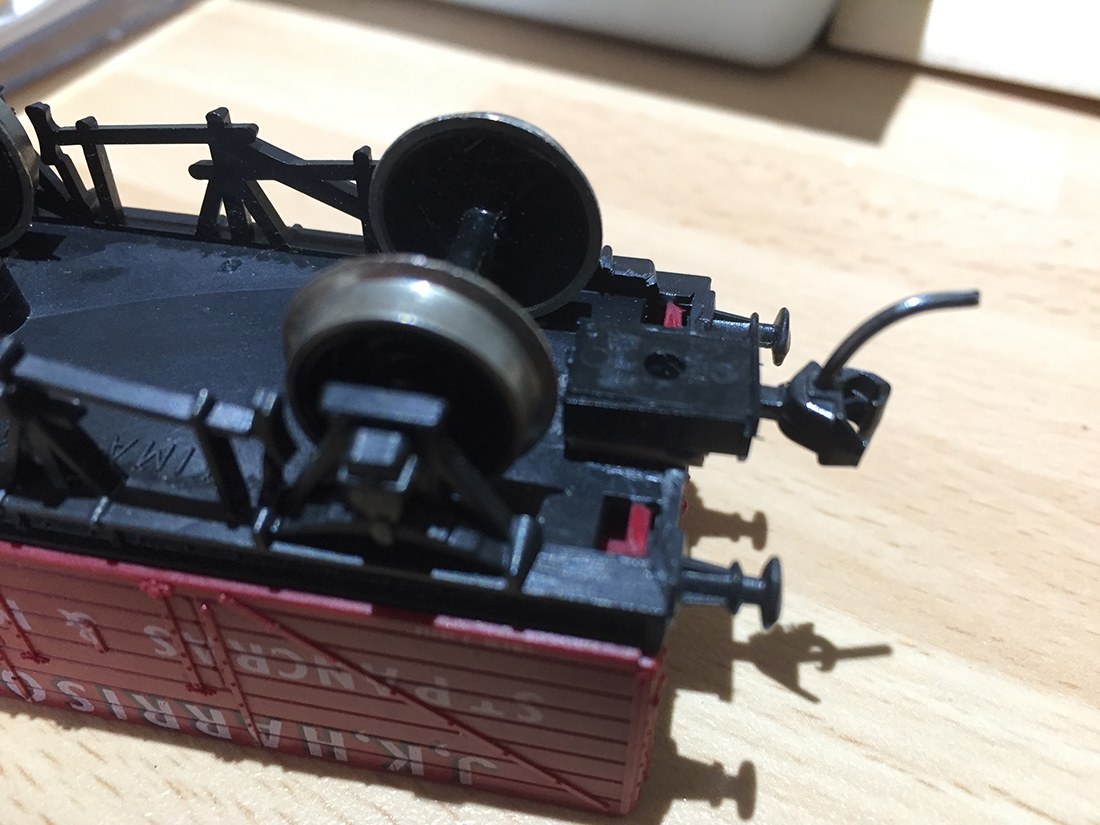
Depending on the original coupling, I removed it by removing a screw into the bogie or chassis, drilled out a rivet or cut the plastic coupler off.
Fitting the Kadee gearbox to the chassis of a goods wagon was relatively straight forward.
Most of the time the gearbox would sit on the wagon chassis directly, sometimes I would have to cut a notch for the gearbox to sit into, or I would have to pack the underside of the chassis to get the gearbox to the correct height.
I fastened the outlet and gearbox on using blue tack whilst I did a final fitting with the gauge, when all was satisfactory I then glued the gearbox in place. In the photo below I had to pack this wagon gearbox to the correct height.
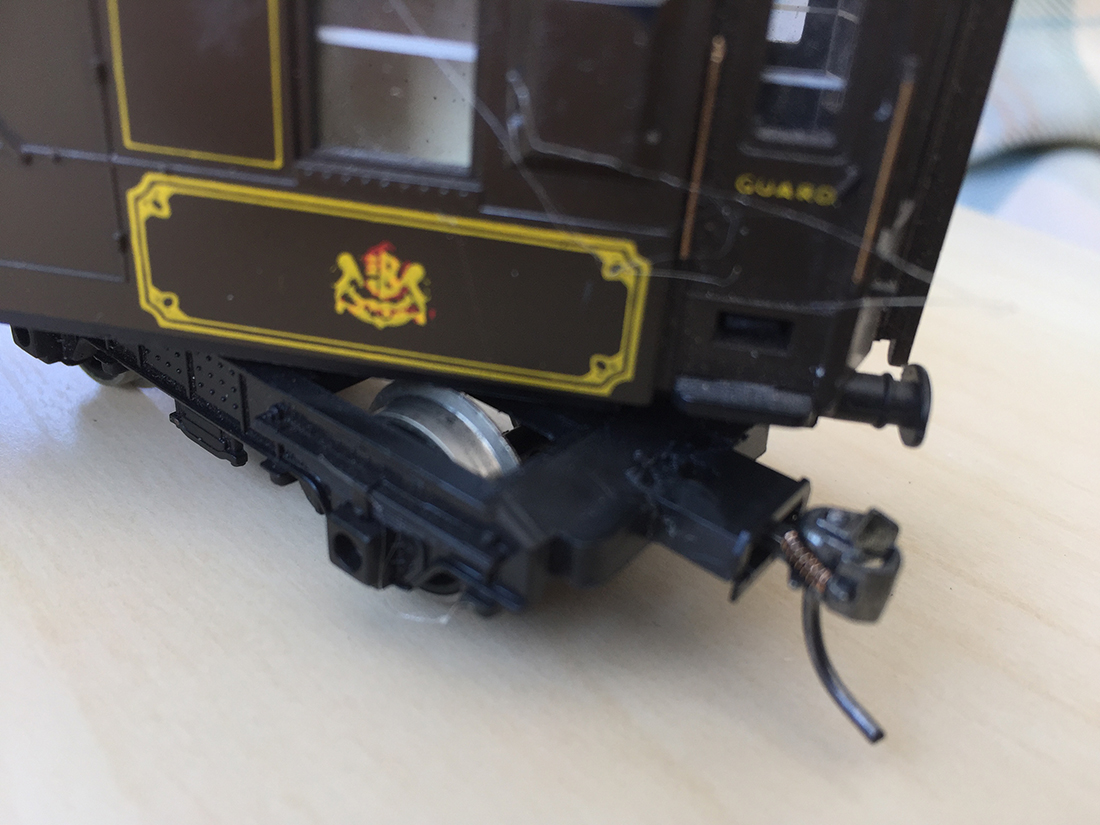
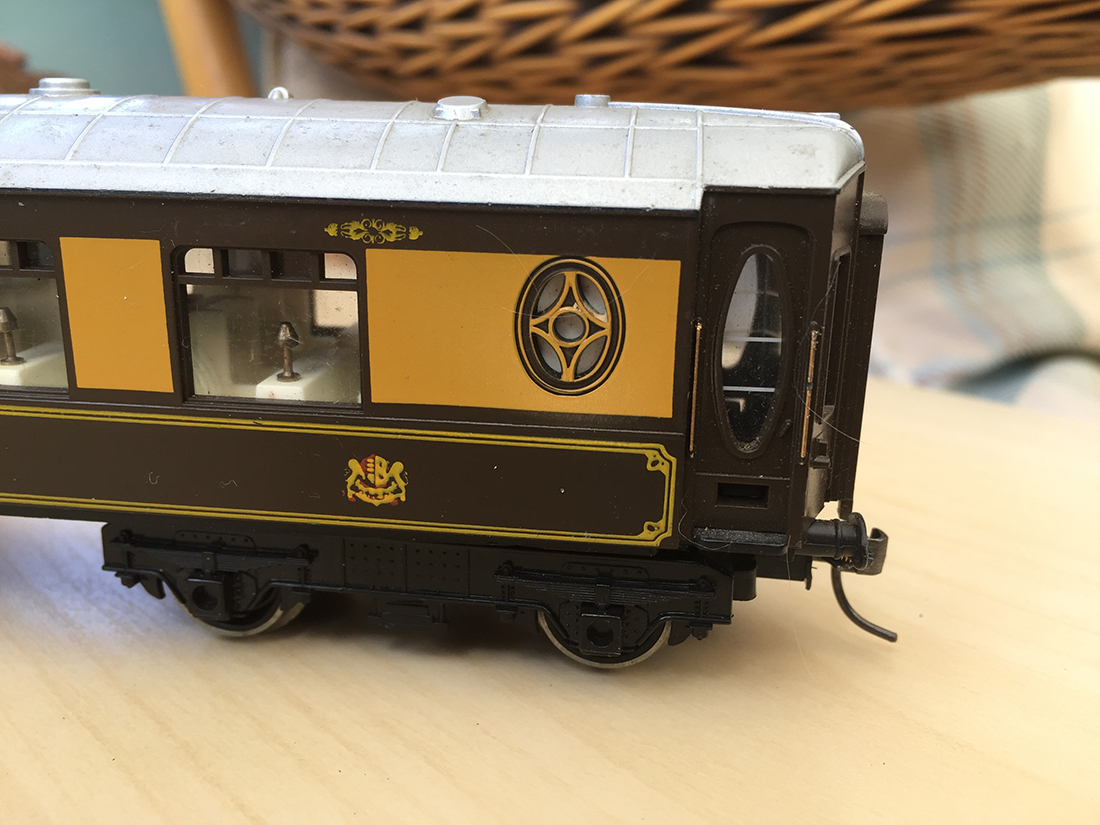
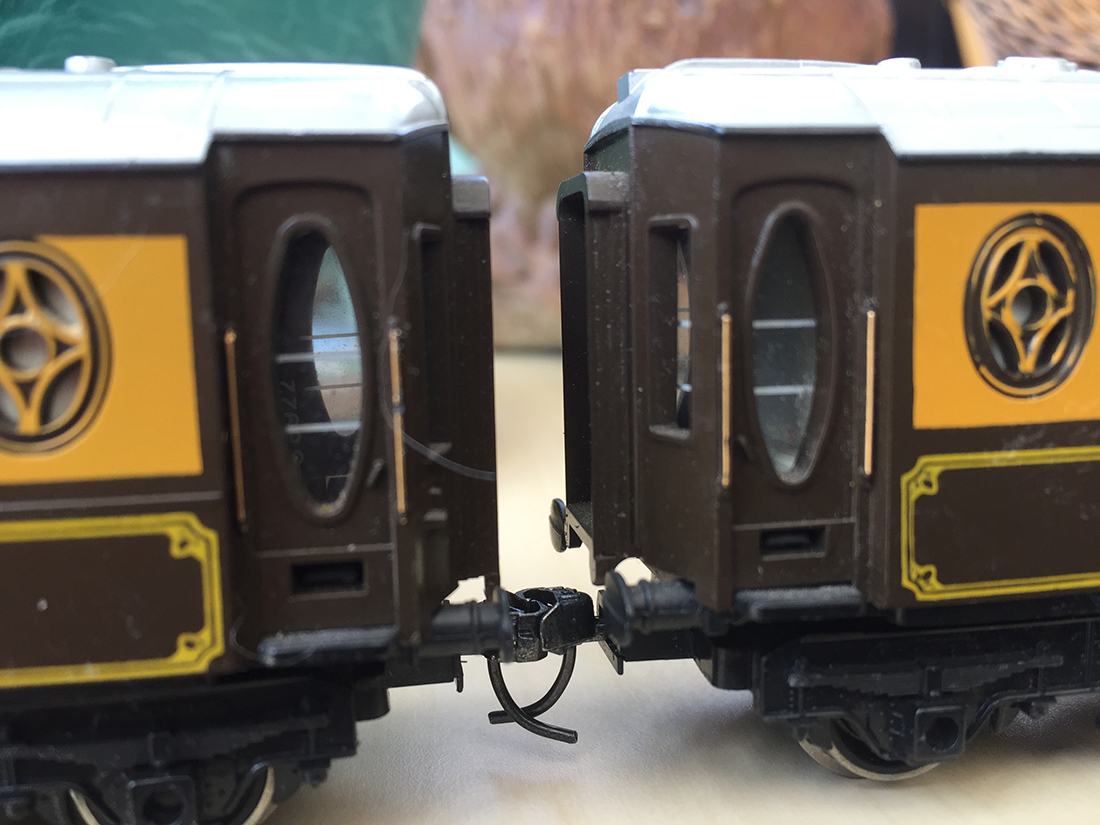
The coaches were somewhat trickier and I found easier to disassemble the coach and work on the chassis alone.
The same principle applied here as with the wagons, but found that the bogie chassis were lower than that of the wagons and some drastic surgery was required on some coach bogies.
I cut slots out of the bogie frame so that the gearbox sat in the frame, but not always level. I used short overset shank couplers on all coaches, cutting the notch to suit each type of coach, most were fairly straight forward once I knew what I wanted to do.
As you can see in the photos the gearboxes sit proud of the chassis frame, but are not really noticeable once coupled and sitting on the track.
As with the wagons I checked the coupler setting with the height gauge, but also did 2 coach ends first so that I could also run them round on my layout and check for correct spacing and ensuring that there was no buffer lock, I then glued the gearboxes in place and did other coaches of the same type.
I have also converted my type 37 Deltic that had fixed couplers, this process was similar to that of the coaches, but I used more care and attention to avoid cockups! I have now my remaining stock of wagons with NEM sockets fitted to change over to Kaydee couplers and 5 locos to do.
Again the couplers for these come in 3 lengths with standard, overset and underset variants for each length of coupler.
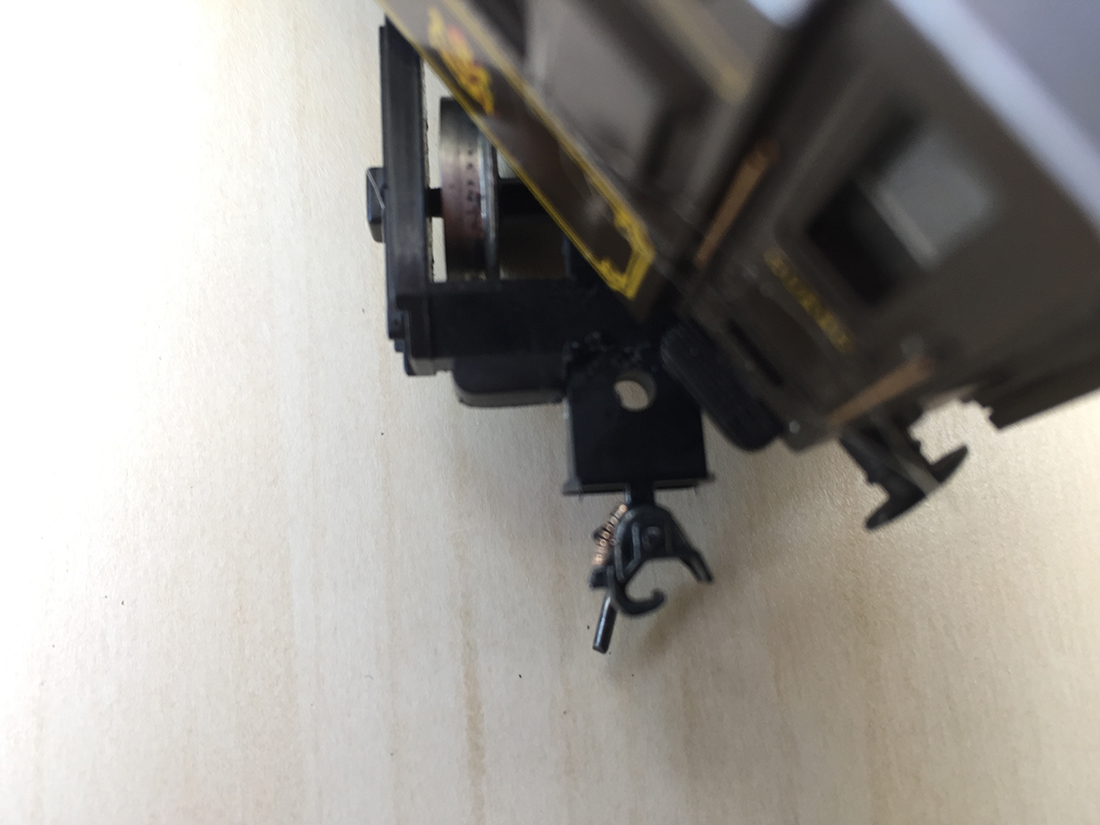
From the pictures below you can see how it looks on my older coaches. I am very pleased with the result and believe they look much more the thing than the variety of older bulkier couplers I had before.
As I said earlier this is not a cheap option, but it gives my couplers a more realistic look, but obviously not prototypical for the UK in the early 1960’s.
This gives my rolling stock a new lease of life and enhanced performance with the shunting ability, that I am currently exploring.
Cheers Peter…”
A big thanks to Peter for sharing his Kadee couplers info.
It reminded me of Dave’s post: Magnetic couplers.
Now on to Paul.
“Hi Al,
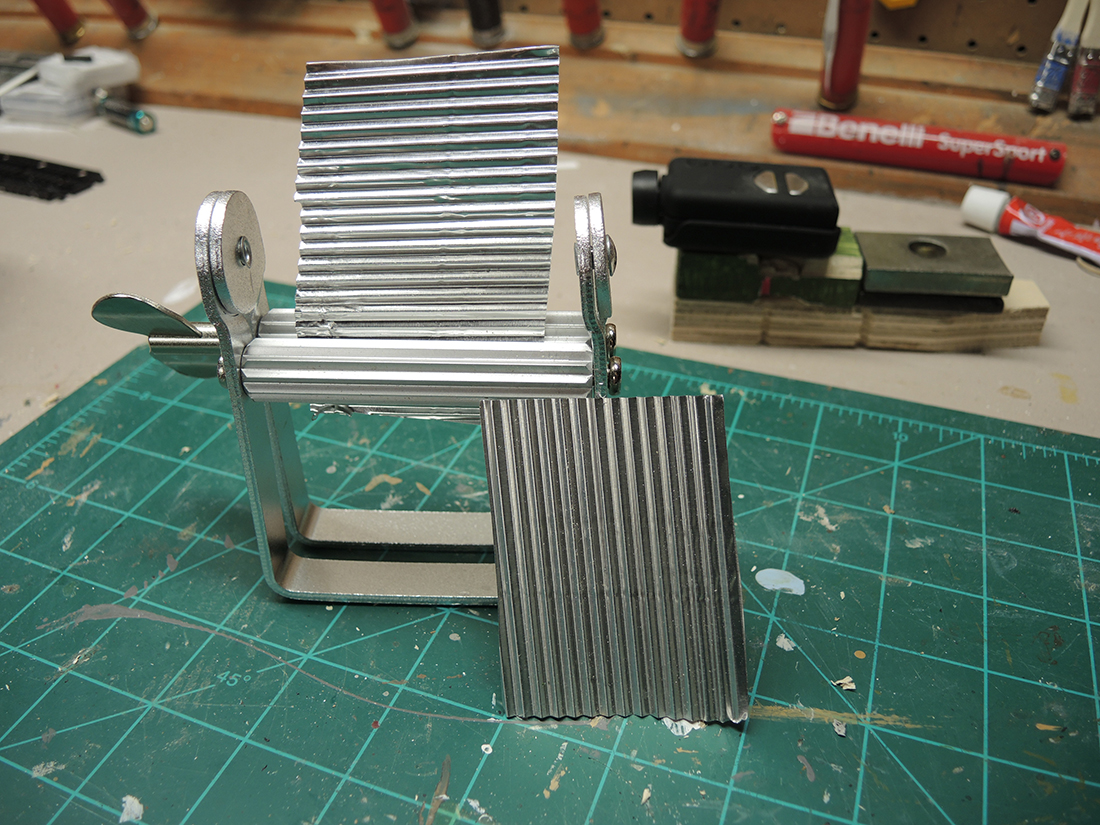
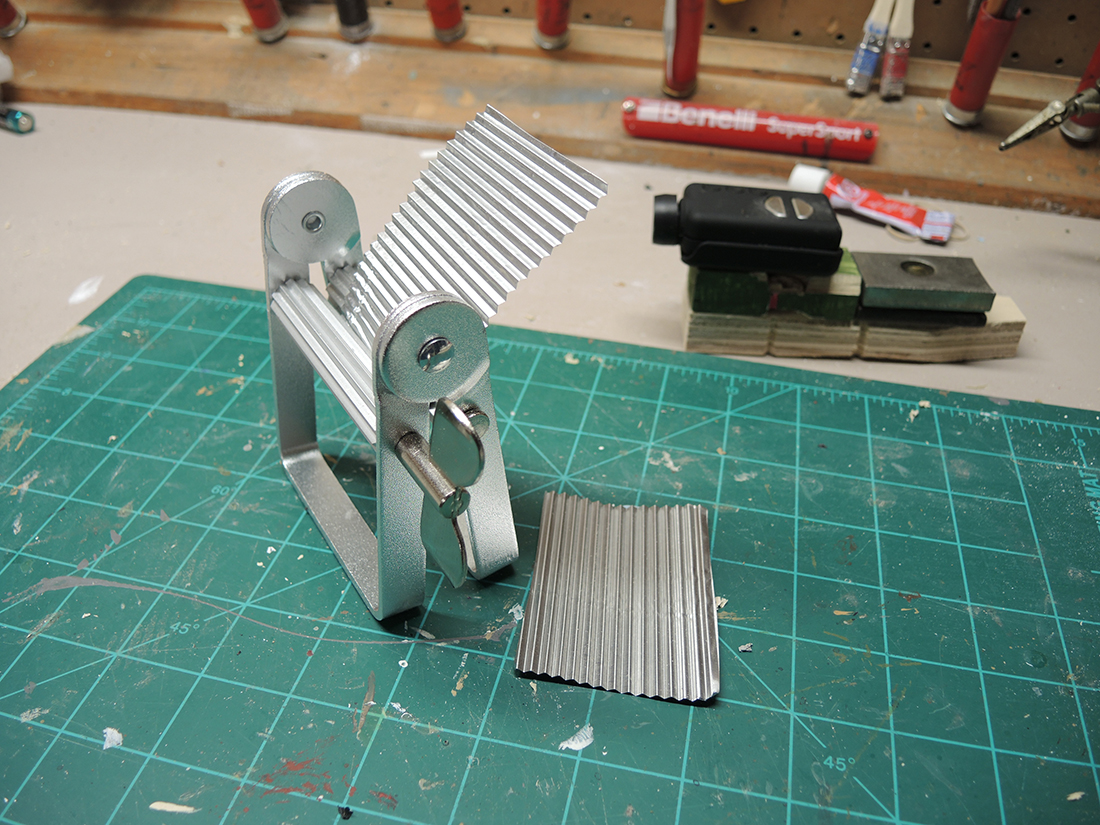
I thought I would show the other modelers an easy way to make metal roofing.
I use an Artist’s Paint Tube Squeezer which is available on Amazon for $8.
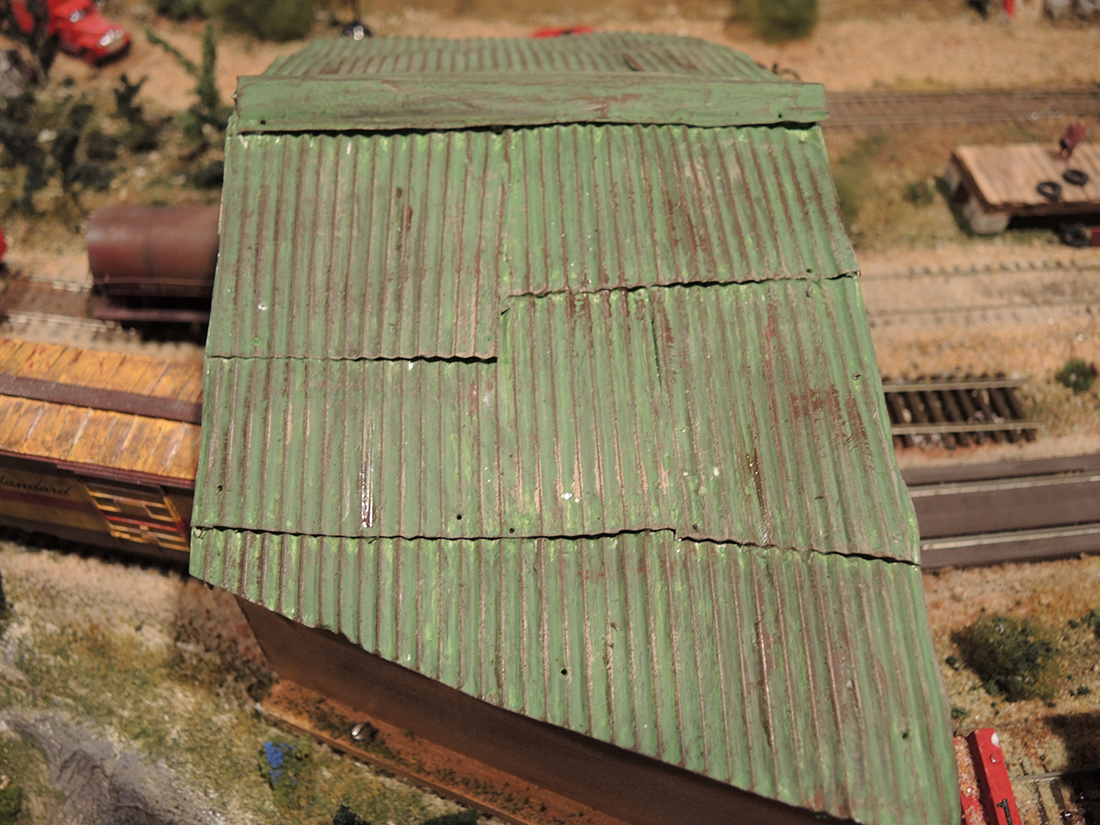
I use the metal from soda or beer cans or from disposable cooking ware. You can make pieces up to about 3″ wide. I show a photo of how I used the material on an engine shed.
Paul”
“Hi, Al.
I have been reading your emails for a while now and just decided to try my hand at sending you something to share with everyone else.
It is only one photo, and this is more of a test than anything else.
If you see fit to use it, I would be thrilled. If not, well, ok. As you can see , it is still a work in progress.
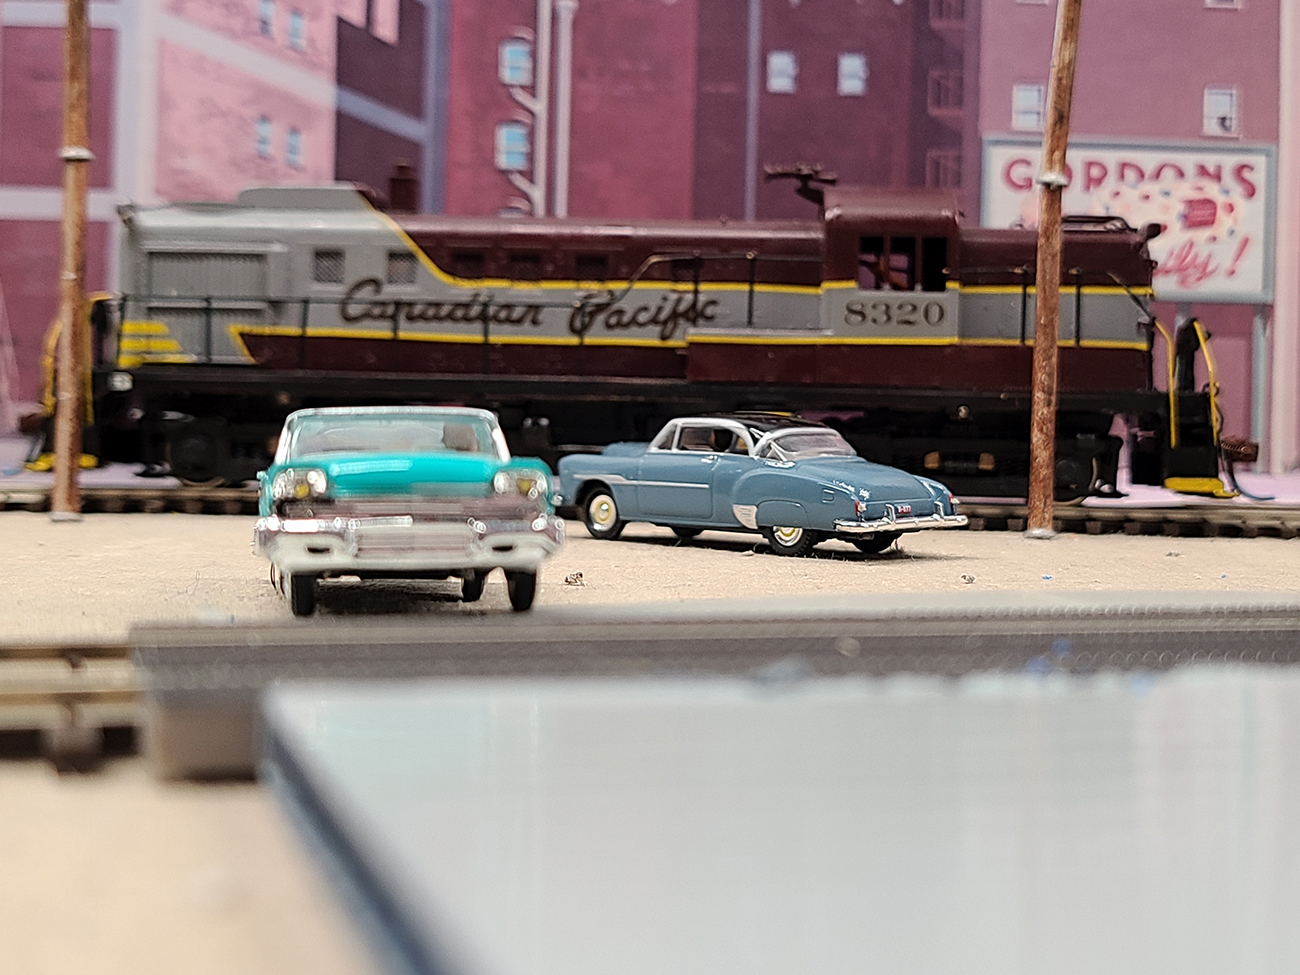
The FarSeas Connecting is owned by Railfan Businessmen who purchase older equipment and re-paint them back to their original colors and run an industrial switching railroad.
The two cars are Woodland Scenics Just Plug, but not lit up during the day.
The loco is a brass Alco Models Alco RS3 that I painted and decaled back in the ‘80’s.
The background are the Walthers scenes mounted on plywood.
If you need more info, please let me know.
Thanks for all you do.
Frank”
A big thanks to Peter, Paul and Frank.
Frank – of course we want to see more!
That’s all for today folks, please do keep ’em coming.
And if creating your own model railroad is an itch you just have to scratch, the the Beginner’s Guide is here.
Best
Al
PS Latest ebay cheat sheet is here.

Hi Paul,
Wonderful idea, tell us – are running HO scale? I wonder how the roofing sheets would look in N scale. Thanks for posting, Don
Great idea that Paul ….looks very surreal …Dangerous Dave
Love the C.P. pic the old Canadian Pacific and Canadian National, great paint job, 50 60’s were a great look, I remember them well.
Don the corregations maybe too large for N scale. But most folks wouldn’t even know and the idea of a metal roof would still be interesting to them.
Peter
Thousand thanks for a great narrative. I cant believe the timing. I am going thru this myself and you reinforced what I was hesitant to chop off, cut, adjust and build up.
Paul
Ingenious
Frank
Nice
George from NY
I never knew about that squeezer ,then again I’m no artist,Guess I’ll be going into the roofing business.Thanks Paul
The Critic
Peter,Is it worth changing out all the couplers and hope they work properly?Kadees are expencive I know they work well but I only bought 10 pairs ,16.00 american + ship. ouch.Carry on!
the critic
Paul,
What an ingenious idea. Most people would not even think of corrugated a from a paint tube roller. Have you tried it with aluminum foil? Or a wine cork wrapper? Campbell models used to sell long thin sheets 3 inches wide and 6 inches long for about $6 each. Or more..
Very informative narrative and photos Peter. Well done.
Paul, great idea and look. Love the patina of the roof.
Frank, nice paint work. One does not often see an RS 3 with a high short hood. 59 Ford and early 50’s Chevy. I think.
Mn Dan
Paul…thanks so much for a great tip! I am a big fan of metal roofs and have wanted to use some in my very new layout…I’m heading to Amazon as soon as I finish this…
Hi Al,
Just a suggestion, but it would be great if you asked the people sending in their contributions that they list upfront what gauge they are showing / running. It seems a lot of times I have to scan all the comments just to see if someone has asked this and again to see if it answered.
Again, just a suggestion.
Pete
I hav done similar tasks on all my rolling stock. I upgraded the couplers on every car that needed it and tweaked others. I used up my stock of Kadee No. 5 couplers and ventured into the Whisker style. I must say, they are easier to work with and I had few problems if any and the match up well with the old No. 5’s. Some cars needed shimming or notching as described above to align the heights.
Kadee is an excellent choice. http://www.kadee.com. The also offer direct replacement NEM 362 couplers, Kadee #’3 17, 18, 19, and 20.
Great looking results!! Very prototypical looking wagons.
Hi Peter: Excellent Workmanship on the freight cars and the passenger cars installing the Kadee Couplers. Takes a Lot of patience. Those couplers used to be inexpensive “back in the day”. Think a knock off called “McHenry” couplers will do just as well, but they are made of Plastic and in “China”. Kadee’s used to USA made. If you ran into difficulties trying to change the couplers over, you could get the “truck set” for either freight or passenger cars with the Kadees already mounted.
And regarding Paul’s workmanship,,, the final installation looked very realistic. I do remember, back in High School…50 yrs ago,, a buddy of mine and his older brother got into HO Scale Model RR’s in a big way. Half their basement, they build a very complicated layout. His older brother was a Machinest. So he brought home some multi gear sets of old gears..We pulled the wide gears apart and used the smaller ones to make a jig that would make HO Scale sheet metal roofing material and metal siding similar to the commercial made stock. After weathering with rear “rust powder” and used floqil paint the sheet metal looked natural and real. The results were the same as you managed. The commercial metal mine kits were difficult to build if you didn’t use a hot enough soldering iron. Those were the days, when their cat would walk across the layout and not be able to knock over the mine buildings on the layout. Too heavy. A neighbors cat sneaked into the basement and played racquit ball with a Modern Atlas Church I had.. Totalled it. Difficult to find parts to repair those without investing hundreds of dollars into a computer 3 D Printer…
~ Mike in the U.S.A. STAY WELL AND HEALTHY ALL.
Excellent articles. I enjoyed them all. Great information. Thank you all.
In answer to Bob Brady, is it worth spending the money converting my old coaches and trucks to Kadee couplings. In a nutshell yes. I wanted to do shunting and Kadee couplings give me the most flexible option. If i want to replace my old rolling stock of coaches they are now running at over £30 each. If I buy new stock I will still have to fit Kadee couplings into the NEM sockets.
Why don’t manufacturers now produce rolling stock fitted with the coupler devices required by the user, rather than take the manufacturers prefers option?
Peter…
Kadee’s a good choice, you mentioned couplers with whiskers I found using the one with the flat spring you can adjust coupler height by putting it under the coupler and gain about 3 thousandths in height.
what is meant by a starter kit for couplers?
Thank you for the kind words about my paint job. I am in process of building an around the wall, with peninsulas, in my full foot print basement.. All the tracks are in and being tested and tweaked if necessary, as is the rolling stock. Scenery is not my strong point and will probably be minimal, but it RUNS. Now, I just need someone(s) to help me Operate it.
I never knew of a toothpaste roller, I used Campbell corrugated and PC board etch to make my roofing.
Please, Alistair, keep up the great work you are doing for the modelers.
When you use the best, you don’t loose money. They are well proven and only trouble when YOU install them wrong. I fell I love 55 years ago with Kadee.
Paul I am also using the paint squeezer and found it to work rater well. Preferred tins for roofing is of course full beer cans.
Hey Paul, thanks for the tip on the Artist’s Paint Tube Squeezer. I am going to order one today.
Frank, great job on the back ground and a super job on the Alco Engine. Looks like a factory job right out of the box.
Peter, thanks for all the tips on changing your couplers out on your train cars. Very detailed information.
Peter….great write up on couplings……..just what I needed….I have been having trouble with cars separating and even derailments. I too have mixed rolling stock and passenger cars. Your article really helped me……Thank you.
Thank you Paul for the suggestion to use the paint squeezer to make corrugated
Iron Sheets for HO projects. I have a question for our viewers, How early was corrugated sheeting used on RR structures? I want to build an engine shed for vintage 1900-1920 and wonder if a corrugated Iron Roof would be prototypical?
For an Ozark, USA location. Suggestions would be appreciated.
Phil G.
Peter, What a wonderful and informative discussion of how you converted to Kadee couplers. Only problem I saw is your workbench is entirely too clean and organized for a model railroader. 🙂
Paul, Great idea! I’ve never seen a paint tube roller like that one before. I have some plastic ones in various sizes that are just a shaft with a slot in it with a key-like handle to turn the shaft and roll up the paint tube. I’d love to know where you bought yours.
Frank, Nice photo. Amazing what can be done with a few elements properly placed and photographed.
will in NM —-Amazon for about $8 –Honestly the tin roofing is not to HO scale but to be in scale the ripples would be about 1/32″ or about 3/4 of a millimeter. You would hardly see the effect. As long as you don’t invite the “Tin Roofing Police ” over to see your layout you should be fine. It’s all in the effect you see and remember it’s your railroad.
Every once-in-awhile I purchase a ten pair pack of Kadee Couplers. I have been converting all my HO equipment for several years now. It takes a long time and lots of cash to do this conversion, especially with my dozens of locomotives and hundreds of cars. But the end result is satisfaction in looks and operations. Sometimes making the physical change is very frustrating as some makes of cars have weird designs for their coupler pockets and the way they are mounted. I have maybe forty cars to go and the conversion will be complete. Anyone want a pile of NMRA couplers? Free! Many thanks from Milwaukee, home of Walthers, and Model Railroader Magazine, and Giannis Antetokoumnpo!
Thank you Paul for the great idea. Just ordered my Artist Paint tube squeezer from Amazon. I have a number of Craftsman Aluminum rail yard kits to assemble (almost sold them on eBay). I’m doing to top them off with the “roof maker” when it arrives. Always enjoy tips like yours to enhance my RR, a 12 X 14’ double deck platform. Lower lever for O Gauge with 4 independent mainlines, and upper level for two HO lines, under expansion to add two more lines. I’m a PRR GG1 fan so I run GG1s on both levels. Raised in Pgh area near steel Mills, and the Union Switch & Signal plant & Headquarters, (Swissvale, Pa)so I never saw a GG1, as Harrisburg was as far west as they ran due to mountains. Walthers Steel Mill kit under construction for steel industry scene., with side buildings. Of course, they’ll have corregated roofs
Thanks again for great top, Paul