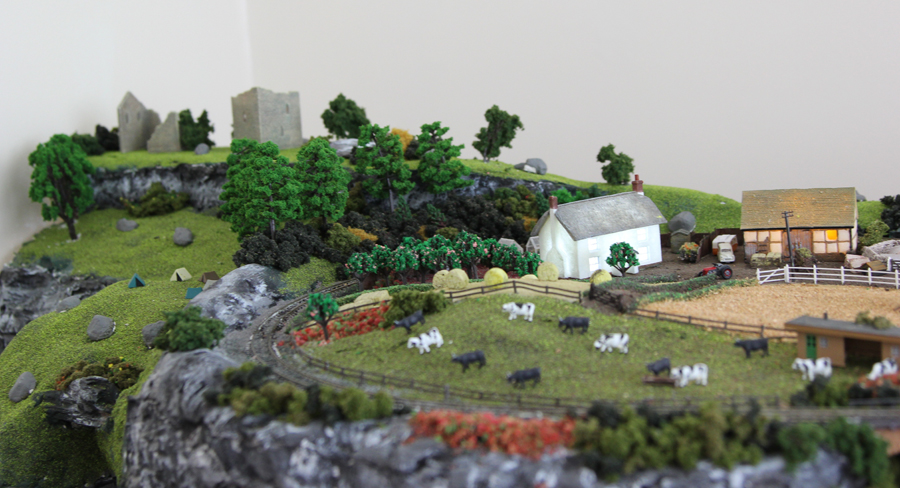
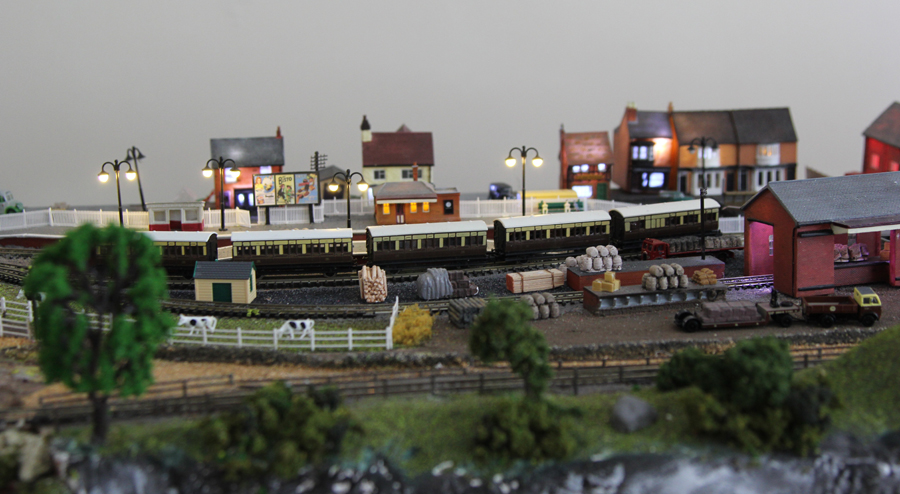
Kevin has been in touch with his N gauge UK layout:
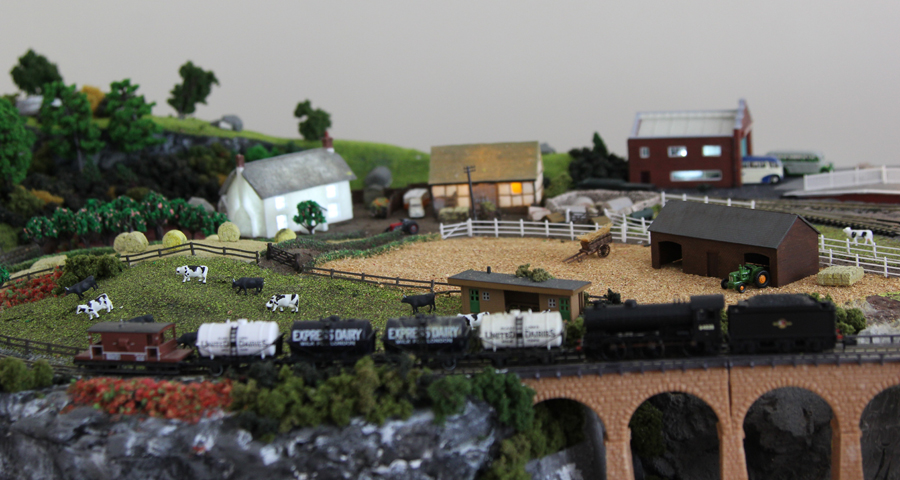
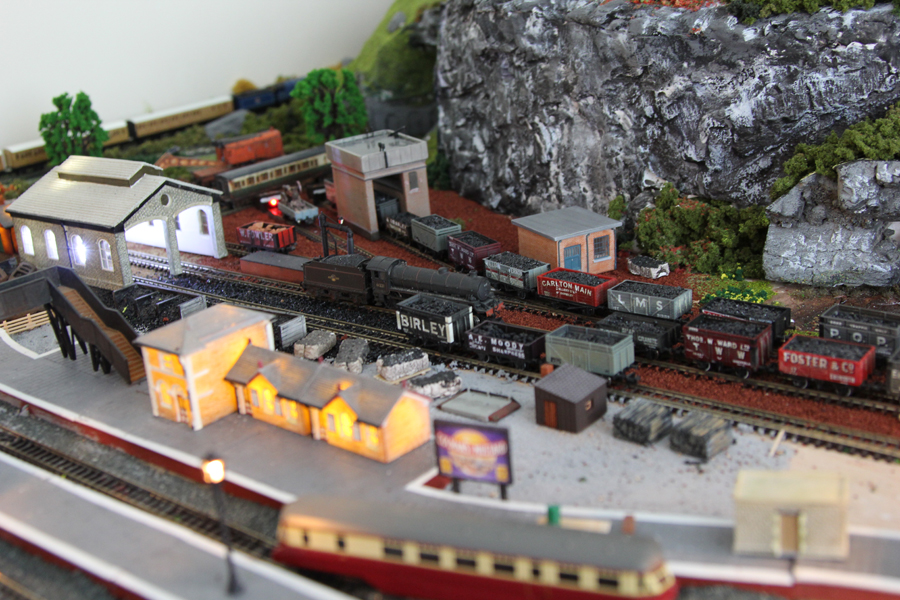
“A few pictures of my n gauge layout. Originally intended as a retirement project I started it early and now it is almost finished.
I make no apology that it is not built to a particular era. I run what I like and mix steam with some modern diesel. I am sure the wrong locos are at times pulling the wrong carriages/wagons.
Overall size of bottom base board is 7 feet by 4 feet plus the small side extension.
The upper level is a basic first radius oval hiding a through fiddle yard for the lower two ovals. In addition on the lower level an end to end automatic shuttle runs from the station and off into a hidden area under the hills.
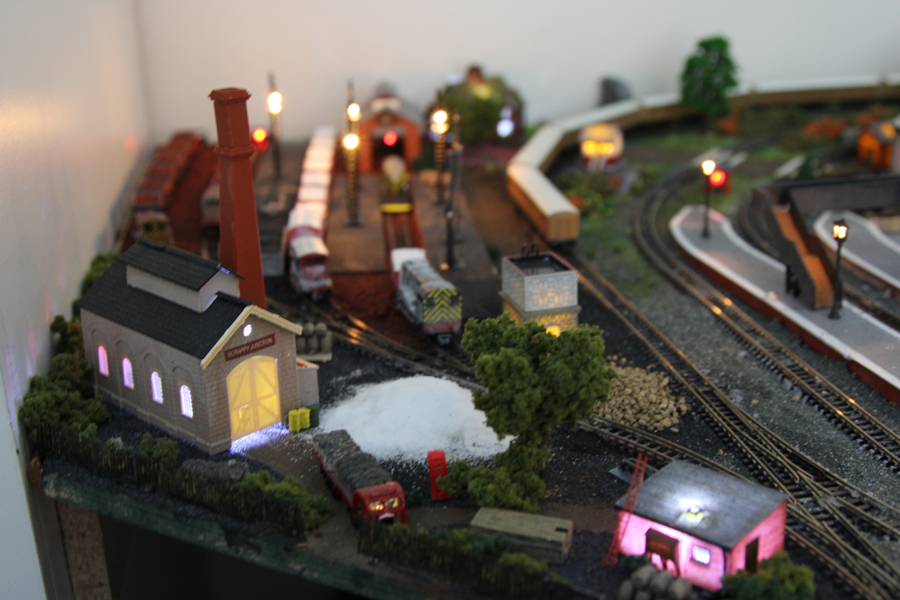
All curved track is “set track” and trains are analogue controlled. Where ever possible each building is lighted by led bulbs. I have added flashing red lights to buffer stops and inside a couple of sheds to imitate braziers/fires. About seventy lights are fitted throughout the layout.
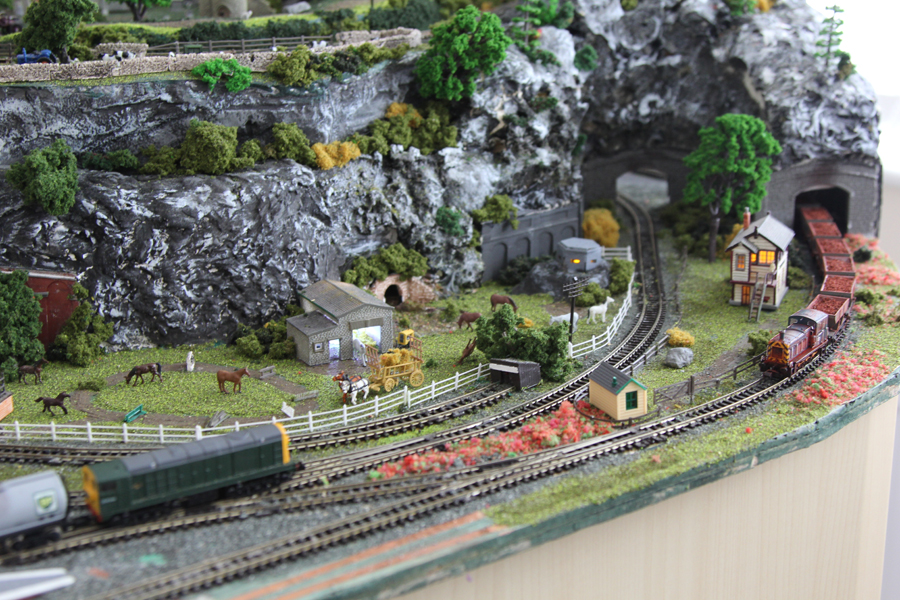
Hills are formed with styrene sheets covered in “mod rock” and poly filler. The textured faces are formed by pushing screwed up baking foil into the soft filler to form the textured surface finish. This was then painted black and then dry brushed with two colour tones of grey acrylic paint.
I still have a lot more detailing to add – mostly on the platforms and to finish the lower level crossing near the horse paddock.
Kevin”


Kevin’s pics really got me thinking about backdrops. So I had a little fun.
This vid is only 20 seconds long but it really does show how much of a difference a backdrop makes to a layout:
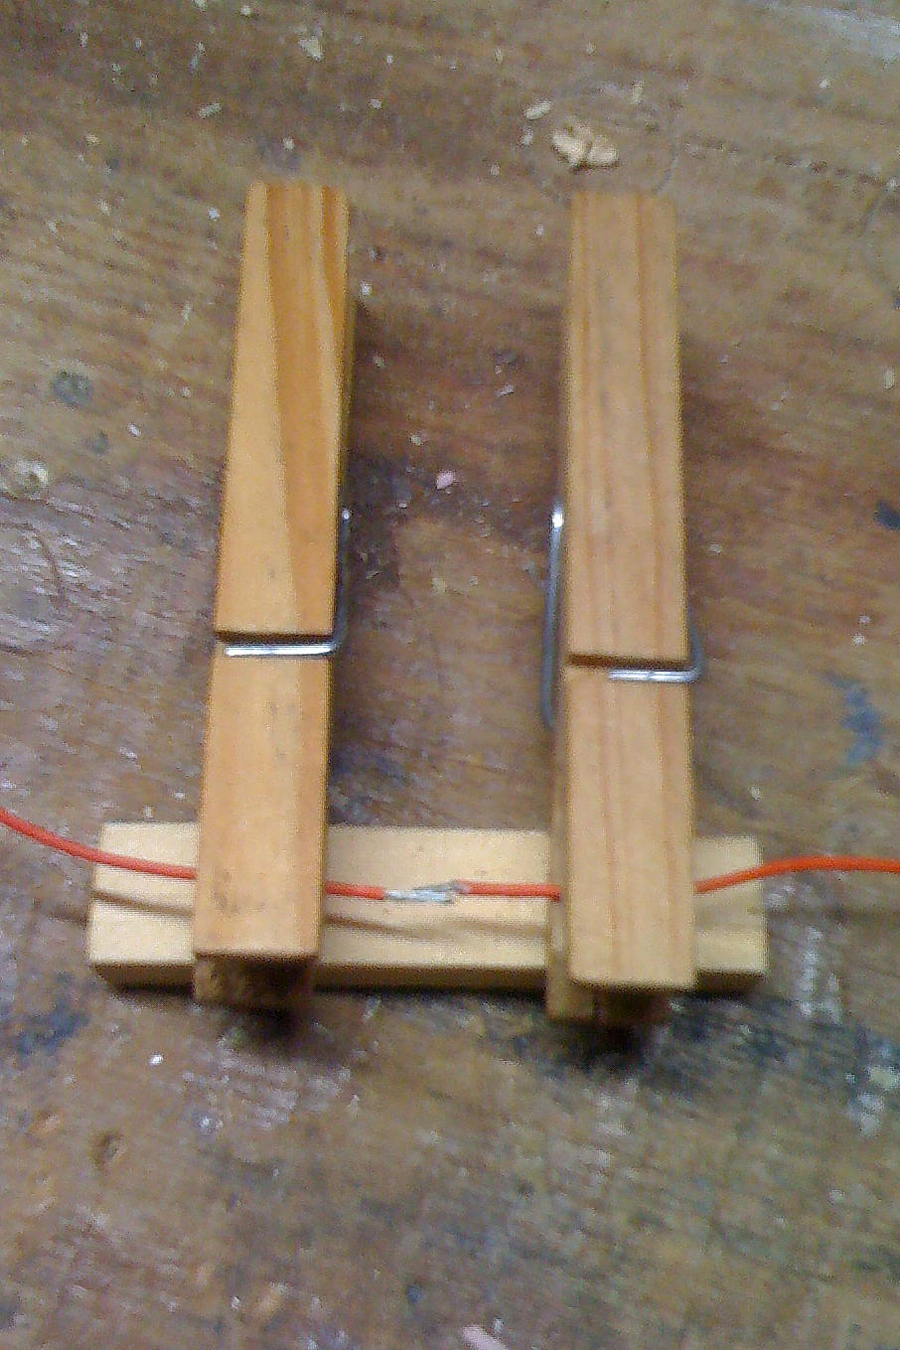
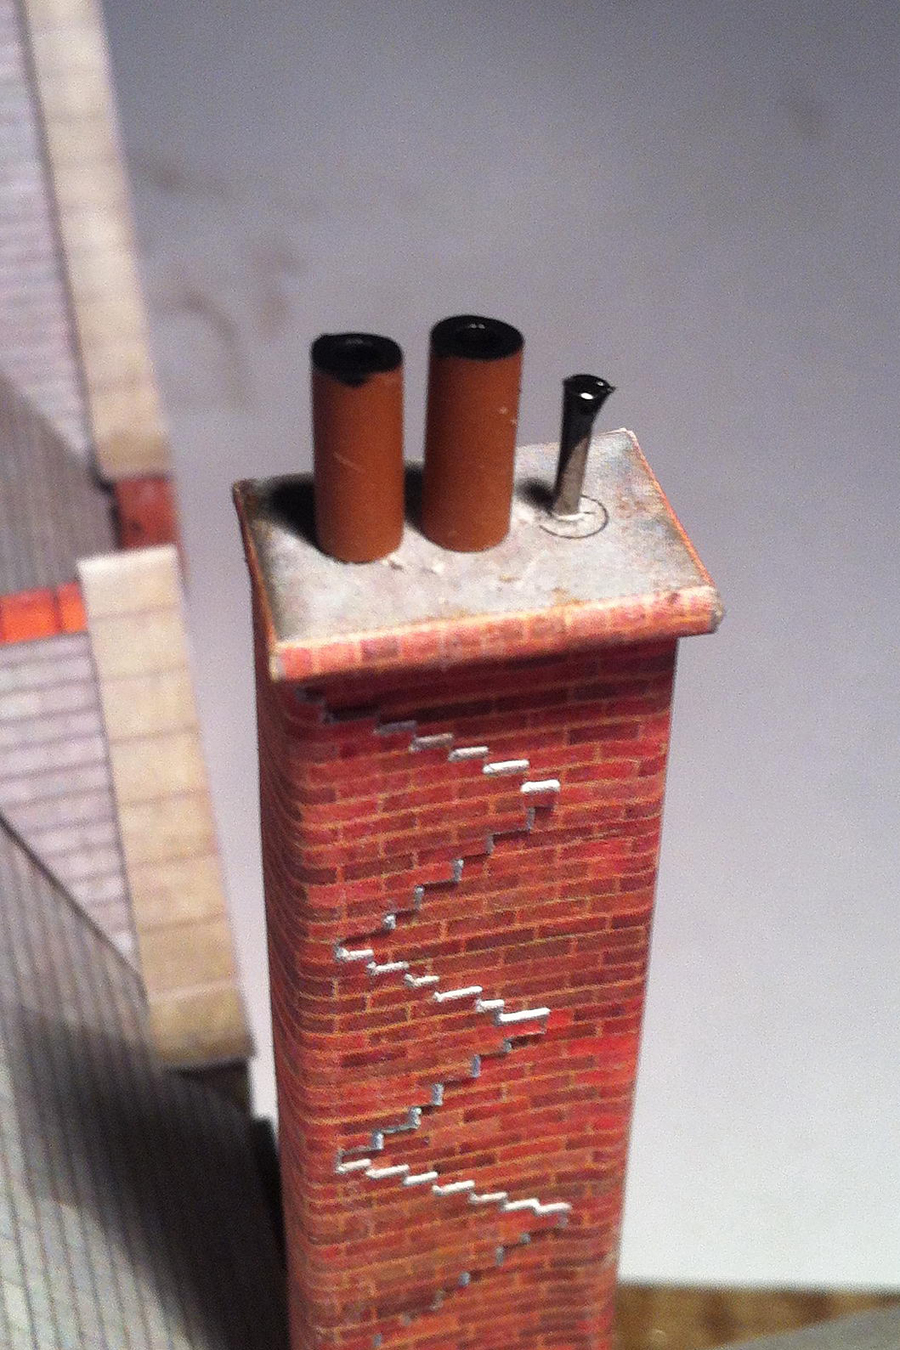
“Hi Al
Three ideas to share. Some may be old hat but they weren’t to me so they maybe useful to some.
1. Soldering two pieces of wire together end to end can be difficult as, in my experience, they don’t stay still!! I found a simple solution was to use two pegs and a short scrap of wood to hold them together as illustrated.
2. Peco flexitrack basically wants to return to being straight particularly at joints and especially if they are situated at insulated rail joiners (not ideal but sometimes necessary). I discovered a way to solve the problem. I cut curves, at the desired radius, out of ply wood to use as a template. Set the track on the workbench and used panel pins (on thesides, not throught the sleepers) to keep the track in place. I then put a spot of superglue on every alternate fishplate, left it to dry and I had a piece of set track at the right radius that would stay there and I could trim to the exact length with no strain on the rail joiners.
3. I was doing some electrical work in the garage the other day with an incompleted cardboard model on the layout nearby, I noticed that one of the chimney stacks was lying on the ground – only, it wasn’t! I had trimmed off a bit of the brown cable insulation and it was the correct colour, length and diameter! My latest model has cable insulation chimney pots held in place by tiny panel pins which give support and hold them upright. A spot of black paint on the top finishes them off.
John”
A big thank you to John and to Kevin for sharing his N gauge UK layout.
I think Kevin’s layout has bags of charm. And John drives the point home that simple tips work best. There’s lots more just like them, in the beginner’s guide.
That’s all for today folks.
Please do keep ’em coming.
Best
Al
PS More HO scale train layouts here if that’s your thing.
Need buildings for your layout? Have a look at the Silly Discount bundle.

Kevin. Great work. Just a quick tip. Your lighting is fantastic. If you don’t want your buildings to ‘glow’ when the lights are on, try painting the insides of the walls and roofs with any matt black paint you have. Works every time. Great scenic work. Keep it up. You have the makings of a great layout.
A very nice n gauge layout , and the pegs holding wire is a good idea …Dave
Hi Kevin,
If I was about a half inch tall I’d love to live on your layout. I wouldn’t even mind if my lights shined through the roof. Nice job.
Best wishes,
Joe
Kevin…really nice detailingon your layout….and don’t apologize for running whatever era or trains you like or have…it’s called freelancing….and this hobby is whatever we decide we want to do with it….and whatever we enjoy and makes us happy. A note to John on splicing wires……don’t need the clothes pins ..just use an “inline wire splice” (google it) then solder and cover w/heat shrink tubing…..if you’re not using some kind of plastic connector……
Also..a tip for flex track users…..when doing curves…….stagger the track joints….and solder rail joiners….you’ll have less problems….on your curves….
Al great job on your emails……and wonderful tips,tricks, and pics…..you’re stuff is inspirational…………Joe W
Nice job!
Keep up the good work.
I am going to start TT size I got HO size And I would like sale it
Great work Kevin, layout looks just right and the mix of stock wouldn’t be noticed only by a few purists. Nice of you to share the tips. All the best. Colin.
Your set up looks real great, I have also some lights light coming through some of my roofs, I can glue card stock.or paint the in side of my houses. Your layout is what you want it to be. Very nice, a lot.of hard work. Dave in Savannah, Ga. USA
The pegs holding the wires is great, but I was taught to always twist the wires together even end-to-end as this also introduces mechanical strength to the joint.
Great Job, I too have a small layout in HO scale, but even with the small size I am running three trains, steam and diesel,,,and have named it OREVILLE,
historical theme park,,,every inch is either landscaped or has a building, with a nice size park, numerous tree’s, benches and also an ice cream stand, several cat backhoe’s and cranes in a still working scene. There are two Bi-Planes flying overhead as an air show in progress…This is my first layout in over sixty
years and I might say I am impressed with the results as I had no plan and it
kind of came together using my imagination,,,I am fine tuning the landscaping, little at a time to have something to do. Simply put it is all about enjoying yourself….so to all the model railroaders out there, have fun,,,You do not need to be an expert, nor do you have to have a large space as I am and have neither…..Charles, Noth Carolina, USA
Kevin,
It is YOUR railroad and you can do anything you want with it. There is a guy in the USA who runs steam loco’s on his real working railroad (not a tourist train). I love your scenery and I only hope I can do half as good with mine when I retire. You are on the gold standard my friend, “he who has the gold makes the standard.”
John,
Nice work and good advice. Over here we use clothes pins to hold our wire. LOL
II read your post everyday I am building a n gage layout I am new and do not understand the terms used by many of the guys, I know nothing about rail roads is there an inexpensive book or page to describe rail road terms? I feel so stupid when I read the comments and get lost in the terminolgy. I would appreciate any advise from all you wonderful modelers out there. Sincerely Tom in the desert.
Oooohhh! Reminiscent of younger years with model railroading and always perusing Model Railroader magazine. Continually amazed at all the different layouts and their incredible detailing.
Tom in the desert.
Google “model railroad terminology” and you’ll get tons of links.
Marty
Right On Kevin
really nice little economical layout
lots of sweet detail and the lighting is super
dont worry about freelancing your train types
its YOUR railroad do what you want….purists?..BAH…
and great tips from others about your lighting
and great tips from John about detailing
KEEP ‘EM RUNNIN’ FELLAS!!
Everyone who connects wires together.
Early on I learned that EVERY soldered connections starts with a sound mechanical connection. The solder makes it permanent and corrosion free.
Kevin, I am constantly amazed as an ‘On30’ scale guy, how many of you ‘N’ scale builders can build such detailed and functional layouts. An absolutely wonderful layout. You have done a great job.
John, I use Peco flextrack on my layout as well, nice tip on getting the track to hold a curve.
An absolute inspiring layout Kevin. Many of us freelance model railroads and for me personally, it just adds character.
Awesome tips on the flextrack John!
Alastair
I’ve been following your website for several years now. I love looking at the photos of the model railroads created and submitted by subscribers. I’ve observed that the one thing the vast majority have in common is that they look “pristine”: nothing’s dirty, no litter on streets, rolling stock isn’t weathered, no simulated rust, no pavement stains, no broken glass panes, no worn shingles on roofs, etc. One of the most rewarding things a modeler can do is make their creation look “world weary”. It goes a long way to add realism to videos or photos of a layout.
Another trick for joining solid wires is to put a loop at the end of each wire, hook them together and solder generously. This is also useful for those damn little Chinese wires for LED’s and signals etc. twist them tight and loop them together. Anyone who can make N-Scale visually acceptable at under one meter distance viewing is a good modeler. You qualify.
Great work, Kevin. Some great ideas as well, so thanks for posting the photos.
Kevin,
Very nice layout! Thanks for the tips!
Tim
would love too see the track plan as mine is n scale but am moving house and wont have a lot of room sounds like a great size. Looks great well done
Lovely layout Kevin, very atmospheric.
John, I think in your hint about forming curves in flexitrack, you mean you put a dab of superglue on the CHAIRS, these are the shaped castings on either end of each sleeper in which the rail sits and slides. Doing this would certainly hold the track to the curve you needed. FISHPLATEs are the metal bars that bolt into the web either side of the rail and join it to the next one, a function which is performed by the so-called ‘rail joiners’ in OO, which form a sleeve right round the bottom of the rail.
The suggestion to stagger railjoints is a mixed blessing, the through rail will tend to reduce the kinking, but it can mean if one rail kinks a bit and the other doesn’t,, making the track there a bit tight or loose to gauge.
Rod
I love your statement in the second paragraph. “Make no apology for your layout etc etc.” As is the case here, sometimes those are the best layouts. They have meaning to you and represent your memories. Keep it up Kevin. this is a great layout.
Pete Calif. USA
Thanks Marty for the help, I new at this I live in chandler Az. I am retired and in this desert heat I have found modeling to be a great thing to keep me in out of the heat and I am amazed at every ones lay outs. I hope some day to send my pictures for your comments. Thanks again Marty I do not know where you hail from but good luck and enjoy the hobby, Tom Still in the desert 112 today.
Yep. Thank you, you are quite right, Rod. I did it in a bit of a hurry and thought at the time that “fishplates” sounded wrong.
I too always twist the wires but it doesn’t really show in the photo.
Kevin –
“The pegs holding the wires is great, but I was taught to always twist the wires together even end-to-end as this also introduces mechanical strength to the joint”
What you are referring to is called a “Western Union splice.” It was developed by Western Union, the telegraph company, to splice telegraph wires together. Google “Western Union Splice”; there are pages upon pages covering the topic.
Word of caution. Put something over the completed splice. Not only for insulation purposes, but to keep the splice from tearing your skin off when you run your hand over the wire while working blind. This kind of splice inevitably leaves a burr or a strand of wire sticking up to get you.
Barry
I’m new has anyone seen a n guage shelf layout modeled after a lumber mill?
Thanks. Dave
while the ‘inline splice’ or ‘western union splice’ is effective the wire ends can sometimes be difficult to flatten out, so they stick up and can be a scratch or puncture hazard. I prefer to use the loop or hook method, its quick, the ends are tucked into the wire and has a shorter gap between the wires, yes it is a fatter joint but it is (for me) faster and easier to make. Of course cover the joint with shrink tubing (slightly less is used by the loop method than the inline method).
I enjoy freelancing, and if anyone complains about it I just point them to the door and instruct them to not let the door hit them on the butt on the way out. Enjoy yourself and your modeling.
Rich F. Warminster Pa USA
A quick note to John on his soldering wife’s end to end. That’s a good idea but your suppose to twist the wires together whenever and wherever possible efores soldering. I learned years ago in Air Force Technical school (and actually my father before that) that you’re suppose to make a ‘good mechanical’ connection before soldering anything be it components or wires…
One way to make solder wire connections stronger is to j hook each wire…
Then you won’t have to hold the wires…
Correction in my post, ‘wife’s’ should be wires… I detest autocorrect….
Kevin, never apologize or explain why or what you are trying to accomplish with your railroad, emphasis on “your”. Running trains, whether analog or dcc, and during no specific time period, is totally up to you, and the pleasure you derive from it. Great job, and many hours of fun lie ahead.
Beautiful modelling. Wonderfully realistic. Full of envy.
Wonderful layouts and comments. To Gerry, if one has multiple wives, your comment makes a lot of sense….easier to keep track of that way. Haha.
Miniature worlds and movie sets are wonderful but it is refreshing to see trains running now and then . I have 21 trains from Z to O scale and I run them . I did not build a movie set or a miniature world. TRAINS SHOULD RUN !
NEVER apologize for setting up your layout the way YOU like it.
clothes pins to hold wires for soldering ?? BRILLIANT!
The Critic
Love the wire holding trick for soldering. As I am almost at that stage with wiring my lighting system I will most assuredly use it
To john, problem No.2. You can use a piece of veroboard, and solder the tracks ( at the join) to the veroboard. The spacing between the copper tracks is perfect and this provides a short straight. OR, I use a short piece of curved settrack and join the flexitrack to each side of the settrack. Perfect where you need insulated joiners.
Steve, Sydney
Nice looking layout on two levels. It would be good to see some pictures further back, showing the whole layout. A track plan would be great too!
Look…it’s YOUR railroad, and as its CEO, President and Chairman, you have the right to decide how and what it runs!!! It’s for YOUR pleasure, YOUR fun, so yea – don’t let anyone tell you how to do it!!!
What a lovely layout..
Very clever idea on securing flextrack for curves.
Nice layout.!!! I going to do my layout something like that but only HO.
very nice layout. i have a couple version of some of these.
Just like this display and other blog was outstanding too. The mountains here, perfect. Good height and tunnels justified for sure. The RR says European and is hypnotizing with scale and differences from U.S. Wouldn’t mind having RR with that look at all myself.
More on this anytime, Rich
Very nice layout Keven, looks good.
John, some ideal ideas
LOVE the idea of using clothes pegs for soldering!! LOVE!!!
Kevin,
Amen to your attitude: “I run what I like!” This is a hobby to me, NOT a job. Don’t get me wrong, I know there are a lot of purest out there and more power to them if that’s their motif. Personally I agree with your philosophy.
Keep on keeping on.
love the farm & oil tanker train
good tips nice layout.
Just quick… Rich F. Is spot on with the miniature hook/loop wire connection and shrink tube. Those type connections must be mechanical connected and then soldered, doing those a few years. Ever see the round end needle nose pliers to do just that, make tiny round loops. Tin stranded wire first though.
R
John, Good tips. For problem No.2, I cut down a piece of curved set track, and join the flexi track onto each end.
Steve (Sydney)
Don’t apologise, Gerry. I had some interesting mental images of ‘wifes’ soldered together. 🙂 Thank you too, Al, for the work you put into this site. I know that what is a few minutes read for us is a few hours work for you. Appreciate, too all the readers and contributors (including commenters) who make this such a great resource as I set out on my first layout. So many great ideas and inspiration. Greetings from down under in Aotearoa New Zealand.
Kevin, that is a great job on your layout!!!! I’m the same way no really theme or era you just run what you like and what works for you. You can always change it if you’re bored that’s fun about model trains it’s your own creativity. Again Greta job and thank you for sharing your ideas and pics. Chris – Michigan
The Western Union Splice or Lineman Splice is a simple and exceptionally strong method to create an inline splice of two wires. YouTube University has examples of how to make the splice, note there is a right and wrong way to twist the wires together. Soldering the completed splice ensures the lowest possible resistance of the splice.
I use the insulation from a length of 8 ga or 12 ga copper wire as insulation to cover the exposed splice. Another option is to purchase heat-shrink tubing to cover the splice. A more modern solution is to use those ‘suitcase’ connectors. They make the splice and insulate the connection in one shot. Even when used in a DCC environment the connect resistance seems negligible.
Nice Job but it may be a bit sterol for my licking… I like scenery to be dated as well as cars and homes. The shiinney cost doesn’t do anything for me. I like the layout but it needs some seasoning… Keep up the great work.. This layout will shine!!!!
Beautiful layout!
Gerrymandering, I was so looking forward to tips on soldering ‘wifes’ together. Nevertheless, great tips from everyone. Cheers from Aotearoa New Zealand to all for a great year.
Gerry, I hear your pain with autocorrect. It was meant to be Gerry, of course.
Just an observation: On Kevin’s layout, once you transition to either inner “loop”, there is no way out.
A delightful layout indeed . A real joy to just sit and watch the trains go round. Very nicely done .
Great tips . Thanks .
John,
Great idea, I too have found that cocktail type sticks but slightly larger diameter work well.