Mark has been in touch with a really easy way for adding lights to model railroad buildings:
“Hi Al.
Here is my ‘Tip of the Day’… or perhaps I should say ‘Tip of the NIGHT’.
Lighting your layout, especially for “night running” of trains brings a whole new dimension of excitement and joy to your modeling.
Most people like the idea, but the comments I hear frequently are “I don’t know how”, or “it’s just too much trouble or work”, or “I don’t want to end up with a ‘rats nest’ of wiring to sort out”, or “I’m just too old and stiff to be crawling around under the layout”, etc…
Here is a simple way to solve ALL those concerns.
Using LED’s for lighting, you only have to drill ONE (1) small hole for approximately every 400 sq feet of layout space full of lighting opportunities.
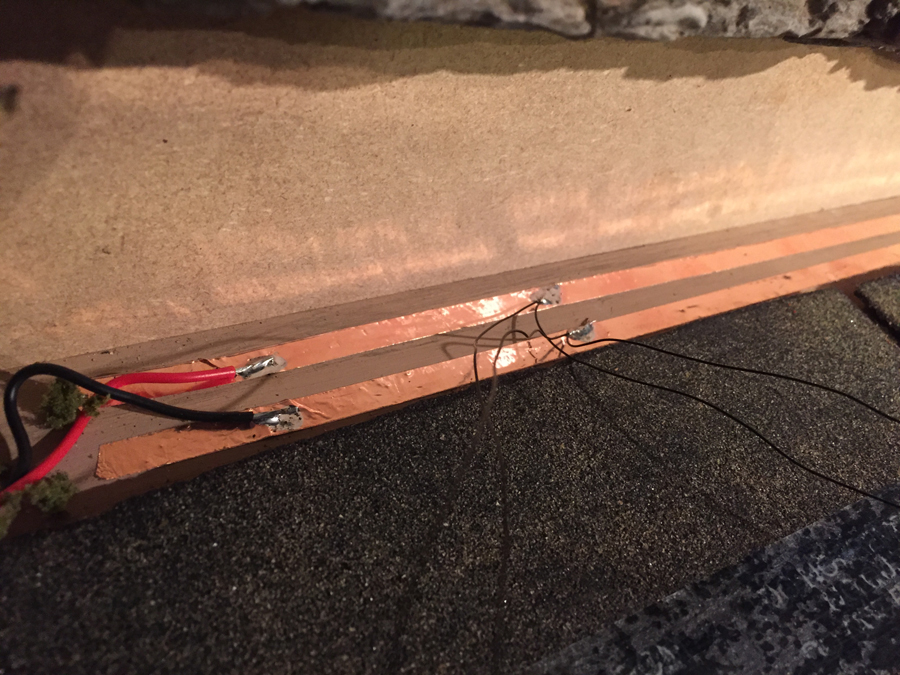
Connect two wires from your power source through this hole to a simple “above board buss” line using 1/4 inch flat copper tape.
This tape is readily available at most craft stores that sell Stained Glass materials. It is self-adhesive – just peel and stick – it will stick securely to just about anything, even rough grained plywood. It is ABSOLUTLY flat and can be covered instantly with buildings, scenery, etc.
Now just solder your LED lighting to the bus, set the structure in place and you’re done!
The copper tape is designed to accept solder readily and a small low wattage iron is all that is needed.
Need to move a building somewhere else? A 10 second clip or un-solder and re-solder and you’re done.
Need to run branch lines down several different streets? Simple – the just lay another line of copper tape at a right angle and a quick drop of solder will connect the two pieces of copper tape electrically together.
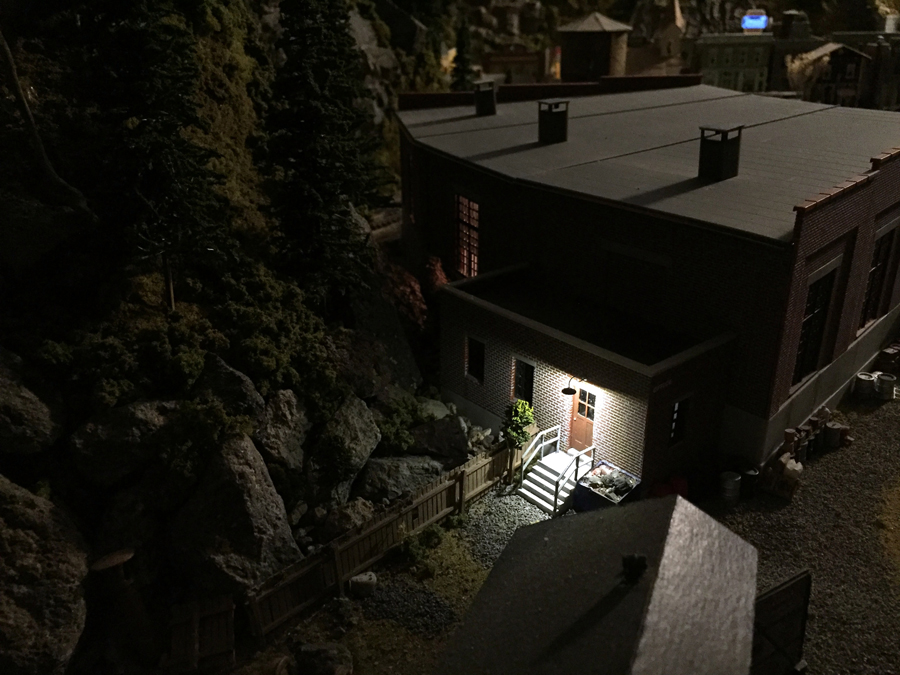
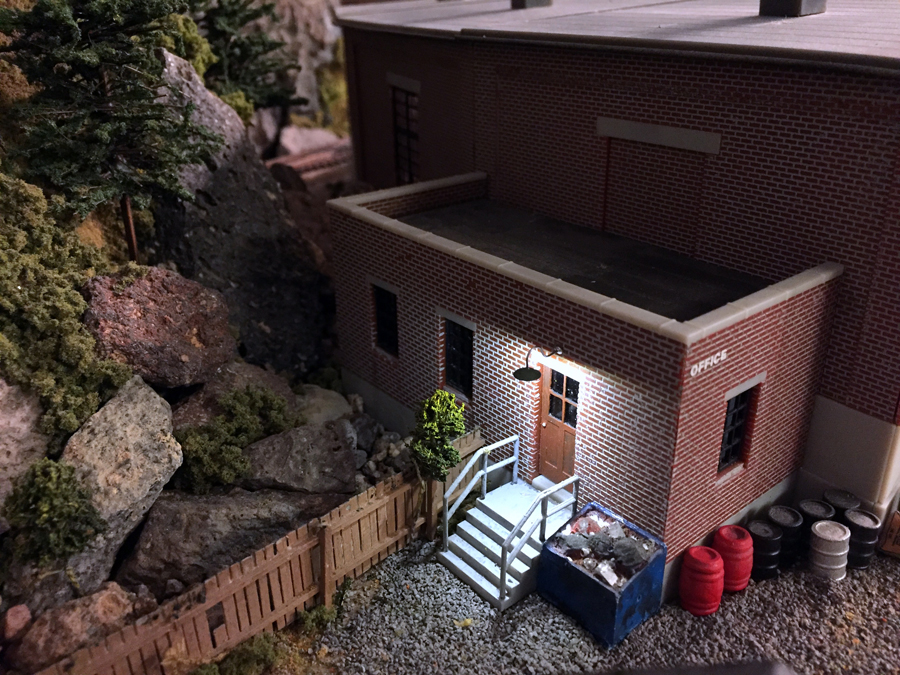
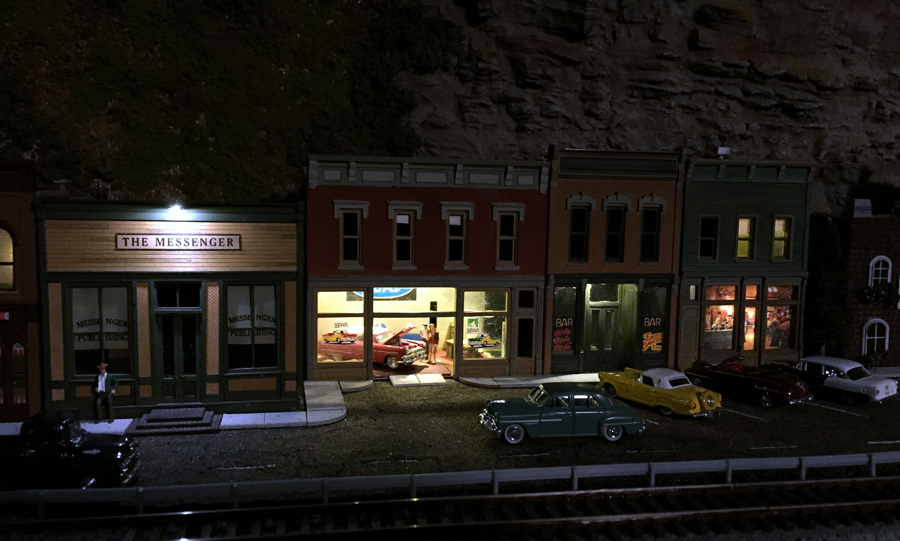
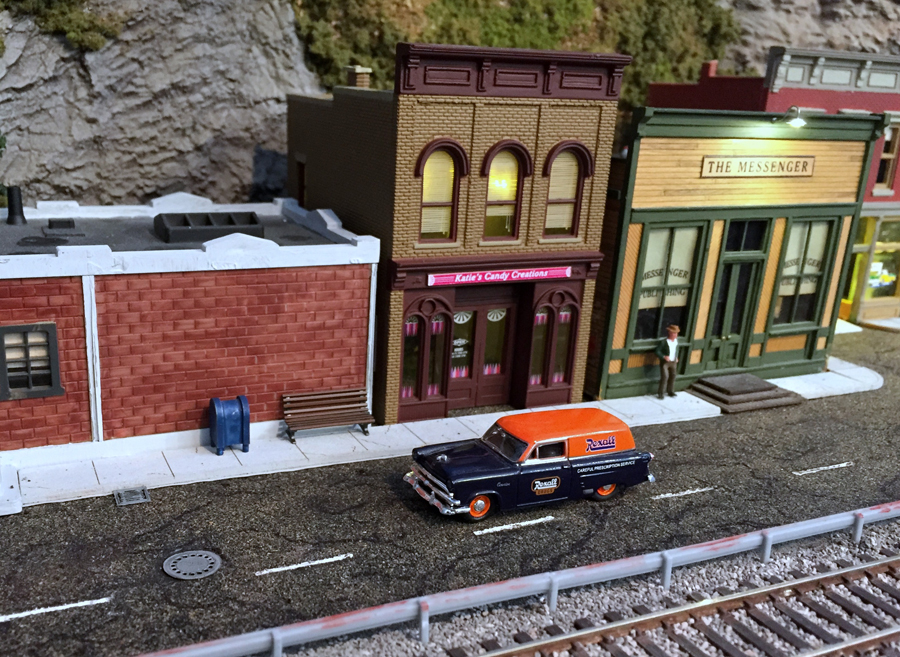
Attached are photos of several LED lit structures on my layout using this system along with a short video of fun with “night running”
Cheers!
Mark”
Adding lights to model railroad buildings:
A huge thank you to Mark for showing us his way of adding lights to model railroad buildings – it’s an excellent ‘how to’ – it’s no wonder Mark is in the Hall of Fame. You get in there by sharing stuff like this…
And don’t forget all the Hall of Fame members have contributed to the Beginner’s Guide ebook too.
That’s all this time folks. Please do keep ’em coming.
Best
Al
PS More HO scale train layouts here if that’s your thing.


Brilliant. Just brilliant.
Beautifully done!!!
Well done my friend. You are well worthy of a lace in the Hall of Fame as you certainly aim to make our lives easier and our layouts more worth of the name of model railway layouts.
Thank you so much.
James Accrington UK.
Great idea using the copper tape , they used to use this method in dolls Houses , have seen it used on a model railway as a bus line years ago , but very handy way to use for lighting on a layout …Dangerous Dave
WOW!! Never thought about using copper tape! We’ve got wires (rats nest) running all over the “under layout”. Sure could have used this method early on.
Fantastic layout, and Copper tape is great idea. Looks beautiful!
Danny Marso,Rhode Island
Good Idea , but how are you hiding it in the finished lay out ???
I had not seen copper tape – a great idea.
Fantastic lighting. The detail of your layout is amazing. I love the old cars because those were popular when I was a kid. A job well done…indeed.
Great tip. We’ve switched over to LED lighting for the buildings on the club layout. The idea of using a tape buss is good as it saves on the number of wires you need to run under the layout. The catch is that you can’t rearrange the buildings as readily, but it’s great once you’ve made up your mind where they’re going to be permanently placed.
Love your idea Mark! In fact I did this very technique back in the mid1970s. Circuit boards were becoming available but I had no idea how to use them for my layout, so I did the same thing you have only using strips of aluminum foil and tape. I made a model of Disneyland (with the train going around it) using Lego and wanted to light the buildings easily. Each strip was on a switch so I could turn on each area separately. Simple but effective! Thanks!
I hope to get started on my layout later this year, on taking retirement. This tip is so timely and will undoubtedly save hours of wiring and head scratching. A big thanks Mark and of course Al for getting all these awesome how to’s to us.
Ed
Would love to see more of your layout. Beautiful detail in those buildings
Looks neat.
Paul
Yep Mark that is the reason you’re a Hall of Fame.Experience and the ability to share in a easy to understand way. I assume the adhesive insulates the copper at the crossovers. Keep’m coming.
Bob in Illinois, USA
Fantastic !!!!! I only wish that I could do that on my upcoming layout.
Tip: Got a “rat’s nest” under the table? When I build my table I plan on drilling holes through the cross members for use in the wiring. Then I plan to run the wires through the holes and secure them with cable ties and all of the control wire to terminate at the control panel.
Now comes the trick. I use something called “Brady wire markers”, (only because Brady made the first ones). What you have is a little book, about the size of an index card, about 3 x 5.
There are multiple sheets spiral bound as to make it a flip page operation. On the pages are strips of sticky adhesive and on the top the strips are printed numbers or letters. The book that I have goes from 0 to 50 or something close to that. If you put them next to one another, you can make any text combination.
Record the number and where it comes and goes; keep track in a spread sheet or the old fashioned way with paper and pencil. Run the numbered wires to where ever they go run then use the cable ties to make it pretty.
We used to run hundreds of wires thru conduit and terminate them in large control panels in an industrial plant. A book of these cost me about $7.00 US. If the wire is small enough, cut the strip in half and use the cut piece somewhere else. You can also remove one easily and use it again.
If you make the negative black or green or something else, you know by color where they go.and skip the wire marker.
They are available in hardware stores and electrical supply houses over here. I really don’t know about countries other than the US.
Barry
Chesterfield, Missouri, USA
Great idea! You didn’t mention in your tip but your first pic shows that you need two cooper tapes per buss. When you run branch tapes that cross the opposite polarity tapes, they need to be electrically isolated from each other. Keep the ideas coming. Tim
A great representation of the real thing,perfectly executed .
Kudos to you.
Mark,
Thanks for the great ideas. I especially liked the video. It set off a whole train of ideas in my head for night lighting my layouts.
Wow very realistic.
And so in the beginning… there be LIGHT! Just outstanding.
nice lighting great how to never heard of the copper tape well worth chasing up at our craft shops.
Forgot to say how realistic your buildings and town look- just like I could step into a simpler time!
Mark, this is really wonderful. I especially like the fact that you run the freight train so slowly. We never did that when we were kids! But it makes for fantastic night time realism. Thanks for sharing. JD
Mark,
How thick are these tapes? And is there an online source for them? I wonder if they might solve a very different problem on the layout I’m just starting. I have a track crossing with four insulated frogs whose spacing is just wrong for my two main locomotives: the two electrical pickup wheels on one side cross the frogs at the same time, losing power to the engine, and just when they’ve coasted past, the two wheels on the other side hit the other two frogs (which are skewed because of the angle of the tracks). Of course two of the frogs have to be insulated to prevent shorts, but I wonder if I could put this copper tape on the other two. That is, if it’s not too thick and if I can buy it online, as I don’t think there’s a retail source near my small town.
– Larry in Maine
I used this copper tape in the 1960’s on home built electric race track layout. With all the running of braided contacts on this tape, I never had any connectivity problems.
Great idea. Just another thought. You could also run the copper tape beneath the layout by adhering it to the underside panels & running wires through the layout to connect to the copper strips. This would also eliminate untidy hanging wires under the layout.
Just anther thought. I have been using 4 port USB hubs & USB extension leads to distribute power throughout my layout. This eliminates a multitude of wires running under the layout. I strip off one end of the lead to connect to the power source & plug in the leads to the USB hubs to power LED’s on the layout. If you need further lights just plug a lead into the hub. They are very cheap to buy on EBay ex China
Once again it seems the easiest solution or idea is the best to put into practice. I like it very much.
Thank you for all the advice, it will come in handy.
Great lighting and so realistic. I loved the folks in the auto show room. Thanks for the tip and the tour. Cheers! NJ Mark
Copper foil is readily available. Go to Amazon. search for “stained glass foil”. You will find many options. Pick your width, pick your length, go for it.
Still in Training,
Carl in Kansas
Very Beautiful layout!! Love the Vintage setting too! Haven’t seen a Rexall Drug store in years either! The Car Show room was a very creative idea, Loved it! The detail is impeccable! Fantastic! I speak for myself and others when I say that I would love to see more of your layout!
Great Work!
Phil in Alabama
Simply de-lightful.as the COG passed down the street. Thank you Mark.
As I read all the comments concerning Mark’s sensational work, I gained greater insight into my lighting task. Simplicity is the necessity to handle a complexing job. Thank you fellows for your ideas.
Tom from Maryland, USA.
Great Idea
But I would advocate some insulation for the exposed areas of the bus system
Excellent! No more to add. Cheers! NJ Mark
Great pictures and great idea. As I have posted with the pictures of my layout, I have to electrify all of my structures with LED lights. I’ll have to check if Michael’s sells the copper tape. Thanks for the beautiful way of lighting.
To Phil in Alabama:
There is still a Rexall Drug Store in Chamberlain, South Dakota. (The only one I know of.)
This same tip came from my good neighbor friend and his Son, using the copper strips for streets as well. Then every automobile can be fitted with headlights and tail lights (LED’S) with simple contacts underneath each vehicle, then the vehicles can be placed anywhere on the layout where you run copper strips. That way vehicles no longer have to be set in one spot forever on the layout.
Marvelous idea.
The copper tape that has been used for slot car track over the years works very well too.
Mark, I like the copper strip idea, where would you use any resistors for the LEDs
To Phil and D.J.
There is a Rexall Drug store is Barstow, California.
Where do you have the resisters needed to light the LEDs? The lighting looks great, especially that building porch in the first photo.
I’ve waited over 40 years to start a layout, and have delayed even more when reviewing all of the fantastic layouts presented in your blog. It’s discouraging! However, when I do find the courage to start, is there a way to look up such great ideas as this one on your site?
Lee
VERY COOL and I did this same method in the early 1970s!
I did a Lego model of parts of Disneyland at HO scale (using my HO train as the Disneyland railroad). I took stripe of heavy duty foil and simply taped down the lighting wires and it worked perfectly! I also had several camera flash cubes (format he old Kodak InstaCamera for those who remember) and put grain-of-wheat bulbs into them to use as reflectors for a light house I did, also with Lego.
Something’s it’s the simile solutions that work best!
WTG Mark looks great! nice looking layout! Have a nice Christmas
Hi Mark, lighting effects are fantastic. Could you please warn everyone about how many LEDs you can connect to any given supply? Each LED likes about 10 – 20 milliAmps. So if you power supply is 300milliAmps, you can connect no more than 15 LEDs !! Also, they drop about 1.2V, so if your supply is 5V, you need about 400 ohm resistors in series with the LEDs. for 12V you need about 1,000 ohms. Resistor=Voltage/Current. Personally, I prefer to use insulated wires and screw terminals so that my supply rails can’t be shorted.
Brilliant idea Mark! I’ve seen the copper strips mentioned before on this blog, but not with the excellent photos and results that you have achieved. I loved the video too — finally a train running slow like the prototype would be. Thanks for sharing your marvelous layout with us. And Merry Christmas and Happy Holidays to all the model railroaders who read this. Also, special thanks again to Alastair for making this blog possible. I know it must take a lot of hard work just to manage the posts.
Good workmanship Would like to see more
They all look so real! Fantastic!
Thanks for making train life so easy.
What do you use to insulate crossing tapes to prevent a short.
I would have never thought of that in a million years
Great idea!
Never thought of that – great idea
Very nice, My previous layout was lit all over, including cars. My new one is now daylight only, if for no other reason than tiny wires and tired eyes!
Great job on this one!
Thanks Mark – I was very encouraged until I read the comment by Stephen White with the electrical technicalities.
Andrew in Oz
I used 1/2″ tape to wire 9 tracks in my staging yard. Then had one lead to the bus,