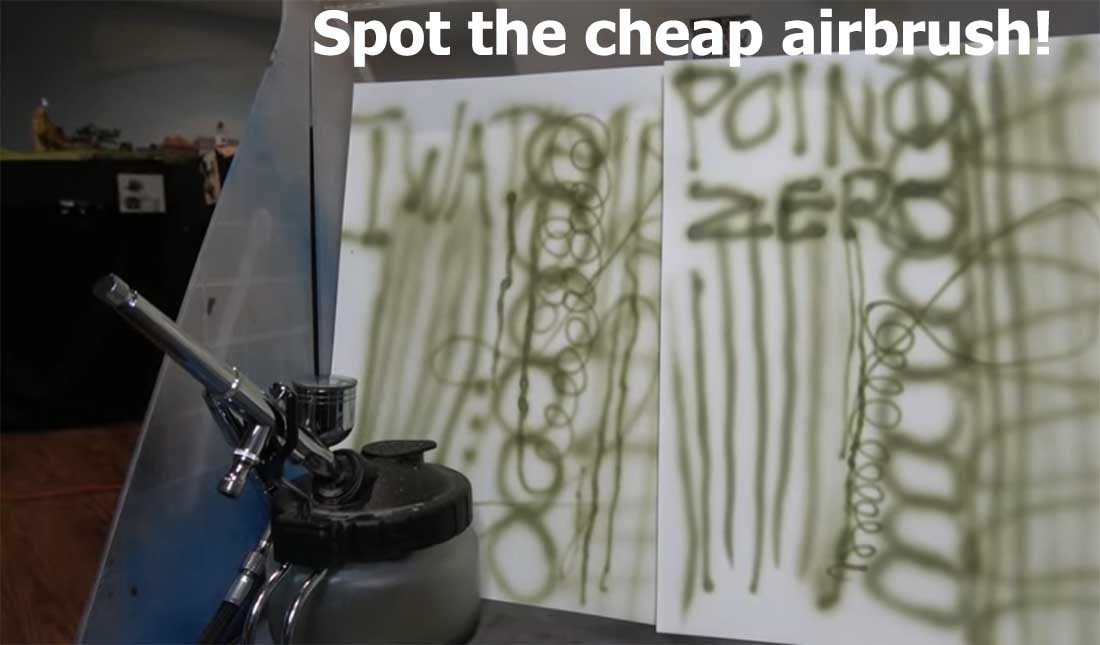
Rob’s been in touch with his model railroad airbrush findings.
He has an expensive one, but wondered how a cheap one would compare.
He’s made a very informative video – because like most things, the quandary is:
Can a cheap one do a good job? Or would that be a case of ‘buy cheap, buy twice’.
Do you really have to bite the bullet and buy an expensive one?
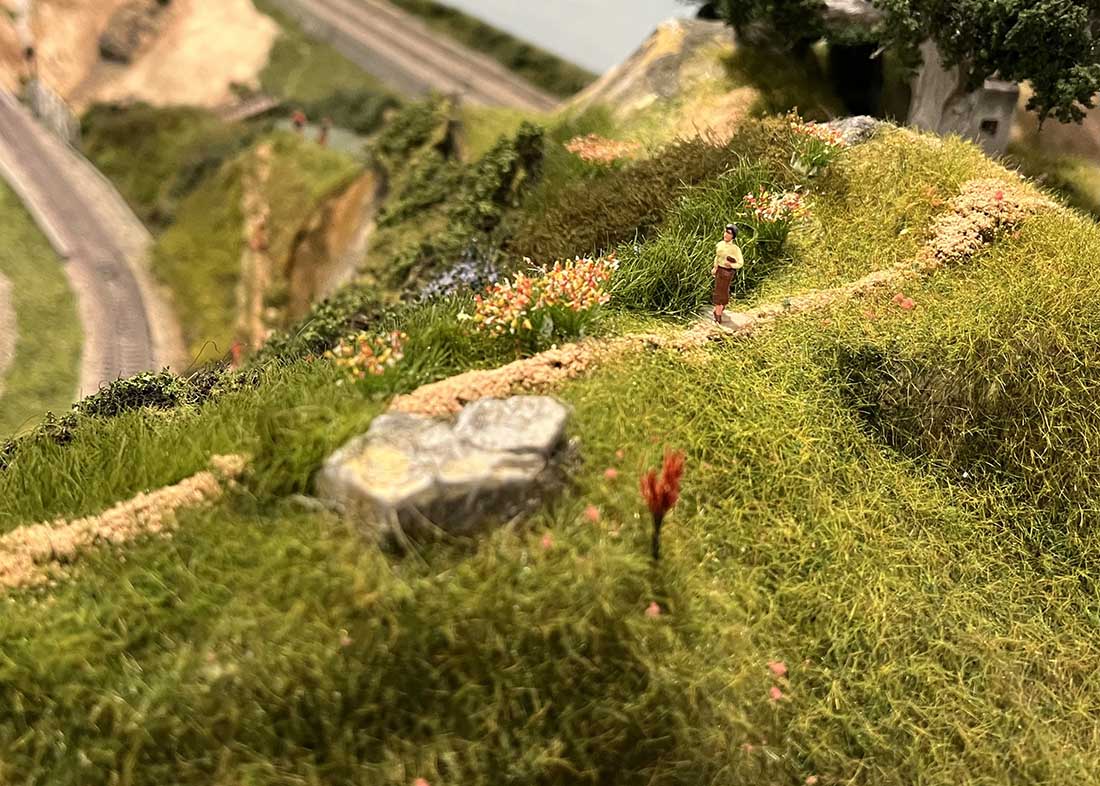
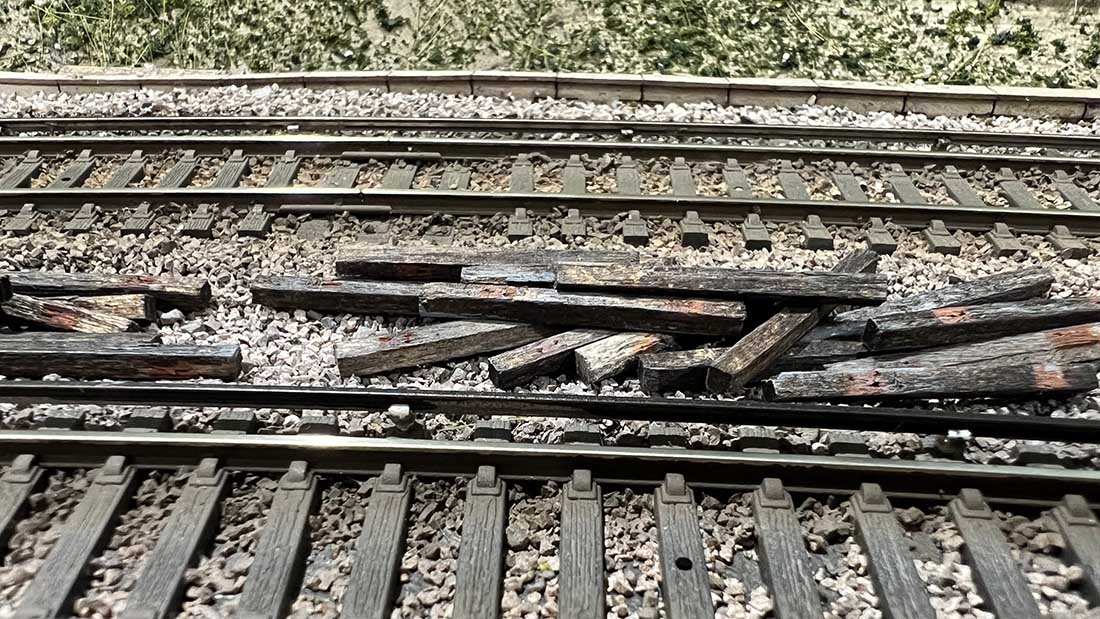
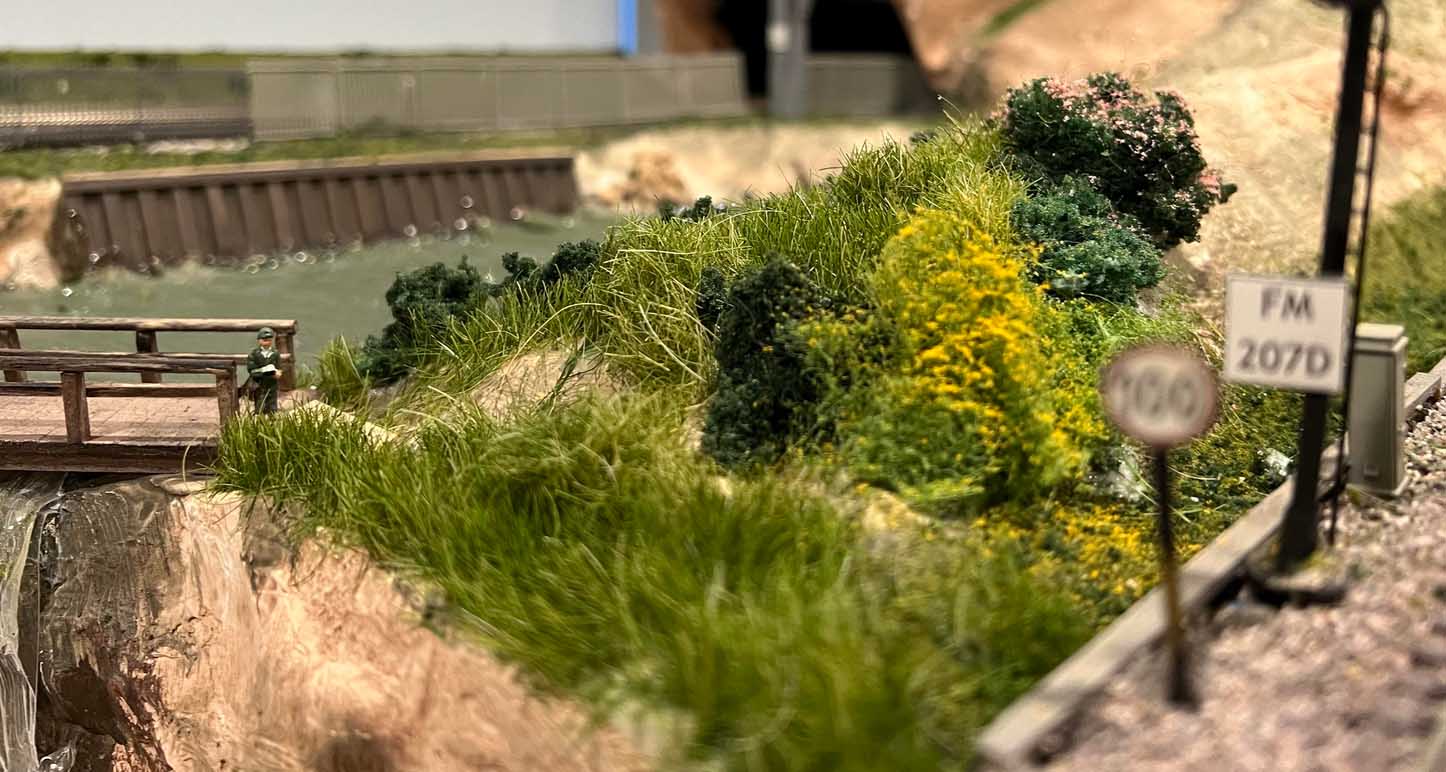
Well, have a look at Rob’s video, and what he’s done with the scenery around his layout.
You’ll be pointing in the right direction when if you are thinking of buying an airbrush for your layout.
He’s pics really do show it off too:

A big thanks to Rob.
I’d love to hear your thoughts on this one if you use an airbrush.
Please leave a comment below!
Now on to Bernie:
“Hi,
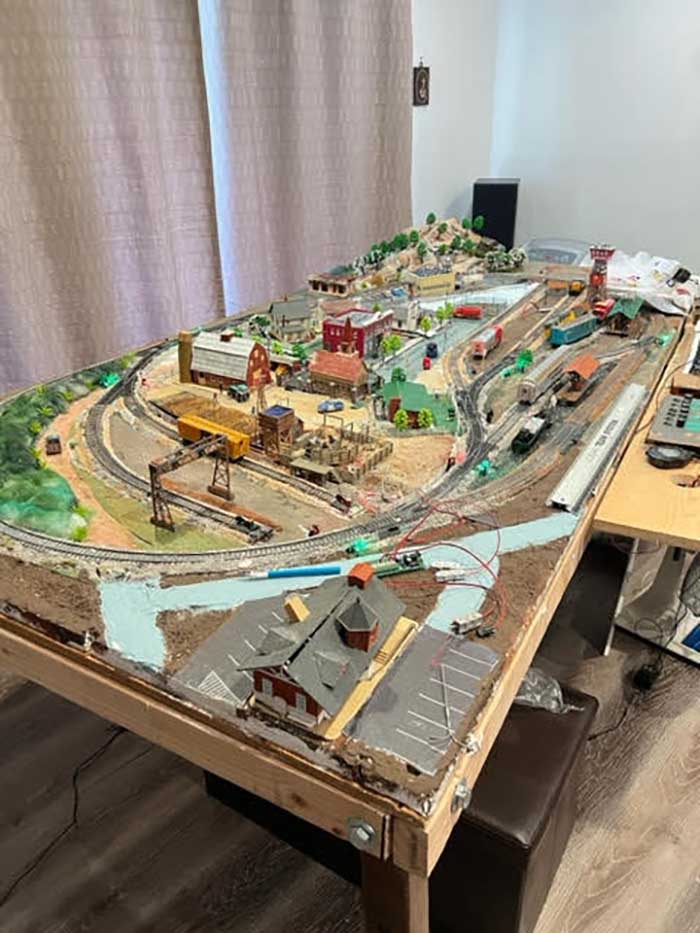
I just finished 80% finished my first HO layout for my grandkids you can see the pictures.
You can see it has a small yard and industrial spur, and another spur for the farm and a team track.
It has three blocks for two cabs.
And now I’m looking into building a bigger yard set up.
I hit on your switchman nightmare Mota vacation and I thought it was pretty nice so that’s why I was kind of looking over your stuff for anything else about yard design.
I’m kind of stuck with a 4 x 8 plywood
Bernie”

Next on to Bill, who sent this in:
“Hi Al,
I ran across an article in Tennessee Magazine about the history of the telegraph in the US and specifically, in the state of Tennessee.
It occurs to me that the telegraph has been an important part of railroading (in the USA) and therefore, model railroading for a very long time yet, most of us don’t make the effort include “wired” poles along main rail lines.
While it is a lot or work, I think the result is worth it especially with steam era layouts.
So, I quickly figured out that the poles can’t just be freestanding and must be anchored in the layout base.
Next dilemma is the “wire”.
For HO scale, fishing line is too thick and thread is the same if not worse.
What do the Hall of Fame guys use and can you post some photos of the telegraph wire on the poles and to buildings?
Bill”
Who can help Bill – any ideas?
A big thanks to Bernis and to Hall of Fame Rob for sharing his model railroad airbrush youtube. I would love to know your thoughts on it.
That’s all for today folks.
Please do keep ’em coming.
And if today is the day you get started on your layout, the Beginner’s Guide is here.
Best
Al
PS Latest ebay cheat sheet is here.


To Bill re “telegraph” wire:
Most thread is too thick to make realistic scale wire in HO scale. And the thread won’t conduct electricity very well, either.
A long time ago I took apart a small transformer that was on a circuit board just to see how it was made. It had a LOT of very fine wire inside, which I carefully unraveled and carefully straightened, then strung on HO scale light poles. I was able to use those wires to power grain of wheat lamps for street lights. Today, I’d use tiny LED lights, but the result would be the same — realistic scale wires that are also functional.
The strands in “picture wire” are fine and strong. They look realistic on HO and even possibly N scale.
Bill, I have used armature winding copper wire in the past, very difficult to work with and easily bent accidentally later. There is a product (I think I found it on EBay or Amazon) that is slightly elastic so that it doesn’t deform when touched and stretches easier from pole to pole. Comes in different diameters and colors (rust, black). Worth trying!
Rob – thanks for the immensely revealing and enlightening video. Timely too.
In several tutorials of one of the well known airbrushing masters, he proclaims that many of the affordable products are capable of results comparable to the expensive units. In fact, in one video he quips “Iwata and Badger are over rated”.
Two days ago, I bought a $49 (Canadian dollars) airbrush (Vaper 19551, from Princess Auto for those that are interested), dual action, and so far it is without a doubt delivering the goods!
Masterful scenery pictures my friend , thanks for those .
Rob
Much thanks for that excellent course on the air brushes. I have a single action that I was not good with- now I’ll get a 2 stage because I have nothing to lose. I was told that beginners should start with single stage and when you get real good at it then advance to a 2 stage. Since I never got real good I never advanced.
There are some of us that dont advance out of the beginner stage in many other aspects of modeling and that sir is not you.
When you say ” I’m not an expert ” I laugh because THE expert’s speaking.
Bernie
Forge ahead.
Bill
Just saw Carl’s response which is brilliant. I’m stealing his idea.
Big Al
Nice- Danke
Rob..::always stunning
Bernie……nice job
Rob. A great tip with mixing paint by directing air in the gun. I was mixing paint outside the gun and always ended more paint than I needed.
I was looking for a new razer and found name brands very expensive. I went to Ebay and found an “off brand” at a 70% savings. The actual head looked the same as the name brand. It performed perfectly. The only difference was the housing. They were likely made in the same factory.
I have painted real cars and trucks for years and found the price op paint guns does not matter it is how good the painter is. These days my hands shake so bad I have been teaching my wife how to paint.
Thank you for the air brush video. Very informative.
Hi Rob, as always a wonderful review and video. I also have an Iwata eclipse, and I recently had some issues with spatter like you have. That Point Zero looks like a great little alternative as a back up brush and certainly well worth the small investment. Thanks for the illuminating review and keep up the great videos. Glyn.
very nice
Thanks for a great comparative video on airbrushes. I love my Badger system. This was very helpful. Many Thanks.
I model in Z scale (1:220) and have yet to find anything that is satisfactory for overhead wires. I think I’ll try some of the suggestions about fine armature wiring or just say the local power companies buried the lines (something that is becoming more common with climate change catastrophic weather).
The used ties along side the tracks were the best detailing i’ve seen – VERY well done!
To Bill,
Ditto on what Carl stated. What he is referring to is Magnet Wire. Spools of Magnet Wire are relatively inexpensive, with sizes (awg) getting down into the 40s (which might be too thin to even carry the current for an LED). If you do decide to use Magnet Wire to carry current, just remember that the wire has an enamel insulation; you have to remove it from the ends when making connections.
Since I am one of the last to read these posts, I hope this gets to the person who needs it:
EZLine comes in scale sizes just for telegraph or telephone poles and model ship rigging.
It’s sold by a company found at — berkshirejunction.com
The company is in Massachusetts
I have used airbrushes for over twenty years to paint car bonnets, wheel covers, portraits and general paintings. I have a range of airbrushes I use including a couple of cheap ones I purchased through eBay. I think it can be the luck of the draw. The two cheapies I have perform very similar to my Paasche, Iwata and Badger. These name brands all cost $200 or more each. My cheapies cost me around $30 each. I have had no problems with these. When painting I generally have several airbrushes set up, which includes the cheapies. It has not been possible to tell where I have used the name brands and the cheapies. The problem with the cheapies is the availability of parts should you need to replace something. For the name brands parts are readily available worldwide.
Re replacement parts; sometimes you can replace the cheap airbrushes for less than replacement parts for the expensive name brand airbrushes. If you are new to airbrushing, buy a cheap one to see if it is something you will use often and have the patience + skill to develop the results you are looking for. Then you can look at brands, price and value. I started with a good airbrushing book that saved me tons of time getting started. I use good name brand airbrushes for projects requiring very fine control and keep spare parts on hand. You can also get good results with cheap, off brands but the metals used and plating quality are often compromised for pricing. If you are getting good results with the cheap ones, then stay with those, just have a spare on hand. I do not know if parts are cross compatible. That could be an issue but you can buy several cheap airbrushes for the price of one name brand. This video is great information to consider.