Roger’s been in touch with his model railroad design and he’s looking for comments:
“Hi Alastair.
I have been following your website for a couple years now and gained much knowledge from all the contributions. I appreciate greatly what you are doing.
I received a Tyco train set for Christmas when I was about 12. Simple figure-eight but I loved playing with it. Not long after I dropped the (bakelite?) controller and it shattered.
Fast forward about twenty years when after college I started my first real job and ran into a hobby shop owner who was a model railroad enthusiast. He introduced me to the local club and I quickly became enamored of the hobby and a member of NMRA.
I purchased a Tyco starter set followed by numerous high quality building kits, engines and cars and made a start on a railroad. Just a simple loop with one siding on a 4×8 sheet of plywood supported by 1×2 framing. Then life got in the way and I set aside my railroading for another 45 years.
Now retired and widowed, I dug out my boxes of railroad equipment with the intent of starting again.
After going through your Beginner’s Guide and numerous other websites, I decided I needed to properly design before building using one of the popular computer design tools.
I have tried several and have settled on SCARM because I was able to do a complete room design, a capability I was not able to duplicate with any of the other tools.
Before describing the pictures I need to say a bit about the design requirements.
First, all of the equipment I have is HO-scale and I don’t want to go smaller – my eyes and fingers won’t let me.
One of the engines I purchased years ago is a Rivarossi Big Boy and I want to be able to run it. Hence, the minimum radius will be 21-inches. Specs say it will run on tighter curves, but my experience on 18-inch curves has not been good. I’m hoping 21-inches will be enough.
Next, the only room I have in which to put the railroad is a relatively small 10×14 feet, and it also must serve for general household storage. So, practically, I have only about 10×9 feet with one corner cut off to allow access to a closet. The design is based on Atlas code 100 trackage with #6 switches, but can be changed if I see a reason to do so.
Finally, I want to model the area around Peace River in Alberta, Canada. There is a railroad through the town and the oldest remaining train station in Alberta from the steam era which I hope to include at some point. For those interested there is much available online about the history of the area and the railroad.
Given these limitations for my model railroad design, I have developed a preliminary design open to any suggestions.
There are lots of opportunities for switching and storage, as well as some space for buildings and scenery, which I have yet to work on. As indicated above, it is done in SCARM, and I think your readers will appreciate the capabilities of that software.
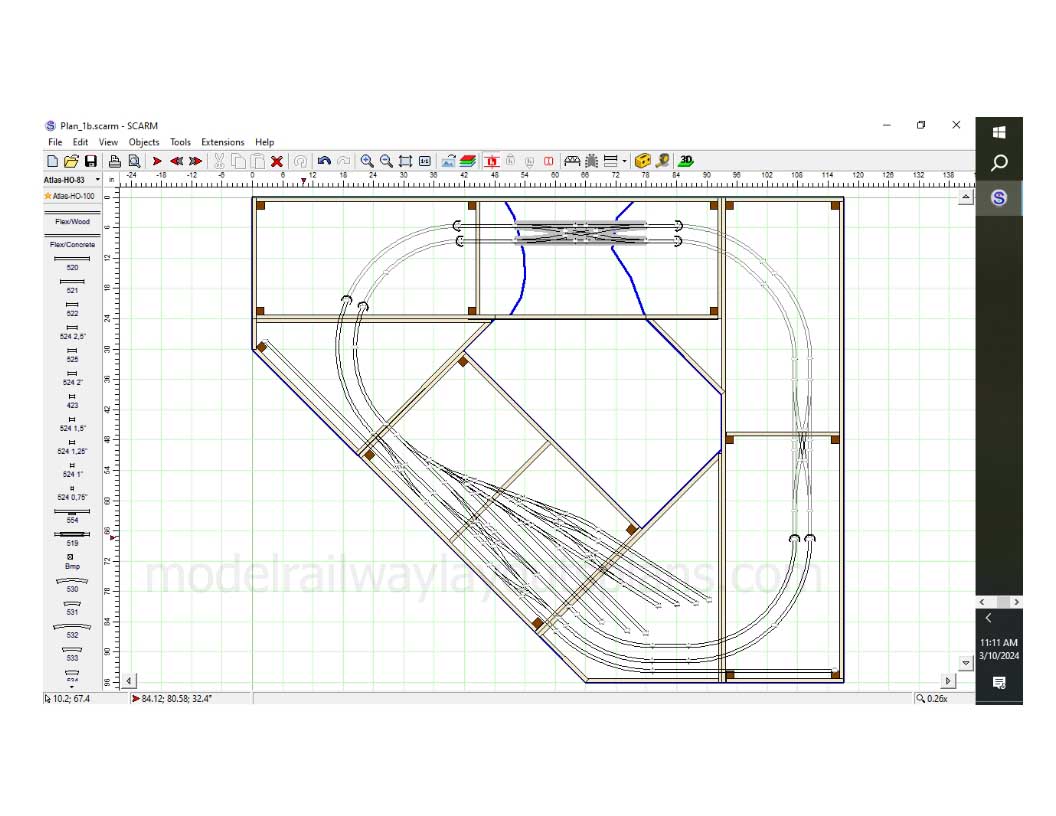
Figure 1 shows the track layout and underlying benchwork – 1×3 framing with 2×2 posts.
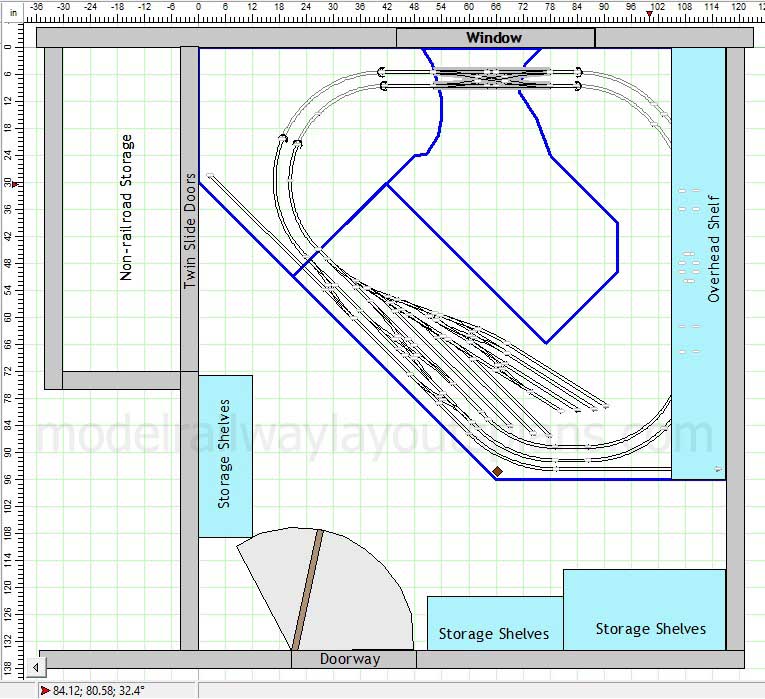
Figure 2 shows the layout within the room walls and existing shelving. Note the window and doors are also identified.
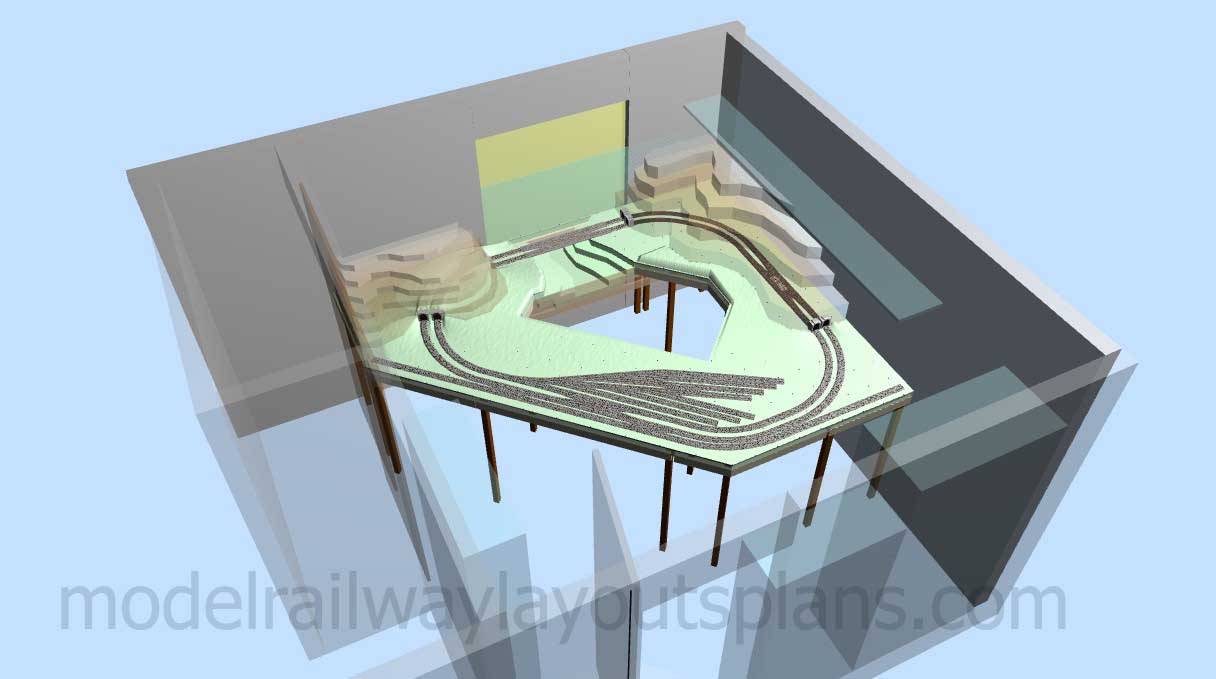
Figure 3 is a 3-D SCARM presentation of all the components, including layers of solid-foam board for mountains and a river and bridge in front of the window.
I’m not entirely satisfied with the current design. I tried three other configurations which I felt did not work as well. I would appreciate any comments you or your readers may have about my starting attempt.
Roger”
A big thanks to Roger for sharing his model railroad design – please do leave a comment below if you have any thoughts on it.
I know lots of you start with Tyco trains – you can have a lot of fun with them, like Stephen: Tyco HO trains.
That’s all for today folks.
Please do keep ’em coming.
And if today is the day you get started on your layout, the Beginner’s Guide is here.
Best
Al
PS Latest ebay cheat sheet is here.
PPS More HO scale train layouts here if that’s your thing.

Thank you Roger for that great solution to working within a confined space. That triangular pattern could be the solution for many of us confronted with shared spaces.
Roger, A nice plan there. A few suggestions. Your Big Boy would be happier with wider curves, say, 24″ radius. If your layout height could be higher, enough, that you could build shelves along the front of the layout. A skirt or doors would hide your treasures. This would permit you to use the full width of the room. Do look at Peco Flex track and switches. This would permit transitioning your straight track into each curve. There are railway clubs in Calgary and Edmonton whose members should be helpful. There are a few train shows in the area as well. Good luck, and have fun.
I like the general concept of a triangle layout. PLEASE reconsider your “double crossover “ hidden ion the mountains. You are asking for trouble.
Roger, It is a well-thought-out use of space and a nice layout. I particularly like the storage planning. It is surprising how much storage is needed for a model train layout. Of course, there are the trains, the rolling stock that is not running now, and all the landscaping and terrain supplies. There are always leftovers to store until needed. Great work, Rob
always helps to see others views. nice work.
How about a single track main that gains altitude with a branch line to a mining or logging industry or a town on the upper level on the shelf (dead end with a turntable). Switching opportunities on the main level and a destination on the upper level. I would put a gorge and a trestle or bridge in front of the window. IDK if you could afford 24″ curves with that idea tho. Anyway good luck with your plan
I would be concerned about how to take care of any derailments up against the wall, looks like a very long reach. Having any kind of turnouts inside mountains or not being readily accessable is a recipe for frustration.
Good to make a start. I would not recommend a “donut hole “ as access to the corners means ducking under the table (unless you have a lift out for entry). If your track radius is 18 inches ( I run my layout with 18 inch curves and everything works fine though I can’t run long passenger cars) I think I would then try building a “u” shape layout. You could design 10 feet along one wall with 18 or up to 30 inches in depth and then up to 4 feet at the bottom of the “u”. That should allow egress of 2 feet to the center and allow for a continuous loop. Take your time with the planning. You have many options.
Jim AZ
nice layout design
Roger,
Your triangular design is a great start.
As stated earlier, the double cross creates a few concerns.
I wonder what a point to point layout would produce in that space.
Matt
Roger, the first observation is, it appears you have close to 45″ radii on your curves that will greatly enhance the appearance of your operations.
Having a turnout, in your case, a double cross-over, under the landscaping causes me to cringe.
ANY hidden trackage needs to be accessible in case of a simple derailment up to and including, especially the double crossover, track repair.
On my third year of operations with all the landscaping in place, I began to have constant derailments under a covered part of the trackage.
Since I had built “old school” mountains, it was easy to reach in from beneath the layout to rescue the loco & rolling stock. BUT! The next pass, with a different loco, also resulted in a derailment.
Fortunately, I was able to pull the entire 12′ X 8′ layout 24″ from the back wall and repair the track joint.
I also have a turnout beneath another part of landscape and realize there could also be issues there. Again, because of “old school” landscaping techniques, I can get to any issue and repair it – but I still have to move the entire layout away from the back wall.
Love the layout! As you progress, there will be areas you may need to re-think. I recommend white glue to secure the roadbed but NOT gluing down the track, use track nails! Changes are much easier to accomplish it the track isn’t glued down.
Once you are on operation and happy with how everything works, then you can apply ballast – which essentially does glue the track down. after the ballast is totally dry, then you can opt to remove the nails.
Enjoy!
Thank you for including the layout diagrams.
It’s much easier to ‘steal” good ideas that way.