The response to Kim’s model railroad track cleaning car has been startling.
(You can see his last post here: How to clean model railroad tracks.)
Lots asked on the comments for a ‘how to’ – and a good number of emails were sent to me too.
But Kim was ahead of us all. Got this in shortly after his first post on the cleaner:
“Hi Al and everyone.
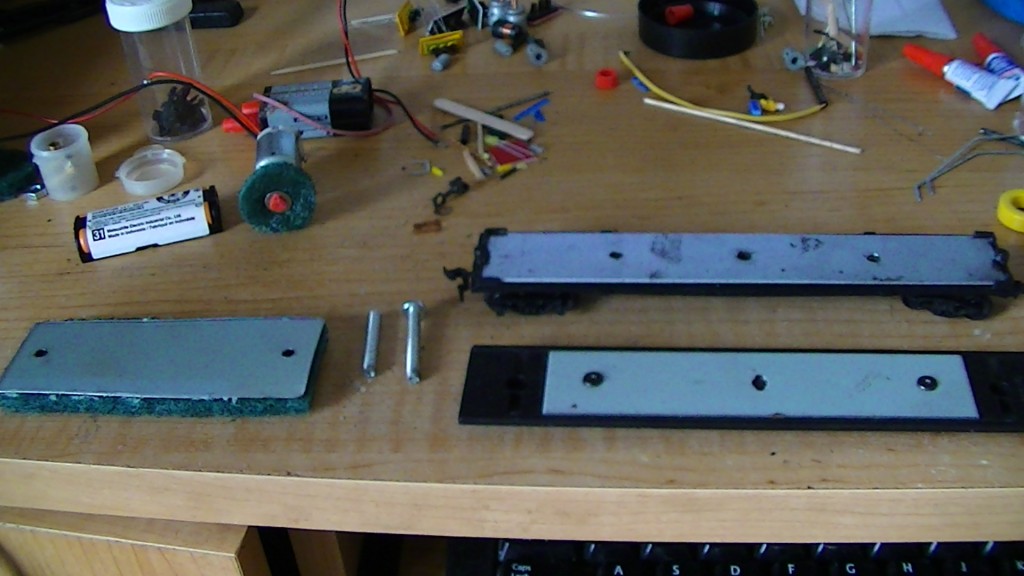
How to make a dragging track scrubber:
1 old car frame with wheels.
two screw’s with the heads cut off.
metal plate with a dish scrubber instant glued to it.
Take your old car and inlarge the two holes each end already there. Make the hole’s slightly bigger than the screws so they slip threw freely but tight. Line up the holes in the car body with the plate. make pencil marks and drill two holes. now make sure the holes are big anough so those two screw posts screw into them.
Glue the pad on with instant glue onto the plate. Slip the posts into the body of the car and threw. The scrubber will sit even on the track and if you lift the car the posts will slip threw.
Now when the scrubber is sitting on the track you can add bolts to the posts to push down with more force. If you secured the scrubber to the car it will cause the wheels to lift if you add weight, and may cause the car to start to bend or warp.
The more force you add to the scrubber the more you will have to add to the car. You don’t want that. If need be can add tiny weights above the wheels each side to push down on the wheels..but I didn’t have that problem.
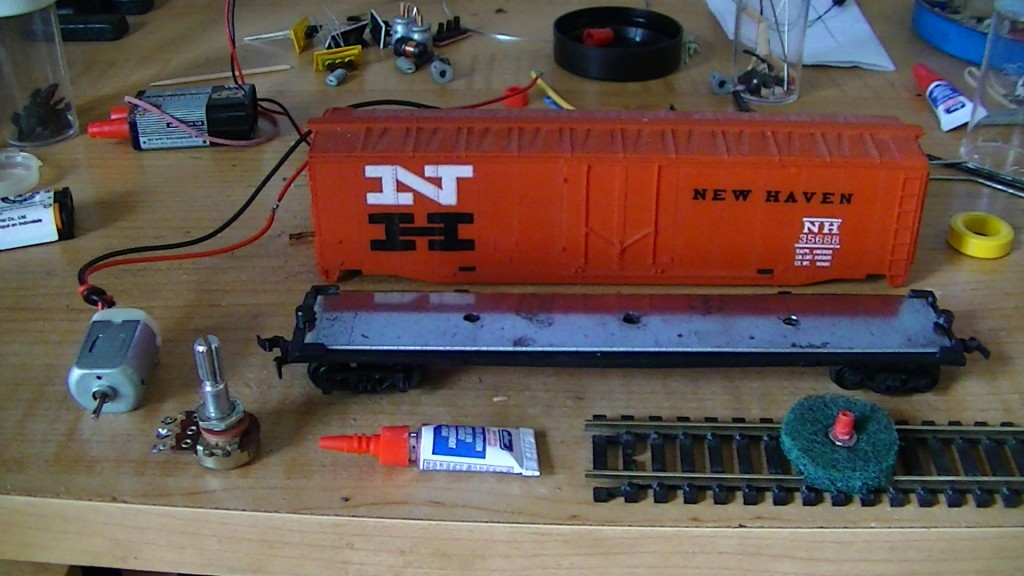
I’m using the same dragging scrubber for the motorized one. Take an old car. Take a small RC high output power motor, or I think a hair dryer motor or similar will do.
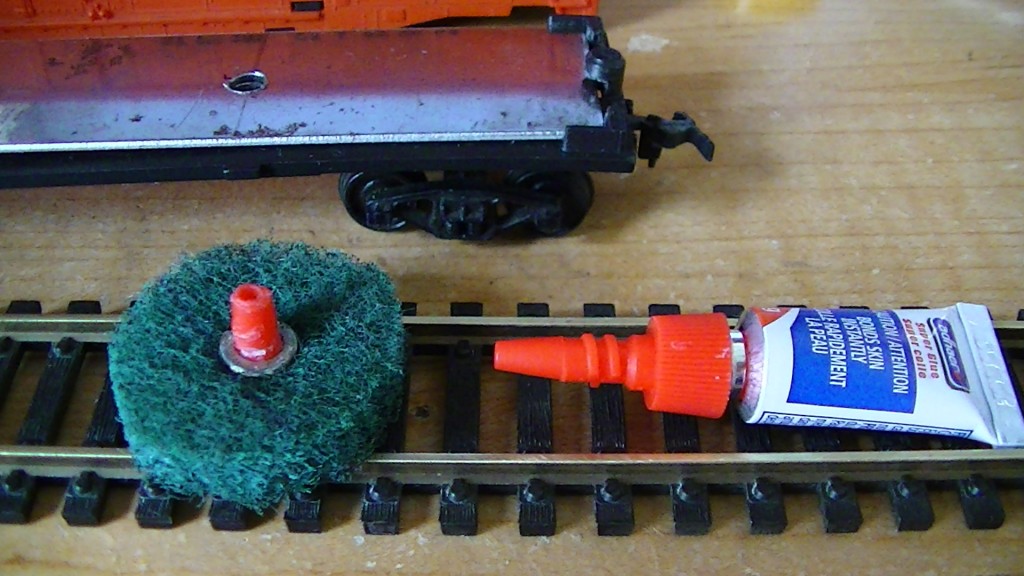
As long as you add power to it and is hard to stop with your finger will do. I took a used instant glue top cut it… added a tiny washer to the large end, slipped on a pad that I cut into a small circle.
Slip it on the post. Add another tiny washer (in photo). I did it this way as it wears down and is useless it would be very easy to make another fast and cheap.
Now take your car. If it has a hole in the centre already, drill it out just enough to slip the head of the motor into it (meaning where the post comes out that little head piece).
Now the motor post should be sticking out the bottom of the car. Attach your pad onto the post of the motor, it’ll be tight so give some force. Now secure the motor into place with a bracket or something so it doesn’t move and is even.
I took a volume switch from an old radio to vary the speed of the motor. A 2.7 volt battery run this scrubber at high speed. As you can see with the test track, it was passed once and you can see how much a difference it did on a over 20 year old dirty track.
Electronically it isn’t hard to figure out how to hook the motor and switch and battery. Positive power runs to the first post of the switch. Another power wirer runs from the second post of the switch to the positive lead of the motor. Negative runs from the battery to the motor. If need be add a resistor to the power wire going into the switch so it isn’t burned out.
The bracket you see in the other photos isn’t very good and was moving too much. You van use the extra holes in the car body to make a bracket to hold the motor in place.
This build looks very crude but works amazingly well. If you don’t mind making 2 tiny holes in the top of the car body you can slip a thin wire inside to activate a power switch to turn it on and off and well as tuning up the speed of the motor.
I had a set of old phones and am using the batteries to run stuff and test stuff with as they are rechargeable threw the old phones. I have one powering my scrubber.2.7 volts. Not many if anybody leaves the scrubber on the track or runs it all the time.
Once done cleaning remove it till next time – the way it cleans, it will be a long while before using again. And I use a ez command centre and ez track on some of my layout and the scrubber didn’t hurt or effect it or any points.
Any comments or suggestions would be great. Thanks everyone and thankyou Al.
Kim”
A fantastic ‘how to’! Please, please do leave your comments below.
(Kim’s post reminded me of Robert’s: Model railroad track cleaning tips.
If you’re heading off to ebay for parts to make your ‘track scrubber’ – have a look through the ebay cheat sheet and see if you can bag a deal.
Lastly, here’s another instalment from Dave. It’s a hoot!
A big thanks to Kim for sharing his Model railroad track cleaning car.
Please do keep ’em coming.
And if today is the day your railway adventure becomes more than a day dream, the Beginner’s Guide is here.
Best
Al
PS More HO scale train layouts here if that’s your thing.
And there’s the Silly Discount bundle too.


Thanks to Kim,
that’s a brilliant invention which I will keep me in my shed, out of the way, for quite a while. So thanks from my wife too.
Dave,
another brilliant video, I’m almost speechless as I nearly choked laughing whilst eating my toast this morning.
Well Done and keep ’em coming.
Hi Kim,
Well I want to thank you for the manual on how to build the track cleaner. I take it your track is “HO”, because I had to find everything to fit an “N” scale wagon, but my son had an old powered outboard motor that I comandeered and it works okay, but weight is a problem at the moment. So I’ve had to go back to the drawing board for now. But thank you for all the help and the idear as it’s just great!!!
Ol’ Puffer lol tell your wife she is welcome lol if you run into problems let me know.Oh I have a small update on that smaller motor.I drilled out the hole that it sits in.I drilled it the diameter of that flang where the post comes out.or call it the head.I pushed hard the motor into that larger hole and now the motor is very sturdy.I will add a better bracket.You notice the track.That track had over 20 years of black dirt grim nasty stuff to stop the current to your locomotive.I passed 1 time with that cleaner and look how new that track looks after.Be awhile you will have to clean it again wouldn’t it.And that cleaner disk cleans the whole track.not just the top but sides and under it.I didn’t put a lot of engineering on attaching the pad.i wanted something I could change out real fast and build pads easy and cheap.The post of the motor slips on the instant glue tip very snuggly.And you can move the pad up or down alittle on the shaft.It is so tight on the post it wont move from the spot you set it at.This is a very fun build.So simple and cheap you cant help it but try and build it.And when you finish it and it works as good as mine does you will think how much money you saved.I saved about $144.00 and more on a dragging cleaner.My cleaner cost me $0 please if you build it show me.i very much like to see my idea come to life with others.Again if you need help ask me. oh ps the money ya save you can put towards the wifes flowers hahahaha
Stemar it will work for N scale for sure.Ya that would work a small motor.Just take your time.Weight problem.Doesnt have to be great force on the pad as it spins so darn fast.Just make sure the pad is snug on the track.Can add a few bolts above each wheel.But if the pad is pushing down to hard it will lift the wheels.When you push the car with your finger and the brush wants to turn its anough force.I drilled out my hole so the head of the motor fit very snuggly in the metal plate and the post sticks out the bottom to except the pad.The motor is so snug in the metal body I can lift the whole car with everything on it off the track without the motor pulling off.Since you wont be changing out the motor only the pad once in awhile.you could careful add a weld or glue the motor tight.Oh everyone.I cleaned the track without cleaner.Dont add cleaner.The pad is spinning so fast the force will spit the cleaner all over your model trains and such and will mess up everything from stripping ya paint off to coloring.You can pull the pad off and wash it in soap water and put back on.okay im starting to sound like a chatter box sorry.if you like any other idea’s or looking for a build ask Al or me.I may have already built it.
The track scrubber is a great idea. My layout is in a very dusty environment, and keeping the track clean has been a problem. By the way, “Threw” is the past tense for “throw”, as in I threw the dog a bone yesterday. It should be spelled “Through” to pass through th eplate. I know, I am picking at nits.
To Kim: a BIG thank you for instructions and for the great idea.
Dave: what can any one say – you are a great video director.
You put a smile on my face with each video you send.
Stemar just a fast note.my fiancé is in perth Australia.I live in Canada.she sent me a jar of vegimit didn’t tell me don’t lay it on thick like peanut butter on toast.noooo so I did real thick.holy crap man. what the heck.hahahaha
To Stemar
Please let us know how your “N” scale cleaner worked out if you are able to get the parts. Many HOers don’t realize that the things they take for granted don’t work in “N”.
Fred
oi Darwin Bruce im an old fart grammer
okay forgive my spelling and grammer. now the n scale be the same but smaller right.so take a tail motor from a 42 inch electric helicopter.power it with a phone battery 2.7 volts.I have one piece of n scale I think track no cars and see if I can get an N scale scrubber with motor working.give me some time.oh and if I already wrote all this and some how it ends up on here as a double sorry
Dave is a model railroad king lol.Im grateful for the wonderfull video’s you give us.Dave do you have a spare room to rent out.I will sleep under your layout if need be.lol thanks
Stemar in the N scale car is there a metal plate like in Ho scale cars.if so mount the motor in the middle.add say nuts not the eating kind.or a piece of metal plate thicker than the factory one if any.if your shaft for the motor wont be long anough with the new plate.keep the factory cut the thicker one to smaller squares add on top of the wheels.keep the centre of gravity very low on the car or it will wobble. or like Anton Bruce member said use a dummy locomotive be more sturdier.Try and keep the weight on the wheels.let me see what I can build.
thanks for the insight into the track cleaner, look forward to trying one out myself, very ingenious
Great track cleaner post. Simple and well thought through. Thanks for another post from Dave as well. Cheers from down under.
It seems to me that you could mount the volume control through the end of the car, sticking out like a brake wheel. You can adjust the speed that way. If it is a salvaged volume control, it probably has an on/off switch build in. Your “brake wheel” now turns it on and off, and controls the speed. Now you don’t need to remove the box car body except to replace the battery every few years.
holly crap my spelling is getting bad. I ment to say that would work.I like that idea.I think the volume nob is alittle big.so be a good idea to replace it with something a bit smaller.But that was all I had at hand for now.I ordered a bunch of 1.5 mm leds to add to my rather boreing locomotives with the factory boring light.Im adding lights to then because they only have marker or cab lights.There is impression’s on the body of the loco’s to put lights.So that’s what im going to do.More Bling.Unless you buy the full out top of the line with decoder loco you get the boring factory.If you guy’s are interested in seeing an loco upgrade let me know.
YOUVE GOT SOME VERY GOOD IDEAS THERE
Thanks Thomas
DAVE: WATCH YOUR BACK!!! THERE’S A SMERSH AGENT LOOKING OUT OF THE WINDOW OF YOUR OBS. CAR!!
008
A very useful project to be sure. Just a few comments that came to mind. I’m an engineer (Electrical, not railroad) and we always think that we have a better idea.
For weights, try the lead fishing line weights. I don’t fish, but years ago they used to be made out of lead. Whack them gently with a hammer and you have a flat surface for the glue to adhere to. For the larger rolling stock, try discarded (or new) auto wheel balancing weights.
Drilling aligned holes. Temporarily clamp the two (or more) pieces together and then drill and unclamp. Or drill the plate out first and then clamp it to the car bed, or wherever. Now the metal plate acts like a template.
Glue. We call it rubber cement on this side of the pond. It is a contact cement that never completely sets and is great for things that must be peeled off and replaced or modified. Available in stationary stores over here.
Barry
kim the track clear guy what is that material you using for the disc on the tracks
as i can not figure out what it is and al for some unknown reason the volumn no work on your videos lately and i do turn it up too
I watched Daves Cam Truck video and would like to know how he did it. Was it a wireless camera or a cell phone video? I sell the wireless cameras for trains and I am curious.
Jerry Truax
Pennsylvania USA
PS I love this group. Always something to learn!!!
Soooo cool. Dave is always so clever as well as fun to watch. Can’t wait to see what’s next.
Jim AZ
Kim, your scrubber pad looks green! is one of those pre-soap pads we get in Canada. I would look for a pad without the soap as that might jammy up some of the switches.
But what a great idea, I have over a mile+ of track to re-lay which I boxed up 25yrs ago – it will need cleaning.
Dave,
Methinks you have too much fun in your loft. Thanks for the entertaining trailer. Looking forward to the actual movie. When is it due out and will it be in a theater near me?
Great use of the truck.
Mark G. USA
Would a K-D magnet affect the car’s or the motor’s operation on the scrubber?
Good morning
Kim and dave
Great track cleaner thanks for the how to
Dave
Very good video,Funny stuff!!!!
A great way to start the day
bob from florida
I have a concern about the rotating disc scrubber. You said it was turning at at a
High speed. Would it be putting micro scratches in the top of the rails
which would be dirt catchers? Maybe the cure would be worse than the problem.
Hello, Kim. I am not a typical modeler. First of all, I’m a she and I am doing a layout for the pleasure of doing it …my way… and tips from many sources! AND trial and error. I, too am creating in a dusty environment. Your track cleaner is ingenious! Now, I wonder if I have the skill to create it! Thank you!