“hi you asked for my best tip.
That would be to use dried out tea leaves mixed it poster paints left to dry break down and use as scatter material cost next to nothing just a bit messy mixing paint and tea leaves.
Thank you for all the advice you have sent”
Ashley”
“Hi Al
I work in the electronics industry and with train layout wiring I would usually add extra wiring runs or use a main power feed line to branch off or use a heavier gauge cable.
To allow for changes on your layout like adding light in buildings, extra signals or adding some new track work.
A larger power supplier to begin with, is better than adding several power supplies to make one.
Regards
Peter”
“Another tip, sorgum moss, plentiful in the woods, use hairspray or 3M fixing spray. Dry then paint to suit for excellent bushes.
Dry the stalks from a bunch of grapes for good treetrunks, 3M spray or glue on the tups and dip in chopped sponge of other material.
Use fine seived dried tealeaves for ballast and spray with 3M fixer. Clean tacks immediately with cotton buds dipped in spirit or nail polish remover.
Nail polish remover is good for weathering plank wagons if done carefully – practice on something you painted first.
Duncan”
“Hi Alastair,
My tip would be to make sure that the track and point work is very carefully laid and tested before ballasting to prevent derailments and stalling.
I have seen many layouts with amazing scenery, only to be let down by poor running due to rushed track laying.
Regards,
Dave”
“My best railroading tip is to have a son. Firstly it legitimises your hobby and secondly the costs makes even the most expensive locomotive pale into insignificance.
Sebastian”
“Hey Al, I got a tip for you.
Looking for some cheap scenery material? Do you drink much hot tea? (I like “green teas, myself.) Well, after brewing a cup, don’t throw that bag away. Dry it out, tear it open, and save the contents. You’d be surprised how much it resembles the twigs and dead leaves, etc., found on a forest floor. Or along the railroad right-away. Or along a stream.
Oh, and by the way… different flavor teas have different colors of tea leaves. (Makes sense, huh?) I drink mainly Bigelow brand teas. My favorites flavors are Orange Spice, Raspberry, and Lemon Lift.
Mike”
“Al,
One of the advantage of a rail gap is you get an authentic “clickety-clack” when the train passes over. Unfortunately, this only occurs in one place, or if you have more gaps then you hear several at once and it just becomes noise. To get a more realistic rhythm, do the following. Assemble a rake of your favorite coaches:
Then, make small notches in one of the running rails, each exactly one coach length apart – this will coincide with the leading axle on each coach, as shown in the diagram. As the train passes over the notches, each wheel on each coach hits a notch simultaneously, and the sound is in phase. As coaches in real life are about 60 ft long, and the track sections are also around 6o ft, the “click-rate” is very close to the prototype and gives a feel for the speed of the train. Of course, all the coaches in the train have to be the same length. If you have a shorter baggage car, then fit this with plastic wheels. The effect is truly delightful!
Philip”
Hi Al,
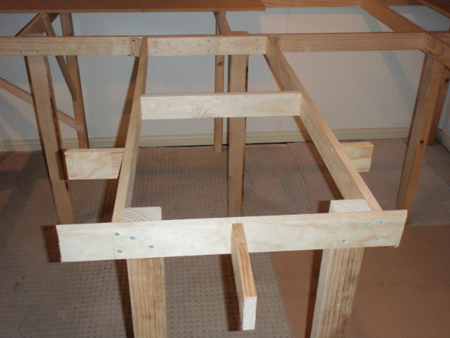
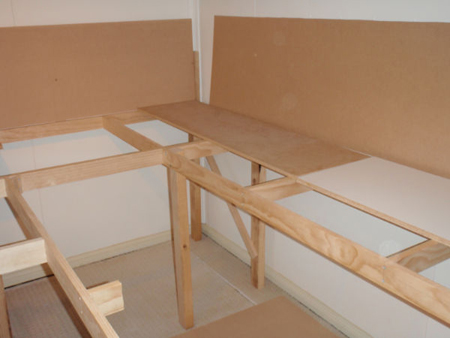
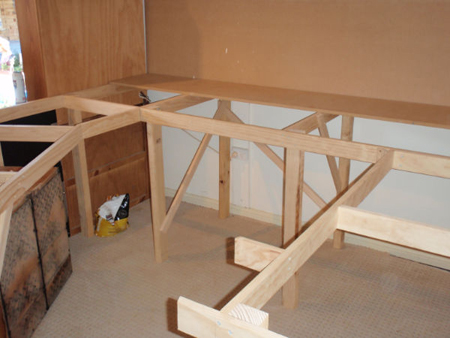
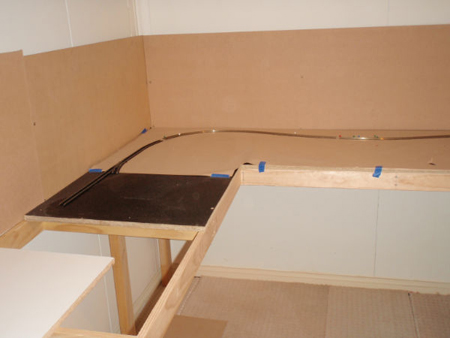
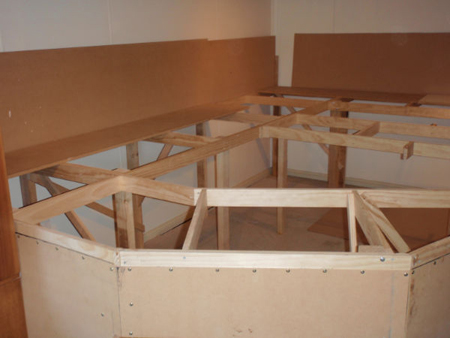
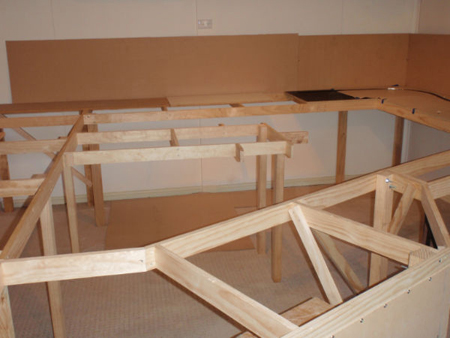
Some time ago I sent you an image of the layout plan I am building.
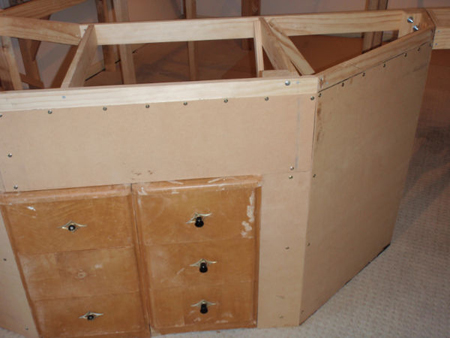
Well, over Easter, and then on my next trip home, (I work away in NSW, but live in S Australia) so only get home every second weekend, I was able to get started on the bench work for the layout.
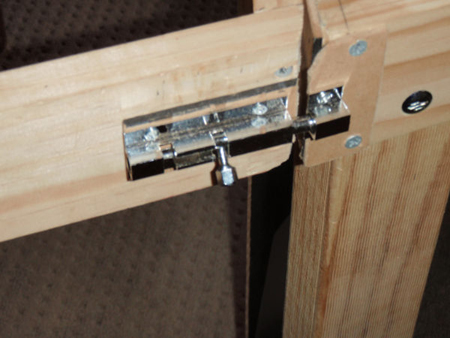
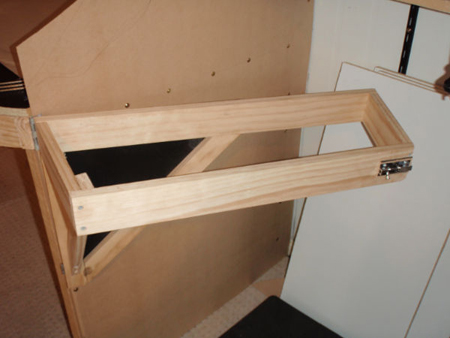
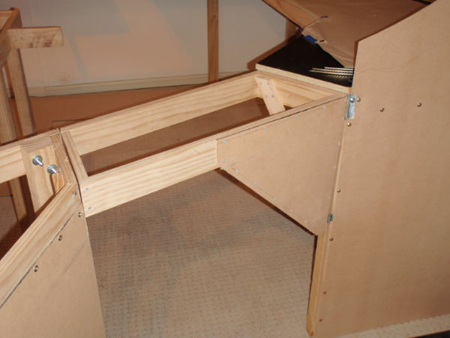
I have attached some photos for you to look at and share if you choose.
The access gate idea was from one of your contributors but modified to suit my needs. I have to allow for wheel chair access as my brother in law is confined to one.
Unfortunately, I will have to change my focus while at home for a while as it is only fair that I spend some time with my partner, and achieve some progress on house reno’s.
I enjoy getting the tips etc that you send through, so keep them coming.
Thanks
Rick
South Australia.”
Wow! Can’t wait to see Rick’s finished layout!
Click here to have a look-see at the latest ebay cheat sheet to save your hard earned cash.
And please do let me know what you think – post a comment below.
Keep those tips coming in!
Best
Al


thanks for all of the tips,it really does help and sometimes saves money.
Made me enivous too!
Hi Rick, You seem to of spent a lot of time on the Baseboard of your Layout, I hope you supply progress photos as it looks like you’ve got a great idea for your layout. So good luck with your future progress and I’m looking forward to seeing your completed Layout.
Good Luck,
Steve, NSW.
Framework is fantastic and seems to be well thought out.I ,too, am looking foward to progress.
Hi,
The tips are fantastic and helps my grandson . Tips for larger scale/gauge would be very useful. I play with gauge one electric and steam indoor and outdoor garden railways in Tasmania. The trains are mostly G scale ie 1:22.5.
Look forward to more tips.
This was very helpful on having a solid foundation. Are we going to have any article on wiring? That is something that will be covered? As well as tricks for realistic looking effects. I had a trainboard where the wires were soldered directly to the tracks. As well as the correct gague of wire to use and where it is to be used-that would be helpful…
thanks.
I like it, very informative!
Brilliant!!!!
very nice and a real time saver
I love the swing out in the bench work. How did you calculate the angle at the far end from the hinge?
One beautiful building. Just right for a layout.
Hi Rick, are you putting any videos on U Tube. Would love to see the progress, especially as I am returning to the hobby after twenty five years away. So it would be very beneficial.
If you do put some on U Tube let us know your handle to search for them, or put a link on here.
Kind regards
John
Rick, great layout mate. Just completing a room to start my own layout, a great South Australian idea.
I look forward to your progress.
Wynn Vale S.A
Hi Rick,
great work on the starting of the baseboard. I live in W.A. and wifr is from S.A.
would be good to meet up when we visit Adelaide.
Laurie
what type of foam would I use for the base on the lay out…I plan on various levels too….
Hi Rick, what a beautiful job of constructing your baseboard. I do like the swinging gate . Very nice indeed. Michael C.
Al,
I have been viewing and reading your tips for about 4 months and am in the starting phase of building my first layout. I am almost 70 now, but have been dreaming about model railroading since high school. Your readers contributions and suggestions have given me a lot to look forward to as I get on with my planning and construction. I do not have as big a space as I would like, but some concessions have to be made to the Mrs. I plan on designing my own little railroad and seeing where it takes me. Thanks for your effort and keep them coming!
Herb, N. Carolina, USA
Excellent timing for me, Rick. Thank you.
I have duplicated your gate, and added a thin horizontal bar support along the non-hinge side to prevent sag.
Just what I needed, when I needed it!
– Graeme.
This is a real help to everybody planning to start a decent layout. Many have no skills in this area and will be put off starting a layout without helpful photos such as this. Great to see this stage in detail as well as the superb finished layouts we see that inspire us all! One thing is certain at this stage – keep it level – rule number 1!!
Thanks for all the great inspirations. It is always so exciting to see whats new for the DIY .
A very big thank to you all… Lars Vr. from Denmark
Hi Rick,
I have spent some time looking closely at your baseboard. Like your brother in law, I too am in a wheelchair and found your pictures particularly helpful. My wife and I have now cleared out the garage, had it insulated and reroofed, and are now ready to start with the baseboard, which, for the most part, I want to build myself. Our garage is rectangular in shape which may make it simpler than your room, which seems to be irregular in shape, but your access arrangement [horizontal open swing] is ingenious, and would mean I could open it myself without help, rather than the traditional vertical swing, or “lift our” access method. Thank you for sharing your great modified idea, even if the original isn’t yours[!!], and may you go from strength to strength as you develop your layout. Your pictures were particularly helpful.
Tom [from Reading, UK]
I love the tip with the Tea, my Wife and I drink a lot of Tea, and just throw it out, this makes good use of it to use as dirt in some spots, I love it when I can re-use something around the house to save a few dollars,thank you.
Danny Marso, Rhode Island
I used 3/4 in. foamboard for the background on our layout . Painted sky blue . Looks awesome . Cut to 24 And 18 in. wide . mounted to layout with 3/8in. board screwed to base of layout . Fast and easy . Comes in 4 X 8 sheets at Lowes.
That swing gate is a great idea. The way you have it constructed with bracing looks great. Someone mentioned stiffening it with a horizontal bar to prevent sag. One way to prevent sag is to add a top and bottom sheet of plywood. Adding the top piece of plywood will stiffen it, but adding a second sheet on the bottom really makes the entire structure solid as a rock. 1/4 or 3/8 plywood is adequate. Also, any wiring inside the gate will be protected. For future access, attach the bottom sheet with screws.
Still in Training at 75,
Carl in Kansas
Hi Alastair,
I am now constructing my baseboard, and if you remember I told you last time that I’m a little handicapped. My baseboard is currently a “U” shape in the garage, and I need to make it into an elongated circle. In a July “Model Railway Layouts”, Rick sent pictures of a sort of door into the centre. Would you please be kind enough to ask him for more details of just how this is constructed, as, with his permission and help, I would like to use this idea. With my deteriorating health I am not able to crawl under the board to obtain access to the centre.
Very many thanks in anticipation of an early reply.
Tom Lori, Reading England.
I noticed that the baseboard is bolted rather than nailed. Very professional and rock solid.
I also noted the tips about Tea Leaves. Unfortunately, we have a shortage here in the USA. It seems some blokes threw them in the harbor. Can you imagine? Any leftovers sent this way will be greatly appreciated.
Steve
the swinging gate is great, I’m doing a lift bridge as well to have an isle way. Great idea thank you! Peter in NY
Hi Rick! I live in Hillcrest and I just completed my bench work and about to put baseboards. I had a 20 x 18 (6.1 x 5.8) shed built in my backyard for my railway. My bench work looks similar to yours except I have 400mm spacings for my cross pieces. Anyway keep sending in posts as I enjoy viewing them. Cheers Rossco Adelaide, South Australia
Just when I thought I had my layout all planned along comes a better idea, Rick’s gate, that sends me back to the drawing board. But now I’ll be able to use more of the space I’m devoting to this project. Looking forward to learning how Rick wires across his gate.
One of your readers talks about using his son as an excuse for his model train expenditures, well at age 75 I’m using my five year old grandson as my excuse. But he’s a taskmaster because he comes over and wants to know why the job isn’t done yet. I patiently explain to him that I need to take time out to work on the tree house I’m building for him.
Craig, Vermont, USA.
Will still along from anything close to a statt, found 2 online product lines that are worth there weight in gold. One is called geek.com ans second one is called wish.com. lots of graet true scale, haven’t found anything over $ 10 qnd many, just pay shipping. Trees, people, streetlights, etc.
.
Love the tips on saving money. (wife has me on a strict budget)
I have used a few, some turned out well, others, meh.
Right now I’m restricted to an old fashioned 4’x8′ layout, so scenery is more in line than lots of track, so the scenery tips are great!
Thanks!
Great bit of carpentry
That’s very impressive! You have some serious Carpentry skills! I’m in NSW too. Because we rent I had to build my Layout to be able to be disassembled, should the need arise.
Keep the progress shots coming Mate 🙂
Hi all I’m Kevin and I live in Brisbane Q L D. I love all the tips and tricks . I myself use the lithium canisters that come in my tablet containers . They make great loads in my load wagons as well as fulle drums .I all so use those little packets that they put in to suck up moisture in sertain produchs .I paint them and fold them as bags of grain Sacks in my wagons
Hello to everyone I liked all the tips. Liked the benchwork started to work on mine this week end have a cad drawing of the benchwork to use some of the materials I already have. will send pics when Istart building