“Hi Al,
Barry from South Australia here again.
This is a follow up to my last email re: the CL2N3-G IC (Integrated Circuit) module.
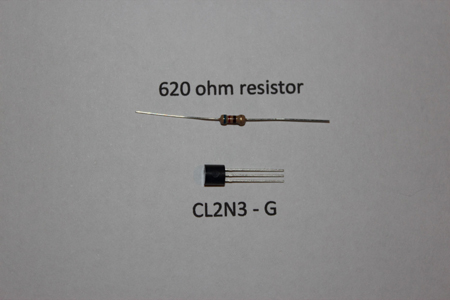
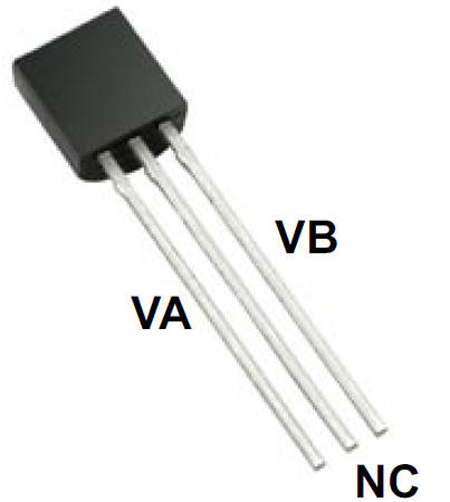
The CL2N3-G picture compares the size to a resistor, and the TO-92 picture shows the module with its 3 legs.
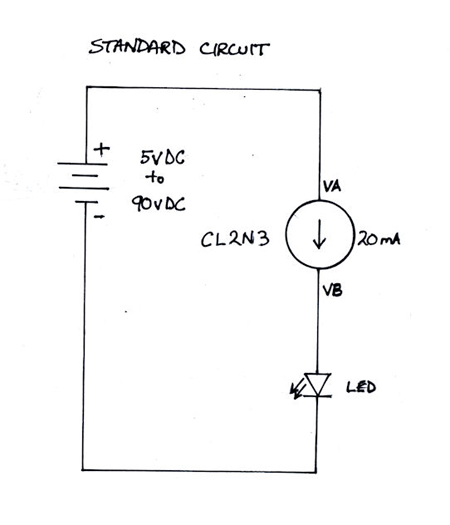
The leg marked NC (Not Connected), can be cut off flush with the body, as it is not needed. The VA leg is the + connection, and the VB leg is the – connection.
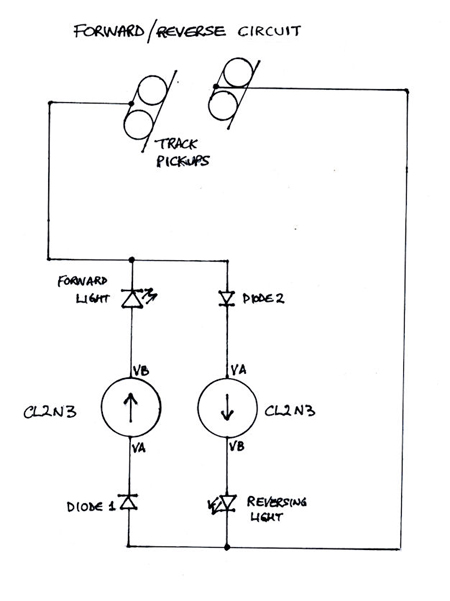
The FR_Circuit picture shows a simple circuit for wiring a forward & reverse LED for an Analogue setup.
The CL2N3 can be used with DCC, just replace the resistors with CL2N3’s.
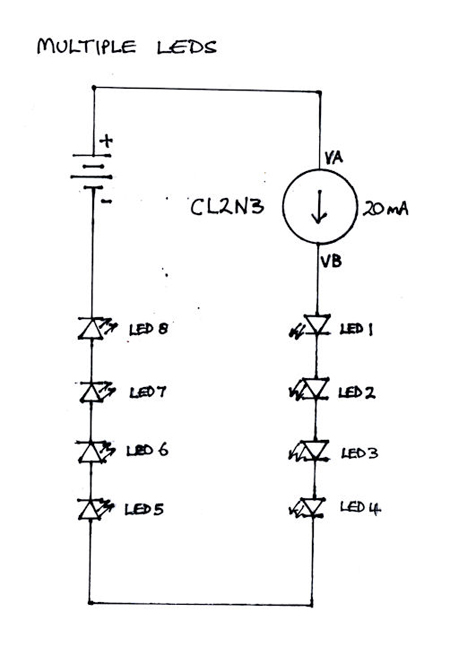
The Multiple LEDs picture, shows how to wire multiple LEDs to 1 CL2N3, which is good for lighting coaches (passenger trains).
The Standard Circuit picture, is, well, a standard wiring diagram of the CL2N3.
A search on the web will also provide many more applications for this wonderful little device, and there is another version that can supply 25mA to a LED, a CL25N3-G IC.
Regards,
Barry”
“I was looking at the TIPS FOR YOU and I want to give you one.
I am retired from a power utility and use the info I have to include running electric (not hot) to all of the locations that us electric.
I found that buying fencing of all this cost lots of money, so. I now use Plastic Window screen for fence.
You can turn it at different angles to get square, or diamond shaped fence. Just cut it to your right height with a pair of scissors.
For the posts I save used stick matches or tooth picks.
For the wire on the power poles and high tension towers I use the elastic thread sold at sewing supply stores. This makes hitting the lines not pull or brake the poles or towers.
G”
“I got a great tip from a Jim O’Connell of Santee,CA. he builtmy Z scale layout in 2012. I too neede a way to keep my ‘ MTL lumber loads,ect. from sliding off my flat cars.
Jim told me to get some elmers glue and put a small drop on the cars and also on the wood packs.
Then when you change from runnind those cars to something else you can peel the wood packs off of the cars and be able to put them back into the plastic “jewel cases” they came in.
To get the glue off of the load and the cars all you have to do is”roll” the glue spot back and forth until it comes off. The glue will stay “soluable” for several years.
It comes in a small brown bottle with a brush top applicator. Hopes this helps.
Most of what I have learned about Z scale is from the people who have been in that scale a long time. Now if it had anything to do with your HVAC system or your ductwork I know all th answers and tricks of that trade, as I was a sheetmetal mechanic for over 40 yrs.
Lee Barry Bristol,Va”
That’s all for today folks.
Please do keep ’em coming.
And if today is the day you get started on your layout, the Beginner’s Guide is here.
Best
Al
PS Latest ebay cheat sheet is here.


A word of warning when usng the CL2N3 current source.
The TO92 package shown is rated for 600mW @ 25C
If you try to use it at 90V it will get VERY HOT and burn out.
In an enclosed space it’s probably only safe to have no more than ~15V across the device. (That’s the supply voltage less the voltage drops across all the LEDs)
Mike
Okay, here is a couple of tips.
For those with spouses that use make-up brushes. Buy them a nice make-up brush set and ask them for their old brushes. The brushes are useable for weathering and detailing of engines and cars. Remember to wash them well with soap and water to remove any make-up and then set them aside for a couple of days, until they are dry. Don’t use a hair dryer to dry them, it can damage the brushes.
Another tip is for those who occasionally use microwaveable dinners. Save those dinner trays. After they are cleaned and dry, they can be used for holding parts of models that you’re in process of building or repairing. The trays could also be used while you are creating scenery on you layout, for holding your small batch of plaster, extra water and your roll of plaster gauze, or you could use them for holding your washes when you’re coloring your scenery.
Lee
I think you mean rubber cement not elmers gloe, and yes it works great for everything from keeping loads of flat cars to holding down your track planning templates.
Sheila, Idaho
Dinner trays such as microwaveable dinners make good portable work benches.
Thanks for all the tips. Ty will come in handy.
Best,
Tom N, Maryland
I KNOW SOMETHING ABOUT ELECTRONICS BUT THAT SCMATIC I AM NOT FAMILER WITH.
In the multiple LED diagram, What is the voltage or voltage range of the power source, DCC track power? If part of a static display AC or DC and what rating on the LED’s
I have a question what is a cl2n3-G? what use does it serve in the circuit? Is it a resistor? a diode? I don`t see it`s purpose! Please help me under stand this divice! Tom in AZ
I am 76 and in process of reassembling and expanding my old ho layout. LEDs and fiber optics totally new to me. Can you and would you please put all the post for those in an order or sequence for a lay person to more easily follow and understand. These lights are intriguing but simple things like “do I use AC or DC”, “how and when”, “power sources – battery or transformers” all have me wondering. I have not found one simple book on subject, not one. Your post have been very helpful but do not guide a layman from start to finish. Thank you for all your information, please keep it going.
The CL2 is a constant current device, sort of like a diode except that in the wrong direction it conducts lots of current, but in the right direction it only conducts a certain amount, 20mA in fact. Use it with another diode in series to prevent a disaster if you do reverse the power supply to it.
The TO92 package dissipates 132 degrees per watt, and the maximum temperature is 125 degrees, so if you are at room temperature of 25 degrees (all Centigrade) then the absolute maximum you can dissipate is 100/132 watts, or about 600mW. This corresponds to a voltage of 30V, but you want a safety factor so I’d suggest you keep it under 15V.
You guys have me totally confused as well. CL2, TO92 what?????????
RE: the above comment, rick from Ontario canada
CL2N3 = Constant Current device
TO92 = the packaging the chip is in(the little black thing with the 3 legs).
Lets keep this simple. Most LED’s drop 1.5 to 3.5 volts across them. If we use a standard green LED it drops 1.5 volts across it. It has a current limit of 20ma. Any more and it dies quickly. So hooking a battery directly to them will usually be rather quick and painful. To limit the current to 20ma we need some kind of resistance or current limiting device. If we have 15 volts then we need to calculate what size resister we need. Ohms law says 15/.02=750. Use the next bigger size and your LED will live a happy long life. Keep in mind we have to use the correct wattage resister as we don’t want to let all the smoke out and end its life too early either. Watts law says 15*.02=.300mW. Use a 1/2watt resister and all is good. So, back to this nifty new device the CL2N3. it has the ability to do exactly what the resister does but better. We can put several LED’s is series and only use 1 device. Keep in mind the voltage drop of the LED’s. You must have at least 5 volts left over so the device will turn on. Lets stick with 15 volts as track voltage is close to this. If we put 5 LED’s in a passenger car that drops 7.5 volts across all 5 leaving 7.5 volts to turn on the device. White LED’s usually drop more depending on how they are made. Check the manufacturer specs and it will tell you what the typical forward voltage is. The other diode in some of the circuits acts as a protection device in case you reverse the polarity. I hope this helps. eBay is a terrible place to buy these. Try some of the online parts suppliers. They are cheap.
for those that recycle old TV’s and computers, take the copper windings and use it for telephone lines along the right of way if used outside it will turn green just as the real copper lines do. Just a thought. On my garden railroad they even carry 9vdc for LED’s and regular lights. Easy way to wire things without going under ground or under the board.
Duz iny 1 no howe 2 spl
Just kidding
Your website has been a lifesaver. Thanks to you and all your compatriots (for me, a good word to use on the 4th of July).
Burt
Just a second thought, if the LEDs are too bright, you could reduce the current to 10 ma or even 5 ma depending on the effect you want. This would be accomplished by increasing the resistor value. Cheers
Leo
Lots of fun for those who have worked with electricity in their past lives. Now we can show off all that lingo and hopefully come up with a working product. In the meantime i will have to just stick with the offering over at Woodland Scenics and rig my layout with their stuff. Probably a little more of the green stuff but there is a reason why they have a product for some of us. In the mean time keep all the info coming and hopefully some of it will apply to all of us. Good crafting everyone.
Oldman Don
Barry. Thank you for the LED tutorial. My issue is that my Lionel ZW is putting out 0 to 22vac. So I wouldn’t be able to use it power LED lights in my layout. My setup is all MTH…DCS and engines. I do not want to have to deal with batteries. I’ve seen a few tutorials on relamping modern engines with LEDs…so maybe that’s how I figure it out. I need to get up to speed so I can figure out if this is something I want to incorporate as I build up my layout. My buildings go in next, so now is the time to do it.
Bill
Along with several folks I can’t really see the point of the Cl thingy, just run LEDs from track type 12v-16v power supply with resistors. For white small LEDs normally rated at 3v a 1k ohm resistor works just fine. Red LEDs can only cope comfortable with 2.5v max and you need to be careful if using power supply more than 12v, you might require a slightly larger resistor.
If you just use old/redundant train type power supplies you can’t do much damage, unlike the up to 90v mentioned. Leds take such little actual power that model train power has more enough. I have loads of LEDs running for years by this method with no problems whatsoever.
Cheers Mike S
awesome