“Hi Al, after seeing Cameron’s article, I decide to send in some photos of my test track.
I have to clean out my double garage (9M x 6M), to make room for my track, so I only have a test track at the moment.
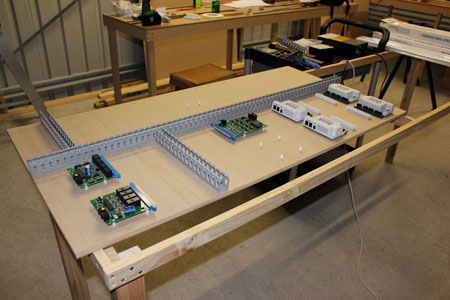
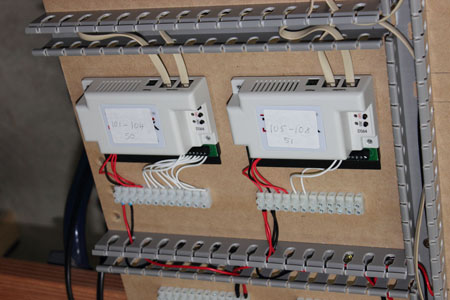
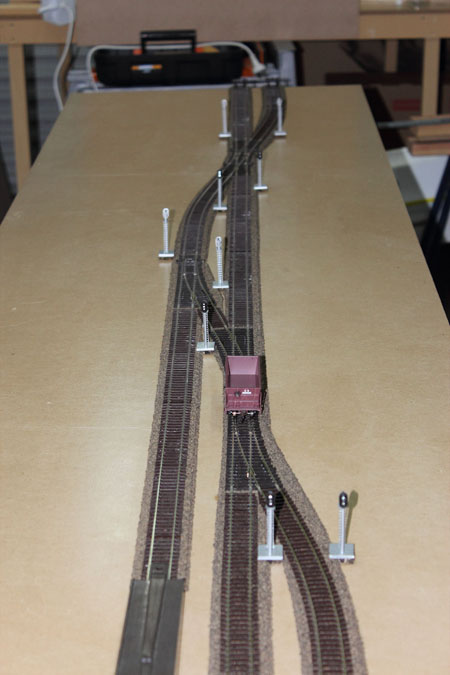
I decided to use Digitrax DCC equipment, which is why I built the test track (8′ x 2′), so that I could get all the equipment to work with the computer software.
I tried JMRI initially, but found it too hard to work out, so went with Rocrail (both programs are free).
I have since bought Train Controller Gold, as this will give me better control in the future.
The reason my wiring is fairly neat, is because I am an “A class electrician”, and I am used to working with higher voltages than 16v, and I was taught as an apprentice to be neat and tidy (and it is a habit I cannot change).
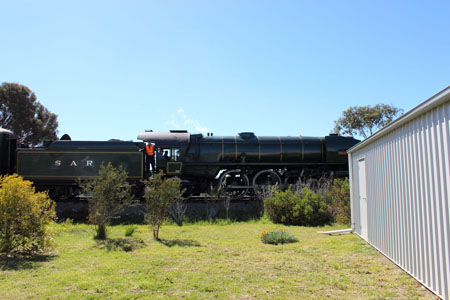
The photo of the steam engine was taken from my back door, and they try and run the steam engines when the weather permits.
The town I was born and grew up in is called Goolwa (in South Australia, and I still live there), is home to Australia’s FIRST railway line in 1854.
This was built to transport river goods (Goolwa is on the River Murray, near its mouth), to a place called Middleton (on the Southern Ocean). When I start on my bigger layout, I will keep you posted on my progress.
Barry”
Wow – that’s the neatest wiring I have ever seen! Al.
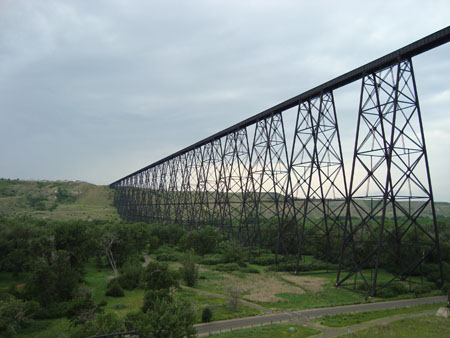
“Mr. Lee, Check this out if you have not seen this before I think you will enjoy. Located in Lethbridge, Alberta Canada. I stumbled on this on the way to Calgary a couple years ago.
Bill”
“Al;
The other day out in my garage where the doggie is I noticed some white stuff like stuffing on garage floor. Come to find out its from a pillow my son thru away and he missed the trash can………..Immediately I thought about snow drifts areas that linger from not getting enough sun exposure…..sheltered areas….gullies fencelines…etc. I dont think it would work for larger areas of snow cover but who knows It probably would if there werent plans for alot of other scenery….
Just wanted to share SO check old pillows before they hit the dumpster, trash truck…..
DG”
“Al,
I’ve been away from the model railroading hobby for several years due to it becoming less important than other things in my life, so I’m not up on the latest available technology. But I’m beginning to think it’s time to get back to a hobby I’ve had since I was a kid (I’m 56 now).
I always ran my trains to what I perceived as scale speed, but alas, some throttle packs don’t do well at slow speeds. Yet, others do. There are several factors that affect the ability to operate the models at near-scale speeds, such as condition of the motors, cleanliness of the track and the powered trucks’ wheels, weight of the train, and the throttle’s potentiometer (throttle).
Aside from those kinds of things, there’s the scale itself; the smaller the scale the harder it is to achieve scale movements. This is because, while we have succeeded in reducing the scale of the railroad world with amazing detail, we can never reduce the scale of their molecular structures! The laws of physics cannot be denied! But, as control and materials technologies progress, better control at slower speeds may be achieved.
I applaud someone drawing attention to this aspect of the art. I’ve observed realistic-looking layouts operated at unrealistic speeds, but also many of the same genre operated with very good realism. I suppose it comes down to a matter of what the layout owner decides is acceptable. And that’s okay.
But for those of us who pursue the finer aspects of the art of model railroading, this is a great point of discussion. Thank you for bringing this to our attention. I really appreciate your daily communications.
Russ”
Thanks to everyone for today’s missive.
Hope you enjoyed it as much as me.
That’s all for today folks.
Please do keep ’em coming.
And if today is the day you get started on your layout, the Beginner’s Guide is here.
Best
Al
PS More HO scale train layouts here if that’s your thing.
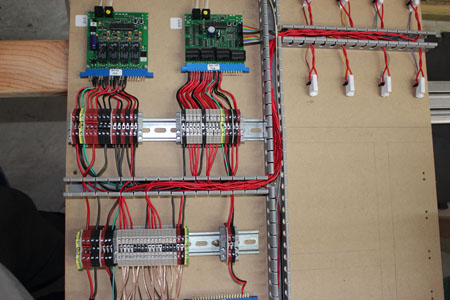
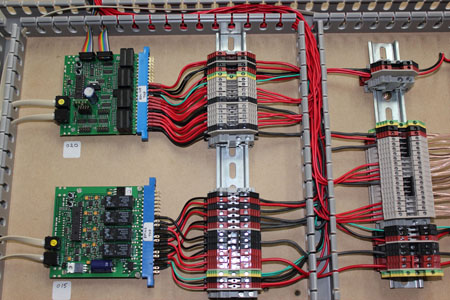
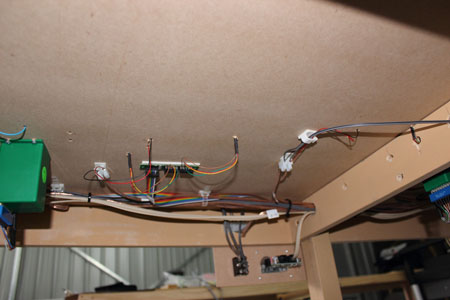

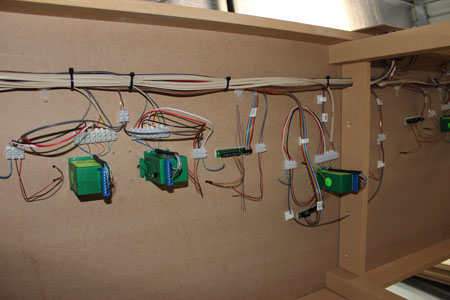
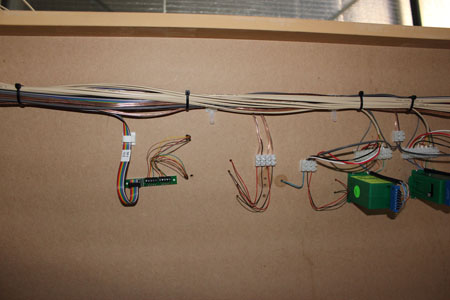
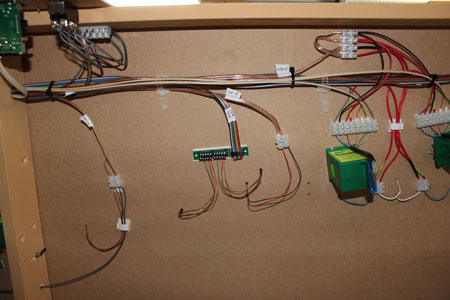

Good professional looking electrics there Barry. Switchboard trunking and DIN rail mounted connectors are the only way to keep things tidy.
Cheers
Ralph
Hi guys im from south africa and i want to start a small project with a train set i picked up. Is there anyone that could help me with a layout that is simple for a bigener. thank i would app
Love you background music Matt, nothing like a little “Wagner to Run Trains By!”
The neatest wiring and layout of trunking I`ve seen apart from Control Panels and switchboards. Designing and drawing (diagrams/schematics) are essential to achieve such a neat and professional job.congratulations !!
Fantastic wiring. I wish I had put that level of thought into my own setup. Those cable ducts and rails you have used are also really versatile. Where would you get something like that?
I too am an ex electrician. When I do my wiring, there are draqwings that show which terminal strips supply which track sections. That will allow easier troubleshooting if a problem crops up. As for the operating system, I was unsure which one. I ended up with Digitrax, which at that time was the only on that had an App for the iphone. I can run my layout (not the switches) from my iphone. Much cheaper than buying an additional wireless remote. By now other brands may have a similar setup?
Matt: Nice layout.How did you get snow on your mountains?? Barry: can you come & wire my layout?? That is neatest wiring I have ever seen. Thank all who have contributed to this wonderfull website in last year.I have gotten some very usefull tips from it
Hi Al, Barrys wiring is terrific..was wondering where he got those realistic shrubs from. I struggle with making scenery that good.Brian
Nice video Mat , and Ralph you can and do my electrics , mine is like an Indian call centre
Wow! Your wiring is inspirational! Thank you so much for sharing your knowledge with us mortals!
John
Nice job on the wiring. I am an electrician too and mine is very similar
Great wiring, the neatest I have ever seen but are the wires numbered to aid identification of individual items.If so fool proof,brilliant.I appreciate how much time it took you to do it.
Being a complete novice in model railroading, I have no Idea what I am looking at other than , this is what the bottom side should look like if your a pro. I don’t suppose some one would tell what the various items that I can see are? Where can one obtain that style wire race? It does look very neat, and it would simplify diagnostics, I should think. Nice work!!
The Marklin train set looks incredible. Some very fine detail. Somebody does great work. Is Marklin a brand name? I don’t remember seeing that name at my LHS. I’ll check out Roger’s in Lodi. They know their stuff.
I think the photos you showed of the Australian model railroader’ electrical work were absolutely inspiring! I hope to emulate his work when I start my layout!
i have never seen wiring like that before reel good this man knows elecrtric’s
i realy am amassed, thanks for letting us see this keep up the good work
Very neat wiring! I wish my wiring was even 10% as efficient as that!
I can only wish for my wiring to look like that. Nice job
Thanks for sharing. Certainly is a better way to do things than what I have at present.
Praise to Barry! Your training as an electrician is absolutely a plus when it comes to model railraod wiring. You’ve designed and made the most functional and visually appealing wiring plan I’ve ever seen. And this surpasses all the ‘expert/professional’ model railroaders layout wiring I’ve seen over the years. It will without a doubt serve you well as time goes by and you have to trace any electrical problems that almost inevitably crop up.
To Russ who raises the issue of protypical operating speeds, especially with small scale trains.
You are correct as to all of the factors tht can and do affect operating speed. However, with good quality motive power and power packs (DC or DCC) you can definitely operate at prototypical speeds. I run N scale and even with DC I am able to get realistic speed control with various brands of locos.
VERY NICE WIREING
Very nice wiring Barry. In the pictorial that is a delightful “S” curve and could mean future derailment problems.
Advice from an old timer and fellow tradesman re-do and include a short length of straight track. Looking at it again perhaps you have.
Kiwi Woodie
I have just finished doing the wiring diagram for my shelf railroad. When I go to do the wiring, I am planning on placing the wires under the track, in a groove cut into the wood under the roadbed and track. I have done this before, and there is nothing to indicate the track is wired. Where I need to connect to the track, I do the connect with solder on the outside of the rail,, usually at a road rail crossing. For turnouts, I run the wire through a hole, to the underside of the wood, and then make the connection to the under layout switch machines. I run signal wire along the same channel, and make similar connections. This is a bit more work, but I like the appearance my work gives to my railroad. I will send pics as I do the work, so you and others can see what I am doing.
I am in awe of the wiring. I am about to start wiring my first layout (8ftx16ft) an ambitious project but what a great hobby. Track laying just starting and learning as I go with help from everyone here.
And the Wagner to accompany the train video. You made my night
This is just perfect! great job! I believe that all who envy this had a lack of foresight. Like me, I just kept building and building. and created a monster. I am moving to Flyer Fast Track from Lionel this would be a good time to fix it. Good timing on the article, THANKS
Scott
Thanks for this, I am using clips to keep my wiring tidy.
The clips I use can be purchased fro your local Hardware store.
Now that is the ideal way to wire a layout. I’ll get there some day. Thanks for the great pics.
It’s impressive and scary at the same time.
You know of course that you are going against tradition by making the wiring so neat !! Mark of a true pro. Wonderful stuff
We are all jealous of your patience. Only one thing I noticed was missing – labels. My philosophy is to wire it (all be it not as neatly) so if you passed away tomorrow another model RRer could figure it out. Keep up the good work!
Excellent picture of that bridge. Here in SW Va. we have one, it is on US 23N near the Natural Tunnel and is used by CSX RR. The Lonesome Pine Model Railroad Club in the town of Applachia,Va. have and exact model of it on their club’s HO layout, they also have an N scale layout. Don’t have any picture of it but the weekend of August #rd, 2013 their layout is open for viewing and they also put on a show as it is called “Applachian Days”. Coal mining country.
Great work, Barry!
I spent my career working in the telephone/telegraph industry, and
your wiring is neater than most central offices I’ve seen!
I use this channel when I build racks for sound equipment or computer servers great way to tame the rats nest !! great idea !
I use velcro instead of wire ties, I can staple it to the underside or on a support peice then just loop it around to contain the wires. If I ever have a problem with the wiring I can just undo to velcro along the wire run and find the problem then just re-fasten it. Much easire than having to cut a bunch of wire ties and then replace them.
PROFESSIONAL JOB.JUST PERFECT!!!!
I have a 4×8 foot train table. Their are two loops with a Marklin HO freight train on the outer lop and a Passenger train on the inside loop. As to scale speed, I’ve assumed that the heavy freight train should run slower than a passenger train. Thus, I race them around the table, and sometimes the loaded freight wins, at my discretion. I cut up a couple tree branches for a natural look and placed hem on a flat car. There is a third inner loop with a Suburban two-car unit running from the downtown area to a residential area.
I started this project just a year ago, so I still have work to do, wiring and landscaping. Since I’m 88 years old, crawling under he table is a chore, but my wife assists me with the landscaping. I’m colorblind so she is needed for sure.
This wiring is really neat and clean. Who does he work for ? NASA ?
Great job.
Great Job! Hope mine will look that good when I am done!
ust watched the video and enjoyed it as usually
keep them coming i have lots to learn as mine is going to be an advantager lol
love that wiring board likes like a pro did it or an electrician that does motor controls
Gee I’m envious of that professional wiring. I have a mixture of spaghetti and neat and tidy through using old computer printer cables, The problem was working out the “pairs” as I,m colour tint blind. But I must be doing something right as things work as they are supposed to.
I’m extremely impressed with this DCC wiring is really neat and clean. My question, sheer scope and size of the DCC project, what is the cost as I’m in the market myself to convert my 10X24X6 tablet to DCC.
VERY IMPRESSIVE! ALL I CAN SAY IS “WOW” Nice Job! Hope I can discipline myself to be as neat and organized!
I’m excited to uncover this great site. I wanted to thank you for ones
time due to this wonderful read!! I definitely loved every little bit of
it and i also have you saved to fav to look at new
stuff in your web site.
Barry what a wonderful set-out of your electrics.
So time ago I tried some wiring that I thought would look acceptable. I began a transportable foldable HO layout that exposes the half the wiring when it is folded upon itself with a large offset hinge. So I used a thin baseboard to make it lighter to carry but that needed stiffeners underneath (I am a structural engineer). All those battens needed openings to pass all my coloured (yes – I am an Australian too) wires through, so my hope of producing a neat and adaptable wiring job quickly evaporated.
I see that you used a thick baseboard and that eliminated the underbattens and that frees up your logic and would make maintenance, modification and extensions a breeze. Wonderful!!
I will now have to hang my head in shame and resort to using a fabric, secured with velcro, to hide my messy wiring when the rail layout ‘coffin’ is folded in storage mode.
James
Fantastic wiring. I live in Adelaide so maybe I should get you to do mine!
A word of advice however, I have found that those little plastic clips that open and close and stick on with tape will all drop off eventually, especially if you have attached them to bare board or wood. I recommend either using a powerful glue on the sticky tape or screwing the clips to the board.
Hi Barry – Top effort there – can you tell me about the signals on the test track – are they automated or manual and where did you get them – thanks Doug T Queensland
Very nice looking, I myself am an electrician. It just runs in the blood
hi the bloke from South Africa didn’t see your name. I am also busy starting a lay out for the first time. Found the best way is to down load a program called Scarm for your track layout. Get a copy of Piko track plans it has a lot of proven layouts and is not expensive. All hobby shops sell them. I found when i started the design I seemed to try and fit every square of board with track. im now on my 15 commutator layout and i think im just about ready to start building. I also found it a good idea to join a local club to bounce your layout ideas with members. Sometime what you think will work is wrong. I hope to post my layout soon for the other members on this blog to make a final comment. Good luck with your design
regards
Gary
Halo i am over 71 now,but i want to do another set up. just got some trainsets cheap of the net. hope some will work,wifes not that happy.I can take my beer up my shed.Let you know how i get on.Thanks for you help.
WOW, All I ever wanted to do was to make track/transformer connection in more than one place… Series I believe !! Connecting Transformer to track, and doing the same, approximately 1/2 way around the layoff, from the same transformer !!
It has all been said … what a wonderful piece of wiring! Congratulations … brilliant.
Peter
Shit you don’t wot to see my wiring it Bad
Nice looking, sure, but how in the heck is this supposed to inspire a beginner such as myself? Wow. Y’all trying to run the newbies off or what? Thanks for nothing.
Hope mine looks 1/2 as good. I am getting a master electrician as well.
from
Rick
No snow in southern \Ontario and warming up slightly to a balmy 40 Celsius.
Thanks for nothing?. Are you smoking crack or what? The guy is nice enough to email a photo of his wiring to all of us. You should be buying him a beer, not cutting him up.
Rick
pissed off this morning anyway
Hi Barry,
What were the first few pictures with wired racks for, they did not seem to blend with the test track and wiring you had that followed.
What ever, they put most of what I have seen/done to shame.
We are holidaying in Australia in your spring 2017 and driving from Perth to Melbourne (Sept/Oct) if passing near you any chance of a viewing.
Mike
Hi Barry,I just had to write about your awesome wiring. As a one time telephone employee (started out making wiring harnesses for switchboards and rewiring step switches, ancient history). Also worked for a wireless TV provider (wiring racks of satellite receivers and transmitters, wiring large buildings for TV distribution, another blast from the past), plus other communications jobs nonexistent today. I contrast your wiring with my temporary layout and its unmarked jumble of mismatched, patched wiring and know I can do better! Thanks for reminding me of what proper coherent wiring should look like.
ANDY In sunny Florida
Barry, a very neat, best I have seen, and must have taken you forever to do. However that would be the under side and I do not think anyone will ever see it. I prefer to solder all connections with heat shrink over them, ya with a little extra wire left over for what ever may happen. And as said before things that sick with sticky things will sometimes come loose and fall down, therefor I like to staple the wires to the underside with low voltage staples, wires can still move, Hey just saying, what ever blows your dress up, Go For It.
NV BOB
Wow, wiring and “Dick” Wagner in the same posting. Very impressive. Someone noted that it looked like NASA wiring, and I was was going to agree, it looks like the wiring harnessing I saw at Martin Marietta (as a guest). Very impressive and informative.
That wiring is GREAT!!!!!!! Very nicely done and thought out………..
I am just getting started with my old 1950’s “O” gauge trains. I have a small set similar to something you would put under a Christmas tree but am now going to go big time with a 11′ X 3′ L shaped layout. 2 questions for my fellow engineers. Should I use my old transformers for something or trash them and start with new. It appears the old transformers are only good for clips to track and maybe 1 other item. Also, I went with 3′ wide to be able to access anything on the table. Can it handle turns or do I have to go 4″. I plan on a 2 track layout.
Barry
In addition to the nicely dressed wiring it would be great if you would share the components you used to operate your signals, switch points, power distribution, etc.
George
I have been ‘playing ‘with trains my whole life, and your wiring makes me feel like a complete amature. I always seem to worry about how the top of the train board looks. Great job down under.
Matt, I loved seeing your Marklin train layout and the trains running. I’d like to see the overall layout plan — it looks quite extensive from your video. Also, I really enjoyed your Wagner background music. Could you post the name of the audio recording that it came from. I’d love to hear the entire recording.
Barry, What a fabulous wiring job you’ve done. I gather your photos are of two different pieces of your test track project. One seems to be all the DigiTrax components for the control system and the other is the wiring of your actual test track. Could you give us a description of the DigiTrax board and what each of the components does? After seeing your beautiful wiring job I went out and ordered some wire duct for my own layout wiring. I doubt mine will turn out as neat and orderly as yours, but it will be an improvement over tangles of unlabeled wires hanging from the bottom of the layout.
Best wiring job I’ve seen yet
I really appreciate tidy and properly run wiring. I used to work in a telephone central office that also had the hub of the network in it. Wiring is always being changed, added to or removed so the wire ducts Barry used are quite familiar to me. He dudn’t show them, but they have snap-on covers to prevent loose wires from escaping.
Most of the engineers (electronic, not railroad) that worked in my building were conscientious about neatly wiring things, but there were those few…
When you are wiring 17,000 phones, this sort of wiring just doesn’t work. We had trays 3′ wide and 40′ long that had a layer of 24 gauge wire pairs (all blue and white) six inches deep in places.
NASA and most other aerospace builders only use white wire in all their aircraft. Sounds like a nightmare, but each wire is hot stamped with an identifying number every foot or so. Schematics are an absolute necessity in these schemes!
KEEP GOOD RECORDS.
Then have fun.
Charlie
P.S. I have completed my move from New Mexico to Florida now. I am in the “Cardboard box in the garage stage of moving”!
NOTE: Moving old stuff from storage uncovered my Father’s 1930’s era Standard gauge Lionel trains. I’ll dig them out and post some pictures soon.