“Hello Al;
The black grit from asphalt roofing shingles makes excellent coal and younger lilac twigs make quite good logs for log cars”
— Graeme
“Hey Al….great stuff as always.
I have to laugh at myself…..as I learn about modeling tips, I find myself reluctant to toss out the styrofoam that comes in packing boxes….got some pieces the other day that literally look like buildings, and would only need painting. Maybe some of the experienced guys could tell us what paints are suitable for raw styrofoam.
It also reminded me of my old days as a drywall hanger….drywall finishing compound is about $6 for a gallon. It is already mixed, it is easy to apply to surfaces, and can make landscaping easily. It is pretty tough stuff once it dries.”
— Tim
“In west pa we have lots of golden rod around. so in fall, first frost browns it out. I wait for 2 weeks and cut off the tops. Then dry out in garage for 1 week. I primer them first, overspray in white and then spray in green, yellows, reds, oranges to tint them. they look great and super cheap other than spray paint!”
— Chris
” Hi,first let me say thanks for all the lay out plans I am getting ready to start a n scale 5by 9 foot lay out.As for my tip try a can of spray foam insulation instaed of news paper under plaster cloth when sprayed it exspands and when dry you can shape it as you like then cover with plaster cloth now you can plant your trees and things with out glueing them in place Thanks again”
— Robert
“Use children’s straws as down pipes and vent pipes from engineer work shops they take any paint and if you use the concertina ones it gives a natural curve to the pipe.”
— Terry
“Alaister
Here’s one for you.
To keep all those wires under your layout out of sight and neatly arranged (I have DC only) I found a really great product available at stationery stores. It’s called StikkiClips. These are small blue clips used to hang papers on your bulletin board or any where else. They have a super strong, removable glue patch and can be removed and reused. They are made in the US but are available in Canada. There are 10 to a pack. The clips come in other colours as well if you want to colour code wire runs, etc.”
— Perry”
And now on to Barry, who has featured before on the site.
He’s kindly sent these pictures in (unfortunately they are quite small).
I was envious for two reasons:
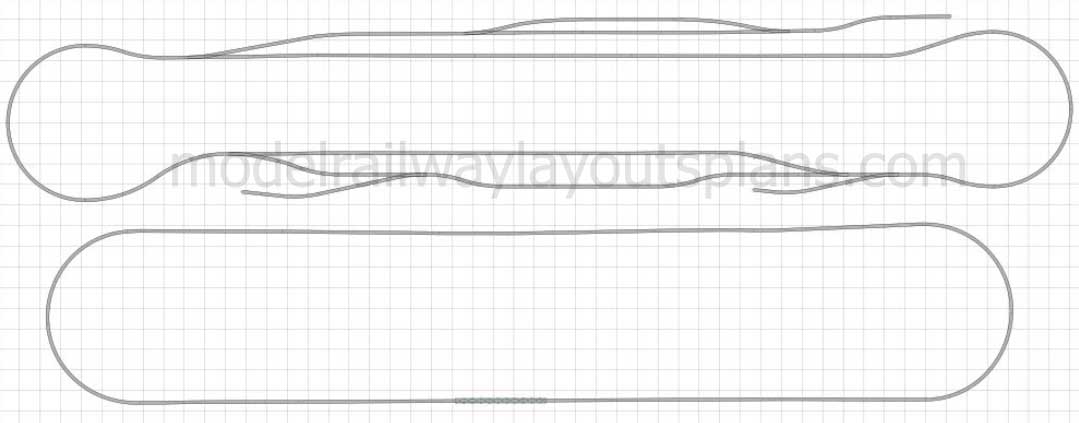
Look at all the space – and the scenery is superb.
Barry writes:
“This layout is in the familyroom in the basement of my daughter’s house.
I started this project the middle of January but I only work on it 2-3 days every 2-3 weeks and they live about 1-1/2 hours from my home.
I have about 110 hours into the total project so far and will probably require another 30 hours to finish the rest of the scenery and then I will send you a complete set of photos showing the development from beginning to end.
Thanks for the compliments.
Regards,
Barry”


There’s more on Barry’s layout here.
Hope you liked the tips. I did. Keep ’em coming.
Can’t wait for more? Take the plunge here. This one time payment of $9 won’t last forever…
I’ll leave you with a youtube of the print out scenery.
It’s hard to believe it’s all been made from downloads that are printed out and stuck together, but that’s exactly what it is.
Best
Al
7

“Maybe some of the experienced guys could tell us what paints are suitable for raw Styrofoam.”
Any Acrylic or Water based paints mat be used.Avoid spirit based paints as these may affect the Styrofoam.
Great idea w/the styro foam. But don’t wait for packaging mt’l. This stuff can be purchased from home improvement stores. It is used as insulation and can easily be cut and glued!!
HEY AL, DID YOU EVER WANT TO MAKE SOME LADDERS? I JUST TAKE HARDWARE CLOTH, AS WE CALL IT, ACTUALLY COURSE SCREEN WIRE, AND CUT A ROW OF CROSS PIECES OUT IN THE SHAPE OF A LADDER, USUALLY 1/4 INCH SQUARES, MAKES A GOOD LADDER. HAVE FUN, LEW,
I have been collecting HO trains and buildings now for 2 years. I have build aa 6′ x 10′ table and I am ready to start laying track. But I cannot come up with a good idea for a track plan. I want to run two trains. Any ideas would help
Hi! Al, some great tips and thanks for that, I asked you some time ago how to paint center white lines on roads, and what was the best method and tools. The layout you were showing at the time had perfect road markings
Drywall compound will shrink and crack upon drying. The thicker it is applied the more it is prone to shrinkage and cracking. Also, it has very little strength shear strength. Applications of it lying flat would be better. There is drywall compound that dries quicker and shrinks very little, but it is not premixed and comes as a powder and is more expensive than the premixed variety.
I have found patching plaster (not plaster of paris) to be a better medium that drywall compound. But, to each their own. Happy modeling!!!!
Lloyd
Hi all, it goes to show from what i read, that it’s not what the item is but what you can make of it. Happy modeling and finding
For all thin lines try calling in on your local friendly sign writer, one that uses vinyl lettering and get him to cut you up some “Lines” from his scrap vinyl. Any width you like, length to suit the scrap. The colour range is vast!
Jollyjack (NZ)
For more styrofoam than you could possibly use… try talking to the supervisor on a building construction site. There are lots of scraps around ( some time veery large pieces) that they will probably let you have if you pick them up.
For thin white lines on roadways, try an art supply store. They should have narrow tape in various widths. Roadways also have yellow lines – artists tape comes in a variety of colors.
I use spray insulation foam to form cliffs an mountains, overspray with earth tones, then use Floquil Diarama Paint to finish. Then just add trees rubble brush. The Floquil paint comes out as a rough finish and look great. It also makes great roofing paint.
Hi there
Thanks
Great tips
Want to Building N scale rail yard . But very new at this. where can i find rail lay outs and parts ? with out haveing to join some book/ magazine club????? Want to build a working yard with log loading and unloading and anything els they make that loads and unloads ??? do not know where to start. help help
Tony,
Paint first with anu laytex wall paint. This will seal the styrofoam, and then use any paint over that!
Many thanks for all info. Had a layout 45 years ago which was stored away when my Son left home. Now interested in it again. It won’t be very Big
Hi can’t find layout for 4×8 HO with 2 trains / a tunnel & raised track some help would be great Thanks Jay
Plan to start building a 6x10ft layout for HO scale soon. I have one auto transport train car that is extra long, and remember years ago having a problem with it going around curves on an old layout. Can someone let me know what radius to use – such as 20 or 22 or even 24 inches? Also, what is the recommendation for the correct amount of rise when building an elevation for track going to an upper level. Thanks much!
Thanks for all your tips everything helps
Hi I am paralyzed and looking for something I can do as a hobby. I have wanted to build a model railroad for a long time. Now, I am thinking it would be a good thing for me to do in my present condition. I am thinking N-guage would be a good fit as I am in a wheelchair and could reach things easier. I am starting from scratch as far as track, engines, etc. I would like a layout with a tunnel and a “mountain”. I would like to have a “yard” and a town. I think a three foot width would work for me. I just now heard about engines and switches that run on a remote. Is that correct? Seems that the wiring would be much easier. I don’t have a fortune, but I do have time and I really need a good hobby. I guess I am looking for advice on a layout and then the brand of train and track. I live an hour away from a hobby store (Traverse City, Mich) so I might need to buy a lot on the net and it is more confusing than I thought. Any advice would be greatly appreciated. Thanks so much. Dick Joseph
I have been collecting h.o. engines and rolling stock for a long time. 12 engines’deisel and steam’ plus about 150 rolling stock of various categories.I also have 4 n-scale engines-‘1 is a 4-8-4 steam engine with an 8 wheel coal car. Plus about 15 rolling stock. I set up a mountainous lay-out for an n-scale display. Rolled up newspaper covered with paper towels and sprayed with white glue mixed with water. After hardening, I used packaged scenery to complete the display.I layed my track around hills and across flats and had a reasonable set-up. About 2×3 feet overall. In n-scale it looked great.
On a larger scale,my newspaper and paper towel method would probably look rediculous and would be prone to collapse or serious deterioration. I am now contemplating a static display built on wall mounted shelving.
Question:: Does any one have a grasp on the type of wood to use and a workable length and width would also be helpful.
Thanks for your reply. Larry B. Ajax.Ontario
Looking for G scale layout plans. Can be somewhat intricate. I’m a good learner. Available outdoor space is approx 35’x15′. I’ll work around the existing plants. Thanks, bob mcpartlin
Startng an S-Scale project. Any layout resources for smaller (4×5 or 4×6) layouts? Also, anyone have any S-Trax turnouts?
Thanks
John
I am planning to start building an HO scale train layout along a wall in my finished basement. I plan to use 1-inch thick styrofoam insulation boards as the base, attached to fir strips. I’d like to make it for two separate tracks in an area approximately 2′ X 16′ in length. I realize that I’ll have to make each end wider to compensate for large, sweeping corners for “return” track to complete the course(s). Any layout plans/ideas would be greatly appreciated.
Thanks.
Bill
While styrofoam seems to be one of the scenery of choice offereings I personally found that urethene insulation makes a better medium for shaping, sculpting, and painting. I use flat spray primers (ie Red oxide, yellow chromate, gray metal, and flat black) and you can scrape the front surface with a wire brush and get a rock “strata” effect or you can pick, poke, scrape. drill – whatever, urethene more easily than styrofoam. For my trees and shrubs I have been using dried flowers, weeds, et al and spraying them with 3-M trim adhesive and “swirling” or “sprinkling them with “flock” type stuff available at most model RR hobby stores.
Try the automotive shops,some sell striping tape in different widths and colors,it has glue on one side.
For Richard Joseph:
First off, if you have full, upper body function and can bend over at the waist. you are in luck. Three foot wide is the widest that I would go. Otherwise I would have to have the layout a good distance away from objects, like a wall, that would block wheelchair access around it. A pre-made layout base could be a closet door, (thirty inches by eighty inches), covered on one side with one or two layers of one inch styrofoam board. Have it secured onto two supporting structures, like end tables. Then basic scenery could be made from blocks of styrofoam glued to the styrofoam board using thick white glue. You could add finishing touches using any method you prefer to use at that point. To paint over the foam, you could use thinned, latex wall paint. Using other kinds of paint like enamel spray paint will cause the foam to melt and produce toxic fumes. When cutting or shaping styrofoam, make sure you wear a face mask and safety glasses, and have a vacuum to suck up the styrofoam bits.
As for buying things on-line. I am against the idea of using eBay or other auction sites. I’ve heard too many stories of people being ripped off. I strongly urge you to buy from actual sellers like Atlas, (www.atlasrr.com), and Walthers, (www.walthers.com). You would have a better chance of returning things if they don’t work. There are other on-line dealers that you could check into. Go to your local library and check the magazine section for model railroad magazines or buy a current issue from a local magazine store. Look at the ads that are listed and check them out on-line.
For ideas about track layouts and scenery, use your favorite search engine and type in keywords like ‘model railroad layouts’ and ‘model railroad scenery’. Visit some of the sites listed. There is a wealth of ideas tips and videos on the web.
Now if you want to go small with a lot of stuff, maybe ‘Z’ scale would be a better choice. I have seen a small, complete ‘Z’ scale layout in a briefcase. That size would allow you to have much more in a smaller space. Just remember the larger or smaller you go from ‘HO’ scale, the less there is for for it.
I have seen yellow or white markers from the art dept used as markings for roadways
I’m a newbie and doing n-scale. First just wanted to say “thanks”for all the great tips. Does anyone have a preferred type of glue to attach foam to foam of my sheet if foam to my hollow core door I’m using as my base? Thanks.
Acrylic and water colors work on raw Styrofoam! No oil base or spray paint! Spray paint will eat the foam quickly!
I would love to see your layout
To Richard Joesph, I was in an accident & was paralized but after many months can walk now. Took up model railroading again after many years & love it. When building my platform I did a little each day. Can’t stand very long. I buy the model buildings that you have to put together as this gives much pleasure & can sit when putting together. I spend what I can being on disablity but shop around at internet hobby sites. You will be suprised at the difference in prices if you shop. Usually can get enough that keeps me busy for most of the month and taking my time it is turning out great! N sale is good for me. Origanal platform is 12 x4 and just extended it to 28 ft. Have many more years of pleasure & keeps me out of my own head. Good luck!!!
I cant thank you enough for all the great tips. Being retired youve given me the inspiration to attempt a killer N scale layout.
Hi Al great tips i want to build layout in conservitorywill have run round 10 x 8 wit 5 x 3 up one end prpose through station for main line runroundand goods yard with two goods shedsintend to have north and south bound main plus i have a couple of shunt engines If i “daisy chain two controllers will that operate the two main lines can you send me the diagram again for the reverse loop which i to use in the goods yard look forward to your early reply Tony McGrath
I live in the USA but I am British and I model in OO the GWR ( Great Western Railway, or, to some of us, God’s Wonderful Railway) covering the years 1895- 1948 in the Devonshire/ Somerset border area. The layout runs around two walls of an 18 X14 foot room at about eye level on top of bookcases. It is a fiddle yard to fiddle yard layout, giving a double track main line between the two boards, displaying a fairly large station with junction to a single line branch.
I admire the buildings that one can download free from the web, print on to card and stick together, but so far I have found only American prototype buildings.Does anyone knpw where one might find similar British structural print outs?
Trevor Gatty
Provided the styrofoam has been sealed with 2 x coats of PVA , I find most paints will adhere to it .
Phil W.
I have my railroad outside, G scale, I really do not know how to make my scenery stand up to the weather. would the tips that are used for the N and HO scale also work outside? thanks in advance Edgar
THE TIPS YOU SENT ARE VERY GOOD, BUT COULD YOU ADVISE OF HOW
TO INSTALL THE TURNTABLE. I COULD USE THIS INFO.
TNKS
RG
For our disabled modeling friends.
Seriously consider a modular approach to layout building.
The individual modules require a little more time and carpentry work to construct but the payback is the easier time you will have doing your layout construction work as the module has easier accessibility from all sides while working on each modular section.
There is a lot of information available both online and through various books and magazines that detail ideas for module design and track plans based on modular concepts.
Model Railroading Magazine has covered modular concepts extensively and I can highly recommend the book The Best of Model Railroadings Track Plans by Robert Schleicher for a lot of good ideas for developing a layout based on modular construction. What makes this book particularly useful is that it develops modular concepts that are useful for building something other than just the normally seen oval layout that is assembled for public displays. The perspective is from that of North American Railroad design and practice but the principles are easily adaptable for European Railway designs.
I am working on a project at the moment in the design stage. The idea is to have traffic, (cars, trucks, buses etc) to drive along my road or highway passing through the whole set up. My plan is to have a belt system under the road using fan belts and fan belt pullys with industrial strength magnets on them spaced say 3 car lengths apart. The plastic cars (or diecast) also have a small magnet placed inside. The belt runs under the road from one side to the other and into a tunnel and moves around the entire board comming out on the opposite side. As each magnet moves along with the belt, the car/s roll with it. It will have a speed control and the traffic can be stopped automatically or manually to allow for trains passing at crossings. This will work! Any comments.
Hi,
Mix drywall jointing compound (ready mixed) with PVA to produce a crack resistant covering for foam, tissue paper and the like. When dry it can be painted with household emulsion. Try ‘wet on wet’ techniques to create interesting ‘natural’ effects.
Cheers,
Mac …
I have been looking for rolled barbed wire in HO scale.
A number of dealers I have contacted have seen it available under “Faller” ww2 scenery but it is no longer made.
Thin wire is ok but how can you simulate the barbs ?
Thank you so much its a wonderful hobby and I just got back into my N scale.
The most fun I have had in 40 years
Thanks keep it coming
Jess
To Kendal Thomas , I use 1/4 inch pin striping tape from the auto parts store for highway dividing lines and stop lines. Many colors and widths available. It is also self stick and removable. Press type is also useful for street lettering,it’s available from office stores.
As far as the center white line in a road. Perhaps you can use stick on auto pin striping. You can find it at any automotive store
Our town dump collects all white styrofoam and keeps it a large trailer to be recycled, so it is a matter of going and asking to pick through it and take what you need
Hi Al
thanks for the neumerous tips you supply thwy are all great and I read every one . I am still struggling with my layout, i have now all the trains running without deraling so thats something i have started to build some sceenery its early stages yet I look at all the other beautiful layouts and think to myself will mine match up. besides the frustration i am still enjoying the hobby and my God son is learning patience thats good
thanks again for all your help
Just purchased a lot of train parts, trains and have to buy boards for my setup. not sure what kind of setup, not sure what to do confused with all the books and web sites that i have looked at. Im not in a hurry. So thanks for your website Al.
Hi, Would any of you have any tips for blackening the upper part of tunnel mouths on a steam train layout
Regards
Derek
My last effort didn’t work out too well so I’ll try again
Model Railway Scale Speeds Calculator
Speed/Mph Time per scale mile/seconds Time per foot/seconds Time per six foot board/seconds
0 Gauge 0O Gauge N Gauge 0 Gauge O0 Gauge N Gauge
10 360 8.2 4.7 2.4 49.1 28.4 14.2
20 180 4.1 2.4 1.2 24.5 14.2 7.1
30 120 2.7 1.6 0.8 16.4 9.5 4.7
40 90 2.0 1.2 0.6 12.3 7.1 3.6
50 72 1.6 0.9 0.5 9.8 5.7 2.8
60 60 1.4 0.8 0.4 8.2 4.7 2.4
70 51 1.2 0.7 0.3 7.0 4.1 2.0
80 45 1.0 0.6 0.3 6.1 3.6 1.8
90 40 0.9 0.5 0.3 5.5 3.2 1.6
100 36 0.8 0.5 0.2 4.9 2.8 1.4
Of course, what is right does not always look right is always a good ‘get out clause’!
a OUTSTANDING LIST OF iDEAS,SOME i NEVER THOUGH OF.
Many of the tips are excellent, HOWEVER, it would be Oh so nice if the tip were prefaced with the scale. ie. “N ga. Tip = . . .:
Would like to know a good book on benchwork, I would like to copy something in the 50′ era, I would like to plan a layout on 4X8 using O gage track. Any Idea ? Thanks Paul
I am new to Lionel Fastrack. With the standard Lionel track, you could run additional wires from the terminal clip that attaches to the transformer to the opposite end of your track to get more power to that end of the track. With the new Fastrack, do you think that would be necessary? And would it work? Thanks – Mike
What a great selection of tips.
As I am just starting this is all a great start thanks to you all-Colin
On model RR highway marking, I found that pinstriping from an automotive supply store works very good. I used 1/8 inch on my
O-Gauge layout and it looks very close to the right size. I beleive it also comes in other widths which may be used for other gauges.
Good luck.
Just starting in this facinating world of model railways. Have bought a large amount of Hornby track trains and buildings from a neighbour. I have a spare room 9′ x 15′ and want some track layout plans. Can you advise any good websites please.
Great tips. Found another one in my readings – for railings, or other pipes: spaghetti or other pasta forms can be used and painted (to keep from becoming soggy). Comes in many sizes, but you have to fight the cook for it…
Want you grain of wheat bulbs to last longer? Use an old DC transformer as a dimmer/power pack and operate them at less than 12 volts. Even a small transformer will do fine. I also found that you need a high output AC supply transformer to operate multiple switch tracks. A common doorbell transformer puts out lots of VA, is @ 16 volts and safe for your switch motors.
to overcome the problem of the lights in carriages changing with the voltage I use a couple of LEDs wired to a micro slider switch and connected to a 3 volt 20mm dia battery which fits neatly into the end of the carriage (phots available if required)
I just retired and plan to put my dream into reality. I have a new building approx. 14′ X 24′. I plan on running a logging/sawmill layout and would like to have a mountain set up for high altitude logging. At what grade or incline can I run with out slippage. I plan to run up grade and then level off for a upper and lower set of track. Has this been done, or can it done? I have heavy good quality engines and rolling stock and plenty of power.
V/r
MSgt Michael Rice
USAF Retired
Mike
I use fastrack and what I did was, use 20 guage wire red and black solder red wire to middle rail and black to outside rail underneath drill hole in table below connection. then run that set of wires to my power strip. I use MTH 24 post strips. I did this about every 3-4 feet of track. I have the same voltage 25 feet away from the transformer as I do at the transformer. hope this helps.
Dave (railcar59)
Hi All,
I’ve been building up a stash of components to put together a Magic Train (1/45 Scale 750-760mm Narrow Gauge) layout. It will probably end up a 4×8 one piece setup or maybe even a modular unit. I haven’t decided yet but basically, it will be a Christmas Layout. We have a sizable collection of Christmas Village pieces we inherited and somehow I got hooked on Magic Trains for their scale and simplicity. I have grandsons. I do have the high detail Stainz Steamer and Fleischmann’s diesel switcher and some of the nicer pieces of rolling stock set aside for Grandpa’s play time. Are there any other so afflicted out there who would care to give up some tips on On30 or 0e layouts? Anything would help.
Roger
Recently been working on a set up that is on floating shelves around a 36×18 office of a friend. Shelf width varies from 5 in on south & east walls to 9 in on north & west walls. Fixed angled pieces in corners and have built 2 tunnels 24 inch long and 1in a corner(has open back in case of mishaps). Joint compound thinned with a little water has worked good for tunnel building over a window screen wire base with 1/4 in aqua dowel framework. No problem with cracking as long as not applied too thick. Foamboard has worked well for background since it is easily carvable and can be textured with a wood rasp or wire brush. Thinned latex paint then spray to whatever color needed. Nearly 100 ft of track with customized scenery. Ready to let it roll in about a wek.
Typo–1/4inch square dowel framework for tunnels connected with Elmer’s wood glue and 1/2inch brads
Hi Al, Some great modelling tips. I have had my model trains for over 35 years, but I found I was losing interest recently; (what a stupid thought). Anyway, after going to many mosel railway shows in my local area, my interest has been ‘re-fired’. Thank goodness, I didn’t want to have to part with such a fantastic hobby
Wow, I just found this forum, and I am in awe of the number of tips I have picked up for my HO layout. I tried to do a modified oval, but even with EZ track, I had problems getting power to the entire layout. I used Great Stuff to make some mountains, and if you want some nice round hills, just cut off the top, and paint and add scenic features to make them look great.
HOLee
when I was young (1950’s) my father built a plastic (Airfix) model church. to make the windows look more realistic (as if they were stained glass) he used the the foil wrappers that the butter came in. Returning to model rail I have also realised that the wrappers around sweets can be used in the house windows to give a glazed effect.
very good website
I am going to disagree with the comment of not buying off ebay. In my experience only I have gotten quite a few brand new locos sound and dcc equipped at at least 100 dollars cheaper than going through walthers.com. in one case I got an athern genesis dcc and sound equipped 150 dollars less than getting it from athern directly.Well I only buy new locos on ebay several of them I have gotten. All work great. I will continue to purchase them from ebay sellers. I am saving hundreds and hundreds. This is just my experience though.
Reply to Derek about steam train tunnel entrance staining. Light a candle and wave under the entrance keeping the lighted wick well away from the tunnel and you will find a black soot left on the structure. Best of luck Dekka.
I always use Floquil paint for everything. Since it’s water based, it won’t harm Styrofoam. Even better, I don’t have to vent my spray booth to the outside and I don’t have to use an exhaust motor that might cause fire with other paint fumes.
For airbrush work, I don’t thin Floquil with water alone; I add a few drops of clear DAWN detergent to a small bottle of paint mixing fluid – about a pint of water and DAWN makes the paint flow and dry evenly. Straight loads of such a cleanser will clean out the best air brush.
On the issue of Styrofoam, and the paints for that, and as an art materials retailer and professional artist I can safely say any acrylic, water-based paint will work on Styrofoam. The aerosols are generally not well suited to any plastic or poly-type material.
I would recommend that some look at air-brushing. It is not too costly, used by some of the best modelers, and with the right training can make you exceed at any painting project including minute details like smoke, mottling and shadowing. If any one has questions, or interest, email me.
Need help 40 inch by 60 inch oval layout n scale bachmann e z track what type tracks would i need.? Thanks
gidday mate
with regards to your ebay cheat sheet.
all i receive is S series track and buildings.
you infer a lot more or am i just confused
“Kendal Thomas says:
at 2:04 pm
Hi! Al, some great tips and thanks for that, I asked you some time ago how to paint center white lines on roads, and what was the best method and tools. The layout you were showing at the time had perfect road markings”
Depending on what scale you’re modeling of course…Try using “automotive pinstriping tape”. After you’ve painted your road flat black or dark gray. Black auto primer works great. Let it dry a day or two. Place the pinstriping tape down as the centerline. Then use “painters masking tape” (That will pull off without pulling off the paint when removed) and leave the width of the road stripe that you want between the striping tape and the edge of the tape you are placing next to it. Do this on both sides of the striping tape and use acrylic yellow paint to cover those 2 uncovered black paths. After it drys, remove the three sections of tape, and you’ve got your double yellow lines.
If you want the single white line, just use the painters tape, and leave the gap width of the line you want. White paint, dry, remove tape. OR, you could start out with a White road, put down the pinstriping tape, trim it as you want (a solid line or dashed line) and then paint the road dark gray. I wouldn’t use anything other than an acrylic for the road surface. Then pull off the striping tape.
Hi, Just been reading Graeme’s tip for scale coal from roofing felt. I use the the discarded inline water filter from my American style fridge. I drain the water then cut it half with a hacksaw, spread the charcoal contents onto a tray & then let them dry in the English sunshine, when we get any that is. The size is perfect HO/OO.
Hello, regarding question of gluing foam board. Home Depot and Lowes sell adhesive for calk guns that is only for foam board. It is often called foam board or panel adhesive. Do not not use Liquid Nails as it will not hold. You often have to look in the stores or ask for help. Sold near Liquid Nails or near paneling
“frederick2nd – looking for rolled barbed wire in HO scale.
Thin wire is ok but how can you simulate the barbs ?”
Hi Fred & All.
The easiest method to create barbed wire – impression-of is, with the net in which you receive birdseed[green] or tangerines [orange], lemons or Garlic[white].
Fiddly but, cutting up these nets into ‘one-strand-strips’ requires you to cut the extrusion at every ‘knot’ (where it would be notted on an actual net. I find a quick “rip” with a scissors sufficient to seperate each ‘run’ but, then go back over each ‘knot’ with a scalpel, trimming-off the two resultant ‘ears’ that have been left. According to Your scale [ plus the weave of the net as, some are ‘tighter’ than others ] cut Tight 1/76, Very-tight [HO/OO] 1/72 or, very Very tight 1/100 to the ‘knot’. Coil the strip [on old cotton-reel etc.] as you travel as, it starts to become quite fragile, the longer the strip that you make. It results in a ‘coil-of-barbed-wire’ but dependant on ‘with or across the grain’ etc, that strip can be more than a little “kinky”. Add a moderate weight – a hefty knurled nut ( Not a Brazil ) does well and the heat of a radiator is enough to straighten-out the kinks.
Plastic – it will of course shed, unless well prepared and, suggest that you make your fence or coils or whatever, before painting steel-grey. Beware of ‘silver’ as no wire stays That clean beyond the foundry gates. . . . .
thats a £1 . . . . . .
DaveB
GARY LYNN – If you’re just starting, try laying track down without fixing it to the board yet, and wire it up and run some trains. That way you’ll see what stock runs round what radius curves, whether big vehicles hit each other on parallel tracks, and above all, how soon you get fed up just driving round in circles. Then you can tinker with it work out what sort of plan you’d like and what scenic features you fancy, you could even shove up some dummy hills, buildings etc out of cardboard or whatever’s handy, see what it’d look like.
RICHARD JOSEPH – Good luck to you mate! Someone recommended Z gauge for you as it fits in a small space – I wouldn’t suggest this if you don’t have previous railway modelling experience, the smaller the scale, the trickier it gets to lay track smoothly and dismantle anything that’s causing trouble; also the dust and dirt stays 1:1 scale so keeping it running nicely is harder; it’s also not cheap, as all the working parts of locos have to be minuscule. I’d stick to N if I were you.
TONY MAC – A reverse loop is easy enough if you want it for goods traffic, you have a short section of track with the rails fed through a double-pole, double-throw switch from either the track before it or the track after it. Drive round onto the section with it connected to the track in rear, stop, flip the switch, the track is now connected to the exit track, reverse direction on your controller and drive on. All you need is a good excuse to stop – such as a train order point or a traincrew-worked road crossing.
Rod
Hi Guys, I wanted to share my tip. I tried to find some foam to use for mountains and terrain, etc,etc. and got a lot of foam for free from a surf shop. All the leftover scrap after the cut out the shape from a surfboard cannot be used so I went to the shop recently and got s tremendous amount, haven’t tried any on my layout yet but what the heck…can’t beat the price.
Love the comments and ideas but wondered what the term PVA means?
Thanks…
Hi guys
This is more of a question than a tip, but I read in an old American model railroad magazine, model railroader I think it was, about a liquid product for building roads. It apparently self levels and just requires borders made of a self adhesive strip which it comes with.
I was wondering if anyone might know what it’s called or anything about it as I would like to experiment with it a bit.
Greetings fellow trackies:
This with utmost respect…….I remember my grade three english (All in one)
teacher saying at one of her higher octaves: “Remember Harry less is more”
Harry:
I am having trouble with water that looks like water, any suggestions?
All the information on here is very usefull, keep them coming
Steve
As an art materials dealer fro over 30 years, I can tell everyone there are a wonderful assortment of paints safe and great for Styrofoam. For starters, they are almost always water based, and not toxic.
You can roll or brush any latex paint, and that is cheaper by the volume than artist quality paints. However, companies like GOLDEN or LIQUITEX offer textural additives that make painting textures that simulate asphalt, stucco, even water, or masonry a snap.
For example, a high gloss gel medium mixed with a small amount of Pthalo blue or green acrylic artists color will come out just like liquid water with a glossy smooth shine, that is 3 dimensional.
A garnet or sand gel medium mixed with Payne’s gray artists color looks exactly like asphalt or with some white added, concrete, with only the use of a cheap 1″ brush from Lowes/Home Depot paint department, called china bristle.
These are all quick drying, non toxic, and run about $6-8 dollars at Michaels or your local art supplier. There are dozens of textural effect gel mediums you can try.
Finally, I have discussed air brushing. You can use air brush colors on Styrofoam, and reduce painting time for large areas, get ultra smooth graduations of color, and solid realistic smoke, soot, or distressed effects with airbrush and airbrush colors. Createx colors are used by pros and automotive detailers fro permanence and instant drying. Remember air dries the paint the minute it hits the surface,
Paint of any other natural source such as oil, alkyd, or lacquer are renegade to most plastics or Styrofoam materials. Plus, with the acrylics, you can hose them down or use any household cleaner you wish with no harm.
I build scenery tables for Games Workshop, when it comes to painting styrofoam sheet, I give the sheet a coat of 50/50 pva glue/water. seals the layer and allows the use of can spray’s
Oh, and the best tip for tidy wiring is that you aren’t going to just remember in a few years time exactly how you wired something up, so keep notes as you go – eg what equipment is fed by what wire, what colour the wire is and which pin number it uses at connectors between baseboards, and what voltage it’s carrying, I have been thankful for doing this several times already!
Rod
egg shells used for stones and brick work
Glueing foam board. Yes to liquid nails if you get the type marked “For Projects. The others will disolve and shrink the foam board. I have mad a tunnel using layers of foam board and LN for projects Works very well.
hi
just starting out. with my first layout and set the tips are great please keep them coming just starting to position track then will be looking for tips on laying ballast
For Dick Joseph,
That was a good suggestion about doing “modules” which are popular in N scale. I think they’re 2’X 4′ or so. You use a certain height so your modules “could” be linked to other guy’s modules end to end. a 3′-0′ x 7′-0″ HOLLOW DOOR IS ALSO A POPULAR BASIS FOR AN N SCALE LAYOUT.
My question is how much dextarity you have in your fingers. To me, N scale is a royal pain in the butt to get on the track and to operate. I got about 60% done with a 3’X7′ N scale layout and just quit. I’ve gone to HO. If you have any way to get my N scale layout from Atlanta you can have it. It’s well done and contains everything you were looking for.
I think sending people to ebay is a bad Idea as that takes needed business from the few local hobby shop’s that are still open. Model Train Shows and Local Hobby shops is the only act left bringing new people into the hobby which is failing rapidly. Most email only hobby people are pass thru dealers. These dealers collect orders and submit them to a supplier once they have enough to satisfy the supplier, but now the suppliers are doing the same, so the wait time of product can be weeks. This process is taking down the Manufacturers. Al is doing a great job here, I sure hope it does not become a commercial venture.
Thanks for the tips!
Here are a few of mine. I use the BACK side of standard roofing shingles to cut out streets. Then I mark the traffic lines with Sharpies’ ultra-fine paint pens, in both white and yellow, (from most craft shops, office supply stores). I use USED coffee grounds (sifted for different grades) for dirt. I make sand & dirt piles from wet tissues or toilet paper. You can shape them any way you want, let them completely dry (for 2 or 3 days) then paint them with white glue and sprinkle your medium over them. I use a lot of spices, such as TURMERIC for sand, CINNAMON or POULTRY SEASONING for a different color of dirt, and USED tea leaves (sifted) for fallen leaves on the ground.
More later
PS: Wish I could post some pix on here!
To cut.out possible losses on E’Bay….I always pay with Pay Pal. That covers my chances of misfortune. Also, most sellers do not want to get into trouble with ebay and Pay Pal together. Anyway, I have never had a problem and I even buy electronics from China. Good luck and keep in tracking.
At Christmas time, we bring out the Z scale trains with buildings and tracks for the tiny tree, N scale for the medium tree and HO for the large tree, I would love to find more Z scale buildings to build as I have many for N and I am currently adding on to my HO layout, I just have trouble finding Z. Got any ideas, I like to build (no finished pieces, if possible and I like to build in wood). Eventually, I would like to have these layouts on display year round, not just at Christmas. If I only had a large enough space to do so, I would have the HO in the fore ground, the N in the mid ground and the Z in the far background all surrounded by their “villages” the perspective would have to be a hillside probably. Has anyone done this?
I have just started into O scale 3 rail having been into G scale for quite a while, Ill health forced me to give up on garden railway. But I have found you can have quite a lot of fun using florists “OASIS” for flower arranging as a modelling media, little tip soak it first and let it dry out then coat with a water and PVA mix before painting. Also useful for supporting locomotives while repairs or mods. (put the stuff in a bag or wrap with an old cloth. The green shavings also make great grass areas when applied or dusted over a painted (while wet) area.
All of the coments have little pearls in them and I thank all of you.
Best Regards,
David
Hi,
I have never heard of you before, so was very reluctant to open your mail in this age of scams and privacy invasion.
Eventually, because I am looking for ‘OO’ layout ideas, I decided to have a look, but expected to find a source of actual layout plans, not just verbal hints and tips. BUT I have enjoyed reading through them all, and have picked up some new ideas, particularly re scenic modelling ways and materials.
At 77 yrs. of age, I am about to start my 3rd. ‘adolescence’ period, and to build another layout, the first since I built one for my son, @ 1983! How methods and materials have changed, and also the quality and detail of locos, carriages, and goods wagons, not forgetting the wonderful kits of buildings, etc., etc.
I am also going to try my hand this time, with DCC control, which was not even a dream in those days of. Correction, something like it might have been wished for!
So, do you actually supply plans of layouts, or know where plans may be obtained from, preferably ‘freebies’? I have subs. to magazines and plans by, my hero in this field, Cyril Freezer, as well as PECO, though not as yet their latest edition, and also a small collection of books on the subject. At present, I am trying to pick an idea here, another there, yet another somewhere else, to then shake them together, and see what I come up with.
Thanks in advance.
Chris.
All very helpful, many thanks
Do you get involved in “T Guage”?
I collect post war American Flyer and most of my purchases has been on ebay using pay pal, I use the current issue of Greenbergs pocket price guide to make sure I’m not paying too much for any item. I found two 4-8-4 northerns with the rare large motor on ebay and bought them for less than $300 each, Greenberg says they are worth $555 in exc. condition as these were. I saw an A.F. northern at a train show last fall and the guy wanted $750 and the number boards were missing and it had major paint loss. ebay is a safe way to collect out of production trains and pay pal makes sure you don’t get screwed. And you can buy parts from portlines.com
In answer to MIKES question on wiring Lionel Fast Track:
Each section of track has several sets of male spade terminals underneath. Lionel sells made up pigtails for about $4.50 a pair but you can make your own for practically nothing. What you need is .110 inch female crimp connectors for 18 t0 22 gauge (US) wire. If you cannot find the .110 inch connectors,.187 will do in a pinch. I found the right ones online for about $6.50 per hundred. .
I used a roll of 2 wire, 19 gauge thermostat wire for the pigtail leads. Be careful to not switch the ground with the hot because the ground terminal switches from side to side under the track. (hot is always in the middle)
I wired every other 10 inch track section to the bus but I am sure this is over kill. Every four sections will probably work just fine. I used 12 guage solid “Romex” style house wiring for the bus because I had some available for free. My layout has 65 feet of track and 16 or 18 gauge stranded wire would have been enough. I ran the 2 bus wires in a complete loop and then tapped a lighter gauge wire down to the transformer. I ran two or three of the track pigtails together and then tied them into the bus with wire nuts under the layout board.
This was all done without any soldering or special terminal boards. All common hardware items.
Running a jumper from track section to track section and then down to the bus would also work. This would be the way to go if you have an elevated track section where you didn’t want a lot of down wires to deal with.
Thx for the tips it should help me a lot as I start my new layout
I have an HO scale set that my Son used to put together for me for several years during the Holidays. Now that he is not around I want to try to set it up myself. I am having hard time on how to lay the tracks on the size of the table I have. (34 inches wide and 97 inches log). Maybe it is a weird size. I wanted to use my dining room table since I don’t use it for anything else. Any help with layouts will be greatly appreciated.
Maria
Tips are great to read. I am starting on a big HO layout and would like to know how to wire in the house lights and the street lights. I bought some of the street lights from china(great price) but I have been told not to use a regular transformer with them that they will blow the lights. The instructions say to use 6 volts or less, so how many of these can go on one circuit. I will start out with this question and work up to the others later. I am retired Army and the doctors and my wife said find a hobby so model railroading seems to fit. thanks in advance for the help
For the guys wanting to make barbed wire, Cornerstone use to sell the kits but they were not coiled on top. I have used welding wire and cut it into small pieces for the upright poles, used fine screen material to make the actual fence, glues it to each post with hot glue gun, used a real fine thread to string from one pole to another on the top curve of the upright pole, To make coiled wire for the top i took the real fine thread and wound it around a piece of small pipe wrapped in wax paper and then sprayed it with hairspray or diluted white glue to make it stay in place and then pulled the piece of pipe out and the coiled wire is left. You can glue this to the top of the uprights. I did this around a place I modeled after a small county jail yard.
It has been 30 years since I last built a nice train layout so I appreciate all the tips. I plan a new one as soon as I can sell my house and move to a small town in Oregon where I can live cheaper than Seattle. I can hardly wait.
After many years in HO then G scale I’m back trying to decide if I go back to HO or try and tackle N scale. Have a small oval of N on my coffee table and really runs great. BUT the size is of some concern. Have much G guage and still have about 180 feet of track outside running on battery power because salt air here in Fla really raises heck with trying to keep the tracks clean.
After almost 50 years in the Military/Contractor realm I’m ready to retire and build my first layout in more than 50 years. I love the tips, but am not at the point in time where I can use them… I’m really looking for ideas on track plans right now, any suggestions as to where to look? Also one quick question: what is “PVA”? I’ve seen it referred to many times like it’s some kind of liquid? but what…?
Chuck
I’m just getting interested in model railroad ho scale and I think its very exciting the way everything looks so realistic I already bought some engines and cars and I think your ideas are great so I’m looking for more ideas on line.My layout is going to 8×16 so I think I could make it vert nice and I want to thank you for some of the great ideas.
Marcel
The radius of the curves are what determine the amount of railroad you can fit into a given space. With any radius the cars and engines will over hang the sides of the rail and the couplers will have a lateral pressure. This is normal, but with small radii it looks ridiculous and may not work; The solutions available are to use a smaller scale, use a bigger radius and either more space or a simpler track plan, or use shorter cars. You run into the same problem when you transition from level track to an incline; you have a vertical curve and a long car will bottom out. So use less aggressive inclines or shorter cars.
Drift wood on a beach is smooth and the shapes can be used to make realistic trees. Beach gravel is sometimes fine enough for roadbeds or gondola ore. Sheets and towels stiffened with paint can make temporary snow scenes. Now a question: can you control two trains separately on a three-rail system by using a catenary and pantograph for one engine and the middle rail for the other? Both controls would use the outer rails in common. If this could work I wouldn’t need to isolate track sections.
For those of you talking about using patching plaster, try the extra light version. Drys quick does not shrink or crack. I also found that ceiling tiles make a great base material for my layout. I just moved and am starting a brand new layout with a few pieces of salvaged landscaping that I cut away from the old layout. I’m thinking about all the mistakes I made the first time around. The new layout is n scale and will be 3 x 12 with a 4 x 4 L on one end. Any thoughts on lessons learned would be appreciated.
I have had good luck with eBay, and just make sure that the seller has great feedback. I do believe in supporting my local hobby shop, and I do when I can.
Thanks, Al
I have found all your ideas and those by others just wonderful. I just started doing another HO scale after some 40 years. Locating parts for the old TYCO locomotives has been a problem. I’ve been told they went out of business at the local hobby shop. I was my sons age the last time I was into this and he is getting impatient/excited to play with it. I find all the e-mails and posts a great read, keep sending them. I will add that the best idea for mountains is the foam. I’ve been testing many methods for sculpting.
I would like to get in touch with Mr. Richard “Dick” Joseph. I too am a a paralyzed Veteran. I am lookingto start a layout. We need to talk and swap issues that don’t affect walking people. Such as foot space. We can’t use a traditional “L” girder bench as the footrest of a wheelchair would make access to the layout impossible! There are a lot more things to consider, but that is the first when starting a layout. The benchwork has to be completely different. Thank you and PLEASE give him my email address. Thank you. Gary. gryxter@verizon.net
I’ve used for many years sawdust died green or brown over green or brown paint. Also, the sifted residue from charcoal briquettes for coal. Almost any kind of rubber-type cushion foam, ground up in an old-fashioned meat grinder cushion, died different shades of green for trees, bushes, etc. Different dried mosses are great too, spay with glue, add foam, sawdust ifs desired. Snap the edges of homosote or ceiling tiles to make rocky strata, real shale works too, if you have access to it but is heavy.
I started a layout 20 years ago – it took up a complete bedroom – needless to say, it was never completed. When I started building Dioramas about 40 years ago and took pictures – they looked so realistic! Since retirement, I have gotten into woodworking, but I have never lost my love for model railroading. So since my “expansive” layout failed, I thought I would start small by building dioramas that could one day be integrated into a larger layout. On another note, I use the “Tortoise” switch motor for my turnouts and find that the 10-base-t computer wire works great. So sad to hear that Fine Scale Miniatures is not around anymore – I have many of their kits – Coal Tower, Freight Station and some I have not started.
When my boys were little, I used acrylic paint (Brown, Green and Black) to paint on those styrofoam inserts that electronic equipment were packed in. The results was a rustic camouflage concrete effect were the boys woud use for their action figures.
Dick Joseph you asked about track and engines. Just a clue stick with Kato the track is excellent and the engines are the best. Ron
I have a DCC layout that runs around a room. I have many lights, crossing lights, building lighting, street lights, signal lights on my layout. Is there anyway to re-wire and have less running to transformers, It is a monster spider web under my layout. Any help would be greatly appreciated. I am trying to section my lighted areas.
My gosh what a wealth of tips and creative ideas! Great as always, Al! Does anyone have an 8020 Santa Fe shell I can purchase? I have looked at literally thousands of entries on Ebay to no avail. Would appreciate any lead. I have considered to try to “build” the missing/broken part. Thanks in advance. Trainman
Tips of wooden chop sticks makes either trash cans or buckets if cut to the right size and pained.
This is for Dick Joseph and all others who have limited reaching distance (and the rest of us too) – Consider alound-the-walls shelf layouts. For continuous running, you would either need turning loops at both ends, or build a fold-up or drop-in-place bridge segment across the doorway(s). You don’t need the depth of a free-standing layout and can go with 1 or 2 feet of depth and still have nice scenery either behind or in front of the track. You don’t have to go around to the other side to follow the trains, just move along with it. You can fit a longer mainline following the walls than than you can fit on a table-type layout in the center of the room. You can even have multiple levels, greatly increasing the mainline length, with either spiral loops (which scare me!) or grades in the background climbing up to the next level and back down, or even have 2 layouts with different completely unconnected railroads (even N-scale on top and HO on the bottom!) Best of all, it takes up less space overall since instead of narrow isles around the edges you can actually use the center of the room for other purposes. And there are no table legs to bump into since you can use ordinary shelf brackets to hang it on the walls (wheelchair friendly). Scenery can be cleaner with a painted or printed background instead of seeing the other side of the layout. Overall I would say more plusses than minuses compared to the free-standing layout in the center of the room, but it’s a matter of preferences and the type of space (and walls) you have. If you don’t want the track to cross the doorways or build turning loops which can be deeper than you might like, you can either put a small yard and turntable at both ends, or use diesels that can run in either direction. Food for thought for anyone starting a new layout.
HEY LEW,
THERE IS NO NEED TO SHOUT!! TURN OFF THE CAP LOCK!!!!!
Jim
I’m about half way through this list of hints and I have to stop and comment.
Don’t any of you know how to proof read?
It is simply reading before sending and before sending think…..Hmmm., does this make sense? Some of these comments are not vrye esye to red because they aren’t very well written.
Common folks, if it doesn’t make sense don’t send it!!!
Thanks for reading my rant.
Jim
Very interesting and helpful with most ideas.
Been looking at all these neat ideas now for about a year. Retired last week and winter coming here in Minnesota so thinking about unboxing all my HO train stuff. Its been several years since I did any of it and confused to what to get for a transformer controller. I don’t see much here on that topic.
Thanks Stan
There is a material called Durham’s Woody putty which comes dry in a large resealable container. If spread like plaster of paris, but does not shrink, and can be sanded/painted. I also build military dioramas and it works great for mud. It is also inexpensive. You can get a 64oz container at Home Depot or Lowes for less than $8.
I’m a very new first timer and enjoy all comments that boost my hope at getting started. I could use help in constructing freestanding platform for HO scale with possibly several lines. Size available is 6′ x 14′. Are there any books that show construction techniques for supports and wiring plans, etc? I don’t have a pc so printing from on line is not an option. Thanks in advance for suggestions.
To John have you looked into making your own using a jig ? I’ve been using Fast Tracks jigs to make my turnouts and they look and work great.
I like these tips, here is a couple more. If you want to make a strong mountain/ tunnels first lay your tracks flat or elevated ,then cut access holes on your table big enough to get your hand in but not interfering with tracks, next crumple up old news paper put on top of tracks or where your want mountains then cut strips of medical bandage that has plaster in it, lay it on top of crumpled paper , then take a speay bottle with water in it wet down bandage it will form to paper, let it dry completely you can add more layers of bandage after first layer dries , making it stronger , then reach through holes in table and pull out paper this makes a strong hollow mountain which you cab paint & put scenery on ( you can get plaster bandage from a medical supply company which is cheaper than hobby shops)
Here is some N-scale tips , if you make your layout in modular table form you can move it easier if you have too , I have moved 4 times since i started my layout it is easy to move and adapt to your new location. a tip for wiring is to drill holes next to outside of track run wires through holes & solder to outside of rails then run wires under table back to power source this gives your a more stable power to your tracks & will make trains run smoother , i use 18 gauge wire it provides plenty of power, As far as my switches i use telephone cable that has pairs of solid wire in it ( a pair would be like orange w/ white stripes & white w/ orange stripes, there can be a lot of pairs in a cable , just ask your local telephone repair guy for scraps, they usually have scraps they can’t use)
Scenery tips , for trees cut pieces of branch of a crate myrtle tree dry then spray w/ hair spray ( final net is good brand ) then dip in woodland scenic foam what ever color you want , For flowers take multi colored pipe cleaners , untwist wires to get fuzz out , this makes great ground flowers along side tracks.
Al: Great reading all the Train tips. Every little bit helps.
Denis
I have purchased engines , cars , track and turnouts (Peco) and most everything I use for my layout from EBAY and use Paypal for payment . Saved lots of cash . Paypal guarantees you get what you ordered . Read the adds carefully ; look at the drive wheels on locos ; don,t purchase cars unless brand new and the quality brand you are looking for ; which usually you can purchase for same price at your local hobby store . LET’S GET TRAINING !
I have tips on what not to do, rather than what to do and how to do it. I currently do not have a layout (I make stuff but don’t operate, except on a test track.), but have built several layouts in the past. Do not use natural materials (e.g. dirt) unless they are sterilized. Also be careful of organic materials that might serve as food. I built scenery from dirt and coffee grounds and one day found my layout populated with hundreds of maggots.. I am an experiences fire protection engineer, and recommend that foam plastic not be used unless all exposed surfaces are heavily coated with a noncombustible material. Clay based spackling compound would be a good choice.
I’m new to this. Rely interesting. I had two layouts over thirty or so years Which I took apart each time I moved. My present is in a glass topped coffee table which is of course portable as it is not Guage. I have moved several times since and am now working on it. Am enjoying every one with ideas. Chairs. Mike
Enjoyed. Mike
TIPS ARE GREAT. GREAT WEB SITE. Just starting out so as yet fave no tips but could use some info. As one other person asked could use a suggestion to a 2 track HO layout with an incline and a large tunnel to fit a 4×8 table. Also would like info on wiring a DCC layout. Is there a good manual to follow? Thanks for all the info. So far have accumulated a pile of containers, styrofoam and cardboard.
Dave USA Ct.
An important warning!! Many modelers are using a hot wire / hot knife to shape foams. If you use “styrofoam” with a hot wire you can release CYANIDE gas which is fatal in confined areas and very dangerous even in open areas. Use the “blue” insulation found in building supply stores instead. Not all foams are the same!!
Hi Al,
Here in Spain wood of any description is not cheap. Anyone wishing to build a baseboard is faced with great expense.
Ikea sell reasonably priced tables with self-assembly legs (ideal for exhibition work) that come in various sizes at reasonable cost.
Provided they are all the same height, they can be easily connected to each other and are very sturdy.
You can even make access cutouts with a jigsaw ;o)
Cheers,
Mac …
Boy what a great bunch of ideas! I have a large n gauge layout. I just started about 1 an 1 half years ago. I am 72 and the n gauge is too small for me so I am starting a 4×8 HO layout. It`s like a whole new world. I saw someone ask what PVA is? I too would like to know? I use usb board 1/2 inch with blue 1 inch styrofoam on top seems to work well. I love everyones tips on the hobby, it has helped me a lot. Please keep it coming, and good luck to the wheelchair bound gentelman. You will do well and enjoy it greatly. Thanks to all……Tom in ARIZONA
Michael Rice
Geared locomotives are used for logging trains. These include Climax, Shay, and Heisler. They have all wheels driven, thus lots of traction. As for maximum grade, you need to test your engines. Starting with the engines, then determine the maximum number of cars you want to pull. Take a long board and attach a windy length of track (logging tracks are not straight). Now test your engine(s) by elevating one end of your test track and see how much elevation each engine will handle. If you use switchbacks to climb a hill, this will limit the length of a string of cars. Keep elevating the test track until your engine slips – this is the maximum grade that engine can pull.
Basically, there are two types of foam. One is the extruded foam which is what you want for model railroad uses. It is sold as insulation, and is blue or pink (depending on brand). It is available in various thicknesses including 1”, 2”, or 3” thick. The other is the white stuff used for shipping things in. It looks like a bunch of little bubbles all stuck together. It is softer and subject to denting, etc.
What is PVA? I believe it is called white glue or Elmer’s glue in the states, and PVA across the pond.
Do NOT use white glue or PVA to glue foam boards. Foam does not breathe and water based adhesives need air to dry. There are numerous adhesives designed for gluing foam, including Liquid Nails For Projects.
I was at Menards and found a gallon of brown (dirt color) latex paint for $5.00. I used it on my extruded foam layout. Now, if any grass or other scenery stuff falls off, it reveals a patch of dirt. It also makes slow construction less painful – unfinished scenery areas I simply call arid land or future farm land. Use your imagination.
My local hobby store usually has a couple of old-timers like me just hanging out. They are a great source of all kinds of information. The owner gives veterans a 10% discount. Ask your local hobby shop people if they give veteran or senior discounts (I notice a lot of the people above are seniors and vets).
Still in training,
Carl in Kansas
I once used brown spray paint on styrofoam. As I sprayed, the whole thing melted away. Oh, well.
To the question about radius on an HO layout.
18″ is absolute minimum. Most small locos and 40 scale feet cars will operate is well laid. But most larger locos and 50′ cars perform best at a minimum of 22″.
Passenger cars and other 60′-74′ + cars look best at 24″ or greater.
Go for 32-36″ curves whenever possible… just looks better and no operating problems.
And if you are running parallel tracks on a curve the space needs to be greater than on straights. Because longer equipment will overhang as they move across a curve and will clip anything too close.
Radius is also involved in turnouts… using #4 or #5 turnouts with large equipment or in a crowded yard is asking for trouble. If you can find the space use #6 or greater on mainlines and branchlines to keep your traffic moving. Use #4 or 5 in yards where you are moving slow and not rolling the big power. Thats why you run Switchers (short) in these spaces.
Happy modeling!
-Bob
Hay! Just wanted to let you know that the grit from a gravel road looks just like coal. So if you do not live on a pavement road you are in luck. Also the gravels from a gravel road look like H.O scale rocks as long as you paint them.
Zach
Someone asked about a layout plan for a 6X10 table with a two train capability. I had a single loop on my 4X8 and I wound up tearing it up and rebuilding it to accommodate two trains – either in the same or opposite directions. I have a DC system and that limits a few things but not much. The layout is double track main with four turnouts which allow for switching tracks with the two running trains. There is a “mountain” at one end of the table with a tunnel running through it and a spur running up to a cement plant on a plateau on the mountain. I installed a small yard and I am adding a Walther’s 90 foot turntable as well. There is also a spur which serves a general store and a small lumber yard in the town. If you would like a drawing of the layout, I can post one if someone will tell me how. Or if you want me to email you a copy, I can do that also. Just get me your email address. I can send it as a jpg file attachment.
Bill Sparling
Sequim, WA USA
To my disabled friends. I am a retired Metro Toronto \police drug squad officer. I was nearly killed twice while on the in two MVA’s. I was in rehab for 5 years and then got a job driving a limo. I stopped for a coffee and while walking in the lot |I got hot by a car. All my rehab, down the pipes. On a few occasions while really depressed I have thought about eating the chunk, but managed to talk my way out of it. I was in radio control for 50 years but I can no longer run around chasing drones and buggies. So I’ve taken up model railroading. Model railroad news and model railroad craftsman are two mags I get every month and they really help. So just try to put your disability behind you and concentrate on your trains.
Rick
Does anyone have a small N scale layout that they want to sell. I live in Bloomington MN.
So, after digging through the attic for the Christmas ornaments I happened upon some boxes which contained the remnants of my train modeling days some forty five years ago.
I was almost moved to tears thinking of the joy and fun during the days when this stock rolled. Two ancient MRC powerpacks (One with “pulse power!), Atlas snap-track, turnouts etc. Then came what was left of the rolling stock. I guess the years (and three children) took its toll there. A beat up 027 2026 locomotive and sound enabled tender with a coal car and a faded white box car. The HO stock is beat up, some Bachmann, Athearn etc.
Point being I was filled with the desire to revisit those days of imagination and joy; I visited my local Trainworld and was surprised to learn of all the advancements made in this hobby. Manually operated blocks now operable under DCC; ultra-realistic locos and stock etc. I spent the interim years scale model and RC building, I cannot believe I let this hobby go by the wayside.
Thanks for the inspiration!!
For Bob McPartlin;
Back in Jersey we had a pretty big G gauge layout (about 1100 feet of track) I designed it to be an operating RR with stations, sidings and industries using Aristo’s Train Engineer remote control, now made by Crest. BUT I found that my friends just wanted to see the trains run from the deck and hear the whistles as they enjoyed a beverage.
I rebuilt it into 3 loops and an up and down cog RR. I moved to a hillside home in PA and find I can’t get up and down from the ground so easily. I’m building a ON30 basement layout instead, One tip – superdetailing buildings for outdoor use may be fun but it’s wasted on the critters that will live there. One other tip, ise tunnels or hills to hide some of the trains so that the visitor keeps interested, Have fun!
just setting up a train set for my grandson and as a support for tunnels i am using the plastic bottles that orange juice comes in with the ends cut off and slipped under the track .
i am then going to cover with scenery material and a few tress pushed through the bottle for support
Great info, enjoy every article you send. Now have a 2 yr old great grandson who is fascinated by the 4 ho trains I have set up. Glued a disney goofy statue on top one box car, so every time it passes he laughs so much. Now I think I have a train hobby buddy for sure.
Amazing tips on here, I really only set up trains as a kid for Xmas and the same when my kids were young so simply put I feel like an idiot not knowing so many of the terms used here like turnouts etc. My goal for creating a layout is going to irritate the purists I want to resurrect my old ho trains in combination with my old Aurora TJet cars. No crashes I promise. I have been looking for track layout plans for a combination set up with no success I saw videos but no real layout plans. So I will need help finding them, also advice on wiring in a manner that will prevent power losses in different spots. I need to keep it simple as I have limited skills. Thanks to all who post here you guys are amazingly creative.
For Dick Joseph….. I model in tiny t gauge,( due to lack of space ) it’s not easy due to the tiny gauge of everything and similar to mentioned difficulty facts about z gauge earlier, if your hands lack any dexterity you could find it difficult to laytrack exactly and cleaning both track and wheels ( which it frequently needs) isn’t easy
The advantage is …..it’s small ….. hope you have fun when you decide ….
In 1954, I was a Detroit Police Cadet, when I met a detective who was also a US Army Reserve Major. He had just returned from deployment to Germany, where he obtained a lot of Marklin equipment. We cut a deal: he would assemble and detail the layout; I would do the wiring. When we were done, we had three trains running on the same track, each independently controlled. HOW? you say, before DCC? Engine #1 controlled by voltage on the two rails; #2 controlled by voltage on negative rail and outside third rail; #3 controlled by negative rail and catennary! My question: I could swear the scale was “TT”, but I find no reference to it any more. Can anybody help?
great tips, what couplers do you use for tyco cars, and other manufactures that do not have pockets for kadee #5’s I have several cars other than Athearn that need couplers changed per my preference to get rid of the nmra horn hook couplers that come standard on everything, mostly I destroy these pockets with my dremel, then try to figure out how to fix them with Kadee pockets, not always successful, any tips on how to do this would be appreciated. thanks, An old railroader in Oregon, ——-Richard
ok, here’s the secret to joint compound, I have been in the bldg bizz for over 52 years and I would imagine, learning on chest drills, hand planes to CNC machines to auto planes and cordless nailers, plaster lath to drywall I figure I may know a little. here:
Joint compound, bucket mix is great for 1/8 or less thickness with reinforcing tape or covering nail or screw heads, it’s problematic, won’t always dry in 24-48 hours prone to cracking, bleeding thru a lot of mis primed paint jobs.When not sanded correctly.
Bag mix, 5,20,45,90 has fiber content and will dry in quick time frames, if mixed correctly will fill areas greater than 1/8 and harden to a sandable rock hard state.
In the south where I live we will mix bag mix and bucket mix, say 20 min or 45 to a pan at a time or a full bucket, as the fiber in the bag mix will stop the cracking when drying, will keep the finished product from shrinking or falling apart.
As a modeler of years gone I used it a lot on styro bases, for mountains backdrop and scenery. I wish all of you good luck, hope this will help. By the way, we use 5 minute bag mix nowadays here in SW Florida as it is almost the only one that will dry fast enough in this constant humidity. yours red.
Hello, I’m just built a 6’ by 10’ table for my first layout it’s really nice. I bought a H O starter set with the Bachman E Z Track with a Athearn train with a lot of extra track. I hate to E Z Track down on expensive table if the Track is not that great. I’m in this all. Should I use a better Track , Flex Track to get a finer detail. Now I have lots of brand new Track & don’t know what to do. should done my research. What Track should I use ? Thanks
Just getting started at 74. Dug out my old 1950’s O gauge Lionel trains and tracks. I have a lot to do with cleanup, repairs, etc. I plan on doing about a 6′ X 10′ layout. Question is: should I use the original tracks (will need more new ones) or just go for all new track?
There are various kinds of glues for plastic, wood, etc. but the one I use most frequently especially for layout construction and landscape work is Contact cement. It’s not only flexible but will bond almost anything including styrofoam without melting the stuff. Be careful though because once the parts are touched together they’re together for keeps. I also use coffee grounds for a lot of scenery stuff but only after it’s been run through a perculator and dried after my morning cupa. Don’t use it fresh from the tin or might attract bugs and other creepy things.
When you find the yellowish spray urethane foam in packing boxes pull it apart and the pieces will look like the cliffs of the mid west plateaus with vertical ridges. Then they can be painted with thick rubberized paint and you will have plateaus that will look exactly like the real thing
for richard in whell chair. my name is ike saylors, who pushing 90, and have been playing with trains since the 1930’s becoming a serious modler in the forties. i have been designing model rrs for myself, friends one for a model railroad club. a few years ago i designed a mrr a gentleman like you. he had a 10 x 10 room, and wanted a waterfront switching layout with at least one loop so he could watch train run without interrruption just for the fun of it. it was a great plan designed for fun. so please consider a waterfront layout and advoid hidden tracks. ike saylors
Hey folks! Just got the bug again to do an HO layout. It has been 40 years since last. Great to see this great hobby still alive. Appreciate all the tips and tricks. Now who has $1000 for me to do this right…lol. Thanks again.
Multiple questions on PVA
“What is a PVA?
Polyvinyl acetate (PVA, PVAc, poly(ethenyl ethanoate): best known as wood glue, white glue, carpenter’s glue, school glue, Elmer’s glue in the US, or PVA glue) is an aliphatic rubbery synthetic polymer with the formula (C4H6O2)n.
For Model RR use, I’d consider the term to apply to wood/carpenter’s glue as opposed to Elmer’s/White/school glue unless gluing paper
As a 50 year modeler my experiences I have modeled in HO S O On30 and 1.5″ live steam, I can advise on a lot of fronts. I haven’t been able to read all the replies. JUST TOO Many to read!
G scale for ballast I suggest visiting local gravel plant. LOOK AT THEIR CRUSHER “FINES” This is what is left over from grinding rock for making cement. Look for one with the SMALLEST FINAL SCREENS. This size is usually best for the right size for G scale and the cheapest as some will GIVE YOU pails full FREE.
Check auto supply stores for striping for car details for street striping. This can work for many scales. Also look to checking out WHAT”S NEW THIS WEEK with Ken Patterson on [You Tube] for the latest HO and N News! It’s new every Monday!
Hi Al,
Three tips I use to cut costs on my layout you can probably use. All for HO scale
1. For hedges, I use green scrubber pads available at the local Dollar store, usually 4 or 5 for a dollar. I cut them to 3/8 inch high, and they scale perfectly.
2. For asphalt roads, I use 4 inch safety traction tape, the kind you’ll see installed on stairs or in commercial kitchens. It comes in black and scales out to just under 30 feet. After laying it down, I lightly rub it with a sanding block to knock down some of the tread and then use 1/16 inch white or yellow pinstripe tape for the lines.A single roll of the stuff is 30 yards long, so you should be able to do quite a bit of HO scale roads.
3. For ghost signage on buildings, I print the signs in color on white tissue paper. I cut the paper to 8″ x 10″, tape it to a backing sheet of paper, and run it through my color printer, one sheet at a time. I set the printer to economy mode so that it will be faded when it’s done.
I then cut the signage out, apply diluted 50/50 PVA white glue to the spot on the building I want it, and lay the sign on the spot. I let it air dry for a minute or so, and then LIGHTLY rub it with my finger so that the tissue draws up into the pattern on the building wall. And it looks like it was painted on forty years ago. You can also use a makeup brush to get the tissue to draw in. The key is LIGHT pressure.
Thanks for all the tips, Al!
I had an 8×12 horseshoe table done in N Scale, I found Walthers to be helpful in finding supplies and wiring goods, track switches come in so many types its boggling but I managed 3 loops on one table and it worked great, after 3 months of wiring it was lost in the housefire and I have begun collecting n Scale again hoping to find layout tips here to start with…Question, is it OK to use all flex track or should I drop straights at the switches?
Pin striping that comes in a lot of different thicknesses and colours would be ideal for road marking and car parks etc
I designed a Truss spelling ‘MAX’ to commemorate my 86 years in model trains.
Max
You can scale 3 times size HO drawings to scratchbuild G scale buildings and rolling stock as I did to design the R.E.A. Tank & Hopper Car because 3X 1/87 = 1/29.
Max
I am just starting a n- scale. I have seen cork that is cut down the middle my question is (why) ? I see there is road bed you don’t have to which is best ?
love the ideal that a home is on the mountain top with a train that runs through a tunnel under it & the petroleum plant is nice as well. the whole setup is well done.