Peter’s been in touch with his Hornby track layout:
“Hi Al,
I dropped you an email earlier this year, with my thoughts on initial planning for a model railway. So here goes a synopsis of my progress to date.
I had an early Hornby 3 rail model raiilway nearly 60 years ago and had hours of fun with it. However I left home to find my way in this world, my Dad sold or gave away my model railway.
I flirted with layouts a couple of times, but I was in the army and moved round a lot and also found I had little spare time for modelling.
I had been following your blogs etc for about 15 months really enjoying everyones contribution. Anyhow my wife clocked me visiting all the model railway sites and bought me a Hornby Flying Scotsman set for Christmas. (Surprise!).
I had nowhere to build and run an extensive Hornby track layout and “she who must be obeyed” wouldn’t countenance a shelf in the spare bedroom for a linear out and return layout.
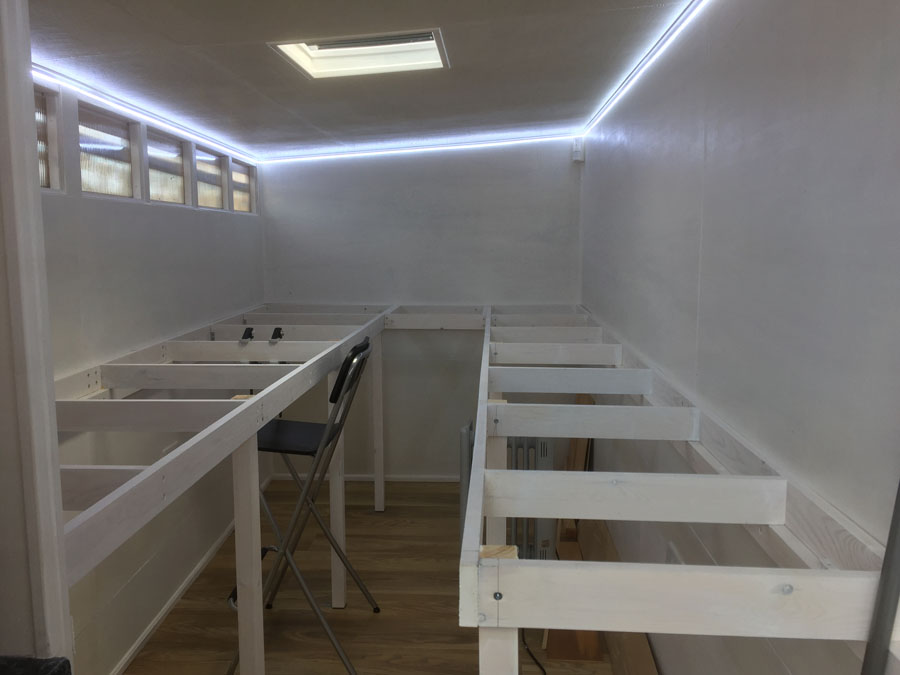
I had one shed but that was used for a gym and tool storage, so I decided to put a 14 ft long shed at the back of the house, however the width available was only 6 ft tapering down to 5 ft. Once the shed was built I lined it with 2 inch foam insulation and a top covering of 6mm ply.
I installed ring main power and lighting circuits. Adjacent to the door I installed a 2 foot work area with an old kitchen cupboard and worktop. This left me about 11ft length for my layout. The attached photo shows the shed with the baseboard staging set out.
I covered this with 9mm ply and a 2mm cork topping. Near the work area I have a a 2 x 2 ft lift out to allow trains to have a circular track.
I considered an N gauge layout but read that I might find this a bit difficult on my eyesight at my age, so have gone for OO gauge.
I have gone for a late 50’s early 60’s era of UK railways, but I am not being to pedantic about that. I have spent many hours working on track plans from the very simple to most exotic, and have come up with a solution which seems to meet my operating requirements. (Dangerous Dave’s layout gave me plenty of inspiration!).
I have not put in any inclines as it seems to eat up to much room, plus the fact that I have never built a complex layout before, I’m not sure of my modelling skills so I thought I would err on the side of caution. I have included a copy of the track plan with this email. I would welcome any comments that you have, but please bare in mind that I have now built this layout! I used Empire Express on my Mac as the planning tool and found it to be pretty good on the whole and not to expensive.
I found that building the track to be the most satisfying experience I have had to date, really good fun. I am using Peco Streamline code 75 track and points, finding it easy to manipulate.
Using the metre long lengths to form curves was an interesting experience, I found that if I staggered the rail joints by about 3 inches I got a really smooth curve (I picked this tip up from You Tube). A bit fiddly to do at first, but I soon got the hang of it!
I planned to use some Peco curved points in several locations, but did not like them when it came to laying the track, they could do with a tighter radius to be of benefit to me. All my curves are no smaller than 500mm radius, but still seem tight especially on the inner track.
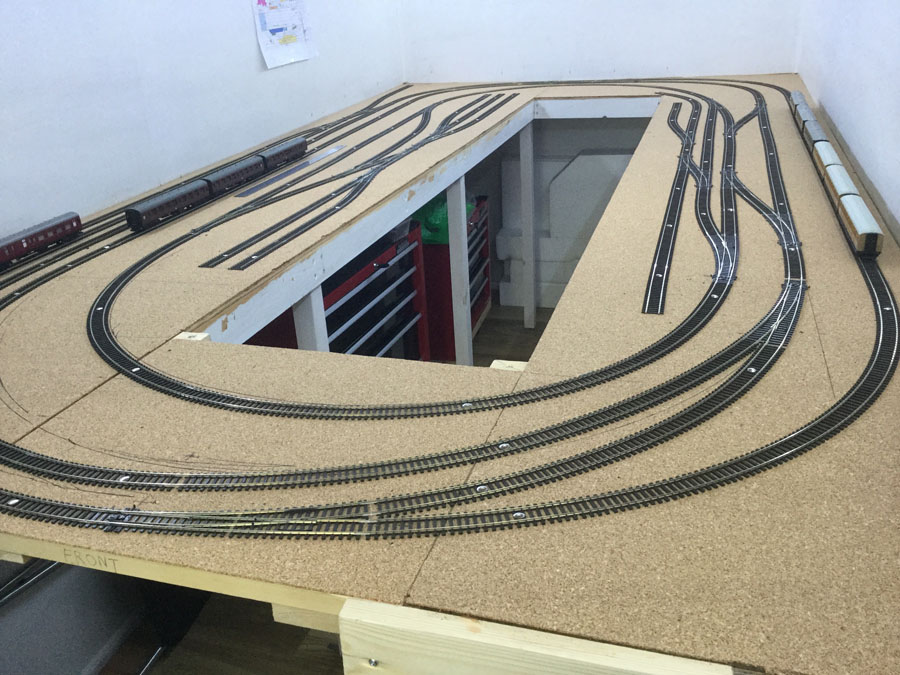
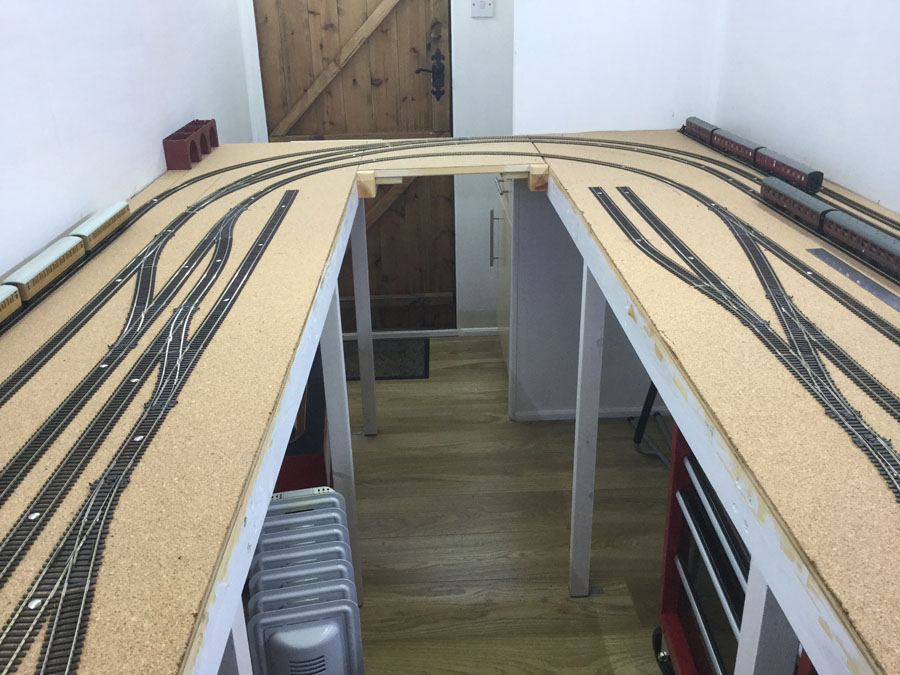
There are a couple of photos of the Hornby track layout, It is currently held in place with drawing pins, this allowed me to go back and adjust points and curves for a better fit; rolling stock seems to trundle round OK, but the proof of the pudding will be when I start running locos round the track.
I am using electro frog points and plan to use Seep point motors which will switch the point and the live frog. (A lot of pros and cons!). However I may have made myself a lot of work as I have not fitted the point motors yet, as I wanted to make sure that I had the track exactly as I wanted it.
I am seriously considering splashing out on a Z21 DCC controller, enabling me and others to use iPhone or iPad as the cab. I know this has the ability for point switching which I am pondering about, although the driver of the train does not set the points! Thats a job for the signalman and their control panel (Signal box). I would appreciate anyones thoughts about that.
Something I did not seriously consider was if I was to use a switch panel for points and signals, where would I locate it, as there is not much room in the middle! (Doh! as Homer would say). If I do use a switching panel it will have to go up on the wall.
I feel that I have achieved a lot to date (I spend most of the summer at my static van so little was done then) but I have a lot yet to plan and implement. To paraphrase Winston Churchill, this is just the start of the beginning! I will keep you posted with updates and hopefully soon some trains will be running.
Best regards,
Peter…”
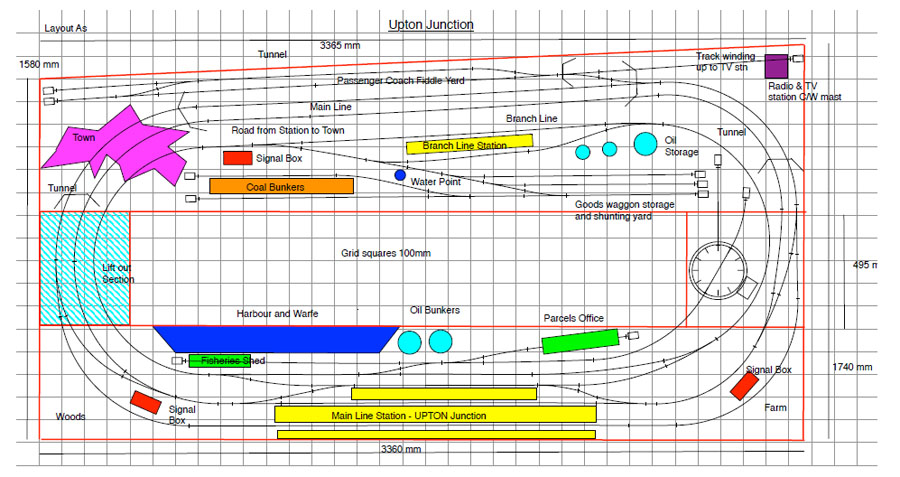
(Click on the track plan to enlarge)
Whenever someone sends me a Hornby track layout, I’m always reminded me of Dangerous Dave:
A big thanks to Peter for sharing his Hornby track layout.
Love the approach Peter has taken – secured a space of his own, and then taken his time to do a ‘proper job’. Can’t wait to see the updates on this one. A big thanks to Peter.
That’s all for today folks.
Please do keep ’em coming.
And if today is the day you get started on your layout, the Beginner’s Guide is here.
Best
Al
PS Latest ebay cheat sheet is here.


Made yourself a nice railway room there Peter …and now starting on the scenics is to me the best and most enjoyable ..Dangerous Dave
I like the shed Peter, very nicely done. If you want iPad/iPhone control have a look at the Sprog DCC usb products.I’ve used the Sprog 3 on a small n scale layout and it works very well and is quite a cheep solution.
If you really want to cover up large sections with tunnels as shown, particularly with points in them, I should make the scenery quite lightweight and removable on sub-bases down to track level, for any significant repairs such as changing a point I find it much easier to work accurately while leaning over the board if I can get my elbows down on something. Also, you might consider whether to put the ‘carriage fiddle yard’ in tunnel at all, there are lots of carriage sidings out in the open, such as Malago Vale west of Bristol, where stock was parked and cleaned, and it makes the associated shunting a pleasure rather than a difficulty. Good luck!
Rod
Just a thought. Use sectional track on the lift out joints. Flex track is hard to keep alined on cut curves. Also you can put the switch controls on the facia near the switch they control.
Have fun. Looks good.
I like the shed. It looks to be well lit and the layout is really nice. Can’t wait to see some scenic details pop up. Cheers! NJ Mark
More photos please Peter!
Nice job Peter, read the entire narrative and the photos are great. What a super job on the added shed. The perimeter lighting and clerestory windows lighting looks sharp. The Winston Churchill phrase at end of narrative made me smile as he is at the top of my history hero’s list. Please keep posting your progress.
Cary B
I have a similar layout in a room dedicated to a shelf layout but unlike your layout, I have center island. The inner track run is like having a flop over figure-8. I’m struggling to get the physical functioning of the pull-out section.
I have a hinged section way of accessing the inner workings, of the layout; however I never thought of lift-out portion which might be the answer to my problem.
I would like to see a picture or two from different angles of how you actually accomplish the lift out section. I am also I interested in your wiring of rail connections to make the pull out functional
Thank you
Truly fantastic layout…
“Dangerous Dave’s” influence is obvious
Suggest keeping any mountains that cover track lightweight and removable…
(I have been in the hobby overr 50 years now… do not ask me how I learned this lesson)…
If you choose to hide your fiddle yard, I sugggest using a “view block” rather than covering it over. Anoter solution might be to make it a removable shelf like a cassette…
John in California
Another suggestion is that you figure out a way of adjusting the side-to-side and possibly up-down positioning of the tracks at the end of your lift-out section. Changes in humidity and temperature will cause all the woodwork to move about a bit, and before you know it nothing will go round those tracks without falling off.
You can probably figure out why I make this suggestion…
A truly great start to a layout there. One suggestion, I would have used one inch foam board for my base. Easy to glue roadbed, then track, scenery and add more foam sections for hills etc.. You could also cut sections and create ravines or even raise sections to make a rise in track elevation. Just say’n. But again, you’re off to a great start.
Jim AZ
I see you have an oil filled radiat heater. I too used these in the passed. The heat goes straight up so there is little air movement to make the heat even throughout the area. I found that a small computer fan hung in a corner would circulate the air very nicely.
Layout looks like it is going to be very nice,
Bob H.
Peter; enjoyed your fact’s conversation. You certainly will end with fantastic operating space to work your trains.
That’s a great layout Peter. Here’s where the best part starts switch lights, other lights, scenery and so much more! This has so much potential!!! I’d love to have this layout. Can you please keep us up-to-date with your progress and share lots of pictures. Enjoy yourselve with this beautiful layout.
I just love what you’ve done!
For such a small space, you’re gonna have lots of interesting stuff!!! Keep the pictures coming, especially the wiring.
Pete
Rainy Silicon Valley, CA.
hi, would like to see more, keep me posted
Hi Peter, Layout is good but not sure of the lift out section with curved track. I also had the same idea but failed. Have a look at my chanel, ‘Castlebridge OB Owner’ and the video about my mistakes.
All the best, Barry. UK
I’d like to thank all that posted tips, sent videos and pictures of their layouts. It was very helpful to me in rebuilding my layout. There were so many great ideas and tips. The idea of doing little scenes turned out to be the greatest. Maybe went went overboard with this. Modeling two real cities makes for a great narrative when showing our layout to friends and family. Our railroad Fairfield and Cheston has a bit of history. Abraham Lincoln rode on the Fairfield line to deliver the Gettysburg Address. We moved our layout (totally dismantled) from Virginia to North Carolina. In the process went from a 4′ x 5′ N scale layout to 4′ x 13′ layout. Also converted from DC to DCC. I will send pictures.
Hi Peter,
Seep point motors work very well, but the switch in them is very basic and I’m expecting to have to replace all of mine as time goes on.
I would not trust them to operate electro frog points. I am using the switch to illuminate leds on my control panel and they’re not always reliable. I plan to eventually have the point motors connected to toggle switches.
Your layout is superb.
Cheers, David
Beautiful job, and always important to work ‘neat’. It’s important to weather your track, because that’s a model too. Please keep us posted on your progress.
The tracks on the lift out section will be a real problem to keep aligned. I have three movable sections and each with only one track.Each has a hinge on one side. Shown in a prior post. The hinges keep that side aligned but the free side needs adjustment monthly as the weather, humidity, causes changes. I leave them connected as much as possible. Rather than a lift out I would leave it fixed. Dangerous Dave had a post where he made an easy way to slide under his table. Since you only have to go in and out once that is what I would suggest even if you leave the lift out.
Nice layout but as other have pointed out, the liftout section could be a trouble spot I would suggest moviing the switch from the lifeout to solid ground. that way you only have to align 1 set of tracks instead of two.
Good luck in the future
Terry/Idaho USA
As others have said great layout with very good use of the space that you have Peter. If you decide to go for a Z21 you want regret it, works with Google of course not just iPhones. I’ve had one for several years and our club bought one having seen mine along with several members. Don’t forget you can download the Z21 app for free before you take the plunge to have a look at it.
Cheers Mike S
Hi Peter,
Looks like a good start on your layout. Where do you guys find such nice clear 1×4’s and 2×2’s for building your layout framing? The stuff I get from Home Depot or Lowe’s is usually full of knots. Occasionally I can find some boards from Finland that are either clear or have just tiny knots. The shed you built for the layout looks great. The perimeter lighting appears to provide enough light to the room.
One other suggestion, if you’re going to do backdrops, paint or attach them before you get too far along with the scenery.
I agree with others that your coach fiddle yard should not be hidden in a tunnel if at all possible. If you must put it in the tunnel, removable foam board construction would be a must. The track plan looks like a good balance of operating possibilities versus enough open space to look realistic. Please keep us posted as your layout progresses.
Wow that amazing. I hope mine turns out that good.