“Hi Alastair,
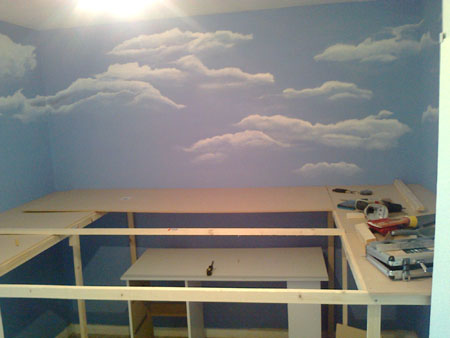
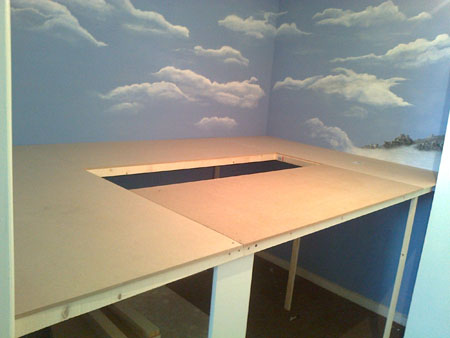
Several comments on how I did the sky, thought I’d share the technique with everyone.
It’s all done with emulsion.
First, paint the complete wall with whichever shade of blue you would like.
Then when it’s dry, with a stiff brush no bigger than 1/2″ start by painting the outer cloud with pure white in short circular motions, 1″ at a time and moving along right to left.
As you come further down into the cloud let the brush dry out of paint on it’s own accord until the blue starts to come through the cloud. This way you can layer the cloud as often as you wish.
On some of them smoothly merge a grey into the bottom of the white to emphasise the shade from the sun.
For the whispey bits of cloud (which are not too prominent in the photograph) very lightly with a smaller stiff dry brush, paint a few whispey lines away from the main cloud in a slightly wonkey motion to fade out to nothing.
It took a few days to paint the clouds and get it how I wanted, but is was certainly worth it.
Will be in touch again when got new photos, Just doing my church at the moment
Cheers
Stuart P”
A huge thanks to Stuart.
Backdrops make such a difference to a layout. But I know from your mails and comments what a thorny issue they are.
I thought Stuart’s solution was fab.
What I like best about it, is if it doesn’t work out, another lick of paint and it’s all back to normal.
Please leave a comment below if you’re going to give it a go!
That’s all for today folks.
Please do keep ’em coming.
And don’t forget the Beginner’s Guide is here, if you
Best
Al
PS Latest ebay cheat sheet is here.


This is one briliant idea for a sky backdrop. I was looking at cutouts – and/or actual photographs. Now,after seeing Stuarts images and reading his how-to, I know what way to go now. As always Alastair, an excellent and relatively easy method of creating clouds.
Now a question for active wiring enthusists; are there any ideas on how to wire a crossing so that lights and gates active simultaniously well before the train reaches the crossing. Generally, crossing gates will drop when the train rolls over a floating track. Not realistic.
Larry B. in Ajax,Ontario. HO and N-scale amateur.
Dear Alastair
Thank you for all your emails, please ask Dave to turn up the volume on his commentaries and turn down the volume on the sound effects.
Thank you once again.
I am just figuring out how to get you a video.
from my little piece of England in Ontario.
best regards
Peter Jacobs
Hi Al,
Thanks for the updates from Stuart and Dave …
Stuart that shy is beautiful. Thanks for the directions on how to.
Dave you have a great railroad thank you for sharing the video update.
This site is a great place to be.
Keep on training!
tom N
PS: The cloud background will fit nicely into my N gauge raillroad with its design. Going to do it.
Thanks for a great tip. Just the info I needed.
Thanks for all the hints and tips that you post, keep ’em coming
nice back drop
Hi Al,
I was wondering if you could post a track layout and size. Watching the video it is difficult to visualize the track layout itself. I love what you have done, and am getting my basement cleared out so I can build a layout for my grandson.
Thanks,
Mr. Mike
it is all amazing stuff i love watching the videos and the how tos
Has anyone thought about using cotton wads for a 3D effect? In one of my past artworks, while using oil paints, I used pretty much the same steps as listed in the above article and waited ’till the paint was tacky. I would then take light tuffs from cotton wads and applied them to my painted cloud areas, using white cotton for the top and using gray shades for the bottom sides. It did turn out fairly decent.
The gray cotton was created before the the oil paint was tacky, by using a shallow pan with a very diluted wash of medium gray acrylic paint. I would take the cotton and allow it to soak up the diluted gray liquid and then set the cotton on paper to wick away the excess liquid from the cotton. When dried, I would then take the stiff cotton and flex it in my hands to make it fluffy again and then applied it to the artwork’s tacky paint as the underside of the clouds.
When I was finished and content with the way the artwork looked and it was fully dried. In a dust free room, I then took hair spray gently and lightly coated the cotton to stiffen it up and to repel dust. Later, when the artwork needed to be dusted, I used the exhaust hose of a vacuum cleaner to blow dust off the clouds. To defuse the air, I used an old knee-high nylon sock covering the exhaust tube. Now-a-days you can use the canned air that techs use for dusting keyboards and other computer hardware with. Remember to use just short burst of canned air.
Sorry about the sound , will have to switch off the loco sounds when commenting , what I tried to say was the coaches where too heavy for the little 4 f steam Loco , I put the bigger duchess class on and no problem , that incline is a bit steep though 3 and a half inch in 10 ft of run . diesels no problem , but smaller steam there is ..
Dave
By the way Al I ain`t that big ??
NICELY BUILT
Can you explain or clarify what a ‘Wonky’ motion is???
Ajax Larry.
You can embed a motion sensor in the track before the gates to trigger them to operate, and turn light to green open the gate, they seem to work with a delay. Don’t forget to put another embedded motion sensor after the gate to close it and turn light to red. You can embed motion sensors to set up a relay so lights indicate if track ahead is ok to proceed.
Very nice methods of making sky backgrounds. I would point out however there are not 90 degree angles in nature and to avoid that I use a piece of thin plywood (even cardboard would work) and bend it to create a curve in the corners and then blend it in with the rest of the wall.
Nice bit of artwork ..Dave
I am no electrician,but was wondering if,on the crossing gate issue,there is a way to use a laser light trip switch to activate it.I have a similar switch on my home garage door,but is WAY too large for layout use.You could place this at any point on the track and when the train blocks the light connection the switch activates.Let me know if anyone comes up with this or tries it out.If it works I can use it on my layout which will be started after I move in 6-8 months.There would also have to be some type of timer delay since once the light is unbroken the gate would go up before the train has passed the intersection,or possible use 2-3 of these to get the train through before the gate rises
I have 2 identical n scale locomotives in my consist ,but keep uncoupling.How can I correct this?THANK you,Don P.
Brilliant work…art in railroading. All the school projects as children, just training ground for great work like this. Anterrific encouragement to others who might be timid about trying. The best is that you can always start over…repaint the wall the base color. When I am scratch building I do a trial run on scrap of the same materials used. No surprises then. I wonder if Stuart does the same or relies on his talent and experiments as he goes? But Well done mate.
model railroading IS AN ART!!
WOULDN’T YOU AGREE?
A brilliant backdrop and some great painting techniques – perfect for a train room.
Cheers!
Kaustav
Thanks for sharing. A job well done!
If you want great clouds and backdrops watch Bob Ross in The Joy Of Painting, usually on your PBS TV channel. That’s how I learned to do more than just clouds and it isn’t all that difficult. By the way Stuart explained his way of doing clouds that’s where he learned it. Except it doesn’t make much difference which way you make the circles. Rotate left or right and see what you get.
Those clouds look perfect. Just like a photograph. If I had any talent at all for painting, I would try it.
Re: Gates
With motion detectors, other moving items may falsely trigger the gates. With a proximity sensor adjusted to include only the area that the locomotive would be in, you will have a more accurate gate tripper. The idea about lasers is also a good one.
looks good
There is a circuit called, three wire start stop circuit. It can be found in electrical circuit books and online. It would work nicely using proximity switches, one switch normally open and the other normally closed, along with a small relay with two normally open contacts. Once the start switch is activated, the deactivation is done only with the stop switch, or turn off the power. the second relay N.O. contact would be used to activate the lights and gates.
n.c. sw n.o. sw relay coil
volts in +>——- —- —— ”””’ ——– C ——-> –
—II—
1st n.o. relay contact wired in parallel with n.o. switch
volts in +>———II—————-lites———> –
2nd n.o. relay –gates– gates wired in parallel with lites.
When close the n.o. switch it closes the circuit and pulls in the coil which closes the normally open relay contacts. When the n.o. switch releases, the relay contact holds in the circuit. when the n.c. switch is opened it deactivates the coil and all the relay contacts open up, deenergizing the circut and lites and gates.
I can’t make all the connections or show the switches properly but labeled parts. Maybe clear as mud but any electrician you know should know how this works and could help. Probably find it on internet also. Hope this helps. Good luck.